参考:https://www.cnblogs.com/netonline/p/10288219.html
一.Heketi简介
1.简介
Heketi是一个提供RESTful API管理GlusterFS卷的框架,便于管理员对GlusterFS进行操作:
- 可以用于管理GlusterFS卷的生命周期;
- 能够在OpenStack,Kubernetes,Openshift等云平台上实现动态存储资源供应(动态在GlusterFS集群内选择bricks构建volume);
- 支持GlusterFS多集群管理。
2.框架
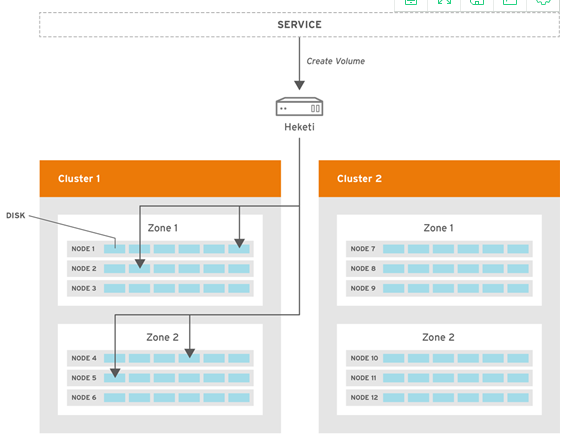
- Heketi支持GlusterFS多集群管理;
-
在集群中通过zone区分故障域。
二.环境
前提k8s集群接Glusterfs集群已部署好
Glusterfs集群部署:https://www.cnblogs.com/minseo/p/6919421.html
例如CentOS7.5只需要执行以下几步即可
yum -y install centos-release-gluster7.noarch
yum --enablerepo=centos-gluster*-test -y install glusterfs-server glusterfs-cli glusterfs-geo-replication
systemctl enable glusterd
systemctl start glusterd
systemctl status glusterd
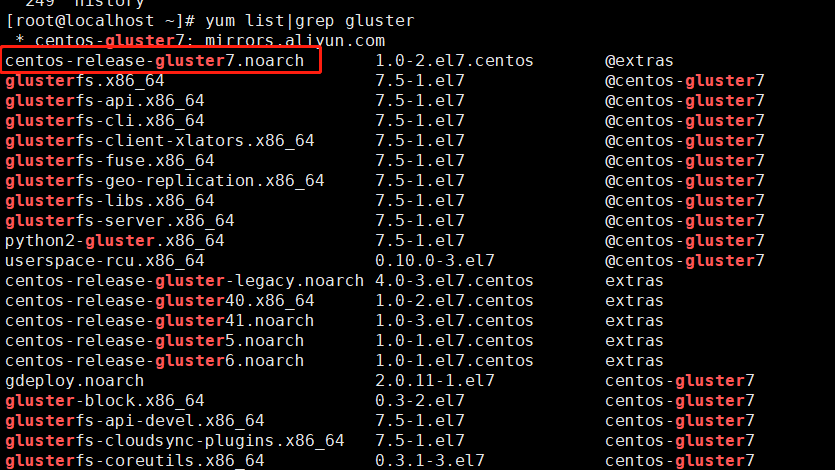
其中第一步安装centos-release-gluster7.noarch的版本不清楚的话可以使用命令查看
yum list|grep gluster
注意:Glusterfs之需要安装并启动即可,不必组建存储池
集群IP地址规划
| Hostname | IP | 备注 |
| k8s-master | 192.168.1.63 | |
| k8s-node01 | 192.168.1.65 | |
| k8d-node02 | 192.168.1.66 | |
| heketi | 192.168.1.61 | |
| glusterfs01 | 192.168.1.61 | |
| glusterfs02 | 192.168.1.62 |
所有主机关闭防火墙和Selinux
三.部署heketi
1.安装heketi
192.168.1.61安装
#CentOS默认无heketi源,添加源及安装
yum install -y centos-release-gluster
yum install -y heketi heketi-client
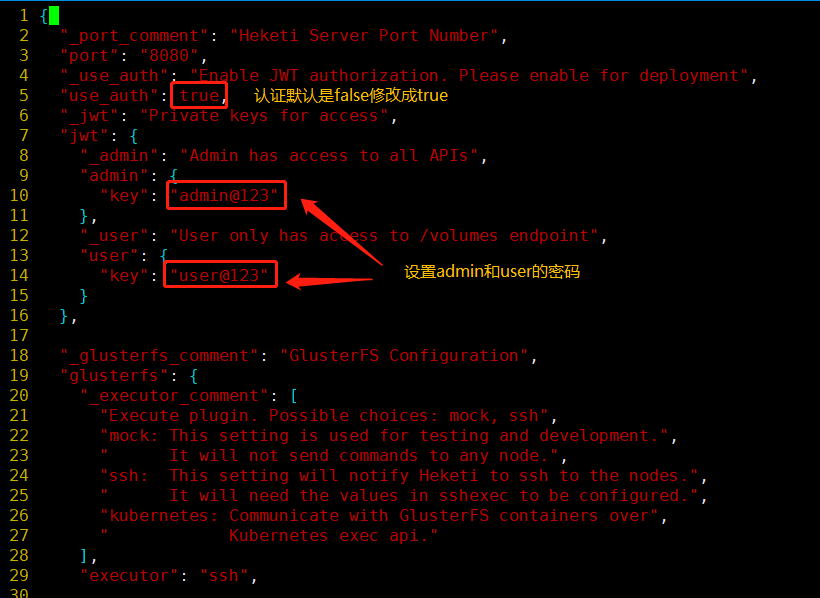
2.配置heketi.json
# cat /etc/heketi/heketi.json
{
#默认端口8080
"_port_comment": "Heketi Server Port Number",
"port": "8080",
#默认值false,不需要认证
"_use_auth": "Enable JWT authorization. Please enable for deployment",
"use_auth": true,
#设置密码
"_jwt": "Private keys for access",
"jwt": {
"_admin": "Admin has access to all APIs",
"admin": {
"key": "admin@123"
},
"_user": "User only has access to /volumes endpoint",
"user": {
"key": "user@123"
}
},
"_glusterfs_comment": "GlusterFS Configuration",
"glusterfs": {
"_executor_comment": [
"Execute plugin. Possible choices: mock, ssh",
"mock: This setting is used for testing and development.",
" It will not send commands to any node.",
"ssh: This setting will notify Heketi to ssh to the nodes.",
" It will need the values in sshexec to be configured.",
"kubernetes: Communicate with GlusterFS containers over",
" Kubernetes exec api."
],
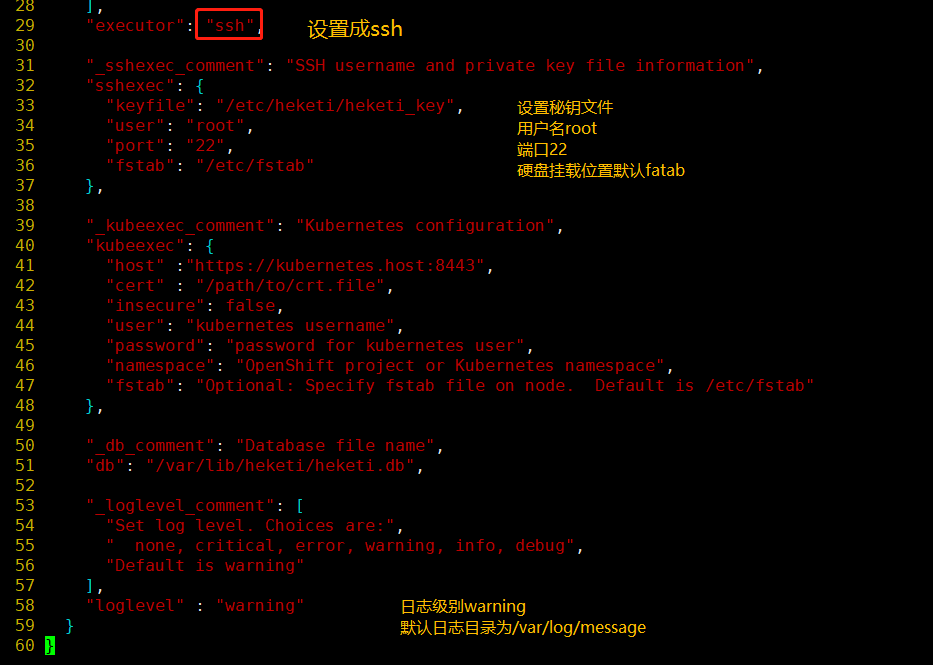
"executor": "ssh",
"_sshexec_comment": "SSH username and private key file information",
"sshexec": {
"keyfile": "/etc/heketi/heketi_key",
"user": "root",
"port": "22",
"fstab": "/etc/fstab"
},
"_kubeexec_comment": "Kubernetes configuration",
"kubeexec": {
"host" :"https://kubernetes.host:8443",
"cert" : "/path/to/crt.file",
"insecure": false,
"user": "kubernetes username",
"password": "password for kubernetes user",
"namespace": "OpenShift project or Kubernetes namespace",
"fstab": "Optional: Specify fstab file on node. Default is /etc/fstab"
},
"_db_comment": "Database file name",
"db": "/var/lib/heketi/heketi.db",
"_loglevel_comment": [
"Set log level. Choices are:",
" none, critical, error, warning, info, debug",
"Default is warning"
],
#默认日志输出debug
#日志信息输出在/var/log/message
"loglevel" : "warning"
}
}
3.设置heketi免密访问GlusterFS
# 选择ssh执行器,heketi服务器需要免密登陆GlusterFS集群的各节点;
# -t:秘钥类型;
# -q:安静模式;
# -f:指定生成秘钥的目录与名字,注意与heketi.json的ssh执行器中"keyfile"值一致;
# -N:秘钥密码,””即为空
[root@heketi ~]# ssh-keygen -t rsa -q -f /etc/heketi/heketi_key -N ""

# heketi服务由heketi用户启动,heketi用户需要有新生成key的读赋权,否则服务无法启动
[root@heketi ~]# chown heketi:heketi /etc/heketi/heketi_key

# 分发公钥至GlusterFS主机;
# -i:指定公钥
[root@heketi ~]# ssh-copy-id -i /etc/heketi/heketi_key.pub root@192.168.1.61
[root@heketi ~]# ssh-copy-id -i /etc/heketi/heketi_key.pub root@192.168.1.62
4.启动heketi
#启动前确保/usr/lib/systemd/system/heketi.service 包含配置--config=/etc/heketi/heketi.json
systemctl enable heketi
systemctl start heketi
systemctl status heketi

验证
# curl http://127.0.0.1:8080/hello
Hello from Heketi
四.设置GlusterFS集群
1.创建topology.json文件
# 通过topology.json文件定义组建GlusterFS集群;
# topology指定了层级关系:clusters-->nodes-->node/devices-->hostnames/zone;
# node/hostnames字段的manage填写主机ip,指管理通道,在heketi服务器不能通过hostname访问GlusterFS节点时不能填写hostname;
# node/hostnames字段的storage填写主机ip,指存储数据通道,与manage可以不一样;
# node/zone字段指定了node所处的故障域,heketi通过跨故障域创建副本,提高数据高可用性质,如可以通过rack的不同区分zone值,创建跨机架的故障域;
# devices字段指定GlusterFS各节点的盘符(可以是多块盘),必须是未创建文件系统的裸设备
#本次两台glusterfs主机添加硬盘/dev/sdb
# cat /etc/heketi/topology.json
{
  "clusters": [
    {
      "nodes": [
        {
          "node": {
            "hostnames": {
              "manage": [
                "192.168.1.61"
              ],
              "storage": [
                "192.168.1.61"
              ]
            },
            "zone": 1
          },
          "devices": [
            "/dev/sdb"
          ]
        },
        {
          "node": {
            "hostnames": {
              "manage": [
                "192.168.1.62"
              ],
              "storage": [
                "192.168.1.62"
              ]
            },
            "zone": 1
          },
          "devices": [
            "/dev/sdb"
          ]
        }
      ]
    }
  ]
}
2.通过topology.json主机GlusterFS集群
# GlusterFS集群各节点的glusterd服务已正常启动,但不必组建受信存储池;
# heketi-cli命令行也可手动逐层添加cluster,node,device,volume等;
# “--server http://localhost:8080”:localhost执行heketi-cli时,可不指定;
# ”--user admin --secret admin@123 “:heketi.json中设置了认证,执行heketi-cli时需要带上认证信息,否则报”Error: Invalid JWT token: Unknown user”错
# glusterfs节点添加磁盘后无需格式化及挂载
# heketi-cli --server http://localhost:8080 --user admin --secret admin@123 topology load --json=/etc/heketi/topology.json

查看集群信息
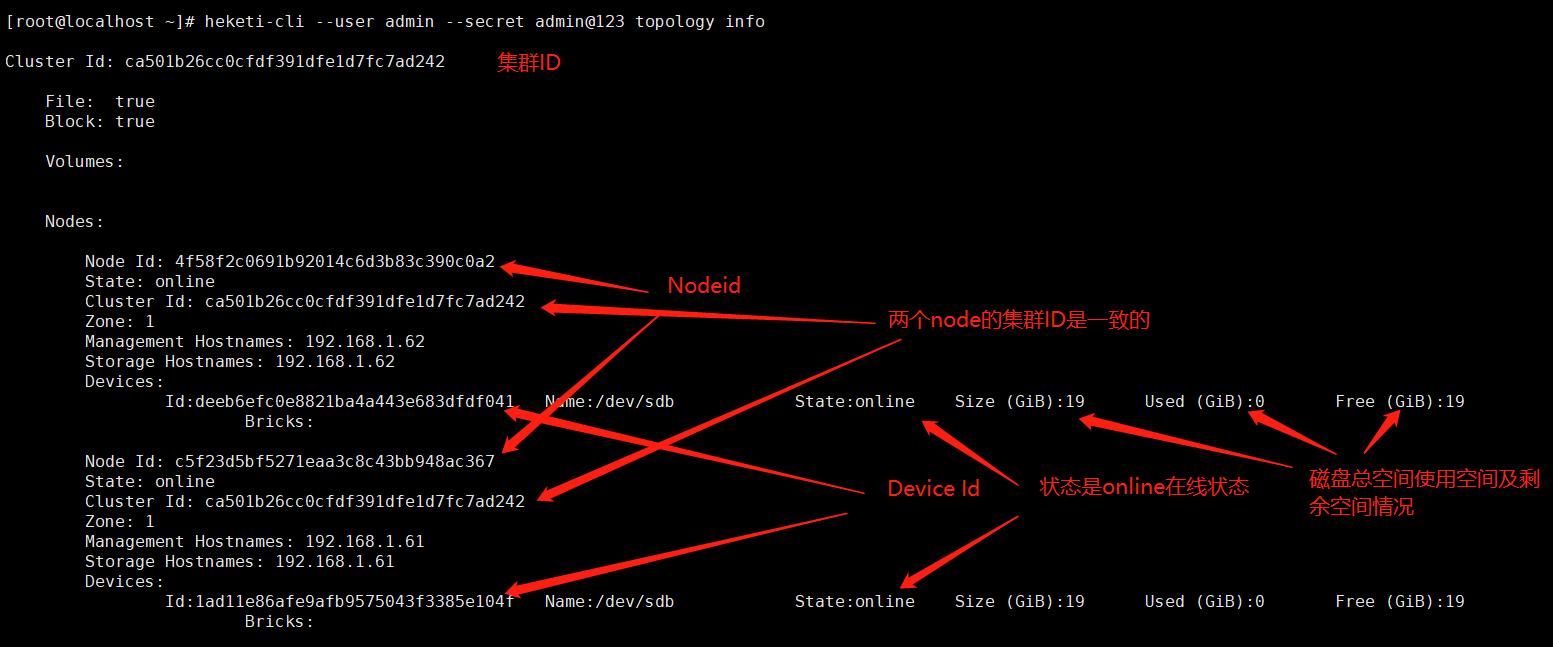
# 查看heketi topology信息,此时volume与brick等未创建;
# 通过”heketi-cli cluster info“可以查看集群相关信息;
# 通过”heketi-cli node info“可以查看节点相关信息;
# 通过”heketi-cli device info“可以查看device相关信息
# 通过heketi-cli --user admin --secret admin@123 topology info查看topology相关信息
PS:如果没有使用默认的8080端口例如修改了配置文件把端口改成8081了则使用heketi-cli命令都需要加参数--server http://localhost:8081
# 通过heketi-cli --user admin --secret admin@123 topology info查看topology相关信息
heketi-cli --user admin --secret admin@123 topology info
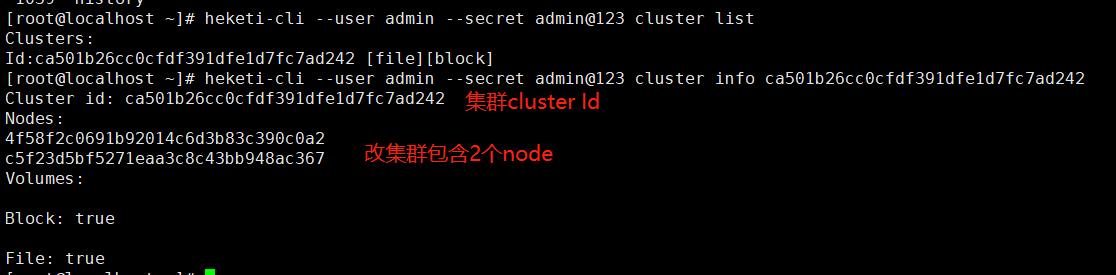
#集群列表
heketi-cli --user admin --secret admin@123 cluster list
#查看集群信息 需要加集群cluster ID
heketi-cli --user admin --secret admin@123 cluster info ca501b26cc0cfdf391dfe1d7fc7ad242
#查看node列表
heketi-cli --user admin --secret admin@123 node list
#查看node详细信息info 需要加node id
 heketi-cli --user admin --secret admin@123 node info 4f58f2c0691b92014c6d3b83c390c0a2

#查看磁盘详细信息info需要加磁盘ID
#可以通过命令 heketi-cli --user admin --secret admin@123 topology info
显示磁盘device ID
heketi-cli --user admin --secret admin@123 device info deeb6efc0e8821ba4a443e683dfdf041

5.K8S集群动态挂载GlusterFS存储
kubernetes共享存储供应模式:
-
静态模式(Static):集群管理员手工创建PV,在定义PV时需设置后端存储的特性;
-
动态模式(Dynamic):集群管理员不需要手工创建PV,而是通过StorageClass的设置对后端存储进行描述,标记为某种"类型(Class)";此时要求PVC对存储的类型进行说明,系统将自动完成PV的创建及与PVC的绑定;PVC可以声明Class为"",说明PVC禁止使用动态模式。
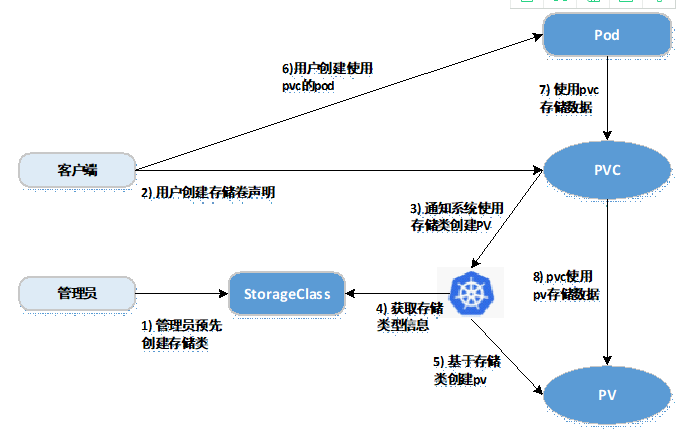
基于StorageClass的动态存储供应整体过程如下图所示:
-
集群管理员预先创建存储类(StorageClass);
-
用户创建使用存储类的持久化存储声明(PVC:PersistentVolumeClaim);
-
存储持久化声明通知系统,它需要一个持久化存储(PV: PersistentVolume);
-
系统读取存储类的信息;
-
系统基于存储类的信息,在后台自动创建PVC需要的PV;
-
用户创建一个使用PVC的Pod;
-
Pod中的应用通过PVC进行数据的持久化;
-
而PVC使用PV进行数据的最终持久化处理。
2. 定义StorageClass
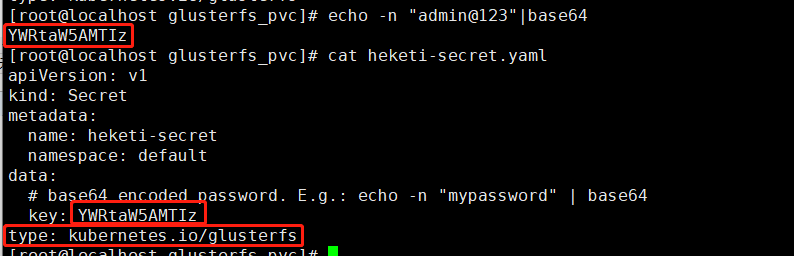
# provisioner:表示存储分配器,需要根据后端存储的不同而变更;
# reclaimPolicy: 默认即”Delete”,删除pvc后,相应的pv及后端的volume,brick(lvm)等一起删除;设置为”Retain”时则保留数据,需要手工处理
# resturl:heketi API服务提供的url;
# restauthenabled:可选参数,默认值为”false”,heketi服务开启认证时必须设置为”true”;
# restuser:可选参数,开启认证时设置相应用户名;
# secretNamespace:可选参数,开启认证时可以设置为使用持久化存储的namespace;
# secretName:可选参数,开启认证时,需要将heketi服务的认证密码保存在secret资源中;
# clusterid:可选参数,指定集群id,也可以是1个clusterid列表,格式为”id1,id2”;
# volumetype:可选参数,设置卷类型及其参数,如果未分配卷类型,则有分配器决定卷类型;如”volumetype: replicate:3”表示3副本的replicate卷,”volumetype: disperse:4:2”表示disperse卷,其中‘4’是数据,’2’是冗余校验,”volumetype: none”表示distribute卷#
# cat gluster-heketi-storageclass.yaml
apiVersion: storage.k8s.io/v1beta1
kind: StorageClass
metadata:
  name: gluster-heketi-storageclass
provisioner: kubernetes.io/glusterfs
reclaimPolicy: Delete
parameters:
  resturl: "http://192.168.1.61:8080"
  restauthenabled: "true"
  restuser: "admin"
  secretNamespace: "default"
  secretName: "heketi-secret"
  #restuserkey: "xiaotech"
  volumetype: "replicate:2"

# 生成secret资源,其中”key”值需要转换为base64编码格式
 echo -n "admin@123"|base64

# 注意name/namespace与storageclass资源中定义一致;
# 密码必须有“kubernetes.io/glusterfs” type
# cat heketi-secret.yaml
apiVersion: v1
kind: Secret
metadata:
  name: heketi-secret
  namespace: default
data:
  # base64 encoded password. E.g.: echo -n "mypassword" | base64
  key: YWRtaW5AMTIz
type: kubernetes.io/glusterfs
# 创建secret资源
[root@kubenode1 heketi]# kubectl create -f heketi-secret.yaml

# 创建storageclass资源;
# 注意:storageclass资源创建后不可变更,如修改只能删除后重建
[root@kubenode1 heketi]# kubectl create -f gluster-heketi-storageclass.yaml
查看storageclass资源
# kubectl describe storageclass gluster-heketi-storageclass
Name:                  gluster-heketi-storageclass
IsDefaultClass:        No
Annotations:           <none>
Provisioner:           kubernetes.io/glusterfs
Parameters:            restauthenabled=true,resturl=http://192.168.1.61:8080,restuser=admin,secretName=heketi-secret,secretNamespace=default,volumetype=replicate:2
AllowVolumeExpansion:  <unset>
MountOptions:          <none>
ReclaimPolicy:         Delete
VolumeBindingMode:     Immediate
Events:                <none>
3.定义PVC
# cat gluster-heketi-pvc.yaml
kind: PersistentVolumeClaim
apiVersion: v1
metadata:
  name: gluster-heketi-pvc
  namespace: default
  #annotations:
  #  volume.beta.kubernetes.io/storage-class: "glusterfs"
spec:
  #与storageclass名字对应
  storageClassName: gluster-heketi-storageclass
  # ReadWriteOnce:简写RWO,读写权限,且只能被单个node挂载;
  # ReadOnlyMany:简写ROX,只读权限,允许被多个node挂载;
  # ReadWriteMany:简写RWX,读写权限,允许被多个node挂载;
  accessModes:
  - ReadWriteMany
  resources:
    requests:
      storage: 2Gi

#创建pvc资源
# kubectl create -f gluster-heketi-pvc.yaml
persistentvolumeclaim/gluster-heketi-pvc created
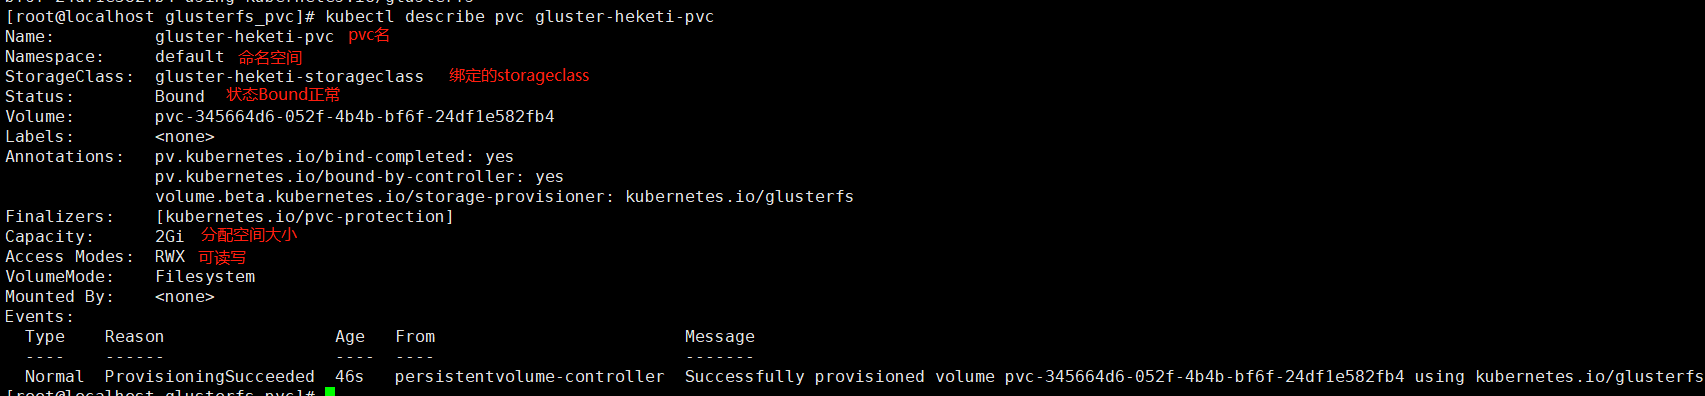
2.查看k8s资源
#kubectl describe pvc gluster-heketi-pvc
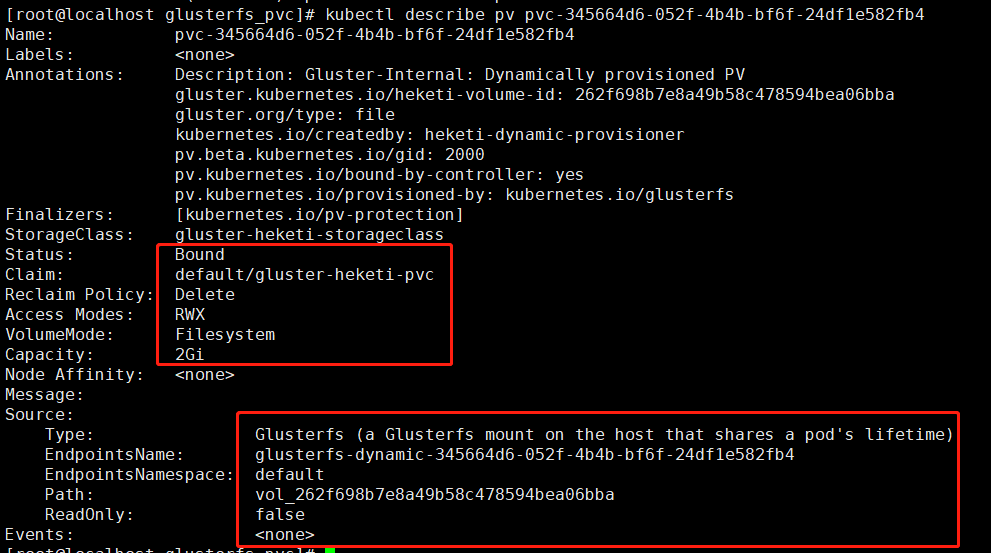
查看pv信息
# 查看PV详细信息,除容量,引用storageclass信息,状态,回收策略等外,同时给出GlusterFS的Endpoint与path;
kubectl describe pv pvc-345664d6-052f-4b4b-bf6f-24df1e582fb4
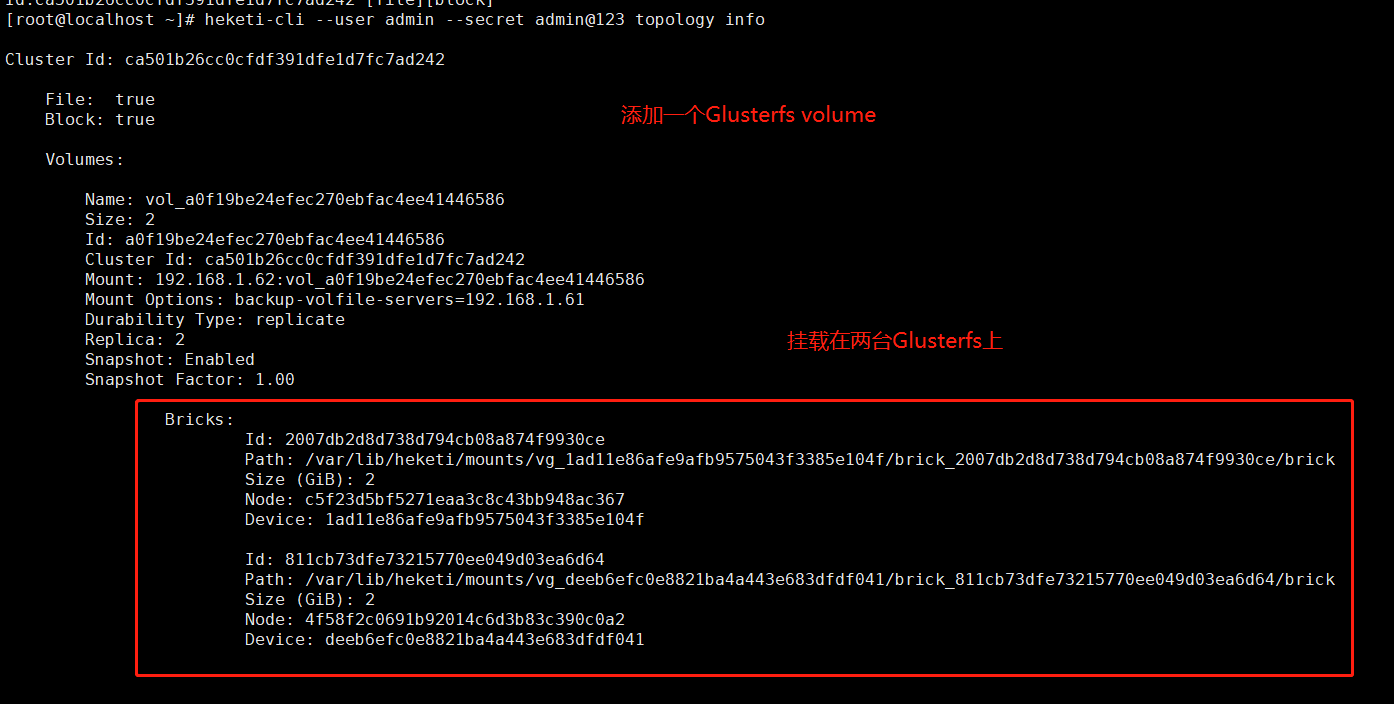
3.查看heketi
heketi-cli --user admin --secret admin@123 topology info
删除heketi信息
直接删除 node device可能无法删除,可以删除heketi数据文件然后重启heketi以后重新创建topology
heketi数据文件位置
rm -rf /var/lib/heketi/heketi.db
systemctl restart heketi
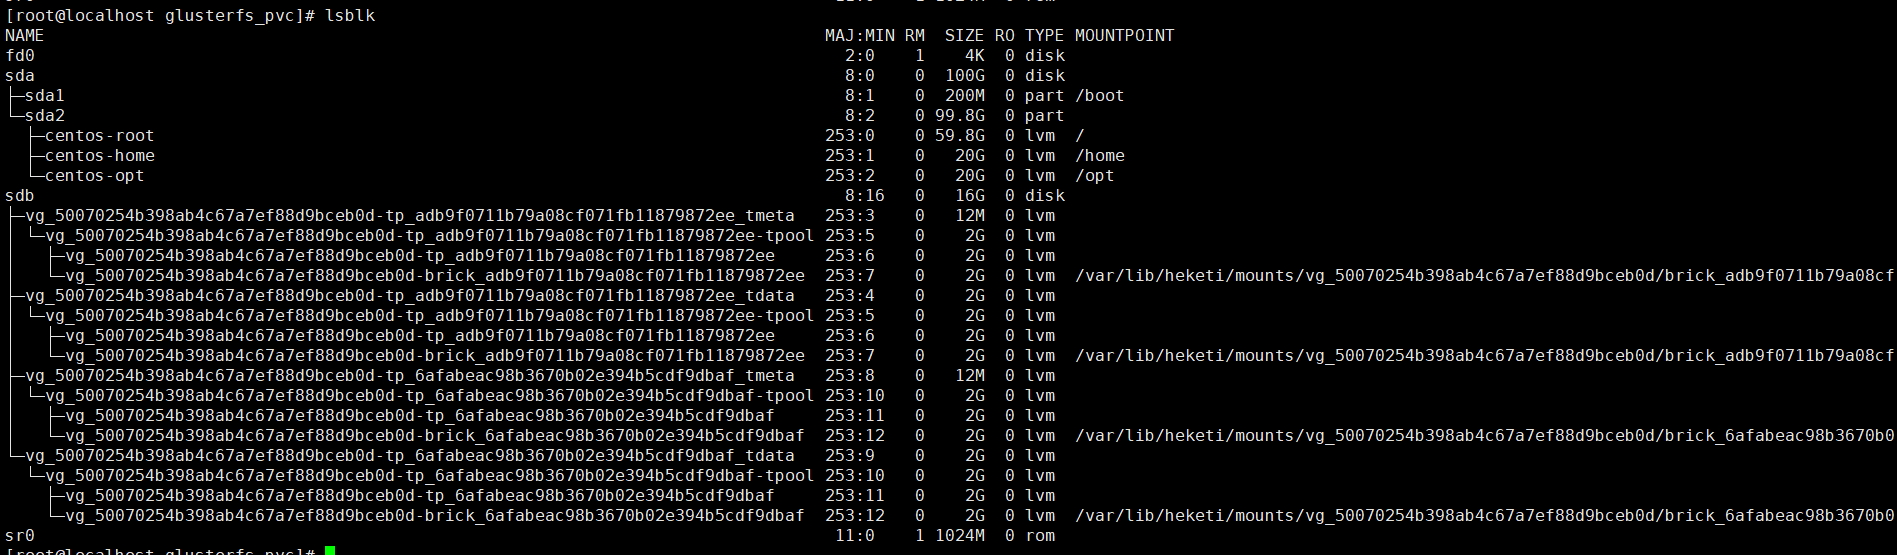
4.查看GlusterFS节点
lsblk
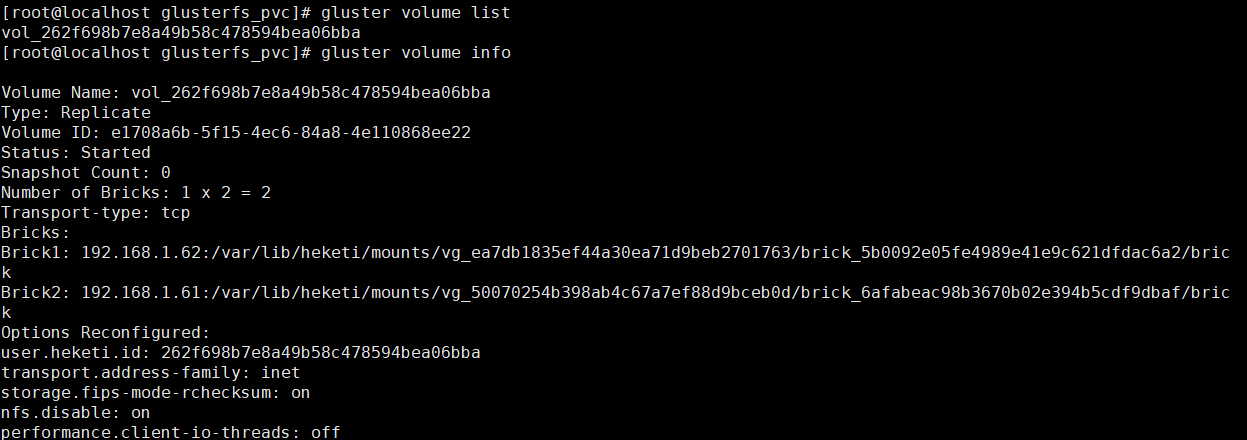
# 查看volume的具体信息:2副本的replicate卷;
# 另有”vgscan”,”vgdisplay”也可查看逻辑卷组信息等
[root@glusterfs01 ~]# gluster volume list
[root@glusterfs01 ~]# gluster volume info
GlusterFS开机挂载也自动写入/etc/fstab

其实是在glusterfs创建了一个大小为2G的LVM
lvdisplay

4.Pod挂载存储资源
# cat gluster-heketi-pod.yaml
kind: Pod
apiVersion: v1
metadata:
  name: gluster-heketi-pod
spec:
  containers:
  - name: gluster-heketi-container
    image: busybox
    command:
    - sleep
    - "3600"
    volumeMounts:
    - name: gluster-heketi-volume
      mountPath: "/pv-data"
      readOnly: false
  volumes:
  - name: gluster-heketi-volume
    persistentVolumeClaim:
      claimName: gluster-heketi-pvc

#创建Pod
# kubectl create -f gluster-heketi-pod.yaml
pod/gluster-heketi-pod created
5.验证
登录Pod创建文件
# kubectl exec -it gluster-heketi-pod sh
cd /pv-data/
# touch a.txt
# echo "This is a file!" >>a.txt
然后去GlusterFS主机查看
df -Th
cd /var/lib/heketi/mounts/vg_50070254b398ab4c67a7ef88d9bceb0d/brick_6afabeac98b3670b02e394b5cdf9dbaf/brick
cat a.txt
6.验证StorageClass的reclaimPolicy
storageclass配置的reclaimPolicy策略是删除delete
#删除pod pvc storageclass
kubectl delete -f gluster-heketi-pod.yaml
kubectl delete -f gluster-heketi-pvc.yaml
不需要删除storageclass即可以在glusterfs上删除gluster volume 硬盘挂载 lv等
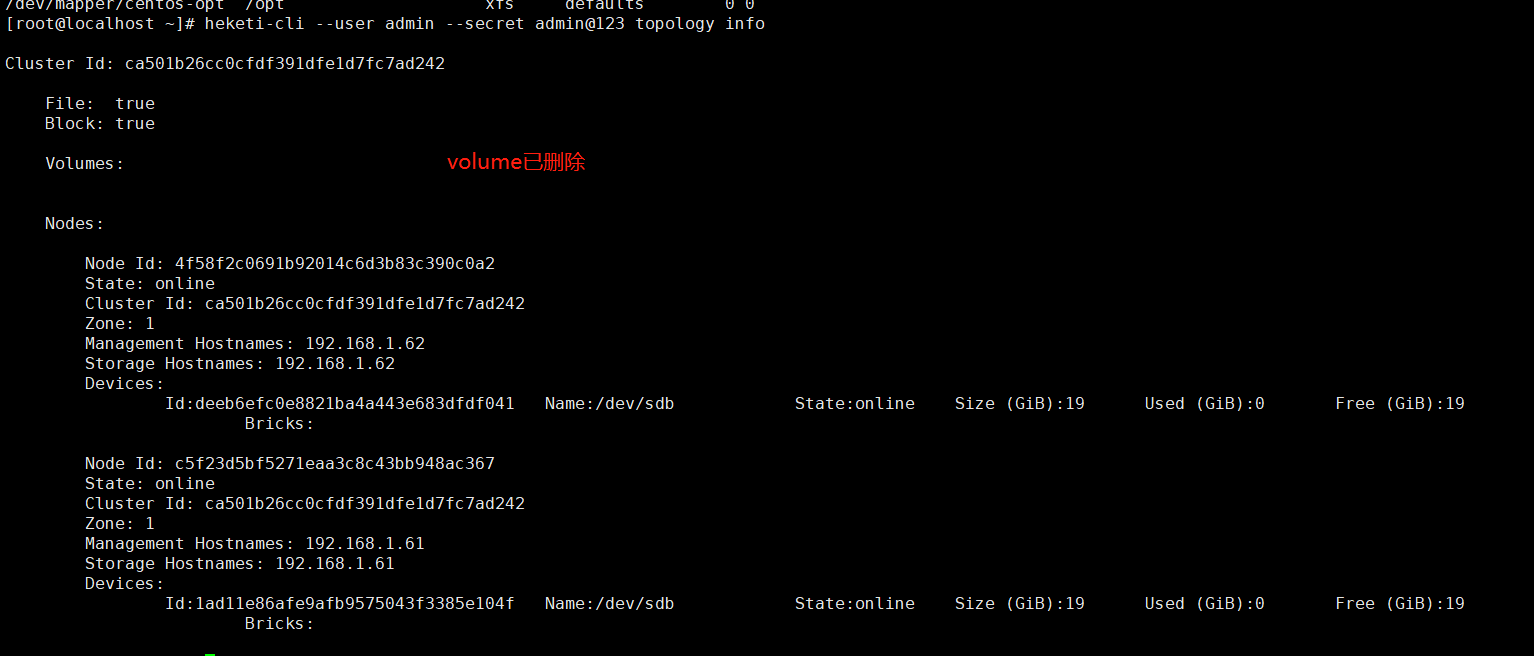
# heketi
[root@heketi ~]# heketi-cli --user admin --secret admin@123 topology info
如果glusterfs端挂载目录忙了可能导致没有删除volume可以手动删除volume
可以通过以下命令删除volume
heketi-cli --user admin --secret admin@123 volume delete a0f19be24efec270ebfac4ee41446586
如果提示目标忙无法删除则查看glusterfs主机是否还处于挂载状态 卸载使用命令umount即可
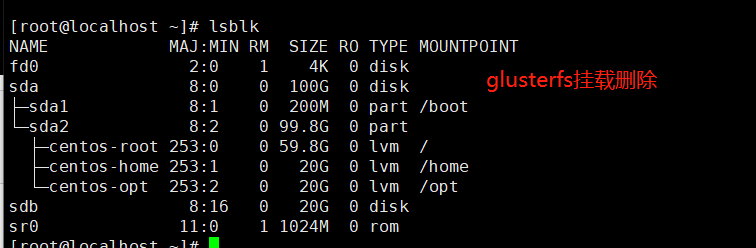
# GlusterFS节点
[root@glusterfs01 ~]# lsblk
[root@glusterfs01 ~]# df -Th
[root@glusterfs01 ~]# gluster volume list
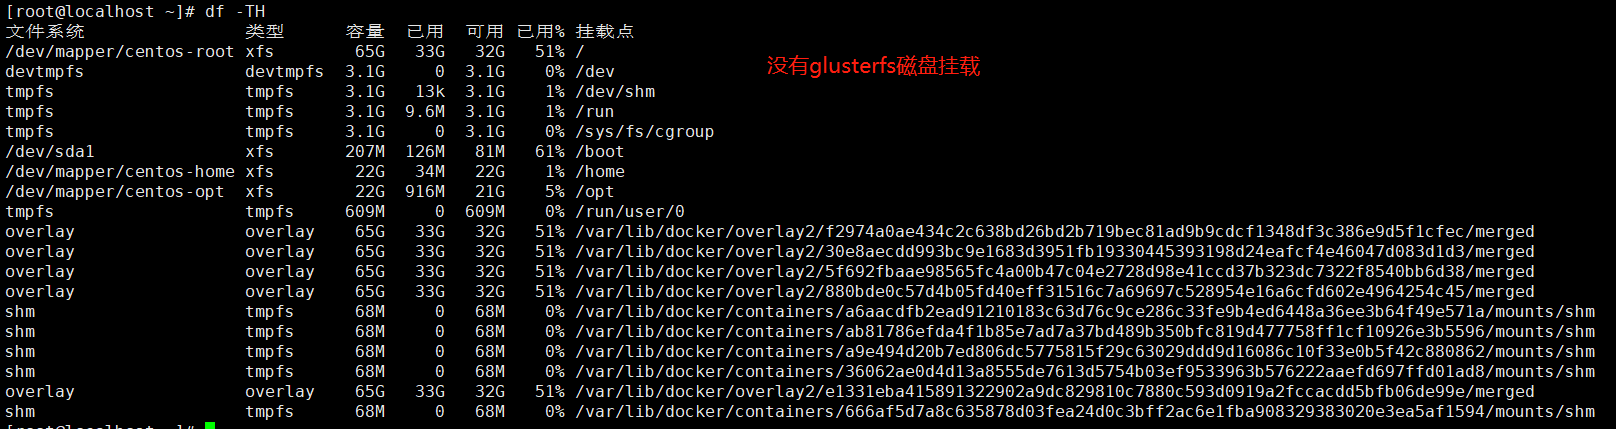
没有glusterfs卷信息


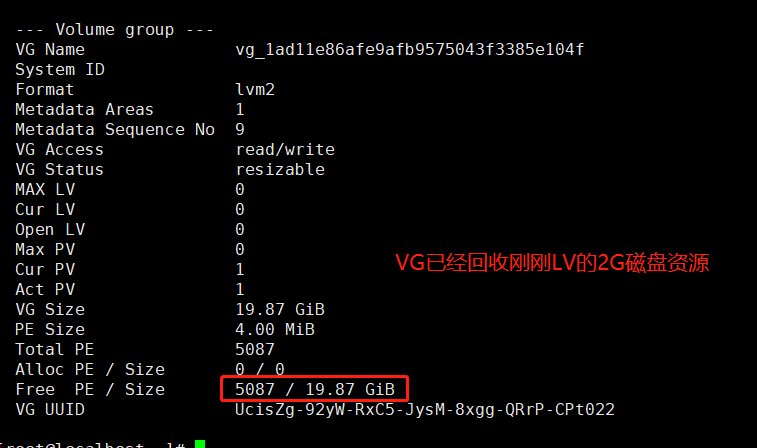
LVM也删除了
lvdisplay
查看vg是否回收磁盘资源
7.测试heketi出现故障时容器挂载是否正常
启动好Pod以后停止heketi
systemctl stop heketi
登录Pop创建文件正常
kubectl exec -it gluster-heketi-pod  sh
touch test
heketi停止不会影响正常使用,会影响下次创建pvc
PS:如果在heketi停止期间通过kubectl删除了pvc则不会自动删除gluster volume 逻辑卷LVM磁盘挂载等信息