开始使用prism是很容易的。按照下面的步骤,你可以快速构件prisim程序。
一、安装依赖包
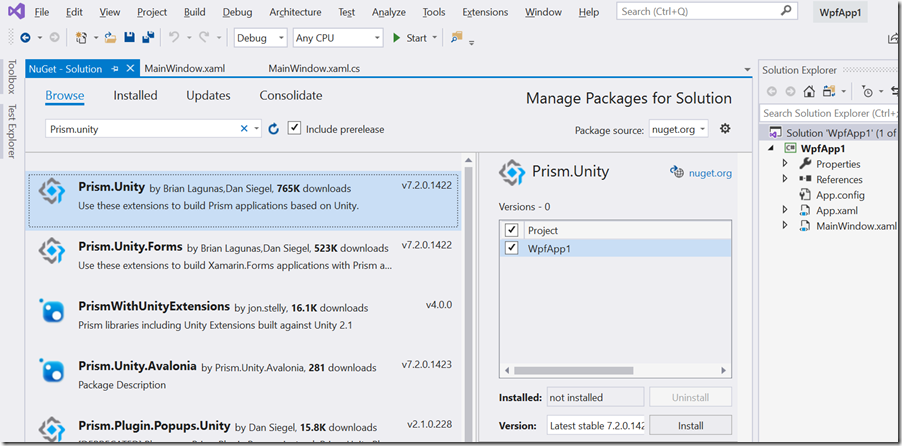
在Visual Studio创建全新的 WPF 应用程序,接下来是安装适当的依赖包,Unity 将是首选的容器。
安装容器完成后,即可进行程序的开发
二、覆盖现有应用对象
下一步是将新创建的 WPF 项目中包含的应用程序,并替换为Prism所指定的应用程序,如以下代码:
<prism:PrismApplication x:Class="WpfApp1.App"
    xmlns="http://schemas.microsoft.com/winfx/2006/xaml/presentation"
    xmlns:x="http://schemas.microsoft.com/winfx/2006/xaml"
    xmlns:local="clr-namespace:WpfApp1"
    xmlns:prism="http://prismlibrary.com/">
    <Application.Resources></Application.Resources>
</prism:PrismApplication>
在上面的代码中,应用程序已经更新为prism应用程序,接下来,就是将应用程序替换为Prism程序,如下所示:
using Prism.Ioc;
using Prism.Mvvm;
using System;
using System.Collections.Generic;
using System.Configuration;
using System.Data;
using System.Linq;
using System.Reflection;
using System.Threading.Tasks;
using System.Windows;
using WpfApp1.ViewModels;
using WpfApp1.Views;

namespace WpfApp1
{
    public partial class App : Prism.Unity.PrismApplication
    {
        protected override Window CreateShell()
        {
            return null;
        }
        protected override void RegisterTypes(IContainerRegistry containerRegistry)
        {

        }
    }
}
定义中有一对抽象方法,必须首先实现:注册类型RegisterTypes和创建CreateShell方法。
三、注册类型
注册类型功能用于注册任何其他程序所需要的依赖对象。例如,可能有一个界面来读取来自某种持久存储的客户数据,它可能看起来像这样:
using System;
using System.Collections.Generic;
using System.Linq;
using System.Text;
using System.Threading.Tasks;

namespace WpfApp1.Services
{
    public interface ICustomerStore { List<string> GetAll(); }

    public class DbCustomerStore : ICustomerStore
    {
        public List<string> GetAll() {}
    }
}
要形成依赖,需要在程序中,将当前应用程序注册为可被注入和依赖的对象,如下代码:
  protected override void RegisterTypes(IContainerRegistry containerRegistry)
  {
      containerRegistry.Register<Services.ICustomerStore, Services.DbCustomerStore>();
  }
四、创建CreateShell
CreateShell方法是创建Shell的方法,也是创建应用程序主窗口的方法。应用类的容器属性应用于创建窗口,这个窗体可以引用所有可以依赖的类。
 protected override Window CreateShell()
 {
      var w = Container.Resolve<MainWindow>();
      return w;
  }
此时,应用程序可以构建和运行,应看起来像以下:
这是一个Prism应用程序。
四、查看模型
WPF 是使用 MVVM模式进行程序开发。它有一个基本类INotifyPropertyChanged来处理已更改的基础设施,该类会将视图模型转换到视图的更改。还有其他的一些类,可以从视图模型来处理事件,而不用从后台代码中写事件处理程序。
首先,需要在视图中添加一些控件。去并添加以下标记,如下:
<Window x:Class="WpfApp1.Views.MainWindow"
        xmlns="http://schemas.microsoft.com/winfx/2006/xaml/presentation"
        xmlns:x="http://schemas.microsoft.com/winfx/2006/xaml"
        xmlns:d="http://schemas.microsoft.com/expression/blend/2008"
        xmlns:mc="http://schemas.openxmlformats.org/markup-compatibility/2006"
        xmlns:local="clr-namespace:WpfApp1"
        xmlns:prism="http://prismlibrary.com/"
        mc:Ignorable="d" prism:ViewModelLocator.AutoWireViewModel="True"
        Title="MainWindow" Height="450" Width="800">
    <Grid>
        <Grid.RowDefinitions>
            <RowDefinition Height="*" />
            <RowDefinition Height="Auto" />
        </Grid.RowDefinitions>
        <ListView ItemsSource="{Binding Customers}" SelectedItem="{Binding SelectedCustomer}" />
        <Button Grid.Row="1" Width="80" Height="40" Command="{Binding CommandLoad}" Content="LOAD" />
    </Grid>
</Window>
以上将添加新的列表视图,该列表将显示客户姓名列表和加载列表的按钮。
    public class DbCustomerStore : ICustomerStore
    {
        public List<string> GetAll() { return new List<string>() { "cust 1", "cust 2", "cust 3", }; }
    }
确保已经注册了当前类型
containerRegistry.Register<Services.ICustomerStore, Services.DbCustomerStore>();
五、创建视图模型
首先,在项目中,创建一个名为 "ViewModels"的文件夹。
在文件夹内,创建一个名为 "MainWindowViewModel的类"。该类的命名规则是prism所规定的特性,可以将MainWindowViewModel映射到MainWindow窗体
using Prism.Commands;
using Prism.Mvvm;
using System;
using System.Collections.Generic;
using System.Collections.ObjectModel;
using System.Diagnostics;
using System.Linq;
using System.Text;
using System.Threading.Tasks;

namespace WpfApp1.ViewModels
{
    public class MainWindowViewModel : BindableBase
    {
        private Services.ICustomerStore _customerStore = null;

        public MainWindowViewModel(Services.ICustomerStore customerStore)
        {
            _customerStore = customerStore;
        }


        public ObservableCollection<string> Customers { get; private set; } =
            new ObservableCollection<string>();


        private string _selectedCustomer = null;
        public string SelectedCustomer
        {
            get => _selectedCustomer;
            set
            {
                if (SetProperty<string>(ref _selectedCustomer, value))
                {
                    Debug.WriteLine(_selectedCustomer ?? "no customer selected");
                }
            }
        }

        private DelegateCommand _commandLoad = null;
        public DelegateCommand CommandLoad =>
            _commandLoad ?? (_commandLoad = new DelegateCommand(CommandLoadExecute));

        private void CommandLoadExecute()
        {
            Customers.Clear();
            List<string> list = _customerStore.GetAll();
            foreach (string item in list)
                Customers.Add(item);
        }
    }
}
以上代码还通过DelegateCommand定义了一个事件的委托,并且注入了之前已经注册的类型
使用视图模型定位器
现在有一个视图和一个视图模型,但是它们是如何连接在一起的呢?需要使用ViewModelLocatorDataContext
默认约定将所有视图放在文件夹中,视图模型放在文件夹中。ViewsViewModels
WpfApp1.Views.MainWindow=>WpfApp1.ViewModels.MainWindowViewModelWpfApp1.Views.OtherView=>WpfApp1.ViewModels.OtherViewModel
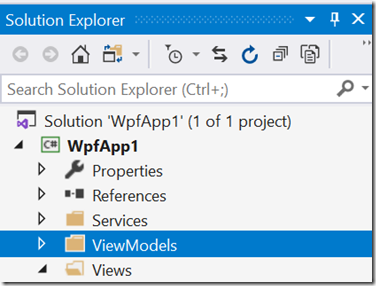
要使此工作,视图和视图模型必须正确地位于其正确的名称空间内。下面是一个屏幕截图,它会是什么样子:

ViewModelLocator会自动进行关联MainWindowViewModel与MainWindow
如果您出于某种原因不想使用此功能,您可以修改如下代码
<Window ... xmlns:prism="http://prismlibrary.com/" prism:ViewModelLocator.AutoWireViewModel="False" > <!-- ui controls here --> </Window>
此文,参照prism官方材料


