概念:RabbitMQ是一款开源的消息中间件系统,由erlang开发,是AMQP的实现。

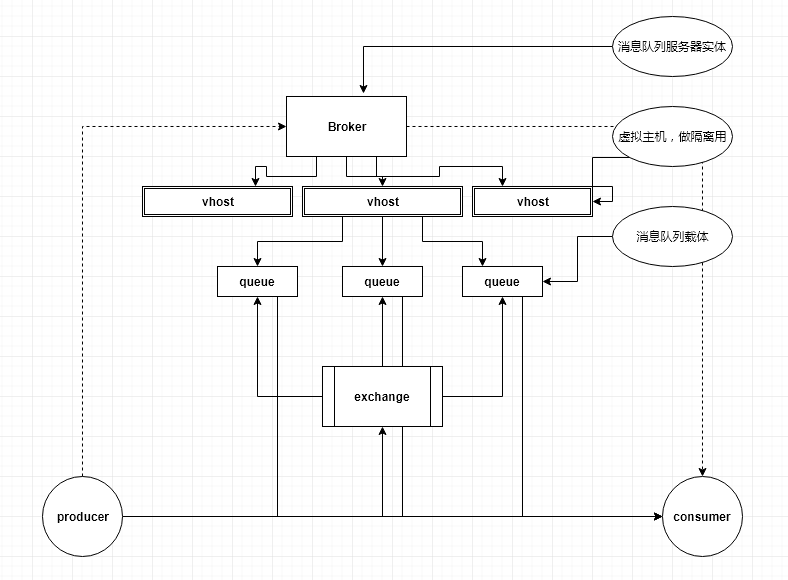
架构图大概如上。
broker是消息队列的服务器,比如在linux上,我们安装的rabbitmq就是一个broker,可以通过url+username+password连接。
每个消息服务器可以创建多个vhost,默认的vhost是“/”,linux中通过rabbitmqctl add_vhost <vhost> 创建vhost,再给指定用户授权即可。
生产者首先通过创建channel与broker连接,类似于创建一个会话,这样可以与消息主机通信发送消息。
消息生产者将消息发送到定义的exchange上,exchange通过不同的转发路由规则将消息转发到相应的队列,消费者选择一个队列监听,如果有多个消费者监听同一个队列,默认是轮询方式,保证每个连接有相同的收到消息的概率。
一个简单的rabbitmq程序:
public class Producer {
    private static final String TEST_VHOST = "testvhost";
    private static final String TEST_QUEUE_NAME = "task_queue";

    private static Connection connection;
    private static Channel channel;

    public static void main(String[] args) throws IOException, TimeoutException, RabbitmqConnectionException {
        try {
            //create connectionFactory with host, username, password, vhost.
            ConnectionFactory connectionFactory = new ConnectionFactory();
            connectionFactory.setUsername("test");
            connectionFactory.setPassword("test");
            connectionFactory.setHost("localhost");
            connectionFactory.setVirtualHost(TEST_VHOST);
            //get connection from connectionFactory
            connection = connectionFactory.newConnection();
            //create an session to communicate with mq host
            channel = connection.createChannel();
            //declare a queue(if not exists, create it)
            channel.queueDeclare(TEST_QUEUE_NAME, true, false, false, null);
            String message = "Hello world";
            System.out.println("sending message : " + message);
            //publish message to the declaring queue
            channel.basicPublish("", TEST_QUEUE_NAME, MessageProperties.PERSISTENT_TEXT_PLAIN, message.getBytes());
        }catch (Exception e) {
            throw new RabbitmqConnectionException("Error connection");
        } finally {
            channel.close();
            connection.close();
        }


    }
}
public class Consumer {
    private static final String TEST_VHOST = "testvhost";
    private static final String TEST_QUEUE_NAME = "task_queue";

    public static void main(String[] argv) throws Exception {
        ConnectionFactory factory = new ConnectionFactory();
        factory.setHost("localhost");
        factory.setVirtualHost(TEST_VHOST);
        factory.setUsername("test");
        factory.setPassword("test");
        final Connection connection = factory.newConnection();
        final Channel channel = connection.createChannel();

        //declaring a queue to listen
        channel.queueDeclare(TEST_QUEUE_NAME, true, false, false, null);
        System.out.println("Waiting for messages...");

        //a piece message per time
        channel.basicQos(1);

        final com.rabbitmq.client.Consumer consumer = new DefaultConsumer(channel) {
            @Override
            public void handleDelivery(String consumerTag, Envelope envelope, AMQP.BasicProperties properties, byte[] body) throws IOException {
                String message = new String(body, "UTF-8");

                System.out.println("Received : '" + message + "'");
                channel.basicAck(envelope.getDeliveryTag(), false);
            }
        };
        channel.basicConsume(TEST_QUEUE_NAME, false, consumer);
    }
}
在spring中:
<!-- spring-rabbitmq.xml-->
<?xml version="1.0" encoding="UTF-8"?>
<beans xmlns="http://www.springframework.org/schema/beans"
       xmlns:xsi="http://www.w3.org/2001/XMLSchema-instance" xmlns:rabbit="http://www.springframework.org/schema/rabbit"
       xmlns:mvc="http://www.springframework.org/schema/context"
       xsi:schemaLocation="http://www.springframework.org/schema/beans http://www.springframework.org/schema/beans/spring-beans.xsd http://www.springframework.org/schema/rabbit http://www.springframework.org/schema/rabbit/spring-rabbit.xsd http://www.springframework.org/schema/context http://www.springframework.org/schema/context/spring-context.xsd">

    <description>rabbitmq 连接服务配置</description>

    <mvc:component-scan base-package="com.battery.rabbitMq"/>

    <!-- 连接配置 -->
    <rabbit:connection-factory id="rabbit-connectionFactory" host="${mq.host}" username="${mq.username}" password="${mq.password}" port="${mq.port}"  virtual-host="${mq.vhost}"/>

    <rabbit:admin connection-factory="rabbit-connectionFactory"/>

    <!-- spring template声明,注入到类中,用于将消息发送到指定队列-->
    <rabbit:template exchange="test-mq-fanout" id="ssoTemplate"  connection-factory="rabbit-connectionFactory"  message-converter="jsonMessageConverter" />

    <!-- 消息对象json转换类 -->
    <bean id="jsonMessageConverter" class="org.springframework.amqp.support.converter.Jackson2JsonMessageConverter" />

    <!-- 声明一个消息队列(
        durable:是否持久化
        exclusive: 仅创建者可以使用的私有队列,断开后自动删除
        auto_delete: 当所有消费客户端连接断开后,是否自动删除队列) -->
    <rabbit:queue id="test_queue" name="test_queue" durable="true" auto-delete="false" exclusive="false" />

    <!-- 定义交换机
     rabbit:direct-exchange:定义exchange模式为direct,意思就是消息与一个特定的路由键完全匹配,才会转发。
     rabbit:binding:设置消息queue匹配的key
     -->
    <rabbit:fanout-exchange name="test-mq-fanout" auto-declare="true" durable="true" auto-delete="false" id="test-mq-fanout">
        <rabbit:bindings>
            <rabbit:binding queue="test_queue"/>
        </rabbit:bindings>
    </rabbit:fanout-exchange>

    <!-- 消费者配置  -->

    <!-- 队列监听类 -->
    <bean id="queueListener" class="com.battery.rabbitMq.QueueListener"/>

    <!-- 监听容器配置 -->
    <rabbit:listener-container connection-factory="rabbit-connectionFactory" acknowledge="manual">
        <rabbit:listener queues="test_queue" ref="queueListener" method="onMessage"/>
    </rabbit:listener-container>

</beans>
@Service
public class MQProducerImpl implements MQProducer {

    @Autowired
    private RabbitTemplate rabbitTemplate;

    private final static Logger LOGGER = LoggerFactory.getLogger(MQProducerImpl.class);

    /**
     * convertAndSend:将Java对象转换为消息发送到匹配Key的交换机中Exchange,由于配置了JSON转换,这里是将Java对象转换成JSON字符串的形式。
     * 原文:Convert a Java object to an Amqp Message and send it to a default exchange with a specific routing key.
     **/
    @Override
    public void sendDataToQueue(Object object) {
        try {
            rabbitTemplate.convertAndSend(object);
        } catch (Exception e) {
            LOGGER.error(e.getMessage());
        }
    }
}
@Component
public class QueueListener implements ChannelAwareMessageListener {

    private static Logger logger = LoggerFactory.getLogger(QueueListener.class);

    @Override
    public void onMessage(Message message, Channel channel) throws Exception {
        try {
            String ackMessage = new String(message.getBody(), "utf-8");
            System.out.print(ackMessage);
            logger.debug("接收到:" + new String(message.getBody(), "utf-8"));
        } catch (Exception e) {
            System.out.print(e.getMessage());
        }
    }
}