1.声明bean
- 声明配置一个bean有三种方式
- 在 XML 中显式配置
- 在 Java 中显式的配置
- 隐式的bean发现机制和自动装配
1.1在 XML 中显式配置
-
<?xml version="1.0" encoding="UTF-8"?>
<beans xmlns="http://www.springframework.org/schema/beans"
       xmlns:xsi="http://www.w3.org/2001/XMLSchema-instance"
       xmlns:context="http://www.springframework.org/schema/context"
       xsi:schemaLocation="http://www.springframework.org/schema/beans
       http://www.springframework.org/schema/beans/spring-beans.xsd
       http://www.springframework.org/schema/context
       http://www.springframework.org/schema/context/spring-context.xsd">

    <bean id="myBean" class="com.lpkienge.MyBean"/>

</beans>
这样一个最简单的bean就配置好了
- bean的id一般按驼峰式命名,但也可以不给出,它会根据类的全限定名称自动生成一个id,com.mibloom.MyBean#0 , #0是用来区分同一个类生成不同的bean的,如果再生成一个就是#1
1.2使用注解自动化装配bean
package com.mibloom;
import org.springframework.stereotype.Component;

/**
 * @Auther: LPKIENGE
 * @Date: 2018/10/29 17:33
 * @Description:
 */
@Component
public class MyBean {
    private String name = "MIBLOOM";

    public String getName() {
        return name;
    }

    public void setName(String name) {
        this.name = name;
    }
}
自动装配只适合那些自己定义的组件,第三方类库中的组件是没办法自动装配的(难道你要在源码上加注解?)所以只能用XML或者JavaConfig配置。
- @Component 注解 标记后该类会作为组件类被Spring发现并创建bean 。(组件(Component)是对数据和方法的简单封装)
- 像@Repository、@Service 、@Controller 都是由@Component构成的所以他们也具有@Component一样的功能。为了结构分层所以使用了不同的名字。
- 使用注解创建的bean自动生成的id不会是长长的包名加类名而是按驼峰式生成的id。也可以指定一个id,如@Component("myName")。(也可以使用 javax.inject.Named @Named("name")来代替@Component("name")但他们之间有细微差别,不建议使用)
- 必须开启组件扫描而且@Component要在扫描范围内才会被Spring发现。
-
- 自动装配只适合那些自己定义的组件,第三方类库中的组件是没办法自动装配的(难道你要在源码上加注解?)所以只能用XML或者JavaConfig配置。
1.2.1 @ComponentScan开启组件扫描
- 类上标注了注解就要让Spring发现,而让Spring发现这一步就是开启 组件扫描。
- 组件扫描默认是不开启的,如果要开启就要使用 @ComponentScan 或者 通过XML 配置。
- @ComponentScan 默认会扫描当前类所在包中所有类和所有子包中的类,如果类上配置了@Component就会被扫描到,并创建为bean。
- 在XML 中 配置 <context:component-scan base-package="com.mibloom"/> 扫描范围也是mibloom包及其子包
1.2.2 @ComponentScan 扫描范围
- @ComponentScan 没有任何参数则会默认会扫描 当前类所在包中所有类 和 所有子包中的类
- @ComponentScan("com.mibloom") 或者 @ComponentScan(basePackages = "com.mibloom.lpk") 设置扫描指定包。
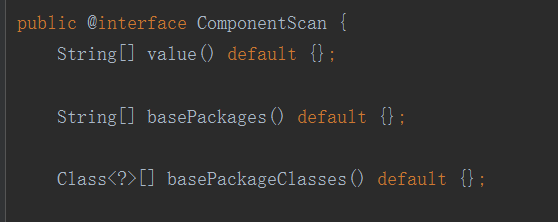
- @ComponentScan(basePackageClasses = SpringConfig.class) 设置扫描该类所在的包,这样扫描的路径不用字符串表示比较安全。
- 查看源码发现 无论是 value 还是basePackages 还是basePackageClasses都是数组形式所以可以一次设置多个扫描路径@ComponentScan(basePackages = {"com.mibloom.service","com.mibloom.lpk")

1.2.3 自动装配即依赖注入
- 使用@Autowired即可自动装配。
- @Autowired可以用在字段 和 任何方法上包括构造器,用在方法上会为方法参数注入依赖。
- @Autowired注入时该bean必须存在,否则会抛异常org.springframework.beans.factory.BeanCreationException :Injection of autowired dependencies failed
- 可以设置 @Autowired(required = false) 这样Spring就会尝试着去装配bean,如果存在则装配,不存在设对象为null,所以required = false时有必要进行null检查。
- 除了@Autowired 还可以使用javax.inject.Inject的 @Inject注解, 它和@Named一样它是属于Java EE 规范的注解,并不是Spring的注解。
1.3通过Java 代码装配 Bean
- @Configuration注解将一个类声明为Java配置类。
- JavaConfig类中应该没有业务代码而仅仅只用来配置。
- JavaConfig类中方法添加@Bean既可以将该方法返回的类注册为一个Bean。
package com.mibloom;
import com.mibloom.lpk.Bloom;
import org.springframework.context.annotation.Bean;
import org.springframework.context.annotation.Configuration;

/**
 * @Auther: LPKIENGE
 * @Date: 2018/11/3 10:55
 * @Description:
 */
@Configuration
public class JavaConfig {

    @Bean
    public MyBean myBean(){
        return new MyBean();
    }

    @Bean
    public Bloom bloom(){
        Bloom bloom = new Bloom();
        bloom.setName("THIS IS MY BLOOM");
        return bloom;
    }

}
- 被@Bean标注的方法 其返回的对象会被注册为Bean, 就这么简单,因此可以在@Bean方法中为该对象做任何事,只要最后 return 该对象即可,如Bloom。
- 使用JavaConfig配置Bean非常方便并且可以为该对象被注册为bean之前进行一些逻辑处理。
- @Configuration 也要被组件扫描器发现才行。
- @Configuration 也是由@Component构成的所以该配置类也会被组件发现注册为bean。
2.异常
- 创建bean 最容易出现的异常就是 BeanCreationException ,这时应该检查该注入的bean有没有被组件扫描器扫描到,只在@ComponentScan 路径下才能创建bean。