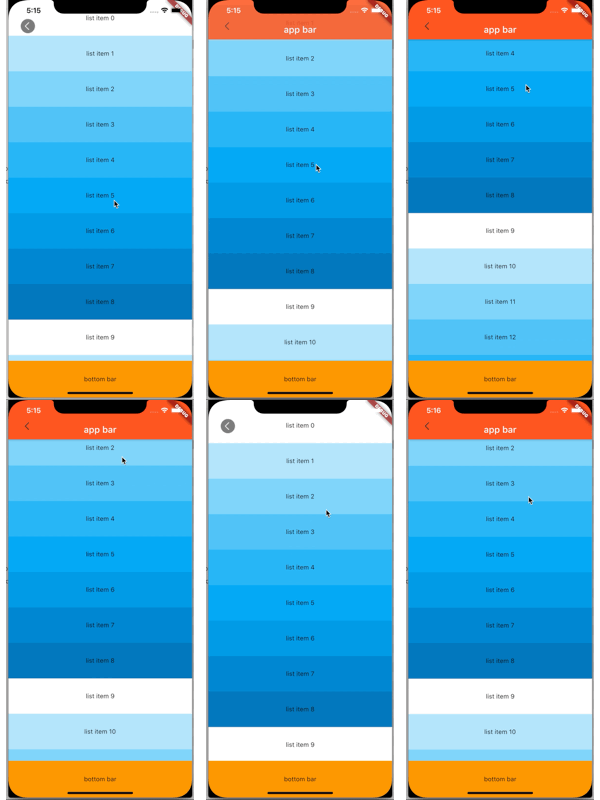
最近要用 Flutter 重构一个 Native 页面,效果如下:

随着页面滑动,圆形按钮逐渐消失,返回按钮逐渐呈现,同时AppBar的透明度在整个过程中,是随着滑动距离线性变化的,而按钮的变化分为两段:圆形按钮逐渐消失,返回按钮逐渐呈现,整个过程可逆。
接下来介绍实现过程。
1.整体结构设计
通过观察可知,listView 可以在 AppBar 底部滑动,常规的 Scaffold widget 无法满足这个需求,而 Stack widget 可以实现组件的叠加,在这里通过 Stack 作为页面的 root widget。通过监听scrollView 的滑动距离,实时计算 appBar 和 按钮 的透明度。
///首先声明 全局变量
  AppBarWidget appBar;
  ScrollController scrollController; //scrollView的控制器
  PositionedBtnWidget roundLeftBtn; //圆形返回按钮
  PositionedBtnWidget rectLeftBtn;  //方形返回按钮
在初始化方法里,给全局变量赋值:
 @override
  void initState() {
    super.initState();
    appBar = AppBarWidget();
    scrollController = ScrollController();
    roundLeftBtn = PositionedBtnWidget();
    rectLeftBtn = PositionedBtnWidget();
  }
整体UI结构使用 Scaffold 作为主框架,body部分则是 Stack ,底部 TabBar使用 Scaffold 自带属性自定义搭建。为了适配 iPhoneX 底部,需要计算 安全区域高度。 MediaQuery.of(context).padding.bottom; ,CustomScrollView 的controller 继承自 ChangeNotifier,可监听其位置变化。
///示意代码
Scaffold(
        body: Stack(
          children: <Widget>[
            ///监听滚动
            NotificationListener(
              onNotification: (notification) {
                if (notification is ScrollUpdateNotification &&
                    notification.depth == 0) {
                  ///滑动通知
           scrollViewDidScrolled(notification.metrics.pixels);
                }
                ///通知不再上传
                return true;
              },
              child: CustomScrollView(),
            appBar,
            rectLeftBtn,
            roundLeftBtn,
          ],
        ),
        bottomNavigationBar: Container(
            color: Colors.orange,
            height: bottomBarHeight,
            child: Center(
              child: Text('bottom bar'),
            )));
2.其他部件的搭建
因为要实现透明度效果,这里使用 Opacity widegt 来实现。控制 opacity 透明度的值,可实现透明度的变化。注意:在这里发现,Stack内的两个组件,如果发生重叠,位于顶部的widget最先响应点击事件。
///示例
Opacity(
      opacity: opacity,
      child: Container(
        height: appBarHeight,
        child: AppBar(
          title: Text('app bar'),
          backgroundColor: Colors.deepOrange,
        ),
      ),
    );
在 Stack 内部,变动部件位置需要用到 Positioned widegt, 点击事件通过 IconButton 来实现
Positioned(
      top: btnTop,
      right: right,
      left: left,
      child: Opacity(
        opacity: btnOpacity,
        child: IconButton(
          icon: Image.asset(image),
          onPressed: () {
            if (widget != null && widget.actionFunction != null) {
              widget.actionFunction();
            }
          },
        ),
      ),
    );
3.透明度计算
通过监听 scrollview的滑动距离,计算各个部件的透明度。
在这里 把完全透明到不透明 需要滑动的距离定为 80(单位逻辑像素 logical pixels)
而按钮 的变化分为两段,每段滑动距离为整体的一半,也就是40逻辑像素。
具体计算方式如下:
 double maxOffset = 80.0;

  scrollViewDidScrolled(double offSet) {
    //print('scroll offset ' + offSet.toString());

    ///appbar 透明度
    double appBarOpacity = offSet / maxOffset;
    double halfPace = maxOffset / 2.0;

    ///圆形按钮透明度
    double roundOpacity = (halfPace - offSet) / halfPace;

    ///方形按钮透明度
    double rectOpacity = (offSet - halfPace) / halfPace;

    if (appBarOpacity < 0) {
      appBarOpacity = 0.0;
    } else if (appBarOpacity > 1) {
      appBarOpacity = 1.0;
    }

    if (roundOpacity < 0) {
      roundOpacity = 0.0;
    } else if (roundOpacity > 1) {
      roundOpacity = 1;
    }

    if (rectOpacity < 0) {
      rectOpacity = 0.0;
    } else if (rectOpacity > 1) {
      rectOpacity = 1.0;
    }
    //print('roundOpacity $roundOpacity rectOpacity $rectOpacity');

    ///更新透明度
    if (appBar != null && appBar.updateAppBarOpacity != null) {
      appBar.updateAppBarOpacity(appBarOpacity);
    }

    if (roundLeftBtn != null && roundLeftBtn.updateOpacity != null) {
      roundLeftBtn.updateOpacity(roundOpacity);
    }
    if (rectLeftBtn != null && rectLeftBtn.updateOpacity != null) {
      rectLeftBtn.updateOpacity(rectOpacity);
    }
  }
代码地址
Demo