1.官方文档
https://developer.android.com/studio/build/multidex
主要内容:
- 什么是64K限制
- 编码时如何避免64K 限制
- 拆分dex避免64K 限制
2.DEX
DEX = Dalvik Executable , android Dalvik java 虚拟机的可执行字节码文件。APK文件包含 DEX,其中包含应用的已编译代码。
3.什么是64K限制
Dalvik Executable 规定单个 DEX 文件内可引用的方法总数限制在 65,536,其中包括 Android 框架方法、库方法以及你自己的方法。
在计算机科学领域内,术语千(简称 K)表示 1024(或 2^10)。65,536 等于 64 X 1024,因此这一限制也称为“64K 引用限制”。
当android应用中方法数量超过这个65536,打包时报错信息如下:
The number of method references in a .dex file cannot exceed 64K.
如下图:

4.查看dex引用方法的数量
用android studio 分析一个apk,看下它的classes.dex 文件。
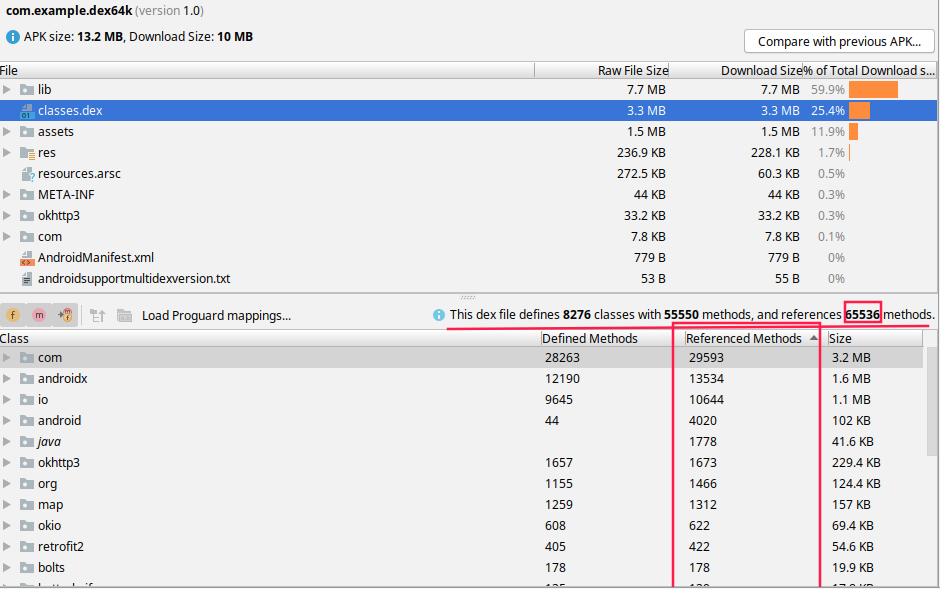
- 这个apk内方法引用数已经达到限制,再添加一个方法、引用一个其它方法就会打包失败。
- 其中红框65536是当前引用的方法数,同时也分析出了这个应用定义了8276个类,有55550个方法。
5.编码时避免64K 限制
编码时应尽量减少应用代码中的方法数量。假如真的方法数量很多,常用避免64K限制策略如下:
5.1 减少依赖库
减少代码依赖的库数量,能不用的就不用。确保在应用中引入庞大依赖库所带来的好处大于添加大量代码所带来的弊端。
5.2 启用代码压缩
通过 ProGuard 移除未使用的代码
 1 android {
 2     buildTypes {
 3         release {
 4             minifyEnabled true
 5             proguardFiles getDefaultProguardFile('proguard-android.txt'),
 6                     'proguard-rules.pro'
 7         }
 8     }
 9     ...
10 }
5.3 把函数放到本地so库中
在本地so库的的代码并不影响dex方法数量,假设f1()调用f2(),f3(),f4(),可以只把f1声明名native的,其它的放到so里。
下面是一个so库的源码文件,main.cpp ,里面有13w个函数,从fun_0() 到 fun_131071() ,并不影响dex.
 1 #include <jni.h>
 2 #include <string>
 3
 4
 5 extern "C" JNIEXPORT void JNICALL
 6 Java_com_example_dex64k_MainActivity_javaFun1(JNIEnv *env,jobject /* this */) {
 7     std::string hello = "Hello from C++";
 8 }
 9
10
11 void
12 Java_com_example_dex64k_MainActivity_javaFun2(JNIEnv *env,jobject){
13
14 }
15 void fun_0(){ printf("hello world %s,",__func__);}
16 void fun_1(){ printf("hello world %s,",__func__);}
17 void fun_2(){ printf("hello world %s,",__func__);}
18 void fun_3(){ printf("hello world %s,",__func__);}
19 void fun_4(){ printf("hello world %s,",__func__);}
20 void fun_5(){ printf("hello world %s,",__func__);}
21 void fun_6(){ printf("hello world %s,",__func__);}
22 void fun_7(){ printf("hello world %s,",__func__);}
23 void fun_8(){ printf("hello world %s,",__func__);}
24 void fun_9(){ printf("hello world %s,",__func__);}
25 void fun_10(){ printf("hello world %s,",__func__);}
26
27 ......
28
29 void fun_131062(){ printf("hello world %s,",__func__);}
30 void fun_131063(){ printf("hello world %s,",__func__);}
31 void fun_131064(){ printf("hello world %s,",__func__);}
32 void fun_131065(){ printf("hello world %s,",__func__);}
33 void fun_131066(){ printf("hello world %s,",__func__);}
34 void fun_131067(){ printf("hello world %s,",__func__);}
35 void fun_131068(){ printf("hello world %s,",__func__);}
36 void fun_131069(){ printf("hello world %s,",__func__);}
37 void fun_131070(){ printf("hello world %s,",__func__);}
38 void fun_131071(){ printf("hello world %s,",__func__);}
6.拆分dex避免64K 限制
把apk的dex拆分成多个,可以避免64K 限制。
6.1 api >= 21 时如何拆分dex
在模块的 build.gradle 文件中将 multiDexEnabled 设置为 true,如下:
 1 apply plugin: 'com.android.application'
 2
 3 android {
 4     compileSdkVersion 29
 5     buildToolsVersion "29.0.1"
 6     defaultConfig {
 7         applicationId "com.example.dex64k"
 8         minSdkVersion 21
 9         targetSdkVersion 29
10         versionCode 1
11         versionName "1.0"
12         testInstrumentationRunner "androidx.test.runner.AndroidJUnitRunner"
13         //...
14     }
15     buildTypes {
16         release {
17             minifyEnabled false
18             multiDexEnabled true
19             proguardFiles getDefaultProguardFile('proguard-android-optimize.txt'), 'proguard-rules.pro'
20         }
21     //...
22 }
23
24 dependencies {
25     implementation fileTree(dir: 'libs', include: ['*.jar'])
26     implementation 'com.android.support:multidex:1.0.3'
27     //...
28 }
6.2 api < 21 时如何拆分dex
- 打开 multiDexEnabled
- 添加 com.android.support:multidex:1.0.3 依赖
 1 android {
 2     defaultConfig {
 3         ...
 4         minSdkVersion 15
 5         targetSdkVersion 28
 6         multiDexEnabled true
 7     }
 8     ...
 9 }
10
11 dependencies {
12     implementation 'com.android.support:multidex:1.0.3'
13 }
apk内dex文件如下:

6.3 拆分完dex后要设置application
A.未自定义application类时
 1 <?xml version="1.0" encoding="utf-8"?>
 2 <manifest xmlns:android="http://schemas.android.com/apk/res/android"
 3     package="com.example.dex64k">
 4
 5     <application
 6         android:name="androidx.multidex.MultiDexApplication"
 7         >
 8         ...
 9     </application>
10
11 </manifest>
如果用的不是androidx,那么
android:name="android.support.multidex.MultiDexApplication"
B.自定义了Application时
那么它的基类应该是 MultiDexApplication
1 import androidx.multidex.MultiDexApplication;
2
3 public class Dex64App extends MultiDexApplication {
4
5 }
如果无法修改Application的基类,那么
 1 import android.app.Application;
 2 import android.content.Context;
 3 import androidx.multidex.MultiDex;
 4
 5 public class Dex64App extends Application {
 6     @Override
 7     protected void attachBaseContext(Context base) {
 8         super.attachBaseContext(base);
 9         MultiDex.install(this);
10     }
11 }
7.拆分dex的缺点
Dalvik 可执行文件分包支持库具有一些已知的缺点.
- 启动期间在设备数据分区中安装 DEX 文件的过程相当复杂,如果DEX 文件较大,可能会导致ANR错误.
- 在api < 14 的设备上可能无法启动,也可能产生各种错误。 (http://b.android.com/22586)
- 应用发出非常庞大的内存分配请求,则可能会在运行期间发生崩溃。(http://b.android.com/78035)
8.指定某些类到主dex中
如果启动期间需要的类未在主 DEX 文件中找到,应用将崩溃并出现错误 java.lang.NoClassDefFoundError。
使用 multiDexKeepFile 或 multiDexKeepFile 可以手动将某些类指定在主 DEX 文件中。
8.1 multiDexKeepProguard
multiDexKeepProguard 文件使用与 Proguard 相同,并且支持全部 Proguard 语法。
 1 apply plugin: 'com.android.application'
 2
 3 android {
 4     ...
 5     buildTypes {
 6         release {
 7             minifyEnabled true
 8             multiDexEnabled true
 9             multiDexKeepProguard file('multidex-config.pro')
10             proguardFiles getDefaultProguardFile('proguard-android-optimize.txt'), 'proguard-rules.pro'
11         }
12     }
13     ...
14 }
multidex-config.pro与Module下的build.gradle同级,它内容如下:
1 -keep class com.example.dex64k.Dex64App
2 -keep class com.example.dex64k.MainActivity
3 -keep class com.example.dex64k.dex1
4 -keep class com.example.dex64k.dex2
5
6 #-keep class com.example.** { *; } // All classes in the com.example package
8.2 注意事项
- 要打开混淆选项
- 官网示例中的 multiDexKeepProguard('multidex-config.pro') 要改成 multiDexKeepProguard file('multidex-config.pro')
8.3 multiDexKeepFile
 1 android {
 2     compileSdkVersion 29
 3     buildToolsVersion "29.0.1"
 4     ...
 5     buildTypes {
 6         release {
 7             minifyEnabled true
 8             multiDexEnabled true
 9             multiDexKeepFile file('multidex-config.txt')
10             proguardFiles getDefaultProguardFile('proguard-android-optimize.txt'), 'proguard-rules.pro'
11         }
12     }
13     compileOptions {
14     //...
15 }
其中 multidex-config.txt 文件与Module下的build.gradle同级,它内容如下:
1 com/example/dex64k/Dex64App.class
2 com/example/dex64k/MainActivity.class
3 com/example/dex64k/dex1.class