1.服务器磁盘共享实施方案
第一步:安装NFS和rpc。
1. 安装nfs-utils:NFS主程序,rpcbind:PRC主程序
nfs-utils:NFS主程序,包含rpc.nfsd rpc.mount两个deamons
rpcbind:RPC主程序
2.安装NFS和RPC服务
[root@server7 ~]# yum install nfs-utils rpcbind
[root@server7 ~]# rpm -qa | egrep "nfs|rpcbind"
rpcbind-0.2.0-38.el7_3.1.i686
nfs-utils-1.3.0-0.33.el7_3.i686
libnfsidmap-0.25-15.el7.i686
3.查看NFS软件包
[root@server7 ~]# rpm -qa | egrep "nfs|rpcbind"

第二步:启动服务和设置开启启动:
注意:先启动rpc服务,再启动nfs服务。
[root@localhost ~]# systemctl start rpcbind #先启动rpc服务
[root@localhost ~]# systemctl enable rpcbind #设置开机启动
[root@localhost ~]# systemctl start nfs-server nfs-secure-server #启动nfs服务和nfs安全传输服务
[root@localhost ~]# systemctl enable nfs-server nfs-secure-server
[root@localhost /]# firewall-cmd --permanent --add-service=nfs #配置防火墙放行nfs服务
[root@localhost /]# firewall-cmd --reload
第三步:配置共享文件目录,编辑配置文件:
首先创建共享目录,然后在/etc/exports配置文件中编辑配置即可。
[root@localhost /]# mkdir /cmiot/help/files #创建/cmiot/help/files共享目录(绝对路径)
[root@localhost /]# vi /etc/exports
/cmiot/help/files 192.168.xxx.xx1/24(rw,no_root_squash,no_all_squash,sync)
/cmiot/help/files 192.168.xxx.xx1/24(rw,no_root_squash,no_all_squash,sync)
/cmiot/help/files 192.168.xxx.xx1/24(rw,no_root_squash,no_all_squash,sync)
注:端口号 > 1024 需要手动指定端口,反之则不强调
[root@localhost /]# systemctl reload nfs #重新加载NFS服务,使配置文件生效
第四步:NFS客户端挂载配置:
第一步:使用showmount命令查看nfs服务器共享信息。输出格式为“共享的目录名称 允许使用客户端地址”。
[root@localhost ~]# showmount -e 192.168.1.110 #服务器地址
Export list for 192.168.245.128:
/cmiot/help/files 192.168.xxx.xx1/24
/cmiot/help/files 192.168.xxx.xx2/24
/cmiot/help/files 192.168.xxx.xx3/24 #一个服务端共享多个客户端
第二步:在客户端创建目录,并挂载共享目录。
[root@localhost ~]# mkdir /cmiot/help/files
[root@localhost ~]# vi /etc/fstab
#在该文件中挂载,使系统每次启动时都能自动挂载
192.168.xxx.xx1:/cmiot/help/files /cmiot/help/files nfs defaults 0 0
192.168.xxx.xx2:/cmiot/help/files /cmiot/help/files nfs defaults 0 1
[root@localhost ~]# mount -a #是文件/etc/fstab生效
第三步:检查: df -Th

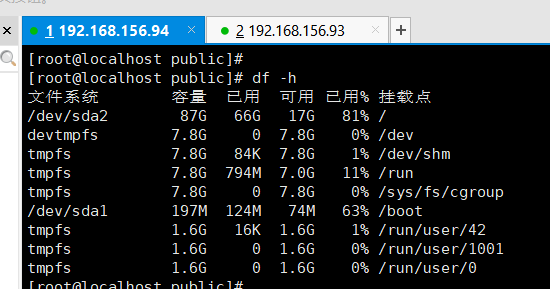
2. NFS应用占用资源情况,请评估结果
同过 df -h 命令查看服务器资源情况如下: