一、首先搭建Nginx服务
yum install -y pcre-devel openssl-devel #用本地yum仓库安装依赖包wget -q http://nginx.org/download/nginx-1.10.2.tar.gz #下载软件源码包useradd -s /sbin/nologin -M www #创建程序用户tar xf nginx-1.10.2.tar.gz -C /usr/src/ #解压缩cd /usr/src/nginx-1.10.2./configure --user=www --group=www --prefix=/usr/local/nginx --with-http_stub_status_module --with-http_ssl_module #预配置make && make install #编译和安装ln -s /usr/local/nginx/sbin/* /usr/local/sbin/ #给命令做软连接,以便PATH能找到/usr/local/nginx/sbin/nginx #启动nginx
特别提示: /usr/local/nginx/sbin/nginx -s reload nginx平滑重启命令
/usr/local/nginx/sbin/nginx -s stop nginx停止服务命令
2、加工Nginx配置文件
cd /usr/local/nginx/confegrep -v "#|^$" nginx.conf.default > nginx.conf
以上Nginx就安装完成了。
二、安装二进制MySQL数据库
说明:
为什么选择MySQL数据库
目前,绝大多数使用Linux操作系统的互联网企业都使用MySQL作为后端的数据库,从大型的BAT门户,到电商门户平台,分类门户平台等无一例外。那么,MySQL数据库到底有哪些优势和特点,让大家毫不犹豫的选择它呢?
原因可能有以下几点
1、性能卓越,服务稳定,很少出现异常宕机。
2、开放源代码且无版权制约,自主性强,使用成本低。
3、历史悠久,社区及用户非常活跃,遇到问题,可以很快获取到帮助。
4、软件体积小,安装使用简单,并且易于维护,安装及维护成本低。
5、支持多种操作系统,提供多种API接口,支持多种开发语言,特别是对流行的PHP语言无缝支持。
6、品牌口碑效应,使得企业无需考虑就直接用之。
下面我们开始安装
1、创建mysql用户的账号

[root@LNMP ~]# groupadd mysql[root@LNMP ~]# useradd -s /sbin/nologin -g mysql -M mysql[root@LNMP ~]# tail -1 /etc/passwdmysql:x:501:501::/home/mysql:/sbin/nologin[root@LNMP ~]# id mysqluid=501(mysql) gid=501(mysql) groups=501(mysql)
2、获取MySQL二进制软件包
百度云盘:http://pan.baidu.com/s/1hrBCzsC 提取码:4yjf

3、采用二进制方式安装MySQL
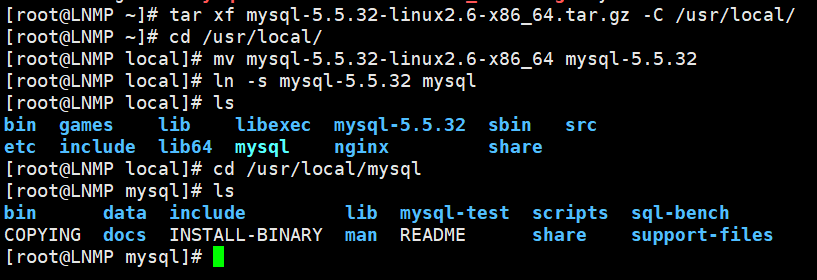
[root@LNMP ~]# tar xf mysql-5.5.32-linux2.6-x86_64.tar.gz -C /usr/local/[root@LNMP ~]# cd /usr/local/[root@LNMP local]# mv mysql-5.5.32-linux2.6-x86_64 mysql-5.5.32[root@LNMP local]# ln -s mysql-5.5.32 mysql[root@LNMP local]# lsbin games lib libexec mysql-5.5.32 sbin srcetc include lib64 mysql nginx share[root@LNMP local]# cd /usr/local/mysql[root@LNMP mysql]# lsbin data include lib mysql-test scripts sql-benchCOPYING docs INSTALL-BINARY man README share support-files
4、初始化MySQL配置文件my.cnf
[root@LNMP mysql]# cd /usr/local/mysql[root@LNMP mysql]# ls -l support-files/*.cnf[root@LNMP mysql]# /bin/cp support-files/my-small.cnf /etc/my.cnf

5、初始化MySQL数据库文件
[root@LNMP ~]# mkdir -p /usr/local/mysql/data #建立MySQL数据文件目录[root@LNMP ~]# chown -R mysql.mysql /usr/local/mysql #授权mysql用户管理MySQL的安装目录[root@LNMP ~]# yum -y install libaio #光盘源安装依赖包,否则下一步的编译会报错[root@LNMP ~]# /usr/local/mysql/scripts/mysql_install_db --basedir=/usr/local/mysql --datadir=/usr/local/mysql/data --user=mysql#初始化MySQL数据库文件,会有很多信息提示,如果没有ERROR级别的错误,会有两个OK的字样,表示初始化成功,否则就要解决初始化的问题
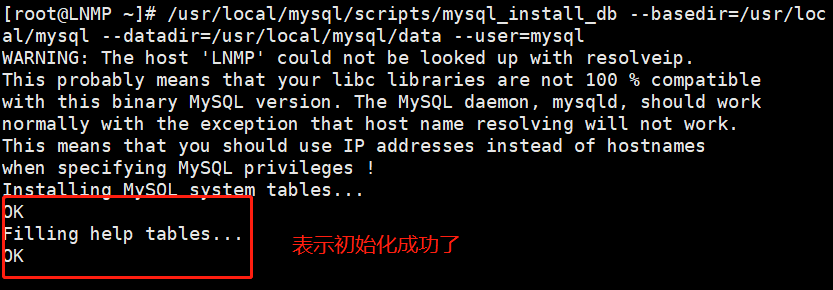
以上的命令主要作用是生成如下数据库文件 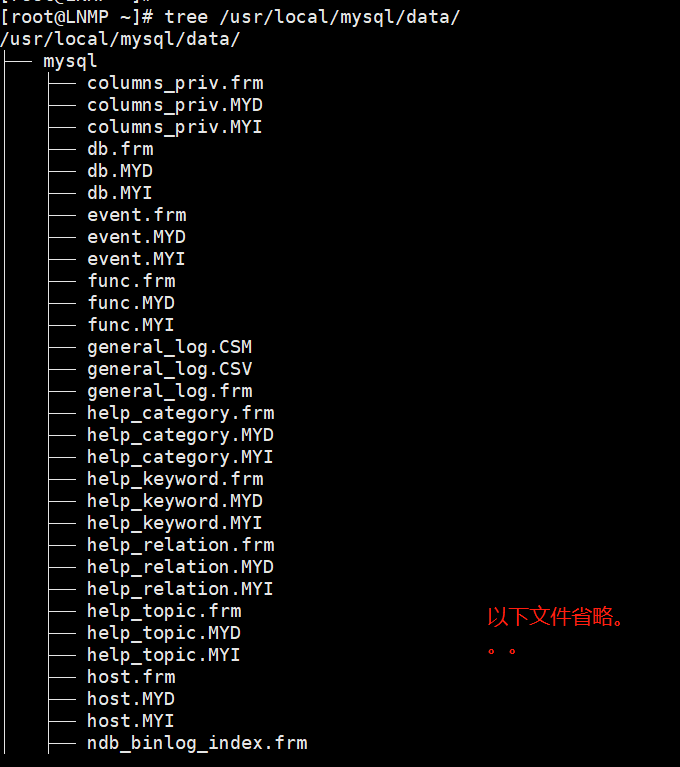
这些MySQL数据文件是MySQL正确运行所必需的基本数据库文件,其功能是对MySQL权限,状态等进行管理。
说明:
初始化故障排错集锦
错误示例1:
usr/local/mysql/bin/mysqld: error while loading shared libraries: libaio.so.1: cannot open shared ob
错误原因是没有libaio函数库的支持。需要
yum -y install libaio
错误示例2:
WARNING:The host'mysql'could not be looked up with resolveip
需要修改主机名解析,使其和uname -n一样,修改后的结果如下:
grepuname -n/etc/hosts
错误示例3:
ERROR:1004Can't create file '/tmp/#sql300e_1_o.frm'(errno:13)
原因是/tmp目录的权限有问题。
解决办法为处理/tmp目录,如下:
ls -ld /tmp
drwxrwxrwt. 3 root root 4096 Jul 14 07:56 /tmp
chmod -R 1777 /tmp/
此故障必须解除,否则,后面会出现登陆不了数据库等问题。
6、配置并启动MySQL数据库
(1)设置MySQL启动脚本,命令如下:
[root@LNMP mysql]# cp support-files/mysql.server /etc/init.d/mysqld #拷贝MySQL启动脚本到MySQL的命令路径[root@LNMP mysql]# chmod +x /etc/init.d/mysqld #使脚本可执行

(2)MySQL二进制默认安装路径是/usr/local/mysql,启动脚本里是/usr/local/mysql。如果安装路径不同,那么脚本里路径等都需要替换
(3)启动MySQL数据库
[root@LNMP mysql]# /etc/init.d/mysqld startStarting MySQL... SUCCESS!

以上是启动数据库的规范方法之一,但还可以用如下方式启动, /usr/local/mysql/bin/mysqld_safe
--user=mysql & 这个命令结尾的“&”符号,作用是在后台执行MySQL服务,命令执行完还需要按下回车才能进入命令行状态。
(4)检查MySQL数据库是否启动
[root@LNMP mysql]# netstat -antup | grep mysql

如果发现3306端口没起来,可以tail -100
/usr/local/mysql/data/主机名.err查看日志信息,看是否有报错信息,然后根据相关错误提示进行调试。
(5)查看MySQL数据库启动结果日志
[root@LNMP ~]# tail -10 /usr/local/mysql/data/LNMP.err
(6)设置MySQL开机自启动
[root@LNMP ~]# chkconfig --add mysqld[root@LNMP ~]# chkconfig mysqld on[root@LNMP ~]# chkconfig --list mysqldmysqld 0:off 1:off 2:on 3:on 4:on 5:on 6:off

注:也可以将启动命令/etc/init.d/mysqld start 放到/etc/rc.local里面
(7)配置mysql命令的全局使用路径
[root@LNMP ~]# ln -s /usr/local/mysql/bin/* /usr/local/bin/[root@LNMP ~]# which mysql/usr/local/bin/mysql

(8)登陆MySQL测试 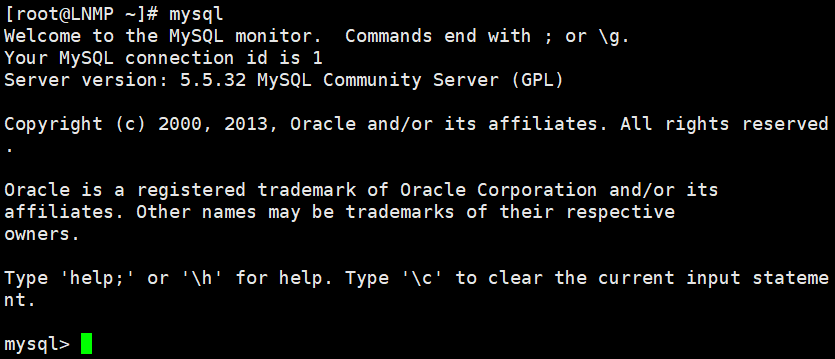
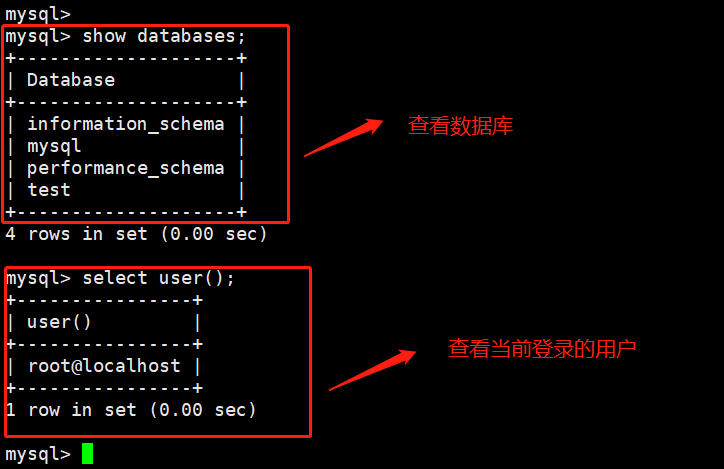
注:MySQL安装完成以后,默认情况下,root账户是无密码的,这个必须要设置。
7、MySQL安全配置、为MySQL的root用户设置密码
[root@LNMP ~]# mysqladmin -u root password '123123' #设置root用户密码[root@LNMP ~]# mysql -uroot -p123123 #用root用户登录数据库

三、LNMP之PHP(FastCGI方式)
一、FastCGI介绍
1、 什么是CGI
CGI的全称为“通用网关接口”(Common Gateway Interface),为HTTP服务器与其他机器上的程序服务通信交流的一种工具,CGI程序须运行在网络服务器上。
传统CGI接口方式的主要缺点是性能较差,因为每次HTTP服务器遇到动态程序时都需要重新启动解析器来执行解析,之后结果才会被返回给HTTP服务器。这在处理高并发访问时几乎是不可用的,因此就诞生了FastCGI。另外,传统的CGI接口方式安全性也很差,故而现在已经很少被使用了。
2、 什么是FastCGI
FastCGI是一个可伸缩的,高速地在HTTP服务器和动态脚本语言间通信的接口(在Linux下,FastCGI接口即为socket,这个socket可以是文件socket,也可以是IP socket),主要优点是把动态语言和HTTP服务器分离出来。多数流行的HTTP服务器都支持FastCGI,包括Apache,Nginx和Lighttpd等。
同时,FastCGI也被许多脚本语言所支持,例如当前比较流程的脚本语言PHP。FastCGI接口采用的是C/S架构,它可以将HTTP服务器和脚本解析服务器分开,同时还能在脚本解析服务器上启动一个或多个脚本来解析守护进程。当HTTP服务器遇到动态程序时,可以将其直接交付给FastCGI进程来执行,然后将得到的结果返回给浏览器。这种方式可以让HTTP服务器专一地处理静态请求,或者将动态脚本服务器的结果返回给客户端,这在很大程度上提高了整个应用系统的性能。
FastCGI的重要特点如下:
HTTP服务器和动态脚本语言间通信的接口或工具。
可把动态语言解析和HTTP服务器分离开。
Nginx,Apache,Lighttpd,以及多数动态语言都支持FastCGI。
FastCGI接口方式采用C/S结构,分为客户端(HTTP服务器)和服务器端(动态语言解析服务器)
PHP动态语言服务器端可以启动多个FastCGI的守护进程(例如php-fpm(fcgi process mangement))
HTTP服务器通过(例如Nginx fastcgi_pass)FastCGI客户端和动态语言FastCGI服务器端通信(例如php-fpm)
3、 Nginx FastCGI的运行原理
Nginx不支持对外部动态程序的直接调用或者解析,所有的外部程序(包括PHP)必须通过FastCGI接口来调用。FastCGI接口在Linux下是socket,为了调用CGI程序,还需要一个FastCGI的wrapper(可以理解为用于启动另一个程序的程序),这个wrappper绑定在某个固定的socket上,如端口或文件socket。当Nginx将CGI请求发送给这个socket的时候,通过FastCGI接口,wrapper接收到请求,然后派生出一个新的线程,这个线程调用解释器或外部程序处理脚本来读取返回的数据;接着,wrapper再将返回的数据通过FastCGI接口,沿着固定的socket传递给Nginx;最后,Nginx将返回的数据发送给客户端,这就是Nginx+FastCGI的整个运作过程。

FastCGI的主要优点是把动态语言和HTTP服务器分离开来,使Nginx专门处理静态请求及向后转发的动态请求,而PHP/PHP-FPM服务器则专门解析PHP动态请求。
二、LNMP之PHP(FastCGI方式)服务的安装和准备
1 检查Nginx及MySQL的安装情况
(1)检查确认Nginx及MySQL的安装路径
[root@LNMP ~]# ls -ld /usr/local/nginxdrwxr-xr-x. 11 root root 4096 Nov 9 00:42 /usr/local/nginx[root@LNMP ~]# ls -ld /usr/local/mysqllrwxrwxrwx. 1 mysql mysql 12 Nov 9 01:00 /usr/local/mysql -> mysql-5.5.32
(2)检查端口及启动情况
[root@LNMP ~]# netstat -antup | grep -E "80|3306"

(3)测试访问Nginx及MySQL是否OK
[root@LNMP ~]# wget 127.0.0.1[root@LNMP ~]# mysql -uroot -p123123
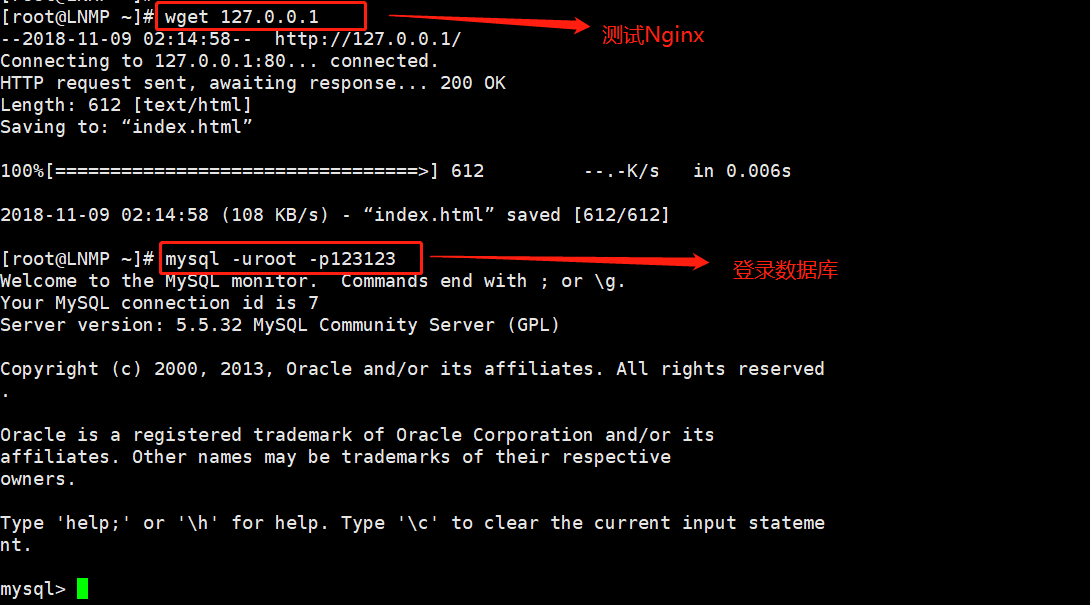
如果访问结果和上图一致,就表明Nginx及MySQL的安装一切正常
2、检查安装PHP所需的lib库
PHP程序在开发及运行时会调用一些诸如zlib,gd等函数库,因此需要确认lib库是否已经安装,执行过程如下:
[root@LNMP ~]# rpm -qa zlib-devel libxml2-devel libjpeg-devel libjpeg-turbo-devel libiconv-develzlib-devel-1.2.3-29.el6.x86_64[root@LNMP ~]# rpm -qa freetype-devel libpng-devel gd libcurl-devel libxslt-devel
注:
每个lib一般都会存在对应的以“*-devel”命名的包,安装lib对应的-devel包后,对应的lib包就会自动安装好,例如安装gd-devel时就会安装gd。
这些lib库不是必须安装的,但是目前的企业环境下一般都需要安装。否则,PHP程序运行时会出现问题,例如验证码无法显示等。
执行下面命令安装相关的lib软件包
[root@LNMP ~]# yum -y install zlib-devel libxml2-devel libjpeg-devel libjpeg-turbo-devel libiconv-devel[root@LNMP ~]# yum -y install freetype-devel libpng-devel gd libcurl-devel libxslt-devel
安装后的结果如下: 
从上图结果看出,仅有libiconv-devel这个包没有安装,因为默认的yum源没有此包,后面会编译安装。
3、安装yum无法安装的libiconv库

./configure --prefix=/usr/local/libiconv && make && make install #开始编译安装
4、安装libmcrypt库mhash加密扩展库mcrvpt加密扩展库
[root@LNMP ~]# wget -O /etc/yum.repos.d/epel.repo http://mirrors.aliyun.com/repo/epel-6.repo #推荐使用简单的在线yum的方式安装[root@LNMP ~]# cd /etc/yum.repos.d/[root@LNMP yum.repos.d]# lsepel.repo moban.repo[root@LNMP yum.repos.d]# yum -y install libmcrypt-devel #安装libmcrypt库[root@LNMP yum.repos.d]# yum -y install mhash #安装mhash加密扩展库[root@LNMP yum.repos.d]# yum -y install mcrypt #mcrvpt加密扩展库
5、开始安装PHP(FastCGI方式)服务
(1、)获取PHP软件包
[root@LNMP ~]# wget http://cn2.php.net/get/php-5.3.28.tar.gz/from/this/mirror

6、解压配置PHP
[root@LNMP ~]# tar xf php-5.3.28.tar.gz -C /usr/src/[root@LNMP ~]# cd /usr/src/php-5.3.28/[root@LNMP php-5.3.28]# ./configure> --prefix=/usr/local/php5.3.28> --with-mysql=/usr/local/mysql> --with-iconv-dir=/usr/local/libiconv> --with-freetype-dir> --with-jpeg-dir> --with-png-dir> --with-zlib> --with-libxml-dir=/usr> --enable-xml> --disable-rpath> --enable-safe-mode> --enable-bcmath> --enable-shmop> --enable-sysvsem> --enable-inline-optimization> --with-curl> --with-curlwrappers> --enable-mbregex> --enable-fpm> --enable-mbstring> --with-mcrypt> --with-gd> --enable-gd-native-ttf> --with-openssl> --with-mhash> --enable-pcntl> --enable-sockets> --with-xmlrpc> --enable-zip> --enable-soap> --enable-short-tags> --enable-zend-multibyte> --enable-static> --with-xsl> --with-fpm-user=www> --with-fpm-group=www> --enable-ftp

对于上面命令,部分参数说明如下:
--prefix=/usr/local/php5.2.28 表示指定PHP的安装路径为/usr/local/php5.3.28
--with-mysql=/usr/local/mysql 表示需要指定MySQL的安装路径,安装PHP需要的MySQL相关内容。当然,如果没有MySQL软件包,也可以不单独安装,这样的情况可使用--with-mysql=mysqlnd替代--with-mysql=/usr/local/mysql,因为PHP软件里已经自带了连接MySQL的客户端工具。
--with-fpm-user=www nginx表示指定PHP-FPM进程管理的用户为www,此处最好和Nginx服务用户统一
--with-fpm-group=www
表示指定PHP-FPM进程管理的组为www,此处最好与Nginx服务用户组统一。
--enable-fpm
表示激活PHP-FPM方式服务,即以FastCGIF方式运行PHP服务。
7、编译PHP
正确执行前文配置PHP软件的./configure系列命令后,就可以编译PHP软件了,具体操作过程如下:
cd /usr/src/php-5.3.28/[root@LNMP php-5.3.28]# ln -s /usr/local/mysql/lib/libmysqlclient.so.18 /usr/lib64/[root@LNMP php-5.3.28]# touch ext/phar/phar.phar[root@LNMP php-5.3.28]# make

8、安装PHP生成文件到系统
[root@LNMP php-5.3.28]# make install
9、 配置PHP引擎配置文件php.ini
(1)设置软链接以方便访问
[root@LNMP ~]# ln -s /usr/local/php5.3.28/ /usr/local/php[root@LNMP ~]# ls -l /usr/local/phplrwxrwxrwx. 1 root root 21 Nov 9 05:30 /usr/local/php -> /usr/local/php5.3.28/
(2)查看PHP配置默认模版文件
[root@LNMP ~]# cd /usr/src/php-5.3.28/[root@LNMP php-5.3.28]# ls php.ini*php.ini-development php.ini-production
请注意以上两文件的异同之处,可通过diff或vimdiff命令比较,如下图所示
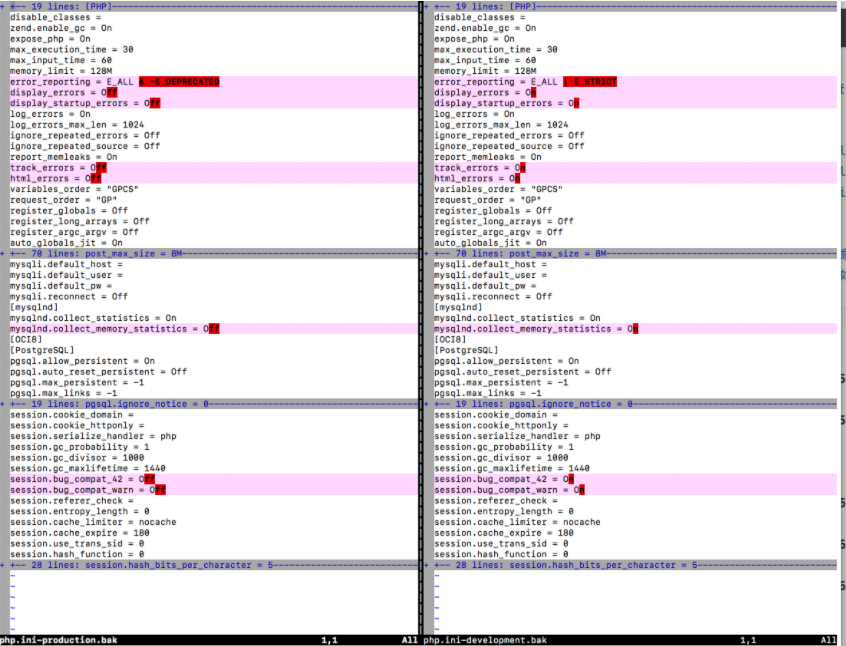
从对比结果可以看出,开发环境更多的是开启日志,调试信息,而生产环境都是关闭状态
(3)拷贝PHP配置文件到PHP默认目录,并更改文件名称为php.ini
[root@LNMP php-5.3.28]# cp php.ini-production /usr/local/php/lib/php.ini[root@LNMP php-5.3.28]# ls -l /usr/local/php/lib/php.ini-rw-r--r--. 1 root root 69627 Nov 9 05:36 /usr/local/php/lib/php.ini
10、配置PHP(FastCGI方式)的配置文件php-fpm.conf
[root@LNMP etc]# lspear.conf php-fpm.conf.default[root@LNMP etc]# cp php-fpm.conf.default php-fpm.conf[root@LNMP etc]# lspear.conf php-fpm.conf php-fpm.conf.default

关于php-fpm.conf,暂时可用默认的配置,先把服务搭好,以后再进行优化。
11、启动PHP服务(FastCGI方式)
(1)启动PHP服务php-fpm
[root@LNMP etc]# /usr/local/php/sbin/php-fpm
(2)检查PHP服务php-fpm的进程及启动端口的情况
[root@LNMP etc]# ps -ef | grep php-fpm[root@LNMP etc]# lsof -i:9000 #默认9000端口提供服务

四、配置Nginx支持PHP程序请求访问
1 修改Nginx配置文件
(1)查看nginx当前的配置
[root@LNMP conf]# vim nginx.confworker_processes 1;events {worker_connections 1024;}http {include mime.types;default_type application/octet-stream;sendfile on;keepalive_timeout 65;include extra/www.conf;include extra/mail.conf;include extra/blog.conf;}
(2)PHP解析,这里以blog为例讲解,内容如下:
[root@LNMP extra]# cat blog.confserver {listen 80;server_name blog.shidu.com;location / {root html/blog;index index.html index.htm;}}
最终blog虚拟机的完整配置如下:
[root@LNMP extra]# cat blog.confserver {listen 80;server_name blog.shidu.com;location / {root html/blog;index index.html index.htm;}location ~ .*.(php|php5)?$ {root html/blog;fastcgi_pass 127.0.0.1:9000;fastcgi_index index.php;include fastcgi.conf;}}
2、检查并启动Nginx
[root@LNMP extra]# nginx -t #检查配置文件[root@LNMP extra]# nginx -s reload #重启nginx服务

此步在生产环境很关键,如不提前检查语法,重启后发现语法错误会导致Nginx无法提供服务,给用户访问体验带来不好的影响。
3、测试LNMP环境生效情况
(1)进入指定的默认站点目录后,编辑index.php,添加如下内容:
[root@LNMP blog]# pwd/usr/local/nginx/html/blog[root@LNMP blog]# echo "<?php phpinfo(); ?>" >test_info.php[root@LNMP blog]# cat test_info.php<?php phpinfo(); ?>
以上代码为显示PHP配置信息的简单PHP文件代码
(2)调整Windows下的host解析
192.168.200.128 www.shidu.com blog.shidu.com mail.shidu.com
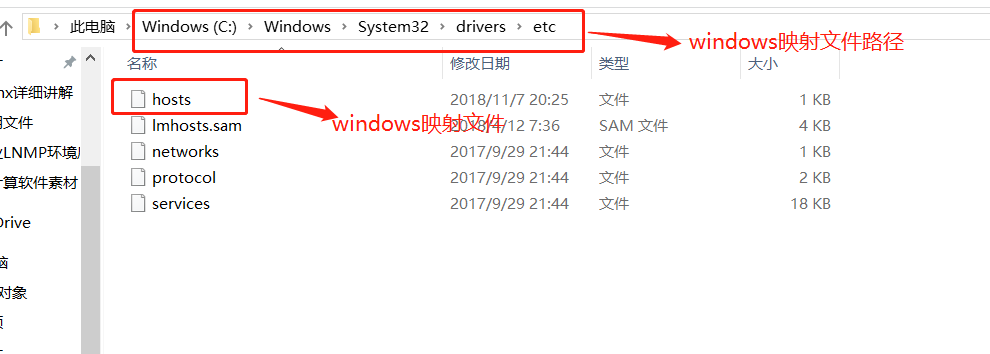
(3) 打开浏览器输入 http://blog.shidu.com/test_info.php 即可进入下图界面
出现此界面,表示Nginx配合PHP解析已经正常。 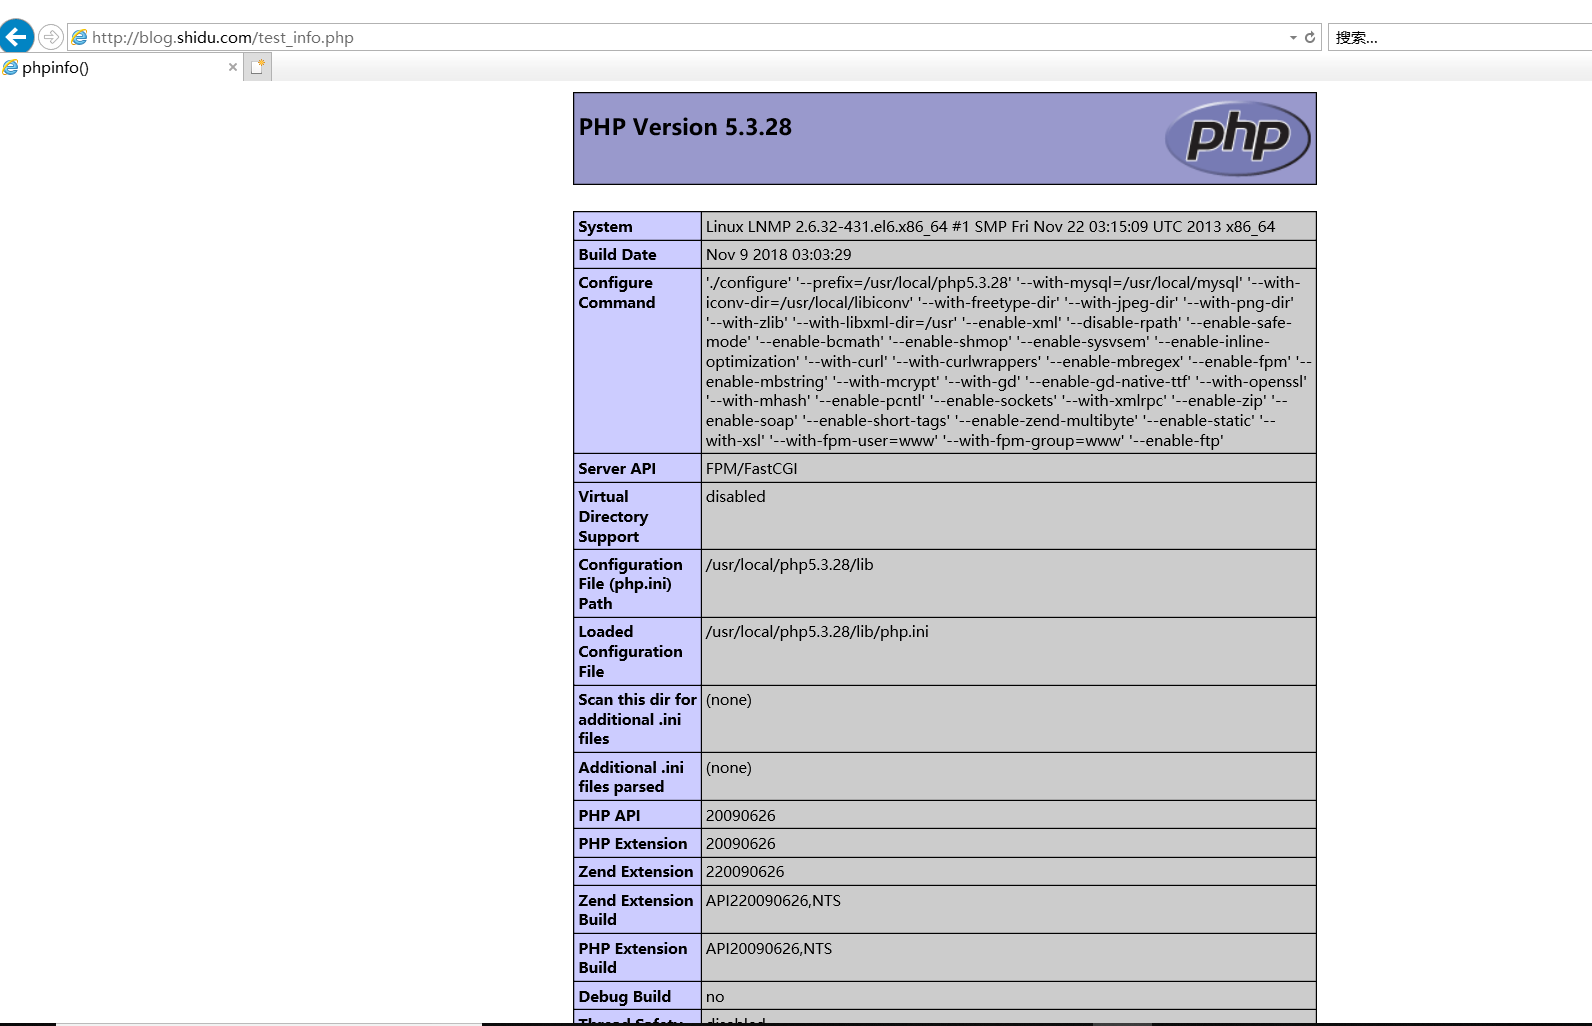
4、针对Nginx请求访问PHP,然后对PHP连接MySQL的情况进行测试
编辑test_mysql.php,加入如下内容:
[root@LNMP blog]# cat test_mysql.php<?php$link_id=mysql_connect('localhost','root','123123');if($link_id){echo "mysql successful by shidu !";}else{echo mysql_error();}?>

五、部署一个blog程序服务
一、开源博客程序WordPress介绍
WordPress 是一套利用PHP语言和MySQL数据库开发的开源免费的blog(博客,网站)程序,用户可以在支持PHP环境和MySQL数据库的服务器上建立blog站点。它的功能非常强大,拥有众多插件,易于扩充功能。其安装和使用也都非常方便。目前WordPress已经成为搭建blog平台的主流,很多发布平台都是根据WordPress二次开发的,如果你也想像他们一样拥有自己的blog,可购买网上的域名及空间,然后搭建LNMP环境,部署WordPress程序后就可以轻松成就自己的梦想了。
二、 WordPress 博客程序的搭建准备
1、MySQL数据库配置准备
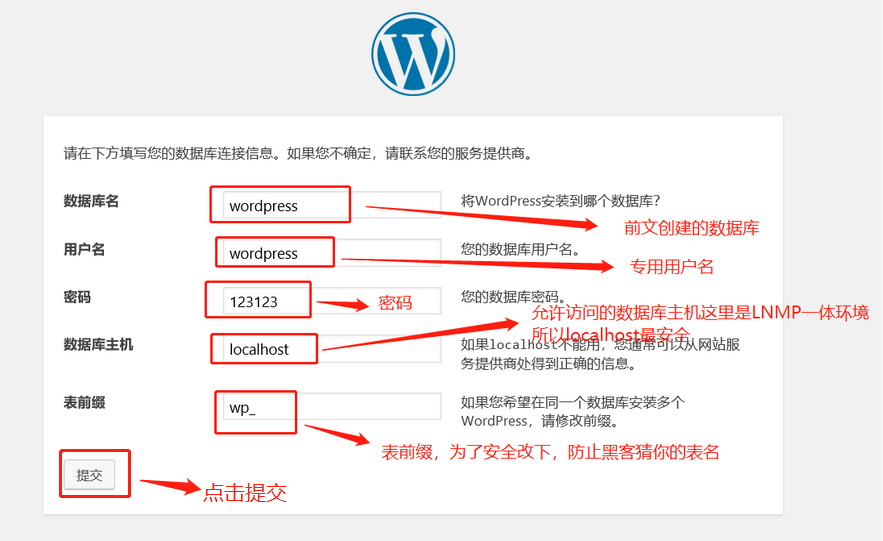
(1)登陆MySQL数据库,创建一个专用的数据库WordPress,用于存放blog数据
[root@LNMP blog]# mysql -uroot -p123123mysql> create database wordpress; #创建一个数据库,名字为wordpressQuery OK, 1 row affected (0.00 sec)mysql> show databases like 'wordpress'; #查看创建的库+----------------------+| Database (wordpress) |+----------------------+| wordpress |+----------------------+1 row in set (0.00 sec)
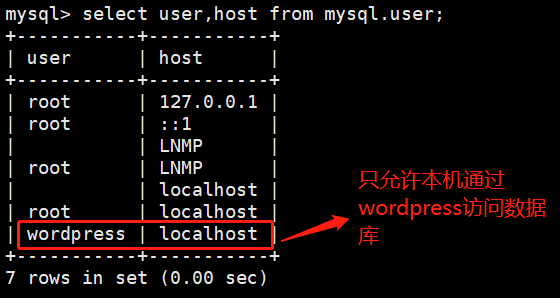
(2)创建一个专用的WordPress blog管理用户
mysql> grant all on wordpress.* to wordpress@'localhost' identified by '123123';Query OK, 0 rows affected (0.00 sec) #localhost为客户端地址mysql> flush privileges; #刷新权限,使得创建用户生效Query OK, 0 rows affected (0.00 sec)mysql> show grants for wordpress@'localhost'; #查看用户对应权限+------------------------------------------------------------------------------------------------------------------+| Grants for wordpress@localhost |+------------------------------------------------------------------------------------------------------------------+| GRANT USAGE ON *.* TO 'wordpress'@'localhost' IDENTIFIED BY PASSWORD '*E56A114692FE0DE073F9A1DD68A00EEB9703F3F1' || GRANT ALL PRIVILEGES ON `wordpress`.* TO 'wordpress'@'localhost' |+------------------------------------------------------------------------------------------------------------------+2 rows in set (0.00 sec)
2、Nginx及PHP环境配置准备
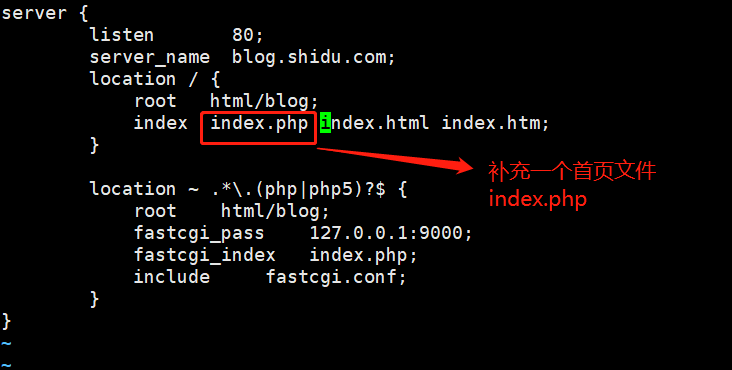
(1)选择之前配置好的支持LNMP的blog域名对应的虚拟主机
[root@LNMP extra]# pwd/usr/local/nginx/conf/extra[root@LNMP extra]# vim blog.confserver {listen 80;server_name blog.shidu.com;location / {root html/blog;index index.php index.html index.htm;}location ~ .*.(php|php5)?$ {root html/blog;fastcgi_pass 127.0.0.1:9000;fastcgi_index index.php;include fastcgi.conf;}}
(2)获取WordPress博客程序,解压到blog域名对应虚拟主机的站点目录下
程序到以下链接提取
链接: https://pan.baidu.com/s/1O4KpF5KifGhT-mDYSDTVnQ 提取码: nu85
[root@LNMP ~]# tar xf wordpress-4.9.8.tar.gz -C /usr/local/nginx/html/blog/[root@LNMP ~]# ls /usr/local/nginx/html/blog/index.html test_info.php test_mysql.php wordpress
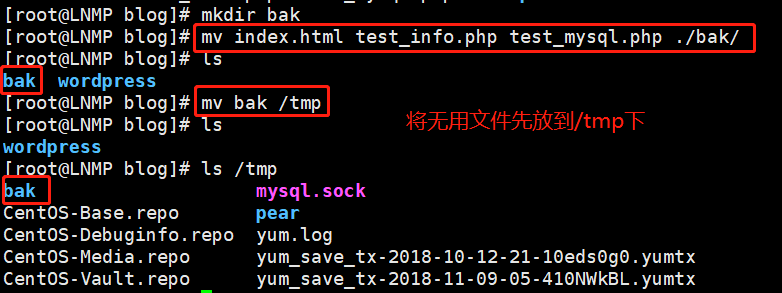
[root@LNMP blog]# mv wordpress/* . #把目录里的内容移动到blog根目录下
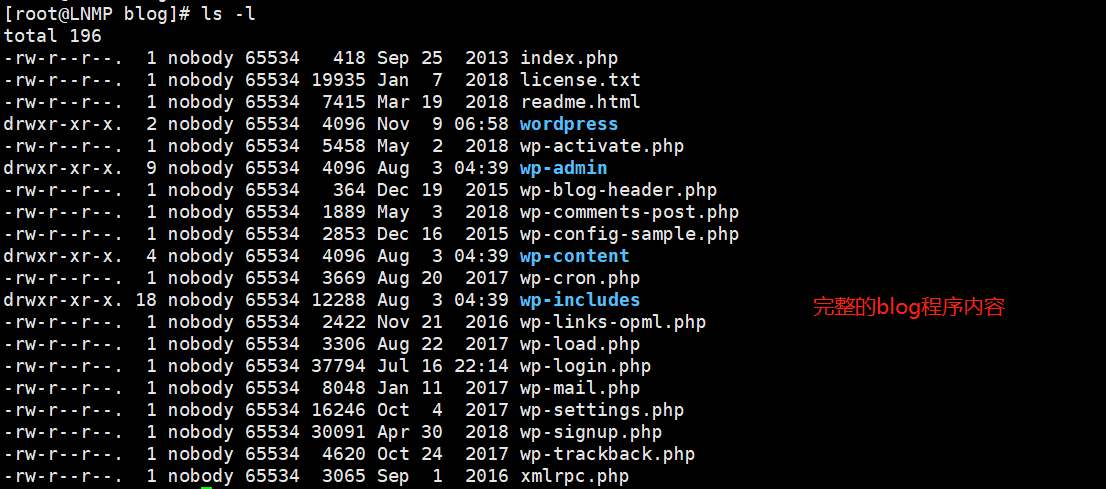
[root@LNMP blog]# chown -R www.www ../blog/ #授权用户访问
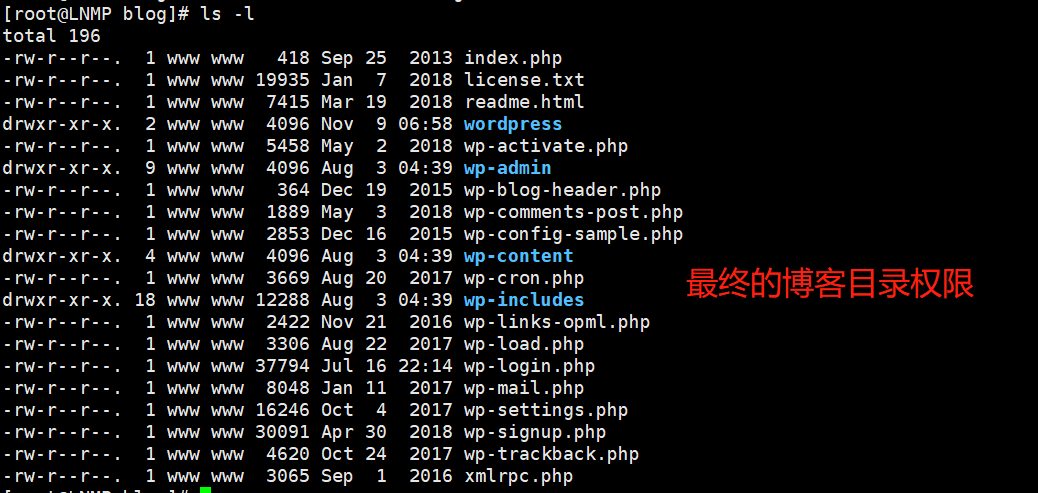
3、开始安装blog博客程序
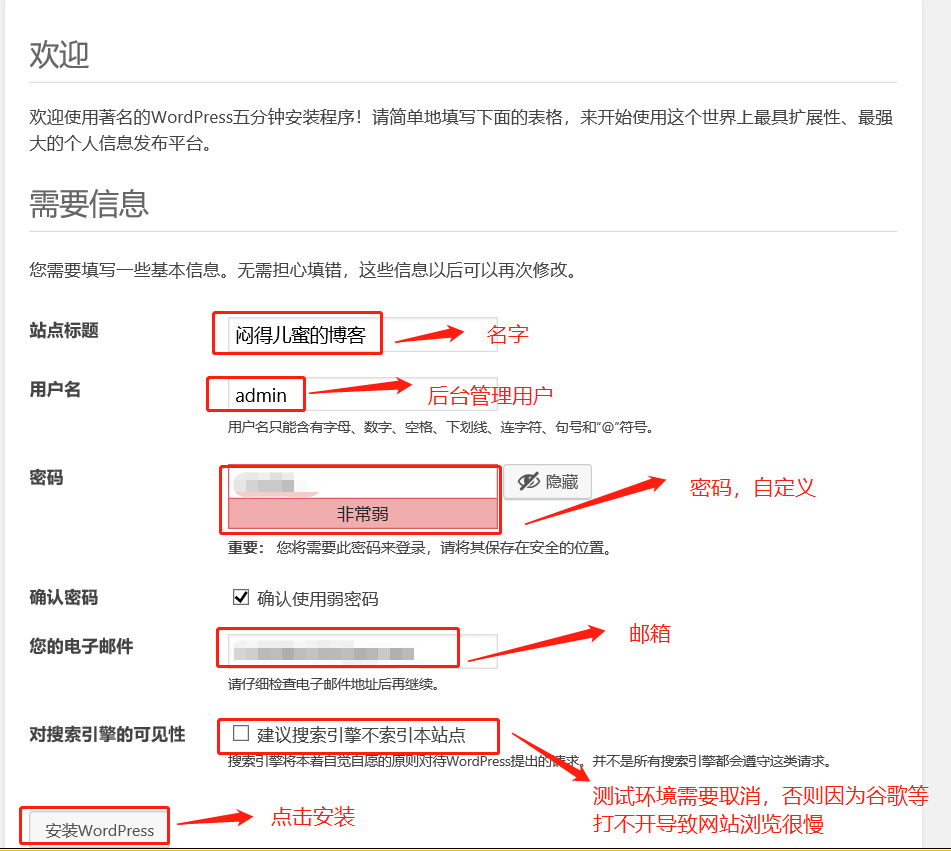
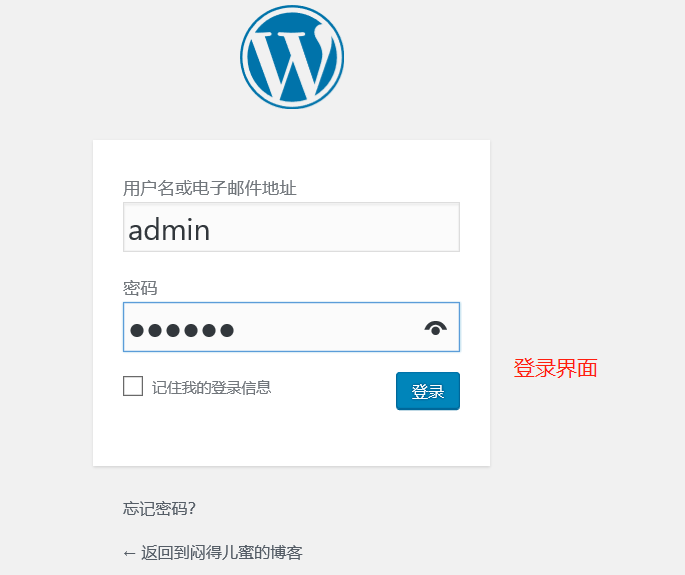
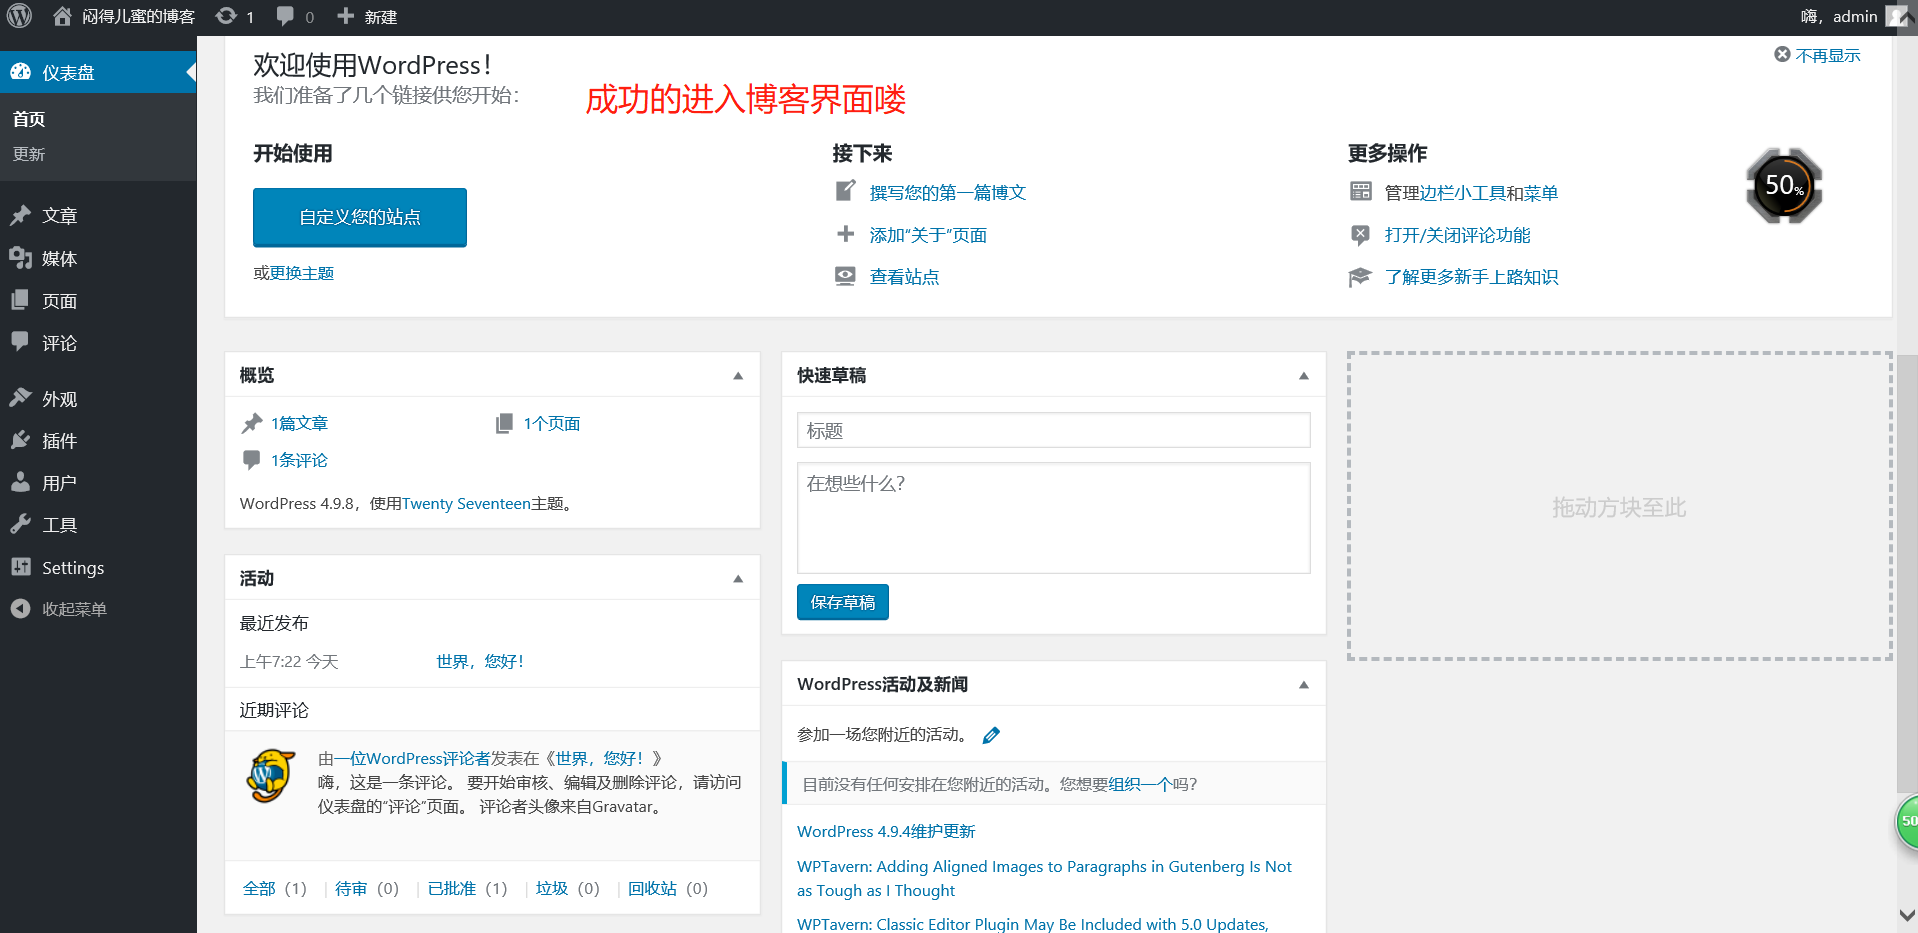
(1)打开浏览器输入blog.shidu.com(提前做好hosts或DNS解析),回车后,出现下图: 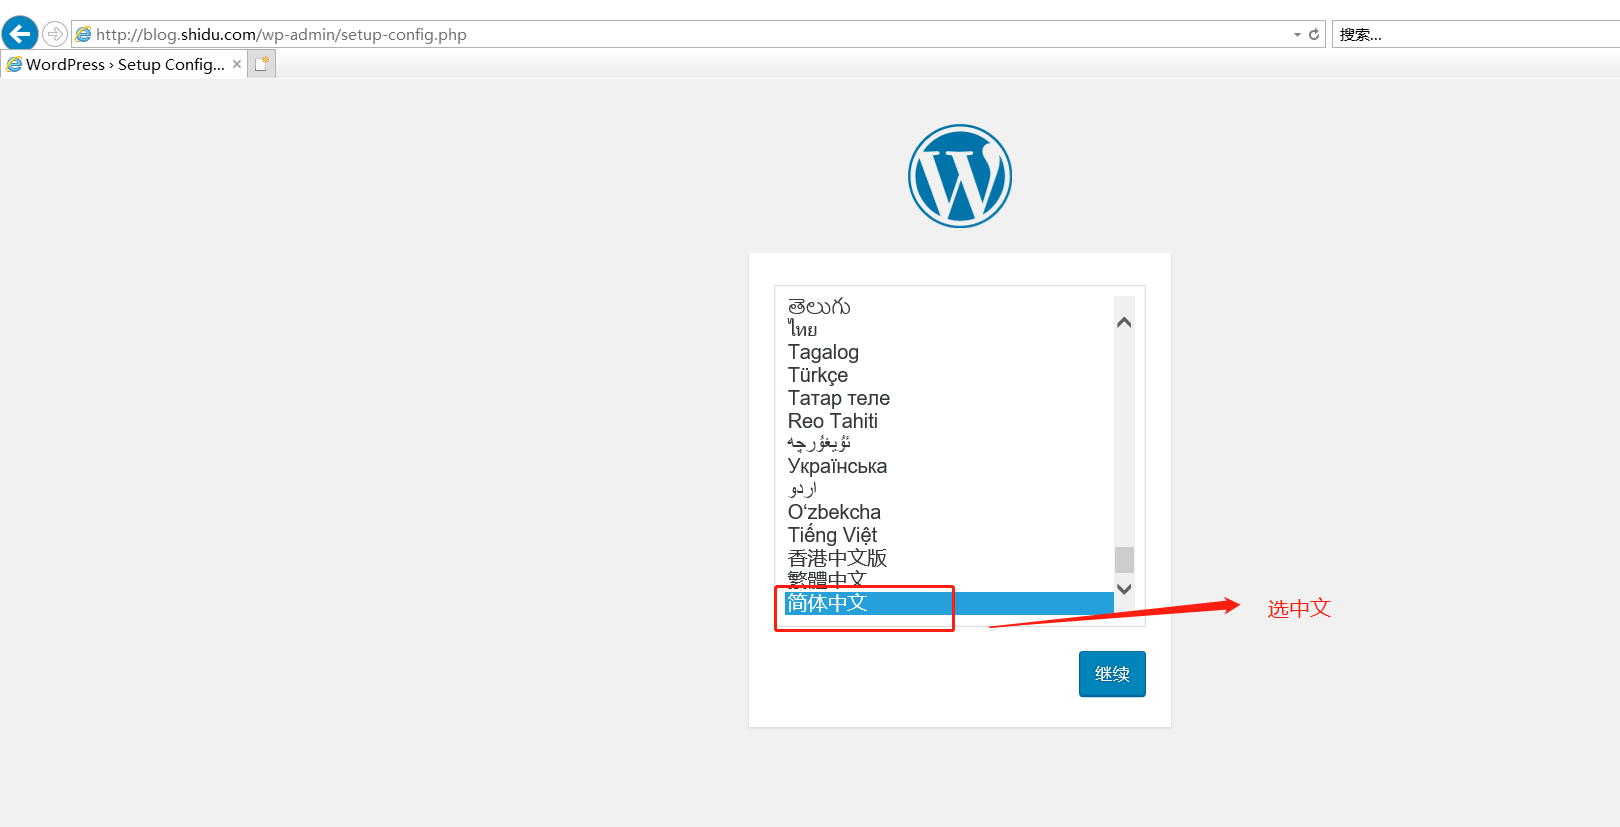
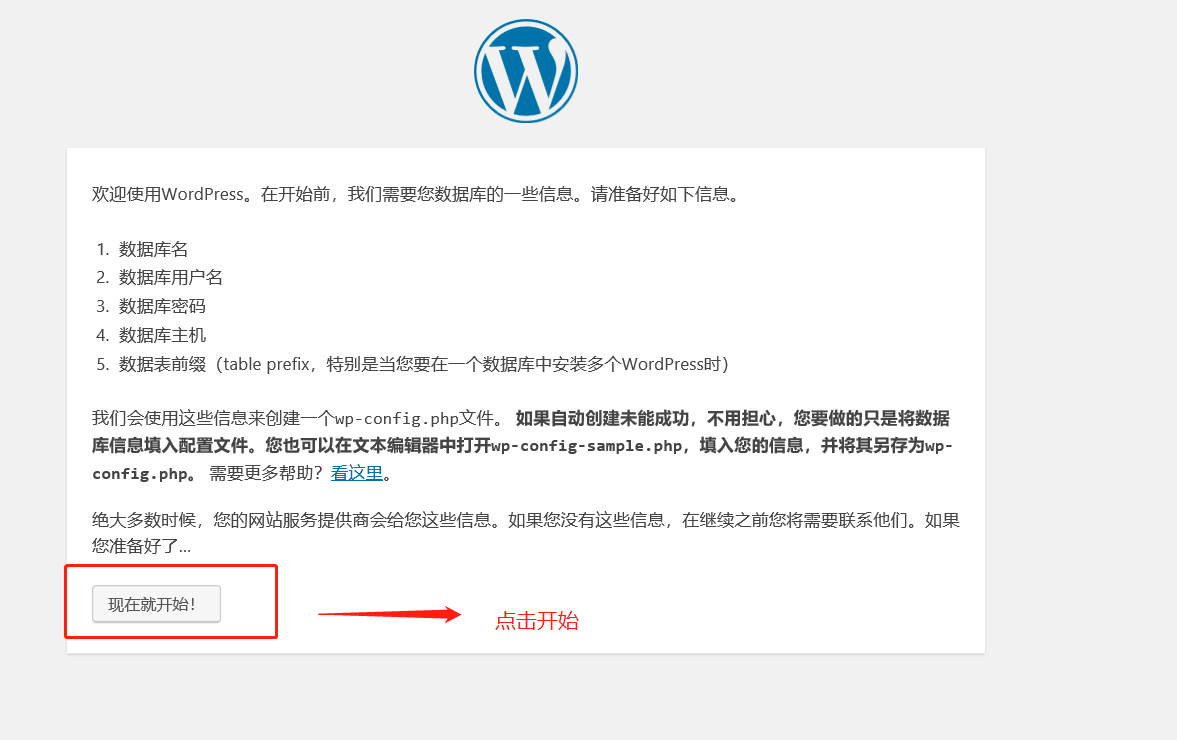


4、实现WordPress博客程序URL静态化
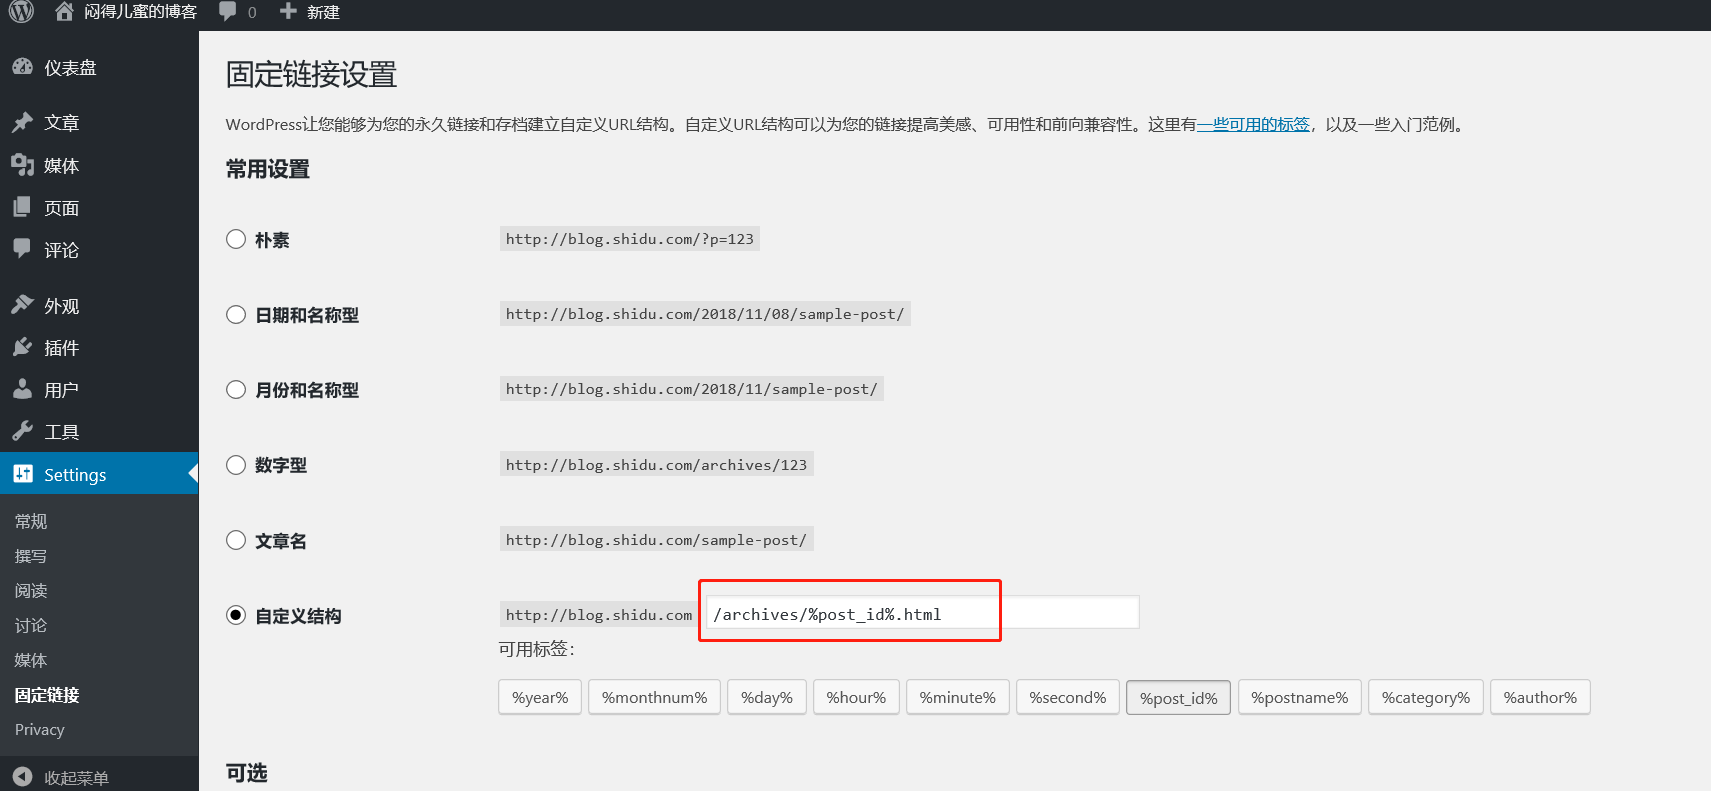
实现此功能时,首先要在WordPress后台依次单击设置--->固定链接--->自定义结构,然后输入下面的代码,并保存更改。
/archives/%post_id%.html#说明:%post_id%是数据库对应博文内容的唯一ID,例如423

接着,在Nginx配置文件的server容器中添加下面的代码:
[root@LNMP extra]# pwd/usr/local/nginx/conf/extra[root@LNMP extra]# vim blog.confserver {listen 80;server_name blog.shidu.com;root html/blog;location / {index index.php index.html index.htm;if (-f $request_filename/index.html){rewrite (.*) $1/index.html break;}if (-f $request_filename/index.php){rewrite (.*) $1/index.php;}if (!-f $request_filename){rewrite (.*) /index.php;}}location ~ .*.(php|php5)?$ {root html/blog;fastcgi_pass 127.0.0.1:9000;fastcgi_index index.php;include fastcgi.conf;}}
最后检查语法并重新加载Nginx服务,操作如下:
[root@LNMP extra]# /usr/local/nginx/sbin/nginx -tnginx: the configuration file /usr/local/nginx/conf/nginx.conf syntax is oknginx: configuration file /usr/local/nginx/conf/nginx.conf test is successfu[root@LNMP extra]# nginx -s reload

现在可以通过浏览器访问了,如下图所示: 