本文只针对于微信小程序的自定义底部导航栏;
PS:可能在进入小程序后,首次点击tabBar会出现闪烁的情况;不能接受的就还是乖乖的用回默认吧!
需求
在开发记账APP时,感觉微信小程序默认的tabBar功能很简单,而且不能进行美化,作为强迫症的我,不能忍,直接搂它;
我需要达到的效果如下:
- 中间的按钮凸起;
- 中间的按钮点击时需要跳转二级页面;

方案
当然,我们以UNI-APP官方的案例为主,先看一下官方怎么做的:UNI-APP 自定义 tabBar;
官方文档也是描述了一下,具体实现也还是需要使用wxml、wxss进行实现,并且需要将自定义tabBar放在项目根目录下的custom-tab-bar文件夹下;最终方案也是跳到了微信社区:微信小程序 自定义 tabBar;
实现
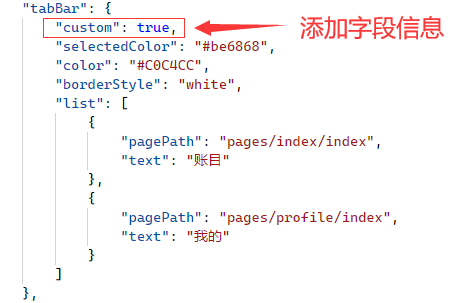
1、修改配置page.json文件
添加custom字段,并赋值true,表示这里我们使用的是自定义的tabBar;
此时,我们这里的配置数据就不生效了;
2、添加自定义tabBar
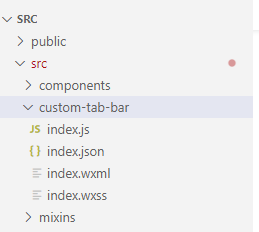
a、创建文件夹
文件包含自定义tabBar:index.js、index.json、index.wxml、index.wxss
针对我上述图中的效果,代码如下:
index.js
Component({
  data: {
    selected: 0,
    color: "#D1D1D1",
    selectedColor: "#A6B1E1",
    list: [{
      "pagePath": "/pages/index/index",
      "text": "账目"
    },
    {
      "pagePath": "/pages/profile/index",
      "text": "我的"
    }]
  },
  attached() {
  },
  methods: {
    switchTab(e) {
      const data = e.currentTarget.dataset
      const url = data.path
      wx.switchTab({ url })
      this.setData({
        selected: data.index,
      })
    },
    // 此处需要针对中间的tabBar跳转到二级页面,而不是使用switchTab
    toadd() {
      wx.navigateTo({ url: '/pages/bill/edit' })
    }
  }
})
index.json
{
  "component": true
}
index.wxml
<!--miniprogram/custom-tab-bar/index.wxml-->
<view class="tab-bar">
  <view wx:for="{{list}}" wx:key="index" class="tab-bar-item {{item.bulge?'bulge':''}}" data-path="{{item.pagePath}}" data-index="{{index}}" bindtap="switchTab">
    <view  wx:if="item.bulge" class="tab-bar-bulge tab-bar-view"></view>
    <image style="display: {{item.bulge? 'block' : 'none'}};" class="image" src="{{selected === index ? item.selectedIconPath : item.iconPath}}"></image>
    <view  wx:if="{{item.text}}" style="color: {{selected === index ? selectedColor : color}}" class="tab-bar-view">{{item.text}}</view>
  </view>
  <view class="bulge"  bindtap="toadd">
    <view class="background">
      <image class="image" src="/static/assets/tabbar/plus.png"></image>
    </view>
  </view>
</view>
index.wxss
.tab-bar {
  position: fixed;
  bottom: 0;
  left: 0;
  right: 0;
  height: 48px;
  display: flex;
  line-height: 1.2;
  padding-bottom: env(safe-area-inset-bottom);
  background: white;

}

.tab-bar-item {
  flex: 1;
  text-align: center;
  display: flex;
  justify-content: center;
  align-items: center;
  flex-direction: column;
}
.tab-bar-item .image {
   27px;
  height: 27px;
}

.bulge {
  position: absolute;
  left: 50%;
  right: 50%;
  transform: translate(-50%);
  top: -12px;
  height: 80px;
   60px;
  display: flex;
  justify-content: center;
}

.bulge .background{
  background: #A6B1E1;
   45px;
  height: 45px;
  border-radius: 100%;
  display: flex;
  justify-content: center;
  align-items: center;
}

.bulge .background .image{
   20px;
  height: 20px;
}

.tab-bar-item .tab-bar-view {
  font-size: 13px;
  font-weight: bold;
}
3、修改tabBar指向页面
实际开发中,如果不进行此项处理则会导致点击tabBar时出现奇怪的问题:点击另外一个bar时,上一个bar才会处于被选中状态;
解决该问题就要在每个tabBar指向页面的onShow添加如下代码:
PS:网上很多教程都是使用this.$mp.getTabBar 或 this.$root.$mp.getTabBar去实现(uni-app v2.0.0之前应该没事),但会在热重载tab page时都会报错:Error in onShow hook: "TypeError: Cannot read property 'getTabBar' of undefined",如下图:

经过一番issue折腾后,最终使用如下实现:
onShow() {
    // 网上很多教程都是使用this.$mp.getTabBar 或 this.$root.$mp.getTabBar去实现
    // 但目前的uni-app(2.0.1)版本下会出现undefined的情况,官方的解决方案是使用如下方式
    if (typeof this.$scope.getTabBar === 'function' &&
        this.$scope.getTabBar()) {
        this.$scope.getTabBar().setData({
            // 当前页面对应的tab index
            selected: 0,
        })
    }
}
但是,我们需要优雅点,使用mixins进行混入,达到一个function随处使用,且本文使用的时局部混入,需要在使用到的页面进行混入,代码如下:
构建mixins
根目录下创建mixins文件夹,并创建tabbar.js
export const mixin = {
    methods: {
        setTabBarIndex(index) {
            if (typeof this.$scope.getTabBar === 'function' &&
                this.$scope.getTabBar()) {
                this.$scope.getTabBar().setData({
                    selected: index,
                })
            }
        }
    }
}
在需要混入的页面进行配置
// 引入混入js
import { mixin } from "@/mixins/tabbar.js";

export default {
  mixins: [mixin], //混入js文件
  onShow() {
    this.setTabBarIndex(0);
  },
}
需要注意
- 在UNI-APP编译后,生成了dist文件夹后再进行此项更改,且直接热更新使用的话会出现两个tabBar且重叠的情况,此时需要删除dist,并重新生成;