说明:这里是Linux服务综合搭建文章的一部分,本文可以作为单独搭建LAMP环境的参考。
注意:这里所有的标题都是根据主要的文章(Linux基础服务搭建综合)的顺序来做的。
如果需要查看相关软件版本和主机配置要求,请根据目录自行查看。
Linux服务综合搭建的文章目录
====================================================
5、foundation通过Rsyslog搭建集中日志服务器
8、rhel7 JAVA web环境搭建(使用Tomcat8整合httpd)
10、foundation配置kerberos和NTP服务以及安全的NFS挂载
====================================================
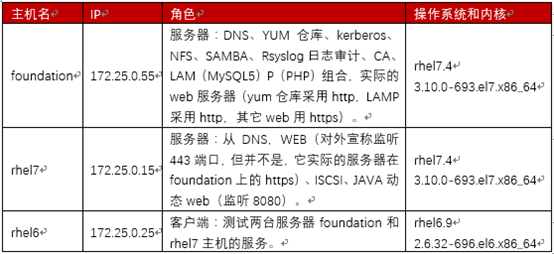
主机角色说明
6、foundation LAMP环境搭建
6.1 安装和启动MySQL服务
6.1.1 安装和启动MySQL
LAMP = Linux + MySQL + P(PHP Python Perl...)这里使用的是PHP
yum install nginx --enablerepo=epel #指定yum源安装软件
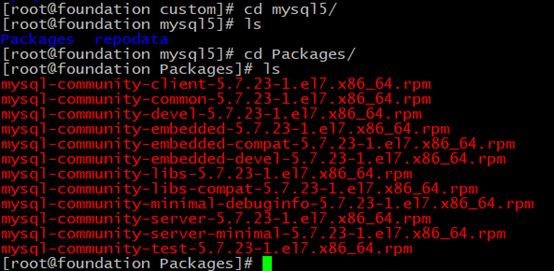
此处我自己做了MySQL5.7的yum源,MySQL使用的5.7

1 [root@foundation /]# yum install mysql-server    #安装MySQL服务器
2
3 [root@foundation /]# yum install mysql        #安装MySQL客户端
4
5 [root@foundation ~]# systemctl enable mysqld   #mysqld开机自启动
启动mysqld服务
1 systemctl restart mysqld
2
3 systemctl enable mysqld
4
5 systemctl status mysqld

6.1.2 配置防火墙

6.2 更改mysql5.7的root用户默认密码
安装MySQL5.7是会生成默认密码,在日志中可以查看,建议修改。

1 mysql -uroot -p
然后输入默认密码,之后执行SQL语句可以发现要求必须重置密码能进行操作,所以我们必须重置密码。

我们可以使用mysql_secure_installation来重置密码或者登录后手动重置密码
使用mysql_secure_installation重置密码,并对数据库进行一些简单的安全加固,建议使用。

然后根据提示进行操作即可
6.2.1 方法一:使用mysql_secure_installation
[root@foundation log]# mysql_secure_installation

Securing the MySQL server deployment.

Enter password for user root: #原来的密码
The 'validate_password' plugin is installed on the server.
The subsequent steps will run with the existing configuration
of the plugin.
Using existing password for root.

Estimated strength of the password: 50
Change the password for root ? ((Press y|Y for Yes, any other key for No) : yes

New password: #新密码

Re-enter new password: #确认新密码

Estimated strength of the password: 50
Do you wish to continue with the password provided?(Press y|Y for Yes, any other key for No) : yes
By default, a MySQL installation has an anonymous user,
allowing anyone to log into MySQL without having to have
a user account created for them. This is intended only for
testing, and to make the installation go a bit smoother.
You should remove them before moving into a production
environment.
#允许匿名用户登录
Remove anonymous users? (Press y|Y for Yes, any other key for No) : no

 ... skipping.


Normally, root should only be allowed to connect from
'localhost'. This ensures that someone cannot guess at
the root password from the network.

Disallow root login remotely? (Press y|Y for Yes, any other key for No) : yes
Success.

By default, MySQL comes with a database named 'test' that
anyone can access. This is also intended only for testing,
and should be removed before moving into a production
environment.

#删除测试数据库并访问它
Remove test database and access to it? (Press y|Y for Yes, any other key for No) : no

 ... skipping.
Reloading the privilege tables will ensure that all changes
made so far will take effect immediately.
#是否现在在重新加载权限表?
Reload privilege tables now? (Press y|Y for Yes, any other key for No) : yes
Success.

All done!
[root@foundation log]#
6.2.2 方法二:手动重置密码:
安装MySQL5.7是会生成默认密码,在日志中可以查看,建议修改。
1 gerp "pass" /var/log/mysqld.log

1 mysql -uroot -p
然后输入默认密码,之后执行SQL语句可以发现要求必须重置密码能进行操作,所以我们必须重置密码。

注意:在重置密码前要重置成简单密码需要先修改密码策略,然后改为简单密码,
我这里就使用了test这样的简单密码作为MySQL的root用户的密码。
先改一个简单密码试试(这是不会更改成功的,因为这个时候密码策略还没改。)
alter user 'root'@'localhost' identified by 'password';
再修改密码策略
show variables like '%password%';
set global validate_password_policy=0;
set global validate_password_length=4;
最后将密码改成简单密码
alter user 'root'@'localhost' identified by 'password';

6.3 MySQL 5.7的一些新特性
sys数据库:
mysql5.7增加了sys 系统数据库,通过这个库可以快速的了解系统的元数据信息
这个库确实可以方便DBA发现数据库的很多信息,解决性能瓶颈都提供了巨大帮助
Sys库所有的数据源来自:performance_schema。目标是把performance_schema的把复杂度降低,让DBA能更好的阅读这个库里的内容。让DBA更快的了解DB的运行情况。
这个库在mysql5.7中是默认存在的,在mysql5.6版本以上可以手动导入,数据库包请在github自行查找
这个库包括了哪些内容?
这个库是通过视图的形式把information_schema 和performance_schema结合起来,查询出更加令人容易理解的数据
存储过程可以可以执行一些性能方面的配置,也可以得到一些性能诊断报告内容
存储函数可以查询一些性能信息
字母开头: 适合人阅读,显示是格式化的数
x$开头 : 适合工具采集数据,原始类数据
6.4 在Windows客户端使用Navicat Premium 12连接数据库
6.4.1 故障
如果使用root用户在Navicat premium连接数据库时报1130错误,说明root用户没有允许远程连接登录,
非root用户在Navicat Premium连接数据库时报1045错误说明普通用户没用允许远程连接登录


6.4.2 解决
在foundation(数据库本地)登录root账户
mysql -uroot -p
mysql> use mysql
mysql> select `Host` from user;        #查看登录权限
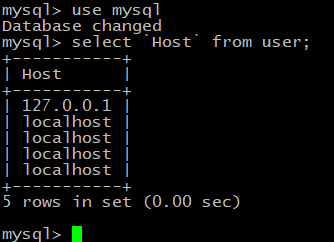
由上我们发现这些用户都没有在远程登录的权限,仅能在本机登录。
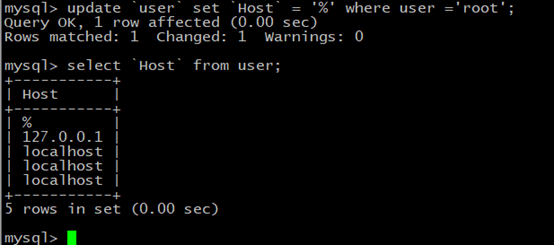
更改权限
1 mysql> update `user` set `Host` = '%' where user ='root';
刷新权限
1 mysql> flush privileges;

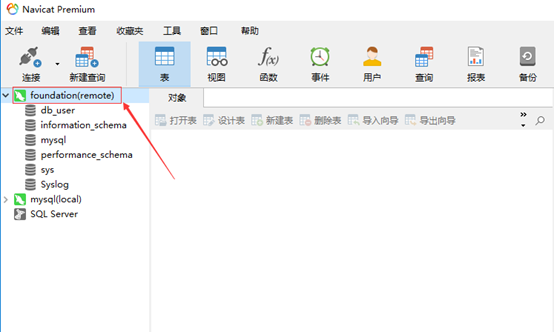
连接成功,不报错。
6.5 准备PHP动态web需要的数据库
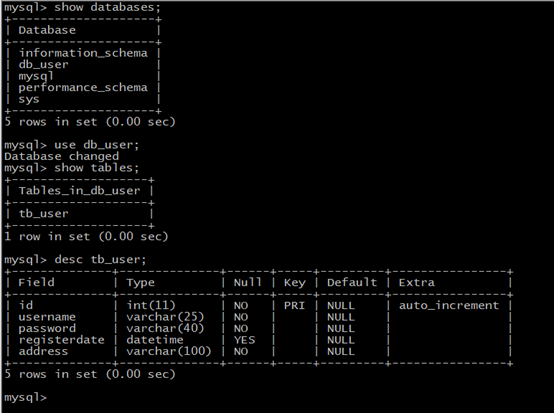
创建数据库脚本
SET FOREIGN_KEY_CHECKS=0;
-- ----------------------------
-- Table structure for `tb_user`
-- ----------------------------
DROP TABLE IF EXISTS `tb_user`;
CREATE TABLE `tb_user` (
  `id` int(11) NOT NULL AUTO_INCREMENT,
  `username` varchar(25) NOT NULL,
  `password` varchar(40) NOT NULL,
  `registerdate` datetime DEFAULT NULL,
  `address` varchar(100) NOT NULL,
  PRIMARY KEY (`id`)
) ENGINE=InnoDB AUTO_INCREMENT=13 DEFAULT CHARSET=utf8;

-- ----------------------------
-- Records of tb_user
-- ----------------------------
INSERT INTO tb_user VALUES ('1', 'Mei', 'test', '2019-06-17 20:44:10', '重庆市');
INSERT INTO tb_user VALUES ('2', 'Meizu', 'test', '2019-06-04 20:44:51', '重庆市');
INSERT INTO tb_user VALUES ('3', 'Daany', 'test', '2019-06-14 20:45:21', '英国');
INSERT INTO tb_user VALUES ('4', 'Jeery', '1234', '2019-06-14 20:46:03', '美国');
INSERT INTO tb_user VALUES ('5', 'Eric', '4324', '2019-06-21 20:46:21', '美国');
INSERT INTO tb_user VALUES ('6', 'Peeter', 'test', '2019-06-05 20:47:59', '成都');
INSERT INTO tb_user VALUES ('7', 'Alisa', 'test', '2019-06-07 20:48:25', '澳大利亚');
INSERT INTO tb_user VALUES ('8', 'Tom', 'test', '2019-06-05 20:48:57', '美国');
INSERT INTO tb_user VALUES ('9', 'Linus', 'test', '2019-06-07 20:49:24', '美国');
INSERT INTO tb_user VALUES ('10', 'Alision', 'test', '2019-06-14 20:49:42', '美国');
INSERT INTO tb_user VALUES ('11', 'Jack', 'test', '2019-06-13 20:50:00', '重庆');
INSERT INTO tb_user VALUES ('12', 'Mark', 'test', '2019-06-13 20:50:15', '英国');
6.6 部署PHP
6.6.1 安装PHP和PHP-MySQL
1 [root@foundation /]# yum install php-mysql php· #安装PHP和PHP连接MySQL数据库的模块
6.6.2 配置端口的SELinux标签
由于我们要求要使用SELinux,同时我们开放8090端口做为网站的监听端口,
然而这个端口在web应用的默认端口中是没有,SELinux默认策略也没有为我们打标签设置上下文。
1 semanage port -l|grep http #查看80端口对应的上下文

根据80端口的标签给8090端口也设置好SELinux上下文
1 semanage port -a -t http_port_t -p tcp 8090
2 semanage port -a -t http_port_t -p udp 8090

6.6.3 配置虚拟主机
新建网站的物理路径
注意:如果有cgi-bin,需要把下面所有的可执行程序的上下文都设置为httpd_sys_srcipt_exec_t
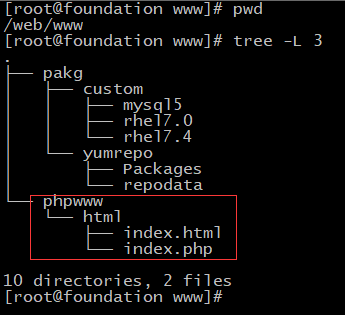
先要保证网站根目录所在的目录有合适的SELinux上下文
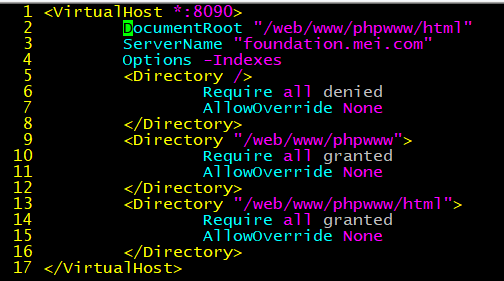
然后配置虚拟主机:
<VirtualHost *:8090>
        DocumentRoot "/web/www/phpwww/html"
        ServerName "foundation.mei.com"
        Options -Indexes
        ScriptAlias /cgi-bin  "/web/www/phpwww/cgi-bin"
        <Directory />
                Require all denied
                AllowOverride None
        </Directory>
        <Directory "/web/www/phpwww">
                Require all granted
                AllowOverride None
        </Directory>
        <Directory "/web/www/phpwww/html">
                Require all granted
                AllowOverride None
        </Directory>
</VirtualHost>
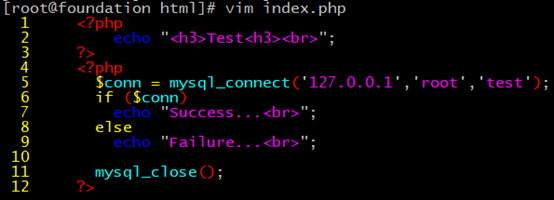
编写网站的测试首页
    <?php
        echo "<h3>Test<h3><br>";
    ?>
    <?php
      $conn = mysql_connect('127.0.0.1','root','test');
      if ($conn)
        echo "Success...<br>";
      else
        echo "Failure...<br>";

      mysql_close();
    ?>
    <br>
    <br>
    <a href="page/register.php">register</a>
    <br>
    <br>
    <a href="page/select.php">select</a>
配置/etc/httpd/conf/httpd.conf文件如下

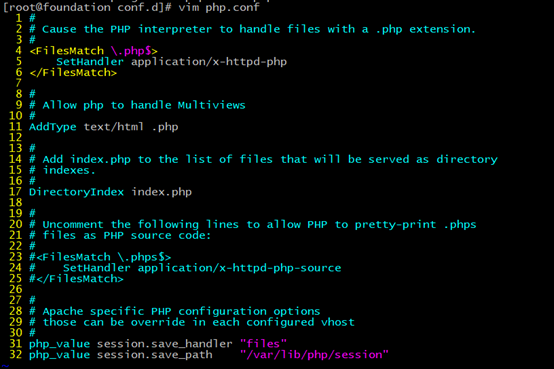
建议AddType配置项写在php.conf文件中,没必要改httpd.conf文件的就不要去冒然修改了,这样可能会造成后期维护起来很麻烦。
添加端口监听:

配置/etc/httpd/conf.d/php.conf文件如下
6.6.4 配置防火墙
1 [root@foundation conf]# firewall-cmd --permanent --add-port=8090/tcp --add-port=8090/udp && firewall-cmd --reload

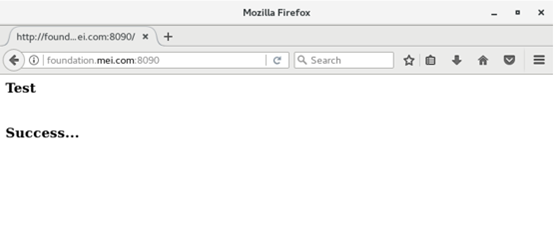
6.7 测试
1 [root@rhel7 /]# curl foundation.mei.com:8090/index.php
2 <h3>Test<h3><br>    Success...<br>
最后希望大家提意见、转发、评论和交流!!!