Vuex特点
- 使用
Vuex的时候需要用到Vue的use方法,use方法是用于注册插件的,所以Vuex的本质就是一个插件,所以实现Vuex就是在实现一个全局共享数据的插件。 - 在使用
Vuex的时候我们会通过Vuex.Store创建一个仓库,所以还需要在Vuex中新增Store属性, 这个属性的取值是一个类。 - 为了保证每个
Vue实例中都能通过this.$store拿到仓库,需要给每个Vue实例都动态添加一个$store属性。
import Vue from 'vue'
import Vuex from 'vuex'
Vue.use(Vuex)
export default new Vuex.Store({
  // 用于保存全局共享数据
  state: {},
  // 用于同步修改共享数据
  mutations: {},
  // 用于异步修改共享数据
  actions: {},
  // 用户模块化共享数据
  modules: {}
})
实现共享数据
实现getters方法
this.$store.getters.myName
实现mutations方法
this.$store.commit('addNum', 10);
defineReactive
// 在Vue中有一个util的工具类, 这个工具类上有一个defineReactive方法,通过这个方法就可以快速的将某个数据变成双向绑定的数据,defineReactive这个方法接收三个参数。
/*
  第一个参数: 要给哪个对象添加属性
  第二个参数: 要给指定的对象添加什么属性
  第三个参数: 要给这个属性添加什么值
*/
Vue.util.defineReactive(this, 'state', options.state);
实现actions方法
this.$store.dispatch('asyncAddAge', 5);
module模块化
注意点:
- 如果获取的是模块中state共享的数据, 那么需要加上模块的名称;
- 如果获取的是模块中getters共享的数据, 那么不需要加上模块的名称;
- 多个模块中不能出现同名的getters方法;
- 多个模块的mutations中可以出现同名的方法,多个同名的方法不会覆盖,会放到数组中然后依次执行,顺序从主模块到子模块。
- 多个模块的actions中可以出现同名的方法,多个同名的方法不会覆盖, 会放到数组中然后依次执行
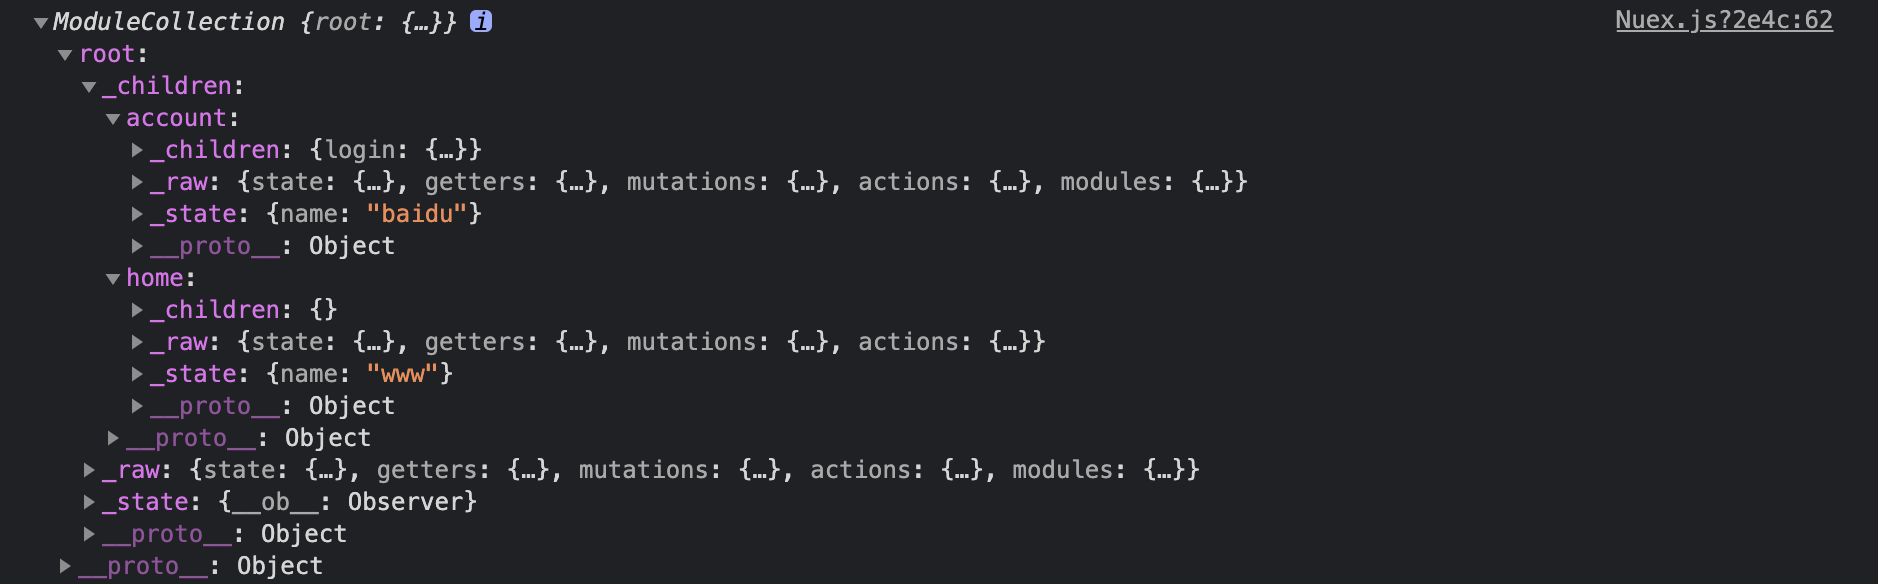
收集模块信息
// 模块格式
let root = {
    _raw: rootModule,
    _state: rootModule.state,
    _children: {
        home:{
            _raw: homeModule,
            _state: homeModule.state,
            _children: {}
        },
        account:{
            _raw: accountModule,
            _state: accountModule.state,
            _children: {
                login: {
                    _raw: loginModule,
                    _state: loginModule.state,
                    _children: {}
                }
            }
        },
    }
}
安装模块
// 第一个参数:待添加属性的对象;第二个参数:要添加的属性;第三个参数:要添加的数据
Vue.set(parent, arr[arr.length-1], rootModule._state);
// rootModule._state上添加parent[arr[arr.length-1]]
store 目录下建立一个Nuex.js实现自己的vuex, 在同级目录下的index.js中使用并暴露出去
// Nuex.js
/*
install方法会在外界调用Vue.use的时候执行并且在执行的时候会把Vue实例和一些额外的参数传递给方法
* */
import Vue from 'vue'
const install = (Vue, options)=>{
// 给每一个Vue实例都添加一个$store属性,这样在每个组件中才能通过this.$store访问.
// 在Vue中有一个名称叫做mixin方法,这个方法会在创建每一个Vue实例的时候执行,所以我们可以通过mixin方法给每一个Vue实例添加$store属性
Vue.mixin({
beforeCreate(){
// Vue在创建实例的时候会先创建父组件, 然后通过render方法再创建子组件, 子组件中导入的其他组件也会依次创建
// console.log(this.$options.name); // 可以拿到创建vue对象的时候的传惨
// Root(main.js中创建的) -> App -> HelloWorld 如果是根组件, 那么默认就有store我们只需要将store变成$store即可
if(this.$options && this.$options.store){
this.$store = this.$options.store;
}
else{ // 如果不是根组件, 那么默认没有store, 但是只需要将它父组件的$store赋值给它即可
this.$store = this.$parent.$store;
}
}
});
}
class ModuleCollection {
constructor(rootModule){
this.register([], rootModule);
}
register(arr, rootModule){
// console.log(arr); // [] [home] [account] [account, login]
// 1.按照我们需要的格式创建模块
let module = {
_raw: rootModule,
_state: rootModule.state,
_children: {}
}
// 2.保存模块信息
if(arr.length === 0){
// 保存根模块
this.root = module;
}else{
// 保存子模块
// this.root._children[arr[arr.length-1]] = module;
// let testArr = ['account', 'login']; // 这种,login属于account模块的子模块
// let res = testArr.splice(0, testArr.length - 1);
// console.log(res);
// ['a', 'b', 'c'] -> ['a', 'b']
let parent = arr.splice(0, arr.length-1).reduce((root, currentKey)=>{
return root._children[currentKey];
}, this.root);
parent._children[arr[arr.length-1]] = module;
}
// 3.处理子模块
for(let childrenModuleName in rootModule.modules){
let childrenModule = rootModule.modules[childrenModuleName];
this.register(arr.concat(childrenModuleName) ,childrenModule)
}
}
}
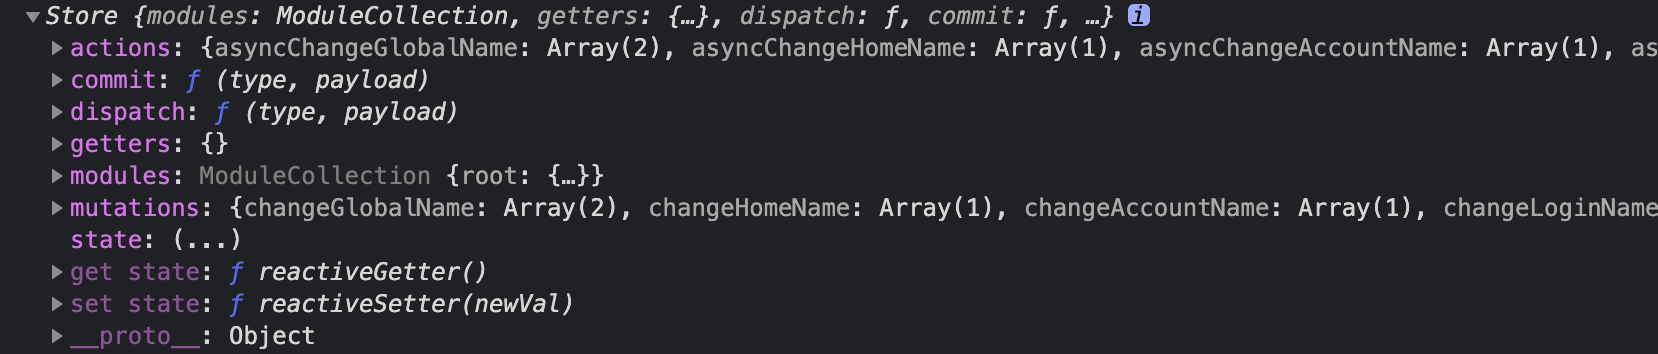
class Store {
constructor(options){
// this.options = options;
// 将创建Store时需要共享的数据添加到Store上面, 这样将来我们就能通过this.$store拿到这个Store, 就可以通过.state拿到需要共享的属性(install方法中已经给每个vue实例增加了$store属性并指向Store的实例对象)
// this.state = options.state; // 直接赋值,后面mutations中方法修改state中的值不会触发更新,所以需要对this.state实现双向绑定,vue中有个工具类方法
Vue.util.defineReactive(this, 'state', options.state);
// 最后一步安装模块,initGetters,initMutations,initActions方法都要安装,需要调整,放到initModules中
// 将传递进来的getters放到Store上
// this.initGetters(options);
// // 将传递进来的mutations放到Store上
// this.initMutations(options);
// // 将传递进来的actions放到Store上
// this.initActions(options);
// 提取模块信息
this.modules = new ModuleCollection(options); // modules格式需要同收集模块信息格式
// 安装子模块的数据
this.initModules([], this.modules.root);
}
initModules(arr, rootModule){
// console.log(arr); // [] [home] [account] [account, login]
// 如果当前是子模块, 那么就需要将数据安装到this.state上
if(arr.length > 0){
let parent = arr.splice(0, arr.length-1).reduce((state, currentKey)=>{
return state[currentKey];
}, this.state);
// 第一个参数:待添加属性的对象;第二个参数:要添加的属性;第三个参数:要添加的数据
Vue.set(parent, arr[arr.length-1], rootModule._state);
}
// 将传递进来的getters放到rootModule._raw上
this.initGetters(rootModule._raw);
// 将传递进来的mutations放到rootModule._raw上
this.initMutations(rootModule._raw);
// 将传递进来的actions放到rootModule._raw上
this.initActions(rootModule._raw);
// 如果当前不是子模块, 那么就需要从根模块中取出子模块的信息来安装
for(let childrenModuleName in rootModule._children){
let childrenModule = rootModule._children[childrenModuleName];
this.initModules(arr.concat(childrenModuleName), childrenModule);
}
}
dispatch = (type, payload)=>{ // 'asyncAddAge', 5
this.actions[type](payload); // this.actions[asyncAddAge](5);
}
initActions(options){
let actions = options.actions || {}; // 拿到传递进来的actions
this.actions = this.actions || {}; // 在Store上新增一个actions的属性
for(let key in actions){ // 将传递进来的actions中的方法添加到当前Store的actions上
// this.actions[key] = (payload)=>{ // 5 安装模块步骤,需要调整,放到数组中依次执行
// actions[key](this.state, payload); // asyncAddAge(this, 5);
// }
this.actions[key] = this.actions[key] || [];
this.actions[key].push((payload)=>{
actions[key](this, payload);
});
}
}
// commit需要是一个箭头函数,因为this.$store.dispatch('asyncAddAge', 5); 通过dispath触发actions方法,其中又触发mutations中的方法,为防止this改变,所以需要使用箭头函数,保证this是当前Store对象。
commit => (type, payload){ // commit才是在vue中调用mutations中方法的方式,eg: this.$store.commit('addNum', 10); type= 'addNum', payload=10
// console.log(this);
// this.mutations[type](payload); // this.mutations[addNum](10); 安装模块步骤修改
this.mutations[type].forEach(fn=>fn(payload));
}
initMutations(options){
let mutations = options.mutations || {}; // 拿到传递进来的mutations
this.mutations = this.mutations || {}; // 在Store上新增一个mutations的属性
for(let key in mutations){ // 将传递进来的mutations中的方法添加到当前Store的mutations上
// this.mutations[key] = (payload)=>{ // 10
// mutations[key](this.state, payload); // addNum(this.state, 10);
// }
this.mutations[key] = this.mutations[key] || [];
this.mutations[key].push((payload)=>{
mutations[key](options.state, payload);
});
}
}
initGetters(options){
// this.getters = options.getters; // 直接赋值getters方法拿不到this.store
let getters = options.getters || {}; // 拿到传递进来的getters
this.getters = this.getters || {}; // 在Store上新增一个getters的属性 // 安装模块需要调整
for(let key in getters){ // 将传递进来的getters中的方法添加到当前Store的getters上
Object.defineProperty(this.getters, key, {
get:()=>{
// return getters[key](this.state); // 当执行getters方法的时候就可以拿到这个this.state
return getters[key](options.state); // 安装步骤修改
}
})
}
}
}
export default {
install,
Store
}
// index.js
import Vue from 'vue'
import Vuex from './Nuex'
Vue.use(Vuex)
// 收集模块信息,增加几个模块
let home = {
state: { name: 'www' },
getters: {},
mutations: {},
actions: {}
}
let login = {
state: { name: 'com' },
getters: {},
mutations: {},
actions: {},
}
let account = {
state: { name: 'it666' },
getters: {},
mutations: {},
actions: {},
modules: {
login: login
}
}
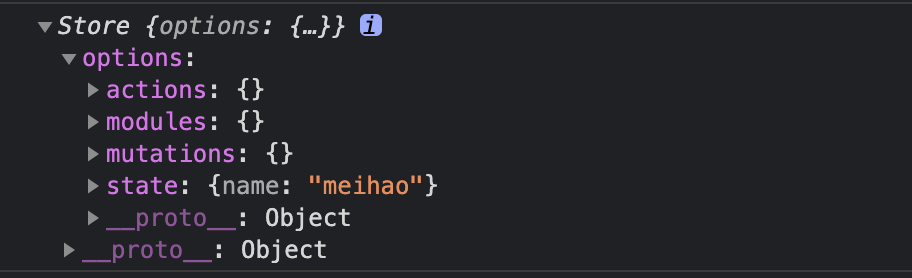
export default new Vuex.Store({
// 用于保存全局共享数据
state: { name: 'meihao' },
// 用于同步修改共享数据
mutations: {
addNum(state, payload){
state.num += payload;
},
addAge(state, payload){
state.age += payload;
}
},
// 用于异步修改共享数据
actions: {
asyncAddAge({commit}, payload){
commit('addAge', payload);
}
},
},
getters: {
myName(state){ // vue中可以通过this.$store.getters.myName访问
return state.name + '666';
}
},
// 用于模块化共享数据
modules: {
home:home,
account: account
}
})
// App.vue
this.$store.getters.myName
this.$store.commit('addNum', 10);
this.$store.dispatch('asyncAddAge', 5);
// main.js
import Vue from 'vue'
import App from './App.vue'
import store from './store'
new Vue({
  name: 'root',
  store,
  render: h => h(App)
}).$mount('#app')
// App.vue
import HelloWorld from './components/HelloWorld.vue'
export default {
  name: 'App',
  components: { HelloWorld },
  mounted() {
    console.log(this.$store);
  }
}
// 处理子模块
// 最终效果