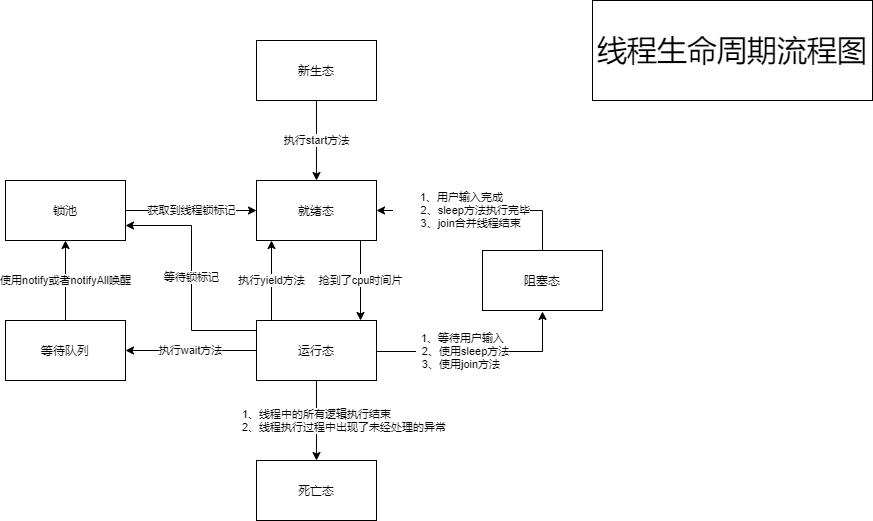
昨天,由于工作比较繁忙,只是简单整理了一下java的线程的生命周期的流程图,今天就根据这个流程图来一步一步的讲解java多线程的知识。
图再来一遍:

第一点、java线程新生态的生成
也就是线程新建成功
1、继承Thread类(为了方便添加线程名字,可以自定义构造方法),代码如下:
public class MyThread extends Thread{
        // 自己书写构造方法,两种方法都可
        public MyThread(String name){
            // super.setName(name);
               super(name);
        }
        @Override
        public void run() {
            System.out.println("This is a Thread!");
        }
    }
二、实现Runnable接口(现在大多都用函数式编程来实现,为了看的明白,咱两种都用)
// 一般方法
 Thread thread1 = new Thread(new Runnable() {
            @Override
            public void run() {
                System.out.println(Thread.currentThread().getName());
            }
        },"thread1");

// 函数式编程
Thread thread2 = new Thread(() ->System.out.println(Thread.currentThread().getName()),"thread2");
第二点、java由新生态转化为就绪态
实际就是start方法,start方法是开启一个新的线程,如果只调用run方法,还是在主线程执行run方法,不会开启新的线程,线程不会进入到就绪状态,所以start方法才是开启线程的方法,
run方法中存入的只是任务内容。代码如下:
Thread thread = new Thread(() ->System.out.println(Thread.currentThread().getName()),"thead");
// 线程的启动
thread.start();
第三点、就绪态到运行态
这一步的话,没有办法使用代码实现,因为呢,当线程执行start方法后,许多线程会去抢占cpu时间片,哪个线程抢占到了cpu时间片,哪个线程就进入到运行状态。
第四点、由运行态回到就绪态
回到就绪态,就需要线程主动放弃抢到的cpu时间片,也就是大家常说的线程的礼让
但是需要注意的是,礼让不代表将cpu时间片彻底让给其他线程,还可能在次抢占时又获取到cpu时间片(没办法,有时候都不知道自己折磨厉害)
代码如下:
public static void main(String[] args) {
    Runnable r = () -> {
        for (int i = 0; i < 10; i++){
            System.out.println(Thread.currentThread().getName() + " : " + i);
            if(i == 3){
                System.out.println(Thread.currentThread().getName() + " : " + i + "start use yield");
                // 线程开始礼让
                Thread.yield();
            }

        }
    };
    Thread t1 = new Thread(r,"thread1");
    Thread t2 = new Thread(r,"thread2");
    // 启动线程
    t1.start();
    t2.start();
}
第五点、由运行态到阻塞态
故名思意就是阻塞了,线程暂停了,主要导致线程暂停的方法由:等待用户输入、使用sleep方法、使用jion方法
一、用户输入就不多说了无非是:
Thread thread = new Thread(() -> {
    Scanner scanner = new Scanner(System.in);
    int number = scanner.nextInt();
}, "thread1");
thread.start();
二、使用sleep方法(睡眠)代码如下:
 public static void main(String[] args) {
        Thread thread = new Thread(() -> {
            for (int i = 0;i < 10;i++){
                System.out.println(Thread.currentThread().getName()+" : "+i);
                try {
                    // 没执行一次睡眠1s
                    Thread.sleep(1000);
                } catch (InterruptedException e) {
                    e.printStackTrace();
                }
            }
        },"thread1");
        thread.start();
    }
三、使用join方法
Thread类中的join方法的主要作用就是同步,使得线程之间的并行执行变为串行执行,切记join在start前面执行无效,不多说
 public static void main(String[] args) {
        // 创建两个线程
        Thread thread1 = new Thread(() -> {
            for(int i = 0;i < 10;i++){
            System.out.println(Thread.currentThread().getName()+" : "+i);
            }
        },"thread1");

        Thread thread2 = new Thread(() -> {
            for(int i = 0;i < 10;i++){
                System.out.println(Thread.currentThread().getName()+" : "+i);
            }
        },"thread2");
        thread1.start();
        // 使用线程同步方法
        try {
            thread1.join();
        } catch (InterruptedException e) {
            e.printStackTrace();
        }
        thread2.start();
        System.out.println("This is main Thread!");
    }
执行多次后结果如下:
thread1 : 0
thread1 : 1
thread1 : 2
thread1 : 3
thread1 : 4
thread1 : 5
thread1 : 6
thread1 : 7
thread1 : 8
thread1 : 9
This is main Thread!
thread2 : 0
thread2 : 1
thread2 : 2
thread2 : 3
thread2 : 4
thread2 : 5
thread2 : 6
thread2 : 7
thread2 : 8
thread2 : 9
呦呵,thread1厉害了,比主线程优先执行完,还没有thread2与其抢占线程。
揪其原因如下: 程序在main线程中调用thread1线程的join方法,则main线程放弃cpu控制权,并返回thread线程继续执行直到线程t1执行完毕,
所以是thread1执行完后,主线程才执行,其实就是主线程中同步了thread1线程,执行join方法后,主线程阻塞,等thread1执行完必后,主线程继续执行
第六点、阻塞态回到就绪态
话不多说了,就是用户输入完必,sleep方法执行完毕、join方法执行完毕
第七点、由运行态到锁池
首先,涉及到的内容为锁,那么什么条件可以用到锁呢,都有哪些锁呢
一、为什么用到了锁
来,先看一个小问题,实现一个购票系统,4个购票员进行购票,代码如下:
 // 定义售票箱的类
    static class Ticket{
        public static int number = 10;
    }
    // 定义四个售票员
    // 使用四个线程进行模拟
    public static void main(String[] args) {
        Runnable r = () -> {
            while(Ticket.number > 0){
                System.out.println(Thread.currentThread().getName()+"start sell one ticket......"+"The remaining quantity of tickets is:"+ --Ticket.number);
            }
        };
        Thread t1 = new Thread(r,"thread - 1");
        Thread t2 = new Thread(r,"thread - 2");
        Thread t3 = new Thread(r,"thread - 3");
        Thread t4 = new Thread(r,"thread - 4");
        t1.start();
        t2.start();
        t3.start();
        t4.start();
来,查看部分结果:
thread - 1 start sell one ticket......The remaining quantity of tickets is:3
thread - 1 start sell one ticket......The remaining quantity of tickets is:2
thread - 1 start sell one ticket......The remaining quantity of tickets is:1
thread - 1 start sell one ticket......The remaining quantity of tickets is:0
thread - 4 start sell one ticket......The remaining quantity of tickets is:40
thread - 3 start sell one ticket......The remaining quantity of tickets is:41
??神魔鬼
原来都是资源共享惹的祸,这几个线程共享这个资源,造成了线程不安全
怎么整?
让他们排队用这个资源就好了呀,一个线程操作这个资源时,锁住资源,不让其他线程动即可,这也就有了锁
二、有哪些锁
1、同步代码段
话不多说直接上代码:
  // 定义售票箱的类
    static class Ticket{
        public static int number = 10;
    }
    // 定义四个售票员
    // 使用四个线程进行模拟
    public static void main(String[] args) {
        Runnable r = () -> {
            while(Ticket.number > 0){
                // 对象锁 "" 任意写都行
                // 类锁
                // 此锁对于所有人需要都相同
                synchronized (""){
                    if (Ticket.number <= 0){
                        return;
                    }
                System.out.println(Thread.currentThread().getName()+"start sell one ticket......  "+"The remaining quantity of tickets is:"+ --Ticket.number);
            }
            }
        };
        Thread t1 = new Thread(r,"thread - 1");
        Thread t2 = new Thread(r,"thread - 2");
        Thread t3 = new Thread(r,"thread - 3");
        Thread t4 = new Thread(r,"thread - 4");
        t1.start();
        t2.start();
        t3.start();
        t4.start();
    }
2、同步方法
话不多说直接上代码:
 // 定义售票箱的类
    static class Ticket{
        public static int number = 10;
    }
    // 定义四个售票员
    // 使用四个线程进行模拟
    public static void main(String[] args) {
        Runnable r = () -> {
            while(SourceConflict.Ticket.number > 0){
                sellTicket();
            }
        };
        Thread t1 = new Thread(r,"thread - 1");
        Thread t2 = new Thread(r,"thread - 2");
        Thread t3 = new Thread(r,"thread - 3");
        Thread t4 = new Thread(r,"thread - 4");
        t1.start();
        t2.start();
        t3.start();
        t4.start();
    }

    /**
     * 同步方法如果为静态方法,锁位类锁,如果不是静态方法,则对应的是this
     */
    public synchronized static void sellTicket(){
        if(Ticket.number <= 0){
            return;
        }
        System.out.println(Thread.currentThread().getName()+"start sell one ticket......"+"The remaining quantity of tickets is:"+ --SourceConflict.Ticket.number);
    }
3、显示锁
话不多说直接上代码:
  // 定义售票箱的类
    static class Ticket{
        public static int number = 10;
    }
    // 定义四个售票员
    // 使用四个线程进行模拟
    public static void main(String[] args) {
        ReentrantLock lock = new ReentrantLock();
        Runnable r = () -> {
            while(Ticket.number > 0){
                lock.lock();
                if(Ticket.number <= 0){
                    return;
                }
                System.out.println(Thread.currentThread().getName()+"start sell one ticket......"+"The remaining quantity of tickets is:"+ --Ticket.number);
                lock.unlock();
            }
        };
        Thread t1 = new Thread(r,"thread - 1");
        Thread t2 = new Thread(r,"thread - 2");
        Thread t3 = new Thread(r,"thread - 3");
        Thread t4 = new Thread(r,"thread - 4");
        t1.start();
        t2.start();
        t3.start();
        t4.start();
    }
三、所以由运行态怎样到锁池呢
当某一代码段或者方法被锁住后,其他线程等待锁标记,无法访问就会进入锁池
四、补充
提到锁,不得不说的就是死锁
来先来个代码,瞅一瞅:
 public static void main(String[] args) {
        Runnable runnable1 = () -> {
          synchronized ("a"){
              System.out.println("Thread1 gets lock named a");
              synchronized ("b"){
                  System.out.println("Thread1 gets locks named a and b");
              }
          }
        };
        Runnable runnable2 = () -> {
            synchronized ("b"){
                System.out.println("Thread2 gets lock named b");
                    synchronized ("a"){
                        System.out.println("Thread2 gets lock named a and b");
                    }
            }
        };
        Thread t1 = new Thread(runnable1);
        Thread t2 = new Thread(runnable2);
        t1.start();
        t2.start();
    }
这个就会锁到死,完全符合死锁的定义:死锁:多个线程彼此持有对方所需要的锁对象,而不释放自己的锁
runnable1占着a锁标记等b,rannable2占着b锁标记等a,等到死,也不释放,就产生了死锁
怎么解决呢,这时候就引出下一个内容,使用wait方法进入等待对列,之后通过唤醒进入锁池
第八点、使用wait方法进入等待对列,之后通过唤醒进入锁池
一、通过wait方法进入锁池以及唤醒
为了解决上个死锁问题,我们采用让其中一个线程,拿到一个锁标记,执行完必后,释放掉锁标记,进入等待对列,等其他线程执行完必后,唤醒此线程即可。
代码如下:
 public static void main(String[] args) {
        Runnable runnable1 = () -> {
            synchronized ("a"){
                System.out.println("Thread1 gets lock named a");
                try {
                    "a".wait();
                } catch (InterruptedException e) {
                    e.printStackTrace();
                }
                synchronized ("b"){
                    System.out.println("Thread1 gets locks named a and b");
                }
            }
        };
        Runnable runnable2 = () -> {
            synchronized ("b"){
                System.out.println("Thread2 gets lock named b");
                synchronized ("a"){
                    System.out.println("Thread2 gets lock named a and b");
                    "a".notifyAll();
                }
            }
        };
        Thread t1 = new Thread(runnable1);
        Thread t2 = new Thread(runnable2);
        t1.start();
        t2.start();
    }
二、唤醒方法notifyAll和notify区别
notify:通知,是Object中的一个方法,唤醒等待队列中的一个线程,使这个线程进入锁池
notifyAll: 通知,是Object中得一个方法,唤醒等待队列中得所有线程,使这些线程全部进入锁池
第九点、锁池到就绪态
锁池中的线程,拿到锁标记回到就绪态,也就是占有锁标记的线程将锁标记释放
第十点、死亡态
一、线程中的所有逻辑执行结束
二、线程执行过程中出现了未经处理的异常
好了,不得不说,java多线程真是让人tddl,今天就先写这些,之后会补上java线程池的内容,本人小白一个,欢迎业界大佬批评指教!