一、前言
分层开发的思想在计算机领域中至关重要,从操作系统到软件设计,分层思想无处不在。
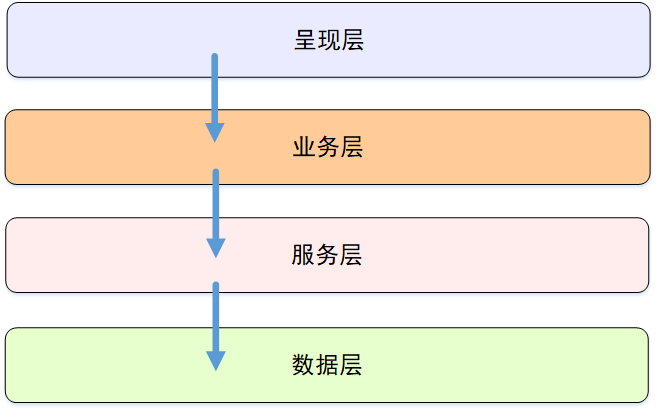
在搭建项目的分层结构前,先简单了解下分层的优缺点。如下图,分为(呈现层、业务层、服务层、数据层)
分层的优点:
1、层次分明,各司其职:每层都有各自的责任,各层级相互独立,上层不需要知道下层的内部实现,上层的改动不会影响下一层。
2、易于开发,便于调试:分层结构使得开发人员可以专注于谋一层进行开发,进行调试时,可以针对每一层进行单独调试。
3、促进标准,移植复用:可替换任意一层,如当前数据层读数据库,可替换为读文件数据,取网络数据。亦可移植到其他项目。
4、。。。。。。
分层的缺点:
1、降低性能:一个简单的数据呈现,需逐层返回且中间的数据转换等都耗费时间。
2、级联修改:在呈现层中增加一个功能,为保证其设计符合分层式结构,可能需要在相应的业务逻辑层和数据访问层中都增加相应的代码。
3、。。。。。。
二、WebAPI项目分层
简单了解了分层优缺点后,创建项目的分层结构
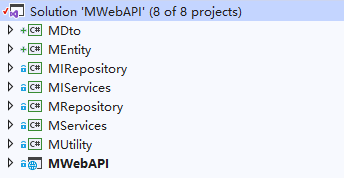
此处注意,这里为了规范项目名称,重新建了个Web API项目命名为MWebAPI(上篇文章项目名称为mweb-api)
各项目职责如下:
Action:用来分发来自客户端(PC、移动设备、浏览器)的请求;
Services:进行具体的业务处理;
IServices:Services的抽象;
Repository:先假想为数据访问层(实际上和数据访问层区别较大);
IRepository:Repository的抽象;
Entity:数据实体映射,通常从数据库映射而来;
Dto:数据传输对象,一般和前端页面相对应;
Utility:通用工具层,提供公用帮助类;
明确了各层的职责,下面创建一个简单的业务来贯穿各层。以获取用户信息为例
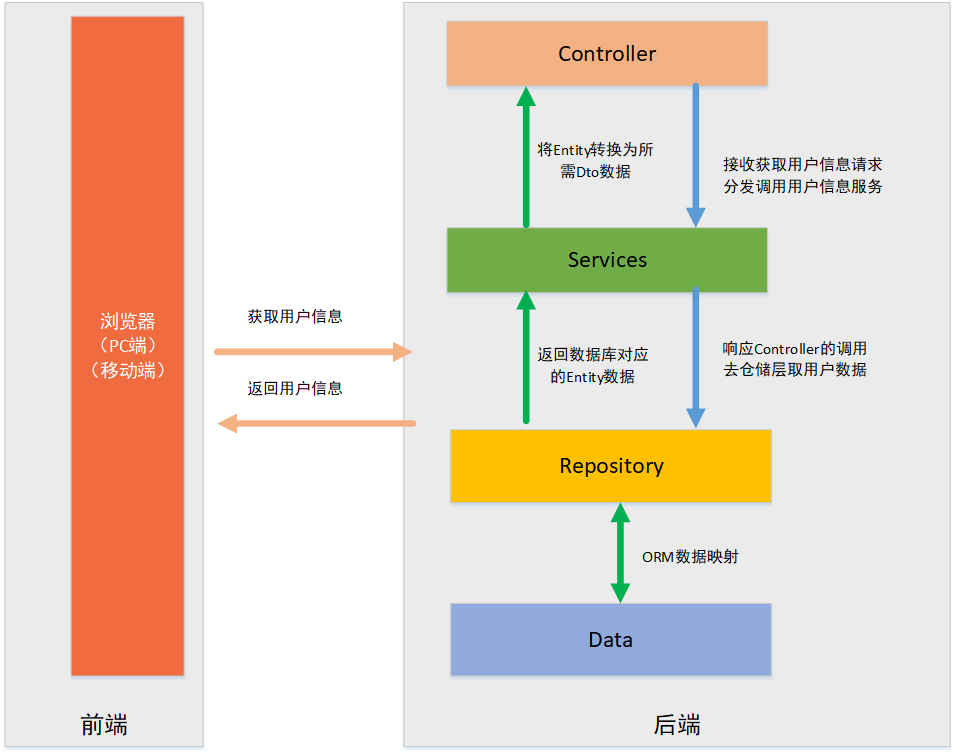
三、获取用户信息流程
四、用户信息各层实现
1、创建UserInfo实体类
在MEntity项目中新建 UserInfo实体类
public class UserInfo
{
    public string UserName { get; set; }
    public int Age { get; set; }
    public string Address { get; set; }
}
2、创建UserInfoDto传输对象
在MDto项目中新建 UserInfoDto
public class UserInfoDto
{
    public string UserName { get; set; }
    public int Age { get; set; }
    public string Address { get; set; }
}
问题:Dto有什么意义?
初略理解:在项目的初期,数据表字段与Controller返回的字段往往是一致的,如同上面的获取用户信息业务。此情形下,Dto无意义。
但当数据表中还有Password,TelPhone等信息但前端并不需要时,此时Dto只返回所需,避免传输整张表,一定程度上提高了项目的安全性。
3、创建仓储接口与仓储实现类
在MIRepository项目中新建IUserInfoRepository
public interface IUserInfoRepository
{
    UserInfo GetUserInfo();
}
在MRepository项目中新建UserInfoRepository,目前项目并未连接数据库,故直接返回个实体类对象
public class UserInfoRepository : IUserInfoRepository
{
    public UserInfo GetUserInfo()
    {
        return new UserInfo()
        {
            UserName = "王二麻子",
            Age = 20,
            Address = "那美克星",
        };
    }
}
4、创建服务接口与服务实现类
在MIServices项目中新建IUserInfoServices
public interface IUserInfoServices
{
    UserInfoDto GetUserInfo();
}
在MIServices项目中新建UserInfoServices
public class UserInfoServices : IUserInfoServices
{
    readonly IUserInfoRepository _rep = new UserInfoRepository();
    public UserInfoDto GetUserInfo()
    {
        var entity = _rep.GetUserInfo();
        UserInfoDto dto = new UserInfoDto { UserName = entity.UserName, Age = entity.Age, Address = entity.Address };
        return dto;
    }
}
5、创建Controller
在MWebAPI项目中新建UserInfoController
[ApiController]
[Route("[controller]/[action]")]
public class UserInfoController : Controller
{
    private readonly IUserInfoServices _services = new UserInfoServices();
    [HttpGet]
    public UserInfoDto GetUserInfo()
    {
        return _services.GetUserInfo();
    }
}
启动项目,浏览器输入:http://localhost:5000/UserInfo/GetUserInfo,数据返回成功。

五、服务注入
此时项目中UserInfoController的 _services 是new出来的,UserInfoServices 的_rep也是如此,目前比较流行的是使用依赖注入的方式去注入服务,下面我们改写Services及Controller,如下:
public class UserInfoServices : IUserInfoServices
{
    private readonly IUserInfoRepository _rep;
    public UserInfoServices(IUserInfoRepository rep)
    {
        _rep = rep;
    }
    public UserInfoDto GetUserInfo()
    {
        var entity = _rep.GetUserInfo();
        UserInfoDto dto = new UserInfoDto { UserName = entity.UserName, Age = entity.Age, Address = entity.Address };
        return dto;
    }
}
public class UserInfoController : Controller
{
    private readonly IUserInfoServices _services;
    public UserInfoController(IUserInfoServices services)
    {
        _services = services;
    }

    [HttpGet]
    public UserInfoDto GetUserInfo()
    {
        return _services.GetUserInfo();
    }
}
启动项目,浏览器输入:http://localhost:5000/UserInfo/GetUserInfo。
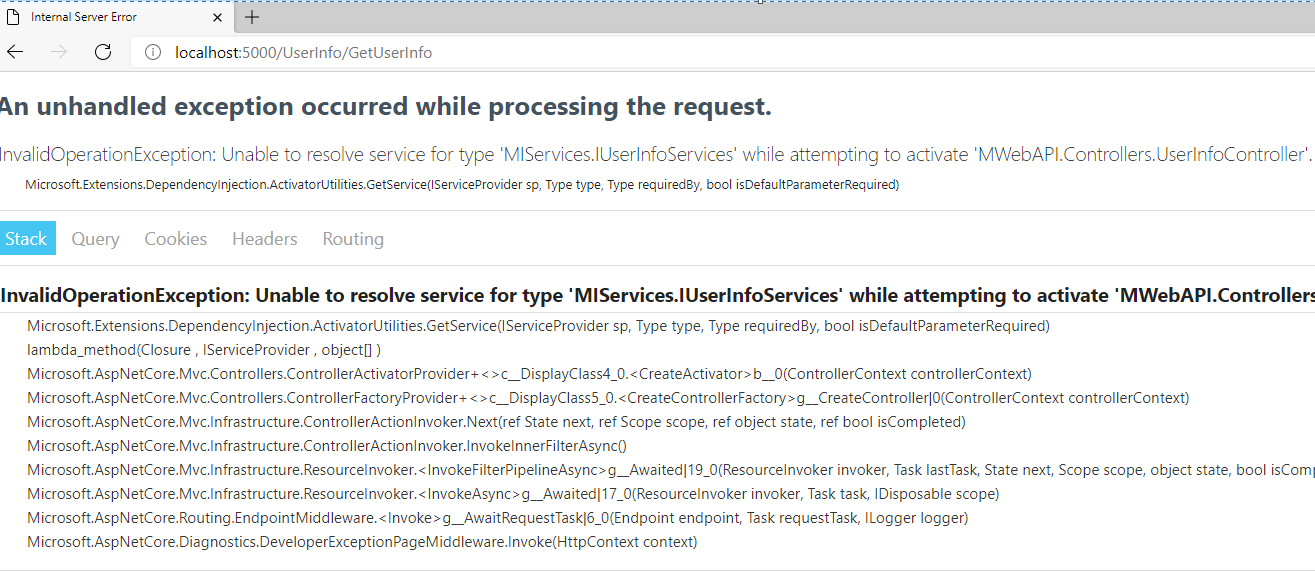
此时是因为未注入服务,在Startup类ConfigureServices方法中注入服务
public void ConfigureServices(IServiceCollection services)
{
  services.AddControllers();
  services.AddScoped<IUserInfoRepository, UserInfoRepository>();
  services.AddScoped<IUserInfoServices, UserInfoServices>();
}
再次运行

六、结语
本篇文章中涉及了两个概念仓储模式与依赖注入(.Net Core 3.1浏览器后端服务(四) 你眼中的依赖注入与我相同吗?),目前并未深入的研究,将在后续的文章中挖掘。
Services和Repository均定义了相应的接口,一个好处是便于服务注入。这样做还有哪些好处?欢迎各位道友一起讨论!!!