在学习react的时候,经常用create-react-app来创建web应用,然而写到后面总有连自己服务器和数据库的需求,create-react-app创建的是一个webpack-dev-server,主要用来进行webpack的编译和热加载(HMR),所以想要把这两个东西融合,就是既能监听修改实现热加载,然后用的又是自己的express服务器。网上有两种解决方案:1.设置代理,同时启动express和webpack-dev-server,然后将webpack-dev-server代理到过来。2.利用webpack-hot-middleware和webpack-dev-middleware这两个插件处理编译和热加载。
在这里我选择第二种,因为觉得既然webpack-dev-server本身就是个express服务器,为什么不能把编译和HMR的功能直接用到express上呢。
但是参照https://github.com/webpack-contrib/webpack-hot-middleware/blob/master/example/server.js出现了问题。
var http = require('http');

var express = require('express');

require('console-stamp')(console, "HH:MM:ss.l");

var app = express();

app.use(require('morgan')('short'));

// ************************************
// This is the real meat of the example
// ************************************
(function() {

  // Step 1: Create & configure a webpack compiler
  var webpack = require('webpack');
  var webpackConfig = require(process.env.WEBPACK_CONFIG ? process.env.WEBPACK_CONFIG : './webpack.config');//我这里改成了create-react-app中的webpack.config.dev(需要npm run eject看到)
  var compiler = webpack(webpackConfig);

  // Step 2: Attach the dev middleware to the compiler & the server
  app.use(require("webpack-dev-middleware")(compiler, {
    logLevel: 'warn', publicPath: webpackConfig.output.publicPath
  }));

  // Step 3: Attach the hot middleware to the compiler & the server
  app.use(require("webpack-hot-middleware")(compiler, {
    log: console.log, path: '/__webpack_hmr', heartbeat: 10 * 1000
  }));
})();

// Do anything you like with the rest of your express application.

app.get("/", function(req, res) {
  res.sendFile(__dirname + '/index.html');
});
app.get("/multientry", function(req, res) {
  res.sendFile(__dirname + '/index-multientry.html');
});

if (require.main === module) {
  var server = http.createServer(app);
  server.listen(process.env.PORT || 1616, function() {
    console.log("Listening on %j", server.address());
  });
简单的把config文件替换成webpack.config.dev并不奏效,发现修改js文件时,确实会重新编译但是网页不会刷新,也就是HMR失败
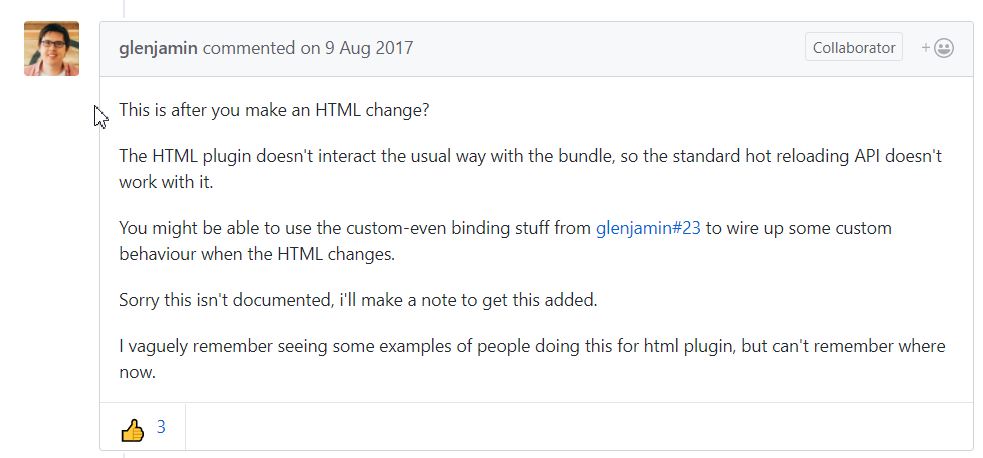
看了webpack-hot-middleware的issue之后找到了问题

通过作者的回答可以看出,html的插件和热加载的api是不兼容的,而create-react-app中的config中用了html-webpack-plugin这个插件,所以要用别的方法来解决这个问题。
在issue里也找到了答案,原理就是用node的chokidar模块来监听index.html的改变,然后主动发送一个reload请求给浏览器,让它刷新
demo地址:https://github.com/thesimpledesigners/webpack-hot-reload-client
首先给webpackHotMiddlewareClient添加监听事件,其中subscribe方法是注册监听事件,之后会用public方法来发布信息,就是js中的观察者模式。payload.action === 'reload'时刷新浏览器
// client.js
(function() {
    'use strict';
    const webpackHotMiddlewareClient = require('webpack-hot-middleware/client?reload=true');

    webpackHotMiddlewareClient.subscribe(function(payload) {
        if (payload.action === 'reload' || payload.reload === true) {
            window.location.reload();
        }
    });

    module.exports = webpackHotMiddlewareClient;
}());
然后利用chokidar来监听index.html文件,使得其一修改就能让服务器发送一个reload请求
//./devScripts/hotReloader.js
(function() {
  'use strict';
  const path = require('path');
  const chokidar = require('chokidar');

  function activate(server) {
    /**
     * Here, we use Chokidar to force page reloading for some other file types
     * like html changes or php if you want
     */
    const watcher = chokidar.watch([
        path.resolve(__dirname, '../index.html'),// index.html is on the root folder
    ]);
    watcher.on('ready', function() {
        console.log('Initial scan complete. Ready for changes');
    });
    watcher.on('change', function(path) {
        console.log('File [' + path + '] changed !');
        // reload the client on file changes
        server.reloadClient();//这个方法要在服务器实现,就是public一个消息给hotMiddleware
}); } // here we export an activate function to activate the watcher module.exports = { activate: activate, }; }());
服务器代码:
const path = require('path');
// import express
const express = require('express');

// import webpack and the dev & hot middlewares
const webpack = require('webpack');
const webpackDevMiddleware = require('webpack-dev-middleware');
const webpackHotMiddleware = require('webpack-hot-middleware');

function createServer() {
  // Step 1: create the express instance
  const app = express();

  // Step 2: Create & configure a webpack compiler
  const webpackConf = require('../webpack.config.dev.js');
  const webpackCompiller = webpack(webpackConf);

  const hotMiddleware = webpackHotMiddleware(webpackCompiller);
  const devMiddleWare = webpackDevMiddleware(
    webpackCompiller,
    {
      publicPath: webpackConf.output.publicPath,
   });

  // Step 3: Attach the dev middleware and hot middleware to the server
  app.use(devMiddleWare);
  app.use(hotMiddleware);

  function startServer() {
    app.listen(3000, function(err) {
      if (err) {
        console.error(err);
        return;
      }
      // log server running
      console.log('Listening at http://localhost:3000/');
    });
  }// end function start server

  /**
   *
   */
  function reloadClient() {
    hotMiddleware.publish({action: 'reload'});
  }// end function RelaodClient

  return {
    start: startServer,
    reloadClient: reloadClient,
  };
}
module.exports = createServer();
华丽的分割线--------------------------------------------------------------------------------------------------------------------------------------------------------------------------------------------------------------------------------------------------------------------------------------------------------------------------
总之,你如果想在express中用HMR,并且用create-react-app中webpack.config.dev的配置,只要两步:1.将服务器代码改成下方的app.js这样,2.修改webpack.config.dev中entry的配置
1:我将上面代码精炼了一下,贴一下我的服务端代码app.js
var http = require('http');
var path = require('path');
var session = require('express-session') ;
var express = require('express');
const chokidar = require('chokidar');
const webpack = require('webpack');
const webpackDevMiddleware = require('webpack-dev-middleware');
const webpackHotMiddleware = require('webpack-hot-middleware');
const app = express();


app.use(require('morgan')('short'));

'use strict';

// Do this as the first thing so that any code reading it knows the right env.
process.env.BABEL_ENV = 'development';
process.env.NODE_ENV = 'development';


const webpackConf = require('./config/webpack.config.dev.js');
const webpackCompiller = webpack(webpackConf);

const hotMiddleware = webpackHotMiddleware(webpackCompiller);
const devMiddleWare = webpackDevMiddleware(
    webpackCompiller,
    {
        publicPath: webpackConf.output.publicPath,
    });

// Step 3: Attach the dev middleware and hot middleware to the server
app.use(devMiddleWare);
app.use(hotMiddleware);

app.active = ()=>{
    const watcher = chokidar.watch([
        path.resolve(__dirname, '/public/index.html'),// index.html is on the root folder
    ]);
    watcher.on('ready', function() {
        console.log('Initial scan complete. Ready for changes');
    });
    watcher.on('change', function(path) {
        console.log('File [' + path + '] changed !');
        // reload the client on file changes
        hotMiddleware.publish({action: 'reload'});
    });
}

app.active()


// Do anything you like with the rest of your express application.

app.set('views', path.join(__dirname, 'views'));
app.set('view engine', 'ejs');

app.use(express.static(path.join(__dirname, 'public')));

app.get("/", function(req, res) {
    res.sendFile(__dirname + '/public/index.html');
});

app.listen(3000, function(err) {
    if (err) {
        console.error(err);
        return;
    }
    // log server running
    console.log('Listening at http://localhost:3000/');
});
2:然后在webpack.config.dev的entry中这样修改
    //require.resolve('react-dev-utils/webpackHotDevClient'),
    'webpack-hot-middleware/client?path=/__webpack_hmr&timeout=20000&reload=true',
就是把原来它自己写的webpackHotDevClient注释掉,加上后面那句话。
我的demo:https://github.com/jokermask/HMRwithExpress
至此大工告成!