最近需要使用浏览器模拟访问页面,同时需要使用不同的ip访问,这个时候就考虑到在使用浏览器的同时加上ip代理。
本篇工作环境为win10,python3.6.
Chorme
使用Chrome浏览器模拟访问,代码如下
import time
from selenium import webdriver

url = "https://www.cnblogs.com/"
driver = webdriver.Chrome("D:/tools/wedriver/chromedriver.exe")
driver.get(url)
time.sleep(2)
print(driver.title)
driver.close()
“D:/tools/wedriver/chromedriver.exe” 是下载的谷歌浏览器驱动,下载地址http://npm.taobao.org/mirrors/chromedriver/
chorme使用ip代理比较简单,使用如下代码即可
import time
from selenium import webdriver

url = "https://www.baidu.com/s?wd=ip"
proxy = "118.190.217.182:80"
chromeOptions = webdriver.ChromeOptions()  # 设置代理
chromeOptions.add_argument("--proxy-server=http://%s" % proxy)
driver = webdriver.Chrome("D:/tools/wedriver/chromedriver.exe", chrome_options=chromeOptions)
driver.get(url)
time.sleep(2)
print(driver.title)
driver.close()
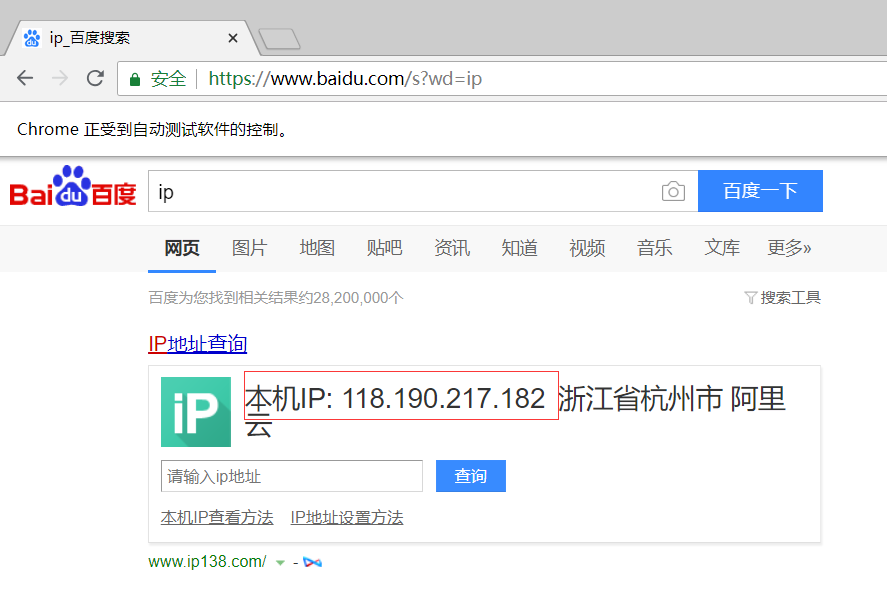
得到的效果如下图:

可以见到百度查询到的本机ip已经改变。Chrome的这种代理方式中,访问使用http、https的网站都代理了。
Firefox
使用Firefox访问网页,代码如下:
import time
from selenium import webdriver


url = "https://www.cnblogs.com/"
driver = webdriver.Firefox()
driver.get(url)
time.sleep(2)
print(driver.title)
driver.close()
直接这样运行会遇到以下错误:
selenium.common.exceptions.WebDriverException: Message: 'geckodriver' executable needs to be in PATH.
需要装geckodriver,下载地址https://github.com/mozilla/geckodriver/releases。使用方式为,将对应版本geckodriver.exe放到python.exe的同目录下。
装好之后再次运行即可访问网站。
Firefox的ip代理较为麻烦,需要设置一些参数,具体如下
import time
from selenium import webdriver


url = "https://www.baidu.com/s?wd=ip"
proxy = "118.190.217.182:80"
ip, port = proxy.split(':')
profile = webdriver.FirefoxProfile()
profile.set_preference('network.proxy.type', 1)
profile.set_preference('network.proxy.http', ip)    # 设置http代理
profile.set_preference('network.proxy.http_port', int(port))  # 注意端口一定要使用数字而非字符串
profile.set_preference('network.proxy.ssl', ip)     # 设置https代理
profile.set_preference('network.proxy.ssl_port', int(port))
profile.update_preferences()
driver = webdriver.Firefox(profile)
driver.get(url)
time.sleep(2)
print(driver.title)
driver.close()
这里有两个注意点:
1.当需要访问的网站为https时,一定要设置network.proxy.ssl参数才行
2.协议的端口号一定要是整数,不能直接使用字符串,如果拿到的是字符串就使用int转一下;我之前就是使用了字符串,一直代理不生效,以为哪里出了问题,磨了半天。。。
运行以上代码之后,得到的页面和上一张图相同,这里不再贴图。
整体代码如下:

# encoding=utf-8
# date: 2018/9/14
__Author__ = "Masako"

import time
from selenium import webdriver


def visit_web(url, proxy):
    # chrome
    # chromeOptions = webdriver.ChromeOptions() # 设置代理
    # chromeOptions.add_argument("--proxy-server=http://%s" % proxy)
    # driver = webdriver.Chrome("D:/tools/wedriver/chromedriver.exe", chrome_options=chromeOptions)

    # firefox
    ip, port = proxy.split(':')
    profile = webdriver.FirefoxProfile()
    profile.set_preference('network.proxy.type', 1)
    profile.set_preference('network.proxy.http', ip)
    profile.set_preference('network.proxy.http_port', int(port))  # 注意端口一定要使用数字而非字符串
    profile.set_preference('network.proxy.ssl', ip)
    profile.set_preference('network.proxy.ssl_port', int(port))
    profile.set_preference("network.proxy.share_proxy_settings", True)
    profile.update_preferences()
    driver = webdriver.Firefox(profile)

    driver.get(url)
    time.sleep(2)
    print(driver.title)
    driver.delete_all_cookies()  # 清除cookies
    driver.close()
    driver.quit()


if __name__ == "__main__":
    url = "https://www.baidu.com/s?wd=ip"
    proxy = "118.190.217.182:80"
    visit_web(url, proxy)
