1、视图概述
由于 Spring Boot 建议使用 jar 的方式发布 web 程序。所以不建议使用 jsp 视图,也不对 jsp 视图做默认的支持。
如果确定要使用 JSP 视图发布 Spring Boot 的应用,那么需要使用 war 的方式发布。
Spring Boot 默认自动配置支持视图时以下的模板引擎:
① Thymeleaf
② FreeMarker
③ Groovy
④ Mustache
2、FreeMarker 模板引擎的配置
配置流程:
① 在 pom.xml 导入 FreeMarker 模板引擎依赖的包
1 <!-- freemarker支持包 -->
2 <dependency>
3     <groupId>org.springframework.boot</groupId>
4     <artifactId>spring-boot-starter-freemarker</artifactId>
5 </dependency>
6
7
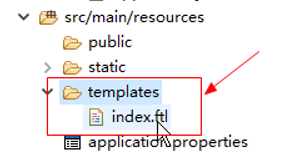
② Spring Boot 的模板引擎的默认路径是 resources/templates,所以在 resources 下创建一个 templates 文件夹。将视图页面放在里面

③ 这样 Spring Boot 就可以支持返回 freemarker 的 ftl 视图了。
 1 @RequestMapping(value="/index")
 2 public String index(Model model,HttpSession session){
 3     System.out.println("-测试插入数据-");
 4     Map<String, Object> entity=new HashMap<String, Object>();
 5     //插入数据
 6     entity.put("sname", "test3");
 7     studentService.insert(entity);
 8        //返回index就会跳到index.ftl
 9     return "index";
10 }
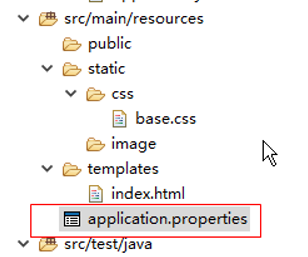
④ 根据需要可以在 resources 的 application.properties 配置文件,修改 freemarker 视图的默认属性。

例如:
在 application.properties 配置文件增加以下配置
#setting freemarker encoding
spring.freemarker.charset=UTF-8
注意事项:
注意 Freeamarker 的自动配置的属性类为:spring-boot-autoconfigure-1.5.4.RELEASE.jar 包的 org.springframework.boot.autoconfigure.freemarker.FreeMarkerProperties类
freemarker 视图的默认属性配置在里面:
 1 package org.springframework.boot.autoconfigure.freemarker;
 2
 3 import java.util.HashMap;
 4 import java.util.Map;
 5
 6 import org.springframework.boot.autoconfigure.template.AbstractTemplateViewResolverProperties;
 7 import org.springframework.boot.context.properties.ConfigurationProperties;
 8 @ConfigurationProperties(prefix = "spring.freemarker")
 9 public class FreeMarkerProperties extends AbstractTemplateViewResolverProperties {
10     //默认的视图的存放路径
11     public static final String DEFAULT_TEMPLATE_LOADER_PATH = "classpath:/templates/";
12     //默认的前缀
13     public static final String DEFAULT_PREFIX = "";
14     //默认的后缀
15     public static final String DEFAULT_SUFFIX = ".ftl";
16     private Map<String, String> settings = new HashMap<String, String>();
17     private String[] templateLoaderPath = new String[] { DEFAULT_TEMPLATE_LOADER_PATH };
18     private boolean preferFileSystemAccess = true;
19
20     public FreeMarkerProperties() {
21         super(DEFAULT_PREFIX, DEFAULT_SUFFIX);
22     }
23
24     public Map<String, String> getSettings() {
25         return this.settings;
26     }
27
28     public void setSettings(Map<String, String> settings) {
29         this.settings = settings;
30     }
31
32     public String[] getTemplateLoaderPath() {
33         return this.templateLoaderPath;
34     }
35
36     public boolean isPreferFileSystemAccess() {
37         return this.preferFileSystemAccess;
38     }
39
40     public void setPreferFileSystemAccess(boolean preferFileSystemAccess) {
41         this.preferFileSystemAccess = preferFileSystemAccess;
42     }
43
44     public void setTemplateLoaderPath(String... templateLoaderPaths) {
45         this.templateLoaderPath = templateLoaderPaths;
46     }
47
48 }
查看 Spring Boot 内置的 FreeMarkerProperties 类的属性,发现 application.properties 里面可以设置的属性竟然比 FreeMarkerProperties 定义的属性多,为什么呢?
答:因为 Spring Boot 直接引用了 FreeMarker 框架原来内部定义的属性,只是在前面加一个前缀。所以导致有一些没有默认值的属性不在 FreeMarkerProperties 类里面。
3、Thymeleaf 模板引擎的配置
配置流程
① 导入 Thymeleaf 的支持包
1 <!-- thymeleaf支持包 -->
2 <dependency>
3     <groupId>org.springframework.boot</groupId>
4     <artifactId>spring-boot-starter-thymeleaf</artifactId>
5 </dependency>
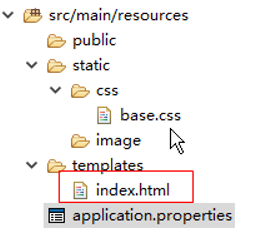
② Spring Boot的Thymeleaf模板引擎的默认路径是resources/templates,所以在resources下创建一个templates文件夹。将视图页面放在里面

内容为:
 1 <!DOCTYPE HTML>
 2 <!-- 注意Thymeleaf模板引擎一定要引入xmlns:th="http://www.thymeleaf.org"命名空间 -->
 3 <html xmlns:th="http://www.thymeleaf.org">
 4 <head>
 5     <title>hello</title>
 6     <meta http-equiv="Content-Type" content="text/html; charset=UTF-8" />
 7 </head>
 8 <body>
 9 <!-- ${name}用于获得Controller返回的Request的取值范围的值,${}一定要在th:开头的标签里才有效 -->
10 <p th:text="'Hello!, ' + ${name} + '!'" >3333</p>
11 </body>
12 </html>
③ 这样Spring Boot可以支持了返回Thymeleaf的html视图了。
1 @RequestMapping(value="/index")
2 public String index(Model model){
3     System.out.println("-测试数据-");
4     model.addAttribute("name", "张三");
5     return "index";
6 }
④ 根据需要可以在resources的application.properties配置文件,增加Thymeleaf视图的默认属性。
spring.thymeleaf.mode=HTML5
spring.thymeleaf.encoding=UTF-8
spring.thymeleaf.content-type=text/html
#开发时关闭缓存,不然没法看到实时页面
spring.thymeleaf.cache=false
注意事项:
具体的application-thymeleaf.properties配置文件能够配置的属性,根据自身实际的情况,可以查看spring-boot-autoconfigure-1.5.4.RELEASE.jar设置。Thymeleaf的属性类为:org.springframework.boot.autoconfigure.thymeleaf.ThymeleafProperties

4、JSP 视图配置(极不推荐)
Spring Boot在默认自动配置已经不支持JSP视图。如果非要使用JSP视图。需要我们手工配置。
配置流程:
① 注意事项
因为JSP是JavaWEB技术,依赖Servlet-API。所以如果使用jsp视图发布包格式为war包;也是因为JSP是依赖Servlet-API的,所以一定要实现一个SpringBootServletInitializer类的子类作为项目的入口,功能类似于web项目的web.xml。
不管使用任何的模板引擎代替JSP。其实就可以认为它是类似于JSP的动态页面技术。就是将原来JSP实现的功能,换一种方式来编写。。。
5、默认读取的静态资源路径
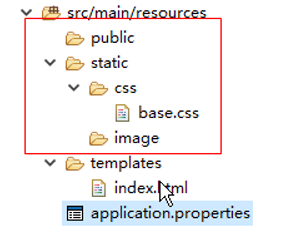
Spring Boot默认读取CSS、JavaScript、html、图片等静态资源的根目录为:
classpath:/META-INF/resources/
classpath:/resources
classpath:/static/
classpath:/public/
也就是说html使用到的CSS、image等静态资源可以放到以上目录文件夹,例如:

注意:具体查看org.springframework.boot.autoconfigure.web.ResourceProperties类的配置,如果要修改,在appplication.properties修改默认的路径。
