参考书
《TensorFlow:实战Google深度学习框架》(第2版)
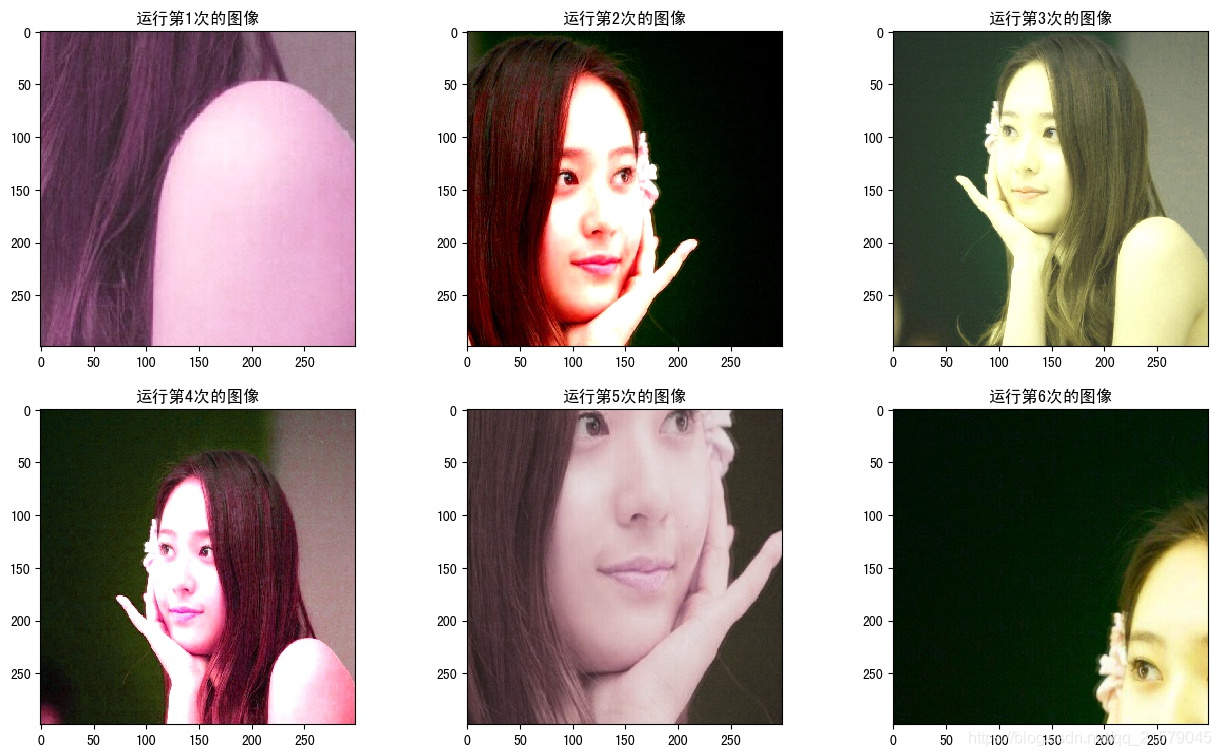
以下TensorFlow程序完成了从图像片段截取,到图像大小调整再到图像翻转及色彩调整的整个图像预处理过程。
#!/usr/bin/env python
# -*- coding: UTF-8 -*-
# coding=utf-8

"""
@author: Li Tian
@contact: 694317828@qq.com
@software: pycharm
@file: figure_deal_test2.py
@time: 2019/1/28 11:39
@desc: 图像预处理完整样例
"""

import tensorflow as tf
import numpy as np
import matplotlib.pyplot as plt


# 给定一张图像,随机调整图像的色彩。因为调整亮度,对比度,饱和度和色相的顺序会影响最后得到的结果。
# 所以可以定义多种不同的顺序。具体使用哪一种顺序可以在训练数据预处理时随机地选择一种。
# 这样可以进一步降低无关因素对模型的影响。
def distort_color(image, color_ordering=0):
    if color_ordering == 0:
        image = tf.image.random_brightness(image, max_delta=32. / 255.)
        image = tf.image.random_saturation(image, lower=0.5, upper=1.5)
        image = tf.image.random_hue(image, max_delta=0.2)
        image = tf.image.random_contrast(image, lower=0.5, upper=1.5)

    elif color_ordering == 1:
        image = tf.image.random_saturation(image, lower=0.5, upper=1.5)
        image = tf.image.random_brightness(image, max_delta=32. / 255.)
        image = tf.image.random_contrast(image, lower=0.5, upper=1.5)
        image = tf.image.random_hue(image, max_delta=0.2)

    elif color_ordering == 2:
        # 还可以定义其他的排列,但是在这里就不再一一列出了。
        # ...
        pass

    return tf.clip_by_value(image, 0.0, 1.0)


# 给定一张解码后的图像、目标图像的尺寸以及图像上的标注框,此函数可以对给出的图像进行预处理。
# 这个函数的输入图像是图像识别问题中原始的训练图像,而输出则是深井网络模型的输入层。注意这里
# 只是处理模型的训练数据,对于预测的数据,一般不需要使用随机变换的步骤。。
def preprocess_for_train(image, height, width, bbox):
    # 如果没有提供标注框,则认为整个图像就是需要关注的部分。
    if bbox is None:
        bbox = tf.constant([0.0, 0.0, 1.0, 1.0], dtype=tf.float32, shape=[1, 1, 4])

    # 转换图像张量的类型。
    if image.dtype != tf.float32:
        image = tf.image.convert_image_dtype(image, dtype=tf.float32)

    # 随机截取图像,减小需要关注的物体大小对图像识别算法的影响。
    bbox_begin, bbox_size, _ = tf.image.sample_distorted_bounding_box(tf.shape(image), bounding_boxes=bbox)
    distorted_image = tf.slice(image, bbox_begin, bbox_size)

    # 将随机截取的图像调整为神经网络层输入层的大小。大小调整的算法是随机选择的。
    distorted_image = tf.image.resize_images(distorted_image, [height, width], method=np.random.randint(4))

    # 随机左右翻转图像。
    distorted_image = tf.image.random_flip_left_right(distorted_image)

    # 使用一种随机的顺序调整图像色彩。
    distorted_image = distort_color(distorted_image, np.random.randint(2))

    return distorted_image


image_raw_data = tf.gfile.FastGFile('F:/Python3Space/figuredata_deal/krystal.jpg', "rb").read()
with tf.Session() as sess:
    img_data = tf.image.decode_jpeg(image_raw_data)
    boxes = tf.constant([[[0.05, 0.05, 0.9, 0.7], [0.35, 0.47, 0.5, 0.56]]])

    # 开始绘图
    plt.rcParams['font.sans-serif'] = ['SimHei']  # 步骤一(替换sans-serif字体)
    plt.rcParams['axes.unicode_minus'] = False  # 步骤二(解决坐标轴负数的负号显示问题)
    fig1 = plt.figure(1, (16, 9), dpi=100)

    # 运行6次获得6种不同的图像。
    for i in range(6):
        # 将图像的尺寸调整为299*299.
        ax = plt.subplot(2, 3, i+1)
        ax.set_title('运行第' + str(i+1) + '次的图像')
        result = preprocess_for_train(img_data, 299, 299, boxes)
        plt.imshow(result.eval())

    fig1.subplots_adjust(wspace=0.1)
    # plt.tight_layout()

    plt.savefig('F:/Python3Space/figuredata_deal/图像预处理完整样例.jpg', bbox_inches='tight')
运行结果:
