相关概念介绍(二)
6.一级缓存
<1>在一个session里查询相同id的数据
 1 package mybatis.annotation;
 2
 3 import java.io.IOException;
 4 import java.io.InputStream;
 5
 6 import org.apache.ibatis.session.SqlSession;
 7 import org.apache.ibatis.session.SqlSessionFactory;
 8 import org.apache.ibatis.session.SqlSessionFactoryBuilder;
 9
10 import mybatis.pojo.Category;
11
12 public class testL1Cache {
13
14     public static void main(String[] args) throws IOException {
15         // TODO Auto-generated method stub
16         String resource = "mybatis-config.xml";
17         InputStream inputStream = org.apache.ibatis.io.Resources.getResourceAsStream(resource);
18         SqlSessionFactory sqlSessionFactory = new SqlSessionFactoryBuilder().build(inputStream);
19         SqlSession session = sqlSessionFactory.openSession();
20
21         Category category = session.selectOne("getCategory", 1);
22         System.out.println(category);
23
24         Category category2 = session.selectOne("getCategory", 1);
25         System.out.println(category2);
26         session.commit();
27         session.close();
28     }
29
30 }
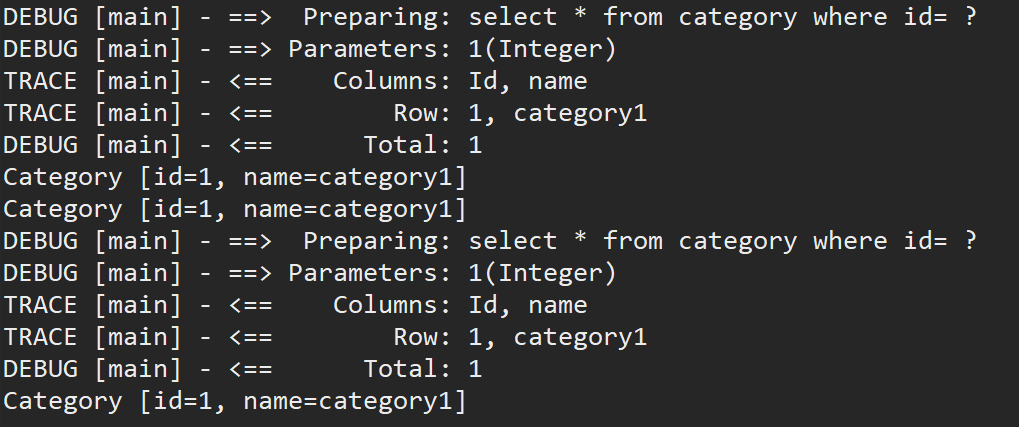
第一次会去数据库中取数据,但是第二次就不会访问数据库了,直接从session中获取。

<2>在不同的session里查询相同id的数据
1         SqlSession session2 = sqlSessionFactory.openSession();
2         Category category3 = session2.selectOne("getCategory", 1);
3         System.out.println(category3);
4         session2.commit();
5         session2.close();
再打开一个session,获取同样的数据,可以看到需要执行sql语句,说明一级缓存是在session里面的。

7.二级缓存
只有一级缓存是,当在不同的session中获取相同数据时,会重复执行sql语句,通过配置二级缓存可以解决这一问题。
<1>启动二级缓存
1     <settings>
2         <!-- 打开延迟加载的开关 -->
3         <setting name="lazyLoadingEnabled" value="true"/>
4         <!-- 将积极加载改为消息加载,即按需加载 -->
5         <setting name="aggressiveLazyLoading" value="false"/>
6         <!-- 开启二级缓存 -->
7         <setting name="cacheEnabled" value="true"/>
8     </settings>
<2>在Category.xml中增加<cache>
1 <cache></cache>
<3>序列化Category
 1 package mybatis.pojo;
 2
 3 import java.io.Serializable;
 4 import java.util.List;
 5
 6 public class Category implements Serializable {
 7     /**
 8      *
 9      */
10     private static final long serialVersionUID = 1L;
11     private int id;
12     private String name;
13     private List<Product> products;
14
15     public int getId() {
16         return id;
17     }
18
19     public void setId(int id) {
20         this.id = id;
21     }
22
23     public String getName() {
24         return name;
25     }
26
27     public void setName(String name) {
28         this.name = name;
29     }
30
31     public List<Product> getProducts() {
32         return products;
33     }
34
35     public void setProducts(List<Product> products) {
36         this.products = products;
37     }
38
39     public String toString() {
40         return "Category [id=" + id + ", name=" + name + "]";
41     }
42 }
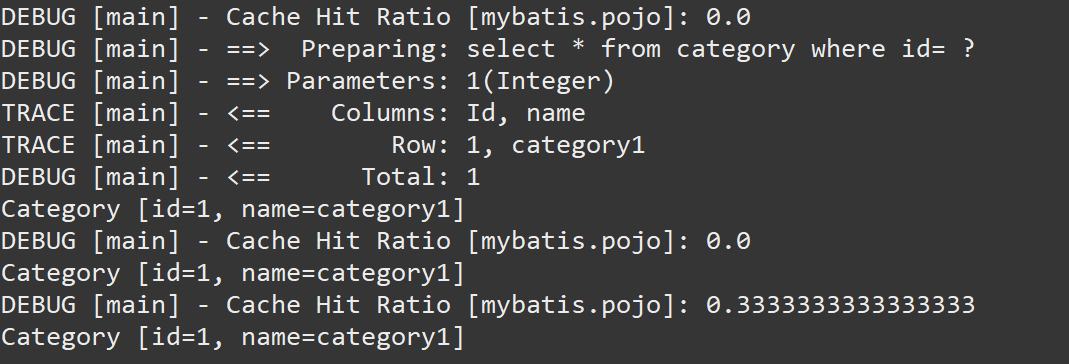
<4>执行相同的操作,在不同的session中查询相同的数据,只需执行一次sql语句,其余的都从缓存中读取。

8.c3p0连接池(mybatis整合C3P0数据库连接池)
<1>首先导入c3p0的jar包:c3p0-0.9.1.2.jar
<2>新建类C3P0DataSourceFactory
Mybatis使用C3P0,需要自己写个类继承UnpooledDataSourceFactory,然后指定dataSource为ComboPooledDataSource。
这个ComboPooledDataSource就是c3p0的数据源。
 1 package mybatis.c3p0;
 2
 3 import org.apache.ibatis.datasource.unpooled.UnpooledDataSourceFactory;
 4
 5 import com.mchange.v2.c3p0.ComboPooledDataSource;
 6
 7 public class C3P0DataSourceFactory extends UnpooledDataSourceFactory {
 8     public C3P0DataSourceFactory() {
 9         this.dataSource = new ComboPooledDataSource();
10     }
11 }
<3>配置mybatis-config.xml,即修改数据源。
1 <dataSource type="mybatis.c3p0.C3P0DataSourceFactory"> 2 <property name="driverClass" value="com.mysql.jdbc.Driver" /> 3 <property name="jdbcUrl" value="jdbc:mysql://localhost:3306/test2?useUnicode=true&characterEncoding=UTF-8&autoReconnect=true&failOverReadOnly=false"/> 4 <property name="user" value="root" /> 5 <property name="password" value="123456" /> 6 <!-- 连接池初始化大小为3 --> 7 <property name="initialPoolSize" value="3"/> 8 <!-- 连接池最大为10 --> 9 <property name="maxPoolSize" value="10"/> 10 <!-- 连接池最小为3 --> 11 <property name="minPoolSize" value="3"/> 12 <!-- 连接池在无空闲连接可用时一次性最多创建的新数据库连接数 --> 13 <property name="acquireIncrement" value="5"/> 14 <!-- 连接的最大空闲时间,如果超过这个时间(秒),某个数据库连接还没有被使用,则会断开掉这个连接。如果为0,则永远不会断开连接,即回收此连接 --> 15 <property name="maxIdleTime" value="30"/> 16 17 <!-- 最大的Statement数量 --> 18 <property name="maxStatements" value="500"/> 19 <!-- 每个连接启动的最大Statement数量 --> 20 <property name="maxStatementsPerConnection" value="50"/> 21 <!-- 同时运行的线程数 --> 22 <property name="numHelperThreads" value="5"/> 23 </dataSource>
<4>作为数据库连接池,无法在小规模访问里看到其效果,需要高并发才能体现出其效果,这里的测试代码只能表示正常运行,无法体现其优越性。运行测试类成功即可。
9.逆向工程
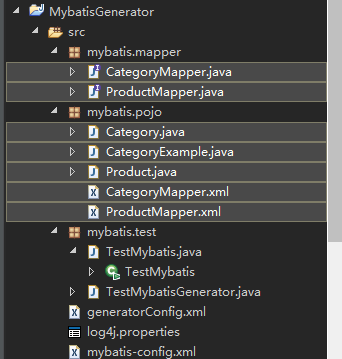
Mybatis Generator是一个用于Mybatis逆向工程的工具。 前面的例子都是先有pojo, mapper, xml, 然后再创建表。用逆向工程的方式,首先保证数据库里有表,然后通过Mybatis Generator生成pojo, mapper和xml。 可以节约时间,提高开发效率,降低出错机率。如下图所示:其中阴影部分的文件都是自动生成的。

<1>导入jar包:mybatis-generator-core-1.3.5.jar
<2>配置文件
在src目录下创建generatorConfig.xml
 1 <?xml version="1.0" encoding="UTF-8"?>
 2 <!DOCTYPE generatorConfiguration
 3   PUBLIC "-//mybatis.org//DTD MyBatis Generator Configuration 1.0//EN"
 4   "http://mybatis.org/dtd/mybatis-generator-config_1_0.dtd">
 5 <generatorConfiguration>
 6     <!--数据库驱动 -->
 7     <!-- 如果IDE(eclipse或者idea) 项目里导入了jar包,那么就不需要配置了jar包的绝对路径了 <classPathEntry
 8         location="e:/project/mybatis/lib/mysql-connector-java-5.0.8-bin.jar"/> -->
 9     <context id="DB2Tables" targetRuntime="MyBatis3">
10         <commentGenerator>
11             <property name="suppressDate" value="true" />
12             <property name="suppressAllComments" value="false" />
13         </commentGenerator>
14         <!--数据库链接地址账号密码 -->
15         <jdbcConnection driverClass="com.mysql.jdbc.Driver"
16             connectionURL="jdbc:mysql://localhost/test2" userId="root" password="123456">
17         </jdbcConnection>
18         <javaTypeResolver>
19             <property name="forceBigDecimals" value="false" />
20         </javaTypeResolver>
21         <!--生成Model类存放位置 -->
22         <javaModelGenerator targetPackage="mybatis.pojo"
23             targetProject="src">
24             <property name="enableSubPackages" value="true" />
25             <property name="trimStrings" value="true" />
26         </javaModelGenerator>
27         <!--生成映射文件存放位置 -->
28         <sqlMapGenerator targetPackage="mybatis.pojo"
29             targetProject="src">
30             <property name="enableSubPackages" value="true" />
31         </sqlMapGenerator>
32         <!--生成Dao类存放位置 -->
33
34         <javaClientGenerator type="XMLMAPPER"
35             targetPackage="mybatis.mapper" targetProject="src">
36             <property name="enableSubPackages" value="true" />
37         </javaClientGenerator>
38         <!--生成对应表及类名 -->
39         <table tableName="category" domainObjectName="Category"
40             enableCountByExample="false" enableUpdateByExample="false"
41             enableDeleteByExample="false" enableSelectByExample="true"
42             selectByExampleQueryId="false">
43             <property name="my.isgen.usekeys" value="true" />
44             <generatedKey column="id" sqlStatement="JDBC" />
45         </table>
46         <table tableName="product" domainObjectName="Product"
47             enableCountByExample="false" enableUpdateByExample="false"
48             enableDeleteByExample="false" enableSelectByExample="false"
49             selectByExampleQueryId="false">
50             <property name="my.isgen.usekeys" value="true" />
51             <generatedKey column="id" sqlStatement="JDBC" />
52         </table>
53     </context>
54 </generatorConfiguration>
这个配置文件有如下作用
1. 指定 mysql-jdbcjar 包的位置,如果项目中已经导入则不需要指定
2. 设置数据库链接账号密码
3. 指定pojo,mapper,xml分别生成的包名
4. 指定表名以及表名对应的类名
4.1 使用自增长键:
1 <property name="my.isgen.usekeys" value="true" />
2 <generatedKey column="id" sqlStatement="JDBC" />
<3>TestMybatisGenerator.java
运行成功之后,就会在对应位置生成pojo,xml,和mapper
 1 package mybatis.test;
 2
 3 import java.io.IOException;
 4 import java.io.InputStream;
 5 import java.sql.SQLException;
 6 import java.util.ArrayList;
 7 import java.util.List;
 8
 9 import org.mybatis.generator.api.MyBatisGenerator;
10 import org.mybatis.generator.config.Configuration;
11 import org.mybatis.generator.config.xml.ConfigurationParser;
12 import org.mybatis.generator.exception.InvalidConfigurationException;
13 import org.mybatis.generator.exception.XMLParserException;
14 import org.mybatis.generator.internal.DefaultShellCallback;
15
16 public class TestMybatisGenerator {
17
18     public static void main(String[] args)
19             throws IOException, XMLParserException, InvalidConfigurationException, SQLException, InterruptedException {
20         // TODO Auto-generated method stub
21         List<String> warnings = new ArrayList<String>();
22         boolean overwrite = true;
23         InputStream is = TestMybatisGenerator.class.getClassLoader().getResource("generatorConfig.xml").openStream();
24         ConfigurationParser cp = new ConfigurationParser(warnings);
25         Configuration config = cp.parseConfiguration(is);
26         is.close();
27         DefaultShellCallback callback = new DefaultShellCallback(overwrite);
28         MyBatisGenerator myBatisGenerator = new MyBatisGenerator(config, callback, warnings);
29         myBatisGenerator.generate(null);
30         System.out.println("生成代码成功,刷新项目,查看文件,然后执行TestMybatis.java");
31     }
32
33 }
<4>配置文件mybatis-config.xml中添加新生成的CategoryMapper.xml映射。
1 <?xml version="1.0" encoding="UTF-8" ?> 2 <!DOCTYPE configuration 3 PUBLIC "-//mybatis.org//DTD Config 3.0//EN" 4 "http://mybatis.org/dtd/mybatis-3-config.dtd"> 5 <configuration> 6 <settings> 7 <!-- 打开延迟加载的开关 --> 8 <setting name="lazyLoadingEnabled" value="true"/> 9 <!-- 将积极加载改为消息加载,即按需加载 --> 10 <setting name="aggressiveLazyLoading" value="false"/> 11 <!-- 开启二级缓存 --> 12 <setting name="cacheEnabled" value="true"/> 13 </settings> 14 <typeAliases> 15 <package name="mybatis.pojo" /> 16 </typeAliases> 17 <plugins> 18 <plugin interceptor="com.github.pagehelper.PageInterceptor"></plugin> 19 </plugins> 20 <environments default="development"> 21 <environment id="development"> 22 <transactionManager type="JDBC" /> 23 <dataSource type="POOLED"> 24 <property name="driver" value="com.mysql.jdbc.Driver" /> 25 <property name="url" 26 value="jdbc:mysql://localhost:3306/test2?characterEncoding=UTF-8&allowMultiQueries=true" /> 27 <property name="username" value="root" /> 28 <property name="password" value="123456" /> 29 </dataSource> 30 </environment> 31 </environments> 32 <mappers> 33 <mapper resource="mybatis/pojo/CategoryMapper.xml" /> 34 </mappers> 35 </configuration>
<5>TestMybatis
运行TestMybatis,执行自动生成的mapper,借助CategoryExample 进行模糊查询名称里出现了9的分类。
 1 package mybatis.test;
 2
 3 import java.io.IOException;
 4 import java.io.InputStream;
 5 import java.util.List;
 6
 7 import org.apache.ibatis.io.Resources;
 8 import org.apache.ibatis.session.SqlSession;
 9 import org.apache.ibatis.session.SqlSessionFactory;
10 import org.apache.ibatis.session.SqlSessionFactoryBuilder;
11
12 import mybatis.mapper.CategoryMapper;
13 import mybatis.pojo.Category;
14 import mybatis.pojo.CategoryExample;
15
16 public class TestMybatis {
17
18     public static void main(String[] args) throws IOException {
19         // TODO Auto-generated method stub
20         System.out.println("先运行TestMybatisGenerator创建mapper,pojo,xml 等文件,然后取消import里被注释的,以及接下来的注释,并执行代码");
21
22         //
23         String resource = "mybatis-config.xml";
24         InputStream inputStream = Resources.getResourceAsStream(resource);
25         SqlSessionFactory sqlSessionFactory = new SqlSessionFactoryBuilder().build(inputStream);
26         SqlSession session = sqlSessionFactory.openSession();
27
28         CategoryExample example = new CategoryExample();
29         example.createCriteria().andNameLike("%9%");
30         CategoryMapper mapper = session.getMapper(CategoryMapper.class);
31         List<Category> cs = mapper.selectByExample(example);
32
33         for (Category c : cs) {
34             System.out.println(c.getName());
35         }
36
37     }
38
39 }
Mybatis入门相关代码:https://github.com/lyj8330328/Mybatis