1.系统版本(VMware 虚拟机)
[root@ansible-admin ~]# cat /etc/redhat-release
CentOS Linux release 7.3.1611 (Core)
2.当执行yum安装软件时报如下错
Error: Error writing to file /var/cache/yum/x86_64/7/epel/gen/filelists_db.sqlite: [Errno 28] No space left on device
是由于磁盘空间不够,清除了部分无用日志之后再次安装
#yum install gitlab-ce -y
………………………………
Transaction Summary
=====================================================================================================================
Install  1 Package
Total download size: 378 M
Installed size: 378 M
Is this ok [y/d/N]: y
Downloading packages:
Error downloading packages:
  gitlab-ce-9.5.2-ce.0.el7.x86_64: Insufficient space in download directory /var/cache/yum/x86_64/7/gitlab-ce/packages
    * free   312 M
    * needed 378 M
3.提示空间不足,剩余空间只有312M,查看磁盘使用空间发现根分区确实只剩313M了
[root@ansible-admin ~]# df -h
Filesystem           Size  Used Avail Use% Mounted on
/dev/mapper/cl-root  6.2G  5.9G  313M  96% /  #扩容的对象
devtmpfs             482M     0  482M   0% /dev
tmpfs                493M     0  493M   0% /dev/shm
tmpfs                493M   50M  443M  11% /run
tmpfs                493M     0  493M   0% /sys/fs/cgroup
/dev/sda1           1014M  139M  876M  14% /boot
tmpfs                 99M     0   99M   0% /run/user/0
/dev/sr0             680M  680M     0 100% /mnt
[root@ansible-admin boot]# df -h /var (/var目录确实为312M)
Filesystem           Size  Used Avail Use% Mounted on
/dev/mapper/cl-root  6.2G  5.9G  312M  96% /
4.于是开始扩容根分区
(1)添加磁盘
虚拟机——设置——硬盘——添加——下一步——选择磁盘类型——填写磁盘大小
(2)查看磁盘
[root@ansible-admin boot]# fdisk -l

Disk /dev/sda: 8589 MB, 8589934592 bytes, 16777216 sectors
Units = sectors of 1 * 512 = 512 bytes
Sector size (logical/physical): 512 bytes / 512 bytes
I/O size (minimum/optimal): 512 bytes / 512 bytes
Disk label type: dos
Disk identifier: 0x000b9a5e

   Device Boot      Start         End      Blocks   Id  System
/dev/sda1   *        2048     2099199     1048576   83  Linux
/dev/sda2         2099200    16777215     7339008   8e  Linux LVM

Disk /dev/sdb: 21.5 GB, 21474836480 bytes, 41943040 sectors #添加的新磁盘
Units = sectors of 1 * 512 = 512 bytes
Sector size (logical/physical): 512 bytes / 512 bytes
I/O size (minimum/optimal): 512 bytes / 512 bytes
Disk label type: dos
Disk identifier: 0x4fddc909

   Device Boot      Start         End      Blocks   Id  System

Disk /dev/mapper/cl-root: 6652 MB, 6652166144 bytes, 12992512 sectors
Units = sectors of 1 * 512 = 512 bytes
Sector size (logical/physical): 512 bytes / 512 bytes
I/O size (minimum/optimal): 512 bytes / 512 bytes


Disk /dev/mapper/cl-swap: 859 MB, 859832320 bytes, 1679360 sectors
Units = sectors of 1 * 512 = 512 bytes
Sector size (logical/physical): 512 bytes / 512 bytes
I/O size (minimum/optimal): 512 bytes / 512 bytes
(3)为新磁盘创建分区
创建分区:
[root@ansible-admin boot]# fdisk /dev/sdb
Welcome to fdisk (util-linux 2.23.2).

Changes will remain in memory only, until you decide to write them.
Be careful before using the write command.


Command (m for help): n        #新建分区
Partition type:
   p   primary (0 primary, 0 extended, 4 free)
   e   extended
Select (default p): p           #选择分区类型
Partition number (1-4, default 1):  #默认为1(因为是新磁盘第一次创建分区)
First sector (2048-41943039, default 2048):
Using default value 2048
Last sector, +sectors or +size{K,M,G} (2048-41943039, default 41943039): #这里我只创建一个分区所以默认是使用所有空间
Using default value 41943039
Partition 1 of type Linux and of size 20 GiB is set

Command (m for help): w  #保存分区结果
The partition table has been altered!

Calling ioctl() to re-read partition table.
Syncing disks.
让系统重新读取分区表:
[root@ansible-admin boot]# partprobe
Warning: Unable to open /dev/sr0 read-write (Read-only file system).  /dev/sr0 has been opened read-only.
(4)扩容
由于sda已经为LVM所以可以直接为其扩容,无需再创建新的LVM
创建物理卷(PV):
使用pvcreate命令创建物理卷,pvdisplay查看物理卷信息:
创建物理卷:
[root@ansible-admin boot]# pvcreate /dev/sdb1
  Physical volume "/dev/sdb1" successfully created.
查看物理卷信息:
[root@ansible-admin boot]# pvdisplay
  --- Physical volume ---
  PV Name               /dev/sda2
  VG Name               cl   #原有盘上的PV
  PV Size               7.00 GiB / not usable 3.00 MiB
  Allocatable           yes (but full)
  PE Size               4.00 MiB
  Total PE              1791
  Free PE               0
  Allocated PE          1791
  PV UUID               beyPTU-i2Ny-ltMw-0tfr-Me0b-Sz0Z-ybS4cy

  "/dev/sdb1" is a new physical volume of "20.00 GiB"
  --- NEW Physical volume ---
  PV Name               /dev/sdb1
  VG Name        #新建的PV的VG name是空的,下一步就是把PV加入VG
  PV Size               20.00 GiB
  Allocatable           NO
  PE Size               0
  Total PE              0
  Free PE               0
  Allocated PE          0
  PV UUID               5N1q14-vf7Y-U1dm-1tkf-ZxAQ-16lE-pW2M5F
查看原VG的情况
[root@ansible-admin boot]# vgdisplay
  --- Volume group ---
  VG Name               cl  #注意记录此名字,扩容时将新的pv加入指定的名字
  System ID
  Format                lvm2
  Metadata Areas        1
  Metadata Sequence No  3
  VG Access             read/write
  VG Status             resizable
  MAX LV                0
  Cur LV                2
  Open LV               2
  Max PV                0
  Cur PV                1
  Act PV                1
  VG Size               7.00 GiB
  PE Size               4.00 MiB
  Total PE              1791
  Alloc PE / Size       1791 / 7.00 GiB
  Free  PE / Size       0 / 0   #发现空闲空间为0(以G计算)
  VG UUID               l4mGeJ-090j-NZ1U-UOhI-c56R-0mtM-xiBm9h
扩展卷组,将/dev/sdb物理卷添加到cl卷组中

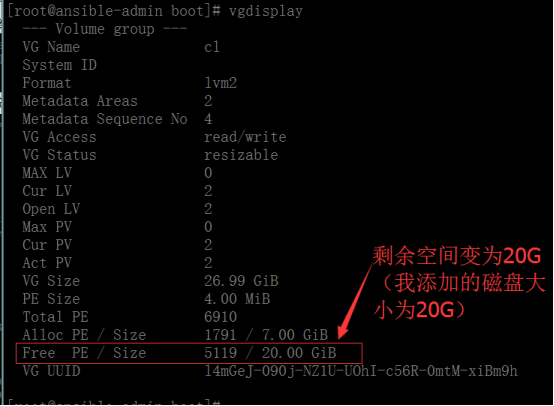
再查看VG情况,可以看到VG大小变化,空余空间
将新的VG空间划入LV(扩容lv_root)
直接扩展10G给/root分区,不用umount,也不需要重启(扩张多大可根据添加的磁盘大小自由支配)
[root@ansible-admin boot]# lvextend -L +10G  /dev/mapper/cl-root
  Size of logical volume cl/root changed from 6.20 GiB (1586 extents) to 16.20 GiB (4146 extents).
  Logical volume cl/root successfully resized.
也可以使用命令
# lvextend -l +50%FREE /dev/mapper/cl-root(表示将剩余空间的50%划入LV)
使用xfs_growfs命令在线调整xfs格式文件系统大小(CentOS6使用resize2fs)
#xfs_growfs /dev/cl/root (因为CentOS7默认文件系统类型为xfs)

最后我们看到逻辑卷分区已经动态扩容到了11G:


至此一次CentOS7 根分区扩容顺利完成