学完了插值,我们来学习在场景里面添加一个立体彩色球(三维插值)
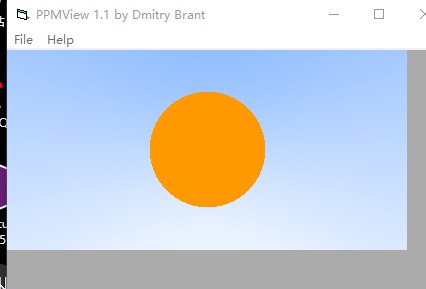
按照惯例,先看效果:

Chapter4: Adding a sphere
我们又一次面临图形学的主要任务。
我们需要再次回顾coord1.1的坐标系统,如果有一个球,在眼睛和屏幕中间,那么如何将其绘制到屏幕上
假设我们沿着y负方向垂直往下看:
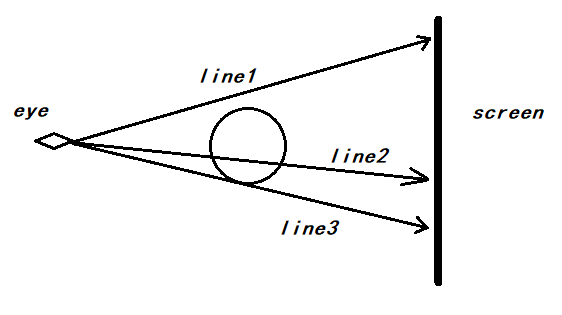
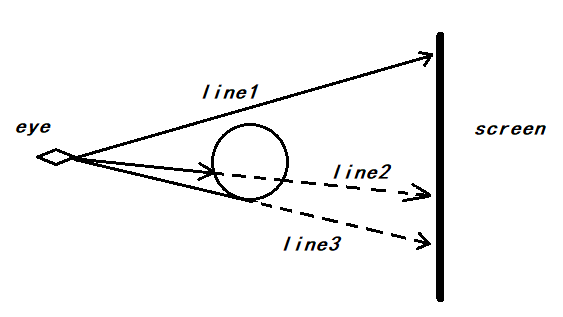
diagram 4-1
扫描屏幕位置的视线(有眼睛发出指向屏幕特定位置)的生成在上一节讲述完毕。
我们的方法是通过逐行扫描屏幕的每一个位置,然后发出对应的视线,检测视线是否与其他物体相交进而确定屏幕位置的像素值(rgb)。
那么,在此案例中,可能出现的三种视线如上
line1 视线不与球相交,畅通无阻,看到的应该是背景,所以,在屏幕上对应的位置为背景色
line2 视线与球体相交,穿过
line3 视线与球相切
那么,这就比较好办了
我们只需要推出判断直线与球是否相交的公式,此题得解
书上的最后的判定公式推错了,但是书上公式处代码是对的,我们自己推一遍。
依据符号约定,向量用粗斜体小写字母,矩阵用粗斜体大写字母,标量用正常体大写或小写字母
************************* 数学分割线 ***************************
球体方程:x*x + y*y + z*z = r * r.
如果球心为{hx,hy,hz},那么方程如下:
(x - hx)*(x - hx) + (y - hy)*(y - hy) + (z - hz)*(z - hz) = r*r.
我们设 p = (x,y,z), h = (hx,hy,hz).
则方程表示形式为:(p - h)·(p - h) = r * r
我们需要确定我们的光线p(t) = a + t * b. 是否曾经碰撞过这个球体
如果它碰撞过,那么存在系数t满足方程。
所以我们求下述公式是否满足
(p(t) - h)·(p(t) - h) = r * r
即: (a + t*b - h)·(a + t*b - h) = r * r
经过化简得到:
t*t* b·b + 2t* b·(a-h) + (a-h)·(a-h) - r * r = 0
化简过程也很简单,你先把a-h组合到一起,然后进行点乘分配律即可
************************* End ***************************
所有的向量都是已知量,我们要求取 t 是否存在,依此来判定屏幕上的点是否是背景色
所以,二次方程求根法, delt不小于0,说明存在,即视线遇到了球体
那么我们假定眼睛仍然在(0,0,0),球心在(0,0,-1),半径为0.5
看一个橘黄色的球
代码如下:
#define LOWPRECISION

#include <fstream>
#include "ray.h"          //https://www.cnblogs.com/lv-anchoret/p/10182002.html
using namespace lvgm;

#define stds std::

bool hit(const ray::vec_type& Center, const precision R, const ray& sight)
{
    ray::vec_type trace = sight.origin() - Center;
    precision a = dot(sight.direction(), sight.direction());
    precision b = 2.0 * dot(trace, sight.direction());
    precision c = dot(trace, trace) - R*R;
    precision delt = b*b - 4. * a*c;
    return delt > 0.;
}


const ray::vec_type lerp4(const ray& sight)
{
    ray::vec_type sphereHeart{ 0.,0.,-1. };

    if (hit(sphereHeart, 0.5, sight))
        return ray::vec_type{ 1.0f,0.6f,0.f };

    ray::vec_type unit = sight.direction().ret_unitization();
    precision _t = 0.5*(unit.y() + 1.);
    return (1.0 - _t)*ray::vec_type{ 1.0f,1.0f,1.0f } +_t * ray::vec_type{ 0.5f,0.7f,1.0f };
}

void build_4_1()
{
    stds ofstream file("graph4-1.ppm");
    size_t W = 400, H = 200;

    if (file.is_open())
    {
        file << "P3
" << W << " " << H << "
255
" << stds endl;
        ray::vec_type eye{ 0.,0.,0. };
        ray::vec_type horizontal{ 4.,0.,0. };
        ray::vec_type vertical{ 0.,2.,0. };
        ray::vec_type start{ -2.,-1.,-1. };
        for (int y = H - 1; y >= 0; --y)
            for (int x = 0; x < W; ++x)
            {
                vec2<precision> para{ precision(x) / W,precision(y) / H };
                ray sight = { eye, start + para.u() * horizontal + para.v() * vertical };
                ray::vec_type color = lerp4(sight);
                int r = int(255.99 * color.r());
                int g = int(255.99 * color.g());
                int b = int(255.99 * color.b());
                file << r << " " << g << " " << b << stds endl;
            }
        stds cout << "complished" << stds endl;
        file.close();
    }
    else
        stds cerr << "open file error" << stds endl;
}

int main()
{
    build_4_1();
}
当然,你可以把球心的位置前后上下左右移动试试,它在屏幕上会进行对应的平移和放缩
不过,无论你怎么移动,你看到的背面和正面是一样的,下面我们就来解决区分背面和正面的方法
Chapter5-1: Surface normals and multiple objects.
这一篇,我们先讲表面法线,下一篇讲剩余部分
我们有了上一章节的知识,现在来实现我们最初的那张图,就很简单了。
还记不记得我们在上一篇文章中的二维插值,是根据平面中的二维位置坐标来进行区分和特化的。
那么我们如果要在三维坐标系中像上次那样,赋予每一个像素点独一无二的特征,我们也可以采取三维坐标位置,但是它不是很好解决上一章节Chapter4末尾提出的那个问题,所以我们还需要找出能够表明球体上某一点的另外一个独一无二的特征且能够区分出背面。那就是——Surface normals(表面法线)
引用书中一张图:
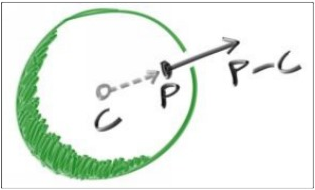
我还是画一个吧
之前就说过,h的三维坐标就是视线到h的向量,p点坐标就是视线向量,因为eye的坐标为(0,0,0),这个应该没问题吧
好,这就好办了,关于平面上某一点的法线,就是该点所在的切平面的法向量,而对于球来说,表面某点p的切平面的法向量平行于向量(h->p),所以p - h 即为p点表面法线(向外),p - h,你可以理解为坐标相减得到的向量,也可以理解为两个向量相减(eye->p,eye->h)得到的向量,结果是一样的
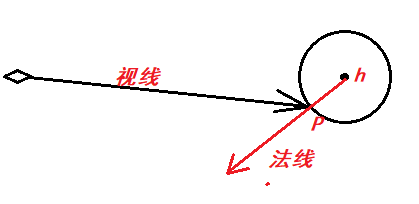
所以,我们目前的任务就是求出p点
即,我们真正要求的是实线
结合
视线公式 p(t) = a + t * b
与
判定相交 t*t* b·b + 2t* b·(a-h) + (a-h)·(a-h) - r * r = 0
求出t系数,就求出了图中的实线向量
代码:
#define LOWPRECISION

#include <fstream>
#include "ray.h"            //https://www.cnblogs.com/lv-anchoret/p/10182002.html
using namespace lvgm;

#define stds std::

precision hit(const ray::vec_type& Heart, const precision R, const ray& sight)
{
    ray::vec_type trace = sight.origin() - Heart;
    precision a = dot(sight.direction(), sight.direction());
    precision b = 2.0 * dot(trace, sight.direction());
    precision c = dot(trace, trace) - R*R;
    precision delt = b*b - 4. * a*c;
    if (delt < 0.)    return -1.;
    else return (-b - sqrt(delt)) / (2.*a);        //根,正、背面
}

const ray::vec_type lerp5(const ray& sight)
{
    ray::vec_type sphereHeart{ 0.,0.,-1. };
    precision _t = hit(sphereHeart, 0.5, sight);
    if (_t > 0.)        //相交
    {
        ray::vec_type normUnit = (sight.go(_t) - sphereHeart).ret_unitization();    //单位法线 -1~1
        return 0.5*ray::vec_type{ normUnit.x() + 1.f ,normUnit.y() + 1.f,normUnit.z() + 1.f }; //映射到 0~1
    }
    //背景色
    ray::vec_type unit = sight.direction().ret_unitization();
    _t = 0.5*(unit.y() + 1.);
    return (1.0 - _t)*ray::vec_type{ 1.0f,1.0f,1.0f } +_t * ray::vec_type{ 0.5f,0.7f,1.0f };
}

void build_5_1()
{
    stds ofstream file("graph5-1.ppm");
    size_t W = 400, H = 200;

    if (file.is_open())
    {
        file << "P3
" << W << " " << H << "
255
" << stds endl;
        ray::vec_type eye{ 0.,0.,0. };
        ray::vec_type horizontal{ 4.,0.,0. };
        ray::vec_type vertical{ 0.,2.,0. };
        ray::vec_type start{ -2.,-1.,-1. };
        for (int y = H - 1; y >= 0; --y)
            for (int x = 0; x < W; ++x)
            {
                vec2<precision> para{ precision(x) / W,precision(y) / H };
                ray sight = { eye, start + para.u() * horizontal + para.v() * vertical };        //屏幕位置
                ray::vec_type color = lerp5(sight);
                int r = int(255.99 * color.r());
                int g = int(255.99 * color.g());
                int b = int(255.99 * color.b());
                file << r << " " << g << " " << b << stds endl;
            }
        stds cout << "complished" << stds endl;
        file.close();
    }
    else
        stds cerr << "open file error" << stds endl;
}

int main()
{
    build_5_1();
}
效果图就是开篇那个
感谢您的阅读,生活愉快~