在使用XAF框架是,默认身份验证是使用用户名和密码的。Win和Web页面如下所示。

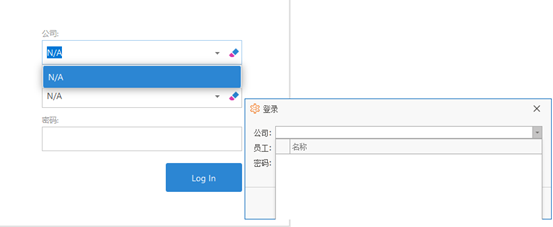
现在要(公司、员工、密码)登录来替代(用户名、密码)登录。效果如下:
 原理
原理
是如何实现自定义传参验证的呢?最关键的步骤在于登录使用自定义的认证标准(能够实现登录)而不是默认的Authentication Standard。
我们可以先了解在生成项目时,有无登录页面的区别。分别打开生成简单的无自动登录和有自动登录的默认Win应用配置(Web应用配置类似)文件WinApplication.cs。
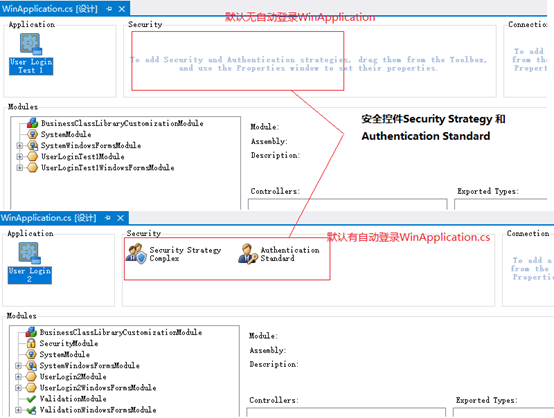
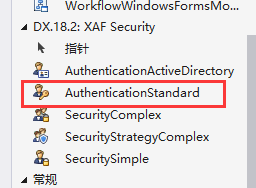
因此,默认登录需要两个XAF控件Security Strategy Complex 和 Authentication Standard,字面意思是复杂安全策略和认证标准。
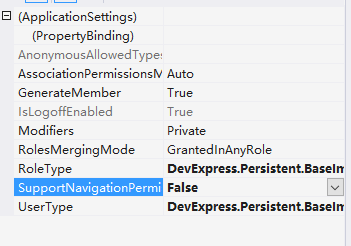
Security Strategy Complex,复杂安全策略。对其功能简单的理解就是定义登录的角色类型、用户类型等信息。查看Security Strategy Complex的属性。实现登录控件是角色类型(RoleType)和用户类型(UserType)来实现自定义的用户登录。
Authentication Standard, 认证标准。简单的理解,就是根据复杂安全策略提供的参数,有了这个控件,就能实现登录。它的方法本身定义了登录页面需要登录的参数。要想实现登录页面,就需要自己写一个控件,然后替换Authentication Standard控件。

注:记得将自定义的控件替换为Authentication Standard(开始时依据官方步骤,不理解原理,遗漏此步骤,因此百思不得其解)。
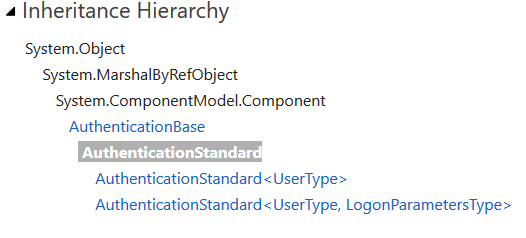
如何自定义控件呢?Authentication Standard控件对应的类为AuthenticationStandard,我们可以自定义类,官方的方法是继承AuthenticationBase、或者IAuthenticationStandard接口。下图是登录类的继承关系图,蓝色部分为登录控件,可以查看官方文件(https://documentation.devexpress.com/eXpressAppFramework/DevExpress.ExpressApp.Security.AuthenticationStandard.class)根据需求,实现和集成。接下来的方法会按照官方的方法来做。
 步骤
步骤
要实现自定义登录(公司、员工、密码)登录。依据以下步骤:
实现员工公司类,并生成演示数据
- 创建参数类
- 创建自定义登录认证类
- 让登录窗口下拉能显示数据
- 为登录窗口提供对象空间
- 让登录窗口能够访问外部数据
- 将自定义类传递给安全系统
实现员工公司类,并生成演示数据
为了实现登录,员工(Employee)需要继承PermissionPolicyUser类。公司(Company)与员工需要创建关联(association)。
员工(Employee)具体代码如下:
 1 using DevExpress.Xpo;
 2 using DevExpress.ExpressApp.DC;
 3 using DevExpress.Persistent.Base;
 4 using DevExpress.Persistent.BaseImpl.PermissionPolicy;
 5 //……
 6     [DefaultClassOptions]
 7     [XafDefaultProperty("UserName"),XafDisplayName("员工")]
 8     public class Employee : PermissionPolicyUser
 9     {
10         public Employee(Session session) : base(session) { }
11         private Company company;
12         [Association("Company-Employees")]
13         [XafDisplayName("公司")]
14         public Company Company
15         {
16             get { return company; }
17             set { SetPropertyValue("Company", ref company, value); }
18         }
19 }
20 //……
公司(Company)类具体代码:
using DevExpress.Xpo;
using DevExpress.ExpressApp.DC;
using DevExpress.Persistent.Base;
using DevExpress.Persistent.BaseImpl;
//……
    [DefaultClassOptions]
    [XafDisplayName("公司"),XafDefaultProperty("Name")]
    public class Company : BaseObject
    {
        public Company(Session session) : base(session) { }
        private string name;

        [XafDisplayName("名称")]
        public string Name
        {
            get { return name; }
            set { SetPropertyValue("Name", ref name, value); }
        }
        [Association("Company-Employees")]
        public XPCollection<Employee> Employees
        {
            get { return GetCollection<Employee>("Employees"); }
        }
    }
//……
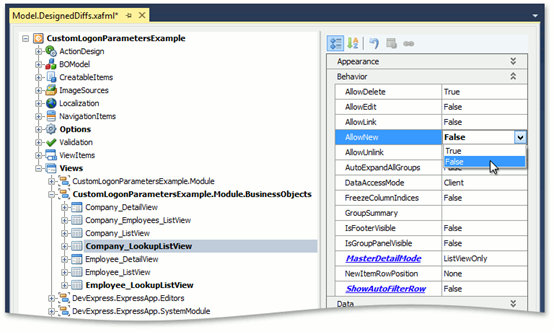
接下来调用项目的模型编辑器,展开Views | CustomLogonParametersExample.Module.BusinessObjects节点,并找到员工(Employee)和公司(Company)的列表视图(ListView视图),将属性AllowNew设置为false。为了防止在这两个视图中创建新对象。
为了方便验证,打开 BatabaseUpdate→Update.cs文件,添加验证数据。
 1 using DevExpress.ExpressApp.Security;
 2 using DevExpress.ExpressApp.Security.Strategy;
 3 // ...
 4 public class Updater : ModuleUpdater {
 5     public Updater(IObjectSpace objectSpace, Version currentDBVersion) : base(objectSpace, currentDBVersion) { }
 6     public override void UpdateDatabaseAfterUpdateSchema() {
 7         base.UpdateDatabaseAfterUpdateSchema();
 8         PermissionPolicyRole administrativeRole = ObjectSpace.FindObject<PermissionPolicyRole>(
 9             new BinaryOperator("Name", SecurityStrategy.AdministratorRoleName));
10         if (administrativeRole == null) {
11             administrativeRole = ObjectSpace.CreateObject<PermissionPolicyRole>();
12             administrativeRole.Name = SecurityStrategy.AdministratorRoleName;
13             administrativeRole.IsAdministrative = true;
14         }
15         const string adminName = "Administrator";
16         Employee administratorUser = ObjectSpace.FindObject<Employee>(
17             new BinaryOperator("UserName", adminName));
18         if (administratorUser == null) {
19             administratorUser = ObjectSpace.CreateObject<Employee>();
20             administratorUser.UserName = adminName;
21             administratorUser.IsActive = true;
22             administratorUser.SetPassword("");
23             administratorUser.Roles.Add(administrativeRole);
24         }
25         PermissionPolicyRole userRole = ObjectSpace.FindObject<PermissionPolicyRole>(
26             new BinaryOperator("Name", "User"));
27         if (userRole == null) {
28             userRole = ObjectSpace.CreateObject<PermissionPolicyRole>();
29             userRole.Name = "User";
30             userRole.AddTypePermission<Employee>(
31                 SecurityOperations.ReadOnlyAccess, SecurityPermissionState.Allow);
32             userRole.AddTypePermission<Company>(
33                 SecurityOperations.ReadOnlyAccess, SecurityPermissionState.Allow);
34         }
35         if (ObjectSpace.FindObject<Company>(null) == null) {
36             Company company1 = ObjectSpace.CreateObject<Company>();
37             company1.Name = "Company 1";
38             company1.Employees.Add(administratorUser);
39             Employee user1 = ObjectSpace.CreateObject<Employee>();
40             user1.UserName = "Sam";
41             user1.SetPassword("");
42             user1.Roles.Add(userRole);
43             Employee user2 = ObjectSpace.CreateObject<Employee>();
44             user2.UserName = "John";
45             user2.SetPassword("");
46             user2.Roles.Add(userRole);
47             Company company2 = ObjectSpace.CreateObject<Company>();
48             company2.Name = "Company 2";
49             company2.Employees.Add(user1);
50             company2.Employees.Add(user2);
51         }
52         ObjectSpace.CommitChanges();
53     }
54 }
创建参数类
在项目*.Modeule下添加参数类CustomLogonParameters。代码如下。
 1 using System;
 2 using System.ComponentModel;
 3 using System.Runtime.Serialization;
 4 using DevExpress.ExpressApp.DC;
 5 using DevExpress.Persistent.Base;
 6 using UserTest.Module.BusinessObjects;
 7
 8 //……
 9    [DomainComponent, Serializable]
10     [System.ComponentModel.DisplayName("登录")]                       //登录标题
11     public class CustomLogonParameters : INotifyPropertyChanged, ISerializable
12     {
13         #region 构造方法
14         public CustomLogonParameters() { }
15
16         //ISerializable,序列化
17         public CustomLogonParameters(SerializationInfo info, StreamingContext context)
18         {
19             if (info.MemberCount > 0)
20             {
21                 UserName = info.GetString("UserName");
22                 Password = info.GetString("Password");
23             }
24         }
25         #endregion
26
27         private Company company;                //公司
28         private Employee employee;              //员工
29         private string password;                //密码
30
31         [ImmediatePostData]   //值应该尽快传递给绑定对象,但用户更改值时,允许强制更新
32         [XafDisplayName("公司")]
33         public Company Company
34         {
35             get { return company; }
36             set
37             {
38                 if (value == company) return;
39                 company = value;
40                 Employee = null;
41                 OnPropertyChanged("Company");
42             }
43         }
44         [DataSourceProperty("Company.Employees")]
45         [ImmediatePostData] //值应该尽快传递给绑定对象,但用户更改值时,允许强制更新
46         [XafDisplayName("员工")]
47         public Employee Employee
48         {
49             get { return employee; }
50             set
51             {
52                 if (Company == null) return;
53                 employee = value;
54                 if (employee != null)
55                 {
56                     UserName = employee.UserName;
57                 }
58                 OnPropertyChanged("Employee");
59             }
60         }
61         [Browsable(false)]                  //用户名在登录页面不显示
62         [XafDisplayName("用户名")]
63         public String UserName { get; set; }
64         [PasswordPropertyText(true)]
65         [XafDisplayName("密码")]
66         public string Password
67         {
68             get { return password; }
69             set
70             {
71                 if (password == value){ return; }
72                 password = value;
73             }
74         }
75
76         public event PropertyChangedEventHandler PropertyChanged;
77         //属性更改时引发事件页面上能快速更改事件)
78         private void OnPropertyChanged(string propertyName)
79         {
80             if (PropertyChanged != null)
81             {
82                 PropertyChanged(this, new PropertyChangedEventArgs(propertyName));
83             }
84         }
85
86         [System.Security.SecurityCritical]
87         public void GetObjectData(SerializationInfo info, StreamingContext context)
88         {
89             info.AddValue("UserName", UserName);
90             info.AddValue("Password", Password);
91         }
92 }
93 //……
注:在登录验证的时候,不能使用引用属性验证。因此,在方法中,根据公司、员工获取用户名(UserName),登录验证的时候使用用户名+密码验证。这就是为什么参数中需要加一个因此用户名的原因。
创建自定义登录认证类
创建类CustomAuthentication。为了实现自定义身份认证,需要继承AuthenticationBase。具体代码如下:
 1 using System;
 2 using DevExpress.ExpressApp;
 3 using DevExpress.Data.Filtering;
 4 using System.Collections.Generic;
 5 using DevExpress.ExpressApp.Security;
 6 using UserTest.Module.BusinessObjects;
 7 //……
 8
 9 /// <summary>
10     /// 自定义登录参数类
11     /// </summary>
12     public class CustomAuthentication : AuthenticationBase, IAuthenticationStandard
13     {
14         private CustomLogonParameters customLogonParameters;            //登录参数
15         public CustomAuthentication()
16         {
17             customLogonParameters = new CustomLogonParameters();
18         }
19         /// <summary>
20         /// 注销
21         /// </summary>
22         public override void Logoff()
23         {
24             base.Logoff();
25             customLogonParameters = new CustomLogonParameters();
26         }
27         /// <summary>
28         /// 重置登录参数
29         /// </summary>
30         public override void ClearSecuredLogonParameters()
31         {
32             customLogonParameters.Password = "";
33             base.ClearSecuredLogonParameters();
34         }
35         /// <summary>
36         /// 通过比较登录参数与数据库中用户对象的值,进行验证。
37         ///
38         /// </summary>
39         /// <param name="objectSpace">用户数据操作对象空间</param>
40         /// <returns>经身份验证的用户</returns>
41         public override object Authenticate(IObjectSpace objectSpace)
42         {
43
44             Employee employee = objectSpace.FindObject<Employee>(new BinaryOperator("UserName", customLogonParameters.UserName));
45             if (employee == null)
46             {
47                 throw new ArgumentNullException("Employee");
48             }
49             if (!employee.ComparePassword(customLogonParameters.Password))
50             {
51                 throw new AuthenticationException(employee.UserName, "密码错误.");
52             }
53             return employee;
54         }
55
56         /// <summary>
57         /// 初始化登录参数
58         /// </summary>
59         /// <param name="logonParameters">登录参数</param>
60         public override void SetLogonParameters(object logonParameters)
61         {
62             this.customLogonParameters = (CustomLogonParameters)logonParameters;
63         }
64
65         /// <summary>
66         /// 返回到要添加程序的应用列表
67         /// </summary>
68         /// <returns></returns>
69         public override IList<Type> GetBusinessClasses()
70         {
71             return new Type[] { typeof(CustomLogonParameters) };
72         }
73         /// <summary>
74         /// 指示登录过程是否是交互式的(通过登录对话框请求登录参数)
75         /// </summary>
76         public override bool AskLogonParametersViaUI
77         {
78             get { return true; }
79         }
80
81         /// <summary>
82         /// 返回登录参数
83         /// </summary>
84         public override object LogonParameters
85         {
86             get { return customLogonParameters; }
87         }
88         /// <summary>
89         /// 是否启用注销方法,继承AuthenticationBase
90         /// </summary>
91         public override bool IsLogoffEnabled
92         {
93             get { return true; }
94         }
95 }
96
97 //……
注:记得初始化方法LogonParameters。
让登录窗口下拉能显示数据
完成参数类和自定义登录认证类后,直接将自定义类传递给安全系统(后一步会介绍)。会发现下拉框无法获取到数据。
要使得下拉框能够获取到这些外部数据。我们需要为登录窗口提供对象空间和让登录窗口访问外部数据。
以Win版本为例,提供对象空间后,下拉时能够获取到数据,数据处于数据保护。
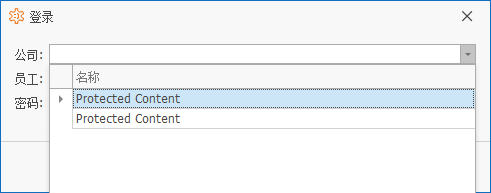
让窗口访问外部数据(公司类型)以后,下拉时能够读取数据。

为登录窗口提供对象空间
Win版
打开Program.cs ,修改代码如下:
 1 using CustomLogonParametersExample.Module;
 2 using CustomLogonParametersExample.Module.BusinessObjects;
 3 using DevExpress.ExpressApp;
 4 // ...
 5 static class Program {
 6     // ...
 7     static void Main() {
 8         // ...
 9         winApplication.CreateCustomLogonWindowObjectSpace +=
10         application_CreateCustomLogonWindowObjectSpace;
11         winApplication.Setup();
12         // ...
13     }
14     private static void application_CreateCustomLogonWindowObjectSpace(object sender,
15     CreateCustomLogonWindowObjectSpaceEventArgs e) {
16         e.ObjectSpace = ((XafApplication)sender).CreateObjectSpace(typeof(CustomLogonParameters));
17         if (e.ObjectSpace is NonPersistentObjectSpace) {
18             IObjectSpace objectSpaceCompany = ((XafApplication)sender).CreateObjectSpace(typeof(Company));
19             ((NonPersistentObjectSpace)e.ObjectSpace).AdditionalObjectSpaces.Add(objectSpaceCompany);
20         }
21     }
22 }
打开WinApplication.cs,修改代码如下:
 1 using DevExpress.ExpressApp;
 2 using DevExpress.ExpressApp.Win;
 3 using DevExpress.ExpressApp.Xpo;
 4 // ...
 5 public partial class CustomLogonParametersExampleWindowsFormsApplication : WinApplication {
 6     // ...
 7     protected override void CreateDefaultObjectSpaceProvider(CreateCustomObjectSpaceProviderEventArgs args) {
 8         args.ObjectSpaceProviders.Add(new XPObjectSpaceProvider(args.ConnectionString, args.Connection, false));
 9         args.ObjectSpaceProviders.Add(new NonPersistentObjectSpaceProvider(TypesInfo, null));
10     }
11 }
Web版
Web代码如下:
 1 using CustomLogonParametersExample.Module;
 2 using CustomLogonParametersExample.Module.BusinessObjects;
 3 using DevExpress.ExpressApp;
 4 using DevExpress.ExpressApp.Web;
 5 // ...
 6 public class Global : System.Web.HttpApplication {
 7     // ...
 8     protected void Session_Start(Object sender, EventArgs e) {
 9         // ...
10         WebApplication.Instance.CreateCustomLogonWindowObjectSpace +=
11         application_CreateCustomLogonWindowObjectSpace;
12         WebApplication.Instance.Setup();
13         // ...
14     }
15     private static void application_CreateCustomLogonWindowObjectSpace(object sender,
16     CreateCustomLogonWindowObjectSpaceEventArgs e) {
17         e.ObjectSpace = ((XafApplication)sender).CreateObjectSpace(typeof(CustomLogonParameters));
18         if (e.ObjectSpace is NonPersistentObjectSpace) {
19             IObjectSpace objectSpaceCompany = ((XafApplication)sender).CreateObjectSpace(typeof(Company));
20             ((NonPersistentObjectSpace)e.ObjectSpace).AdditionalObjectSpaces.Add(objectSpaceCompany);
21         }
22     }
23 }
 1 using System;
 2 using System.Collections.Generic;
 3 using CustomLogonParametersExample.Module;
 4 using DevExpress.ExpressApp;
 5 using DevExpress.ExpressApp.DC;
 6 using DevExpress.ExpressApp.Xpo;
 7 using DevExpress.ExpressApp.Web;
 8 // ...
 9 public partial class CustomLogonParametersExampleAspNetApplication : WebApplication {
10     private static NonPersistentTypeInfoSource nonPersistentTypeInfoSource;
11     // ...
12     protected override void CreateDefaultObjectSpaceProvider(CreateCustomObjectSpaceProviderEventArgs args) {
13         args.ObjectSpaceProvider =
14         new XPObjectSpaceProvider(GetDataStoreProvider(args.ConnectionString, args.Connection), true);
15         if (nonPersistentTypeInfoSource == null) {
16             nonPersistentTypeInfoSource = new NonPersistentTypeInfoSource(TypesInfo, new List<Type>()
17                { typeof(CustomLogonParameters) });
18         }
19         args.ObjectSpaceProviders.Add(new NonPersistentObjectSpaceProvider(TypesInfo,
20         nonPersistentTypeInfoSource));
21     }
22 }
让登录窗口能够访问外部数据
为了能够让下拉框读取公司、员工数据。
Win版本,打开WinApplication.cs,代码如下。
using DevExpress.ExpressApp;
using DevExpress.ExpressApp.Win;
using DevExpress.ExpressApp.Security;
//……
public partial class UserTestWindowsFormsApplication : WinApplication {
//……
public UserTestWindowsFormsApplication() {
//……
//允许在登录窗口中访问公司、员工数据
            ((SecurityStrategy)Security).AnonymousAllowedTypes.Add(typeof(Company));
          ((SecurityStrategy)Security).AnonymousAllowedTypes.Add(typeof(Employee));
}
//……
}
//……
Web版本,打开WebApplication.cs,代码如下。
 1 using DevExpress.ExpressApp;
 2 using DevExpress.ExpressApp.Security;
 3 using DevExpress.ExpressApp.Web;
 4 // ...
 5 public partial class UserTestAspNetApplication: WebApplication {
 6     // ...
 7     public UserTestAspNetApplication () {
 8         // ...
 9 //允许登录串口查看公司、员工数据
10             ((SecurityStrategy)Security).AnonymousAllowedTypes.Add(typeof(Company));
11             ((SecurityStrategy)Security).AnonymousAllowedTypes.Add(typeof(Employee));
12     }
13     // ...
14 }
将自定义类传递给安全系统
调用应用程序设计器。将SecurityStrategyComplex组件从工具箱拖到设计器的安全窗格上。然后,将您在与平台无关的模块中实现的CustomAuthentication组件放在同一个窗格中。
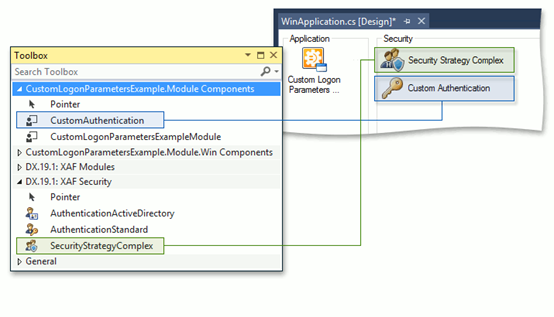
关注SecurityStrategyComplex组件。在Properties窗口中,设置SecurityStrategy。UserType员工。

个人源码地址
百度网盘链接: https://pan.baidu.com/s/1atleFNZeqYqoiNtKfeErIA 提取码: 9fkf