本文较大篇幅引用https://www.mrhelloworld.com/config/,相关内容版权归该文章作者所有
服务配置现状
配置文件是我们再熟悉不过的,在微服务系统中,每个微服务不仅仅只有代码,还需要连接其他资源,例如数据库的配置或功能性的开关 MySQL、Redis 、Security 等相关的配置。
除了项目运行的基础配置之外,还有一些配置是与我们业务有关系的,比如说七牛存储、短信和邮件相关,或者一些业务上的开关。
但是随着微服务系统的不断迭代,整个微服务系统可能会成为一个网状结构,这个时候就要考虑整个微服务系统的扩展性、伸缩性、耦合性等等。其中一个很重要的环节就是配置管理的问题。
常规配置管理解决方案缺点
- 硬编码(需要修改代码、繁琐、风险大)
- properties 或者 yml(集群环境下需要替换和重启)
- xml(重新打包和重启)
为什么使用 Spring Cloud Config
由于常规配置管理有很大的缺点,所以采用 Spring Cloud Config 集中式的配置中心来管理每个服务的配置信息。
Spring Cloud Config 在微服务分布式系统中,采用 Server 服务端和 Client 客户端的方式来提供可扩展的配置服务。
服务端提供配置文件的存储,以接口的形式将配置文件的内容提供出去;
客户端通过接口获取数据、并依据此数据初始化自己的应用。
配置中心负责管理所有服务的各种环境配置文件。
配置中心默认采用 Git 的方式存储配置文件,因此我们可以很容易的部署和修改,有助于环境配置进行版本管理。
Spring Cloud Config 解决了什么问题
Spring Cloud Config 解决了微服务配置的中心化、版本控制、平台独立、语言独立等问题。其特性如下:
- 提供服务端和客户端支持(Spring Cloud Config Server 和 Spring Cloud Config Client)
- 集中式管理分布式环境下的应用部署
- 属性值的加密和解密(对称加密和非对称加密)
- 基于 Spring 环境,无缝与 Spring 应用集成
- 可用于任何语言开发的程序
- 默认实现基于 Git ,可以进行版本管理
环境准备
config-demo 聚合工程。SpringBoot 2.2.4.RELEASE、Spring Cloud Hoxton.SR1。
eureka-server:注册中心(用于集成 Eureka 版的配置中心)eureka-server02:注册中心(用于集成 Eureka 版的配置中心)order-service:订单服务(用于集成 Eureka 版的配置中心)
仓库
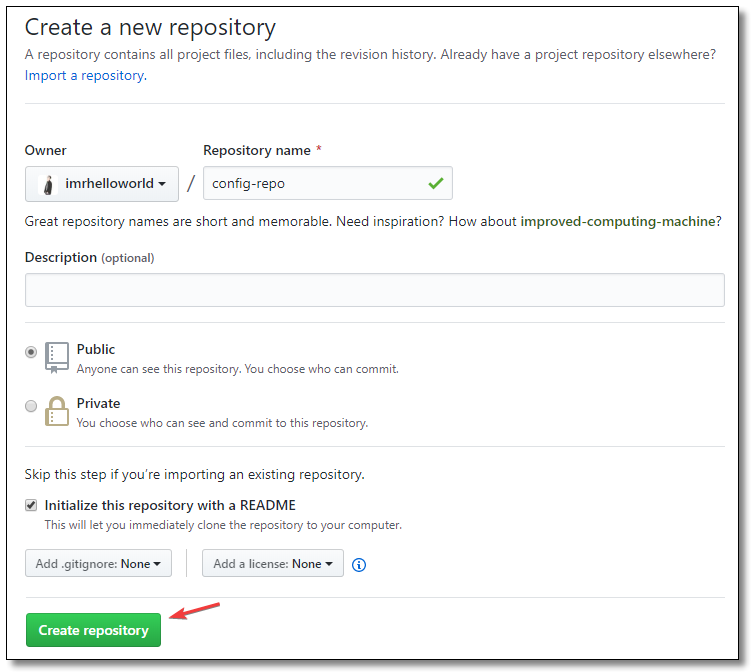
Repository name:仓库名称Description(可选):仓库描述介绍Public,Private:仓库权限(公开共享,私有或指定合作者)Initialize this repository with a README:添加一个 README.mdAdd .gitignore:不需要进行版本管理的文件类型,生成对应文件.gitignoreAdd a license:证书类型,生成对应文件LICENSE
配置文件
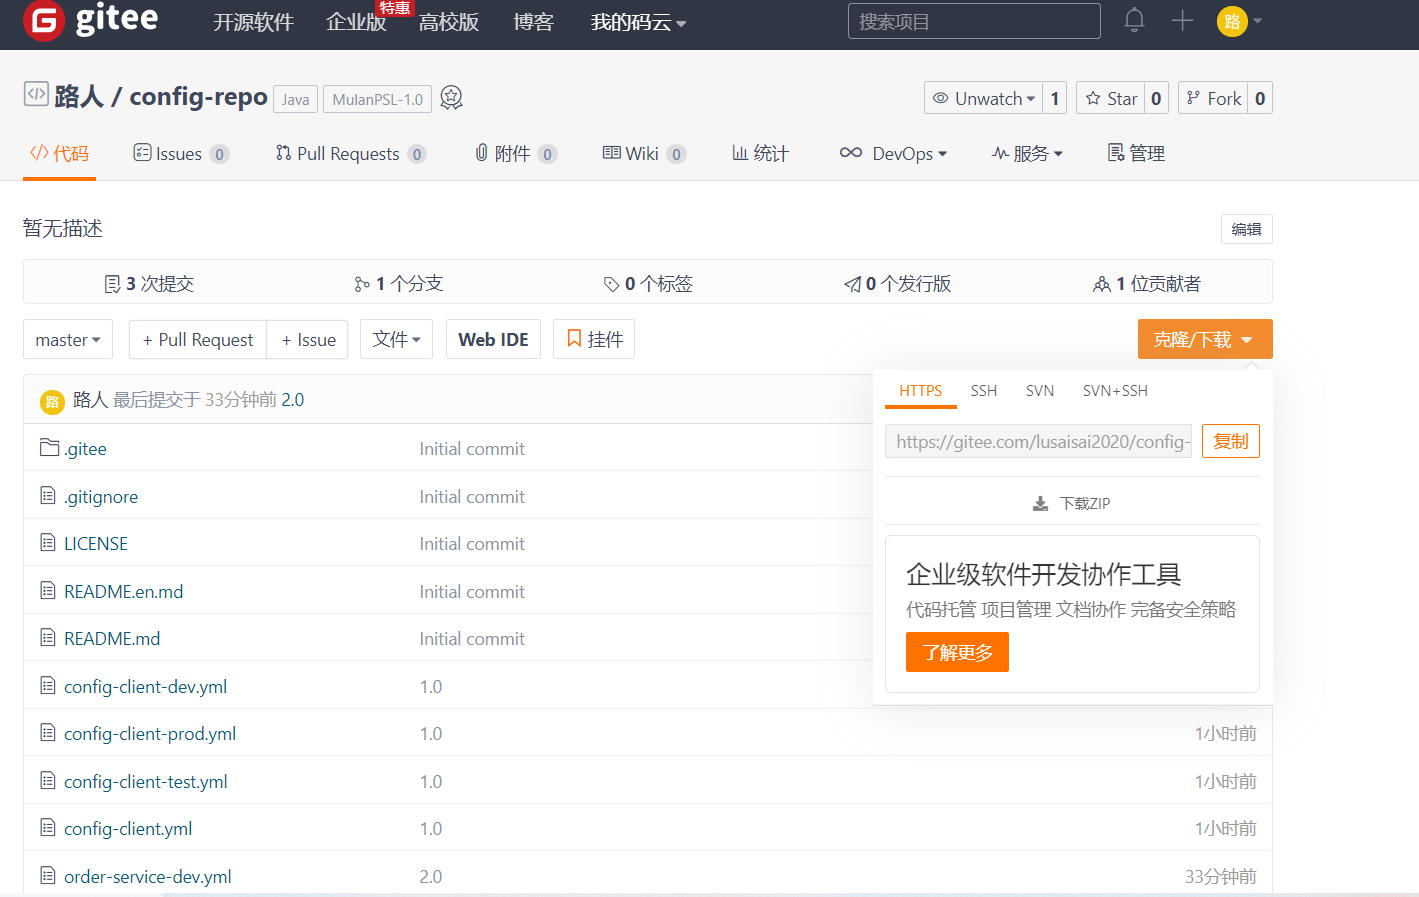
不同环境的配置文件,上传至 config-repo 仓库
配置文件的名称不是乱起的,例如 config-client-dev.yml 和 config-client-prod.yml 这两个文件是同一个项目的不同环境,
项目名称为 config-client, 一个对应开发环境,一个对应正式环境。test 表示测试环境
config-client.yml
server:
  port: 7777 # 端口

spring:
  application:
    name: config-client # 应用名称

# 自定义配置
name: config-client-default
config-client-dev.yml
server:
  port: 7778 # 端口

spring:
  application:
    name: config-client # 应用名称

# 自定义配置
name: config-client-dev
config-client-test.yml
server:
  port: 7779 # 端口

spring:
  application:
    name: config-client # 应用名称

# 自定义配置
name: config-client-test
config-client-prod.yml
server:
  port: 7780 # 端口

spring:
  application:
    name: config-client # 应用名称

# 自定义配置
name: config-client-prod
入门案例
入门案例讲解:基础版的配置中心(不集成 Eureka)
1.创建服务端
在 config-demo 父工程下创建子项目 config-server。
2.添加依赖
<?xml version="1.0" encoding="UTF-8"?>

<project xmlns="http://maven.apache.org/POM/4.0.0" xmlns:xsi="http://www.w3.org/2001/XMLSchema-instance"
         xsi:schemaLocation="http://maven.apache.org/POM/4.0.0 http://maven.apache.org/xsd/maven-4.0.0.xsd">
    <modelVersion>4.0.0</modelVersion>

    <groupId>com.example</groupId>
    <artifactId>config-server</artifactId>
    <version>1.0-SNAPSHOT</version>

    <!-- 继承父依赖 -->
    <parent>
        <groupId>com.example</groupId>
        <artifactId>config-demo</artifactId>
        <version>1.0-SNAPSHOT</version>
    </parent>

    <!-- 项目依赖 -->
    <dependencies>
        <!-- spring cloud config server 依赖 -->
        <dependency>
            <groupId>org.springframework.cloud</groupId>
            <artifactId>spring-cloud-config-server</artifactId>
        </dependency>

        <!-- spring boot test 依赖 -->
        <dependency>
            <groupId>org.springframework.boot</groupId>
            <artifactId>spring-boot-starter-test</artifactId>
            <scope>test</scope>
            <exclusions>
                <exclusion>
                    <groupId>org.junit.vintage</groupId>
                    <artifactId>junit-vintage-engine</artifactId>
                </exclusion>
            </exclusions>
        </dependency>
    </dependencies>

</project>
3.配置文件
server:
  port: 8888 # 端口

spring:
  application:
    name: config-server # 应用名称
  cloud:
    config:
      server:
        git:
          uri: https://gitee.com/lusaisai2020/config-repo.git # 配置文件所在仓库地址
          username: xxx             # Github 等产品的登录账号
          password: xxx           # Github 等产品的登录密码
          #default-label: master # 配置文件分支
          #search-paths:         # 配置文件所在根目录
4.启动类
启动类添加 @EnableConfigServer 注解。
package com.example;

import org.springframework.boot.SpringApplication;
import org.springframework.boot.autoconfigure.SpringBootApplication;
import org.springframework.cloud.config.server.EnableConfigServer;

// 配置中心服务端注解
@EnableConfigServer
@SpringBootApplication
public class ConfigServerApplication {

    public static void main(String[] args) {
        SpringApplication.run(ConfigServerApplication.class, args);
    }

}
5.访问规则
Spring Cloud Config 有一套访问规则,我们通过这套规则在浏览器上直接访问即可。
/{application}/{profile}[/{label}]
/{application}-{profile}.yml
/{label}/{application}-{profile}.yml
/{application}-{profile}.properties
/{label}/{application}-{profile}.properties
{application}:应用名称(目标服务名称){profile}:获取指定环境配置,项目有开发环境、测试环境、生产环境,对应到配置文件就是以 application-{profile}.yml 加以区分,例如 application-dev.yml、application-test.yml、application-prod.yml。默认值为 default。{label}:表示 git 分支,默认是 master 分支,如果项目是以分支做区分也是可以的,那就可以通过不同的 label 来控制访问不同的配置文件。
6.测试
http://localhost:8888/config-client/default
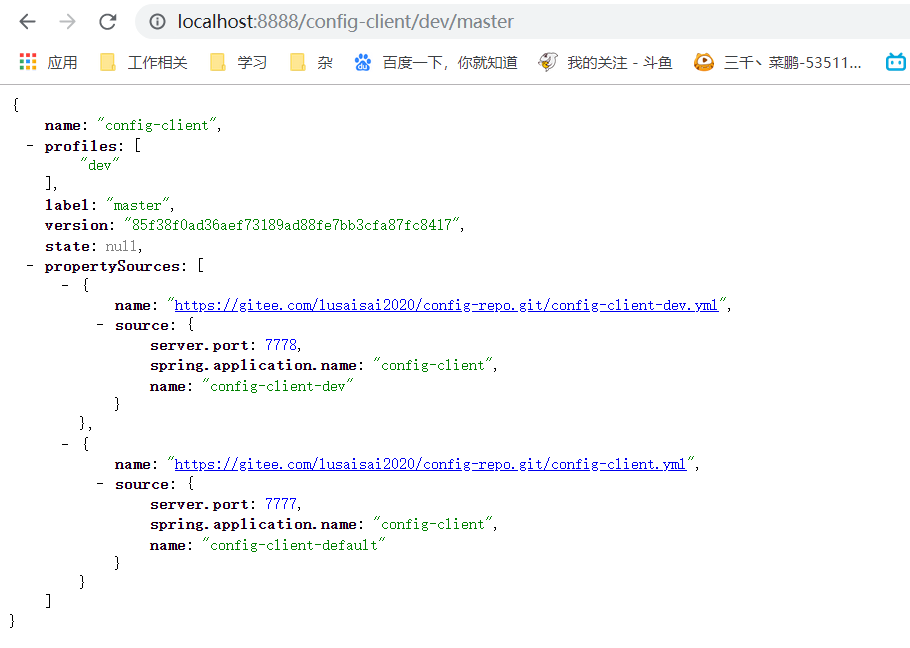
http://localhost:8888/config-client/dev/master
http://localhost:8888/master/config-client-prod.yml
http://localhost:8888/config-client-test.yml
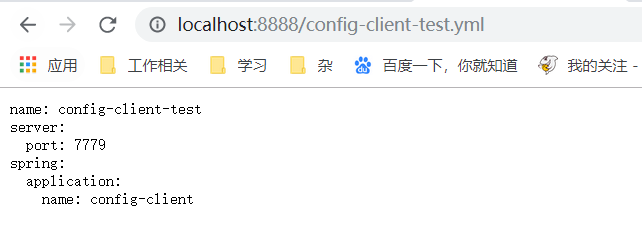
对于yml 和properties类型config可以完美转换, 也就是说 你存的是yml 但是可以读取为properties类型的反过来也是如此
http://localhost:8888/config-client-test.properties
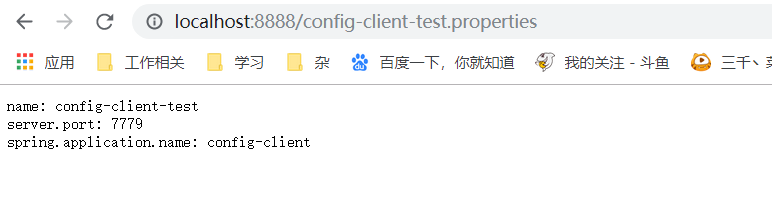
访问以上地址,如果可以正常返回数据,说明配置中心服务端一切正常。
创建客户端
在 config-demo 父工程下创建子项目 config-client。
添加依赖
<?xml version="1.0" encoding="UTF-8"?>

<project xmlns="http://maven.apache.org/POM/4.0.0" xmlns:xsi="http://www.w3.org/2001/XMLSchema-instance"
         xsi:schemaLocation="http://maven.apache.org/POM/4.0.0 http://maven.apache.org/xsd/maven-4.0.0.xsd">
    <modelVersion>4.0.0</modelVersion>

    <groupId>com.example</groupId>
    <artifactId>config-client</artifactId>
    <version>1.0-SNAPSHOT</version>

    <!-- 继承父依赖 -->
    <parent>
        <groupId>com.example</groupId>
        <artifactId>config-demo</artifactId>
        <version>1.0-SNAPSHOT</version>
    </parent>

    <!-- 项目依赖 -->
    <dependencies>
        <!-- spring cloud starter config 依赖 -->
        <dependency>
            <groupId>org.springframework.cloud</groupId>
            <artifactId>spring-cloud-starter-config</artifactId>
        </dependency>
        <!-- spring boot web 依赖 -->
        <dependency>
            <groupId>org.springframework.boot</groupId>
            <artifactId>spring-boot-starter-web</artifactId>
        </dependency>

        <!-- spring boot test 依赖 -->
        <dependency>
            <groupId>org.springframework.boot</groupId>
            <artifactId>spring-boot-starter-test</artifactId>
            <scope>test</scope>
            <exclusions>
                <exclusion>
                    <groupId>org.junit.vintage</groupId>
                    <artifactId>junit-vintage-engine</artifactId>
                </exclusion>
            </exclusions>
        </dependency>
    </dependencies>

</project>
配置文件
客户端配置文件名称必须叫 bootstrap.yml
解释一下这个bootstrap.yml: spring cloud有一个“引导上下文"的概念,这是主应用程序的父上下文。
引导上下文负责从配置服务器加载配置属 性,以及解密外部配置文件中的属性。
和主应用程序加载application.(yml或 properties)中的属性不同,引导上下 文加载(bootstrap.)中的属性。配置在 bootstrap.*中的属性有更高的优先级
spring:
  cloud:
    config:
      name: config-client # 配置文件名称,对应 git 仓库中配置文件前半部分
      uri: http://localhost:8888 # config-server 服务端地址
      label: master # git 分支
      profile: dev # 指定环境
控制层
添加一个 RestController 用于测试获取配置文件信息。
package com.example.controller;

import org.springframework.beans.factory.annotation.Value;
import org.springframework.web.bind.annotation.GetMapping;
import org.springframework.web.bind.annotation.RestController;

@RestController
public class ConfigController {

    @Value("${name}")
    private String name;

    @GetMapping("/name")
    public String getName() {
        return name;
    }

}
启动类
package com.example;

import org.springframework.boot.SpringApplication;
import org.springframework.boot.autoconfigure.SpringBootApplication;

@SpringBootApplication
public class ConfigClientApplication {

    public static void main(String[] args) {
        SpringApplication.run(ConfigClientApplication.class, args);
    }

}
测试
访问:http://localhost:7777/name 结果如下:

Spring Cloud Config 高可用
以上讲了 Spring Cloud Config 最基础的用法,如果我们的项目中使用了 Eureka 作为服务注册发现中心,那么 Spring Cloud Config 也应该注册到 Eureka,方便其他服务使用,并且可以注册多个配置中心服务端,实现高可用。
接下来就集成 Spring Cloud Config 到 Eureka。关于 Eureka 的相关知识大家可翻阅我的历史文章进行学习。
添加配置文件
在 Github 仓库中增加配置文件。
order-service-dev.yml
server:
  port: 9090 # 端口

spring:
  application:
    name: order-service # 应用名称

# 配置 Eureka Server 注册中心
eureka:
  instance:
    prefer-ip-address: true       # 是否使用 ip 地址注册
    instance-id: ${spring.cloud.client.ip-address}:${server.port} # ip:port
  client:
    service-url:                  # 设置服务注册中心地址
      defaultZone: http://localhost:8761/eureka/,http://localhost:8762/eureka/

# 自定义配置
name: order-service-dev
order-service-prod.yml
server:
  port: 9091 # 端口

spring:
  application:
    name: order-service # 应用名称

# 配置 Eureka Server 注册中心
eureka:
  instance:
    prefer-ip-address: true       # 是否使用 ip 地址注册
    instance-id: ${spring.cloud.client.ip-address}:${server.port} # ip:port
  client:
    service-url:                  # 设置服务注册中心地址
      defaultZone: http://localhost:8761/eureka/,http://localhost:8762/eureka/

# 自定义配置
name: order-service-prod
整合注册中心
eureka-server 和 eureka-server02 核心依赖部分一致,参照前文即可
Spring Cloud Config 服务端
服务端和基础版的配置中心相比多了 Eureka 的配置,其他地方都是一样的。
config-server 服务端构建完成以后再复刻一个 config-server02 实现高可用。
依赖
config-server 和 config-server02 核心依赖部分一致。注意是 spring-cloud-config-server 依赖
<?xml version="1.0" encoding="UTF-8"?>

<project xmlns="http://maven.apache.org/POM/4.0.0" xmlns:xsi="http://www.w3.org/2001/XMLSchema-instance"
         xsi:schemaLocation="http://maven.apache.org/POM/4.0.0 http://maven.apache.org/xsd/maven-4.0.0.xsd">
    <modelVersion>4.0.0</modelVersion>

    <groupId>com.example</groupId>
    <artifactId>config-server</artifactId>
    <version>1.0-SNAPSHOT</version>

    <!-- 继承父依赖 -->
    <parent>
        <groupId>com.example</groupId>
        <artifactId>config-demo</artifactId>
        <version>1.0-SNAPSHOT</version>
    </parent>

    <!-- 项目依赖 -->
    <dependencies>
        <!-- spring cloud config server 依赖 -->
        <dependency>
            <groupId>org.springframework.cloud</groupId>
            <artifactId>spring-cloud-config-server</artifactId>
        </dependency>
        <!-- netflix eureka client 依赖 -->
        <dependency>
            <groupId>org.springframework.cloud</groupId>
            <artifactId>spring-cloud-starter-netflix-eureka-client</artifactId>
        </dependency>

        <!-- spring boot test 依赖 -->
        <dependency>
            <groupId>org.springframework.boot</groupId>
            <artifactId>spring-boot-starter-test</artifactId>
            <scope>test</scope>
            <exclusions>
                <exclusion>
                    <groupId>org.junit.vintage</groupId>
                    <artifactId>junit-vintage-engine</artifactId>
                </exclusion>
            </exclusions>
        </dependency>
    </dependencies>

</project>
配置文件
config-server 的 application.yml
server:
  port: 8888 # 端口

spring:
  application:
    name: config-server # 应用名称
  cloud:
    config:
      server:
        git:
          uri: https://github.com/imrhelloworld/config-repo # 配置文件所在仓库地址
          #username:             # Github 等产品的登录账号
          #password:             # Github 等产品的登录密码
          #default-label: master # 配置文件分支
          #search-paths:         # 配置文件所在根目录

# 配置 Eureka Server 注册中心
eureka:
  instance:
    prefer-ip-address: true       # 是否使用 ip 地址注册
    instance-id: ${spring.cloud.client.ip-address}:${server.port} # ip:port
  client:
    service-url:                  # 设置服务注册中心地址
      defaultZone: http://localhost:8761/eureka/,http://localhost:8762/eureka/
config-server02 的 application.yml
server:
  port: 8889 # 端口

spring:
  application:
    name: config-server # 应用名称
  cloud:
    config:
      server:
        git:
          uri: https://github.com/imrhelloworld/config-repo # 配置文件所在仓库地址
          #username:             # Github 等产品的登录账号
          #password:             # Github 等产品的登录密码
          #default-label: master # 配置文件分支
          #search-paths:         # 配置文件所在根目录

# 配置 Eureka Server 注册中心
eureka:
  instance:
    prefer-ip-address: true       # 是否使用 ip 地址注册
    instance-id: ${spring.cloud.client.ip-address}:${server.port} # ip:port
  client:
    service-url:                  # 设置服务注册中心地址
      defaultZone: http://localhost:8761/eureka/,http://localhost:8762/eureka/
启动类
config-server 和 config-server02 启动类核心代码一致。
package com.example;

import org.springframework.boot.SpringApplication;
import org.springframework.boot.autoconfigure.SpringBootApplication;
import org.springframework.cloud.config.server.EnableConfigServer;

// 开启 EurekaClient 注解,当前版本如果配置了 Eureka 注册中心,默认会开启该注解
//@EnableEurekaClient
// 配置中心服务端注解
@EnableConfigServer
@SpringBootApplication
public class ConfigServerApplication {

    public static void main(String[] args) {
        SpringApplication.run(ConfigServerApplication.class, args);
    }

}
Spring Cloud Config 客户端
客户端加入 Eureka 以后,就不用直接和配置中心服务端打交道了,而是通过 Eureka 来访问。
依赖
order-service 的 pom.xml。注意是 spring-cloud-starter-config 依赖。
<?xml version="1.0" encoding="UTF-8"?>

<project xmlns="http://maven.apache.org/POM/4.0.0" xmlns:xsi="http://www.w3.org/2001/XMLSchema-instance"
         xsi:schemaLocation="http://maven.apache.org/POM/4.0.0 http://maven.apache.org/xsd/maven-4.0.0.xsd">
    <modelVersion>4.0.0</modelVersion>

    <groupId>com.example</groupId>
    <artifactId>order-service</artifactId>
    <version>1.0-SNAPSHOT</version>

    <!-- 继承父依赖 -->
    <parent>
        <groupId>com.example</groupId>
        <artifactId>config-demo</artifactId>
        <version>1.0-SNAPSHOT</version>
    </parent>

    <!-- 项目依赖 -->
    <dependencies>
        <!-- spring boot web 依赖 -->
        <dependency>
            <groupId>org.springframework.boot</groupId>
            <artifactId>spring-boot-starter-web</artifactId>
        </dependency>
        <!-- netflix eureka client 依赖 -->
        <dependency>
            <groupId>org.springframework.cloud</groupId>
            <artifactId>spring-cloud-starter-netflix-eureka-client</artifactId>
        </dependency>
        <!-- spring cloud starter config 依赖 -->
        <dependency>
            <groupId>org.springframework.cloud</groupId>
            <artifactId>spring-cloud-starter-config</artifactId>
        </dependency>

        <!-- spring boot test 依赖 -->
        <dependency>
            <groupId>org.springframework.boot</groupId>
            <artifactId>spring-boot-starter-test</artifactId>
            <scope>test</scope>
            <exclusions>
                <exclusion>
                    <groupId>org.junit.vintage</groupId>
                    <artifactId>junit-vintage-engine</artifactId>
                </exclusion>
            </exclusions>
        </dependency>
    </dependencies>

</project>
配置文件
order-service 的 bootstrap.yml,Eureka 注册中心的配置在远程 Git 仓库的 order-service-dev.yml 中。
spring:
  cloud:
    config:
      name: order-service # 配置文件名称,对应 git 仓库中配置文件前半部分
      label: master # git 分支
      profile: dev # 指定环境
      discovery:
        enabled: true # 开启
        service-id: config-server # 指定配置中心服务端的 service-id
控制层
添加一个 RestController 用于测试获取配置文件信息。
package com.example.controller;

import org.springframework.beans.factory.annotation.Value;
import org.springframework.web.bind.annotation.GetMapping;
import org.springframework.web.bind.annotation.RestController;

@RestController
public class ConfigController {

    @Value("${name}")
    private String name;

    @GetMapping("/name")
    public String getName() {
        return name;
    }

}
启动类
package com.example;

import org.springframework.boot.SpringApplication;
import org.springframework.boot.autoconfigure.SpringBootApplication;

// 开启 EurekaClient 注解,当前版本如果配置了 Eureka 注册中心,默认会开启该注解
//@EnableEurekaClient
@SpringBootApplication
public class OrderServiceApplication {

    public static void main(String[] args) {
        SpringApplication.run(OrderServiceApplication.class, args);
    }

}
测试
启动注册中心 eureka-server 和 eureka-server02。
启动配置中心服务端 config-server。
启动配置中心客户端 order-service。
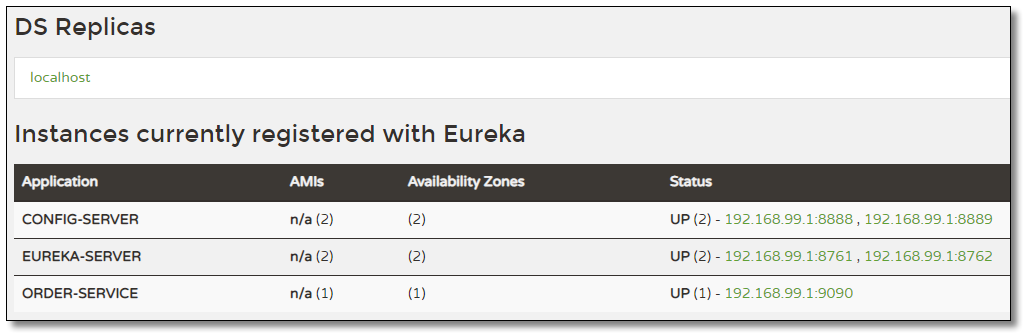
当前环境在 Eureka UI 界面中如下
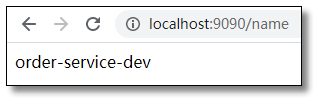
访问:http://localhost:9090/name 结果如下:
config 高可用还可以通过很多种方式, 比如说搭建一个nginx:
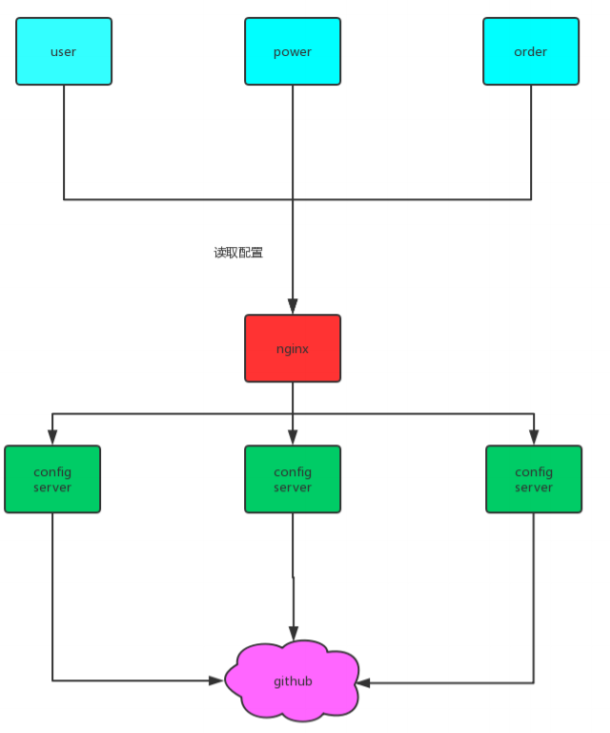
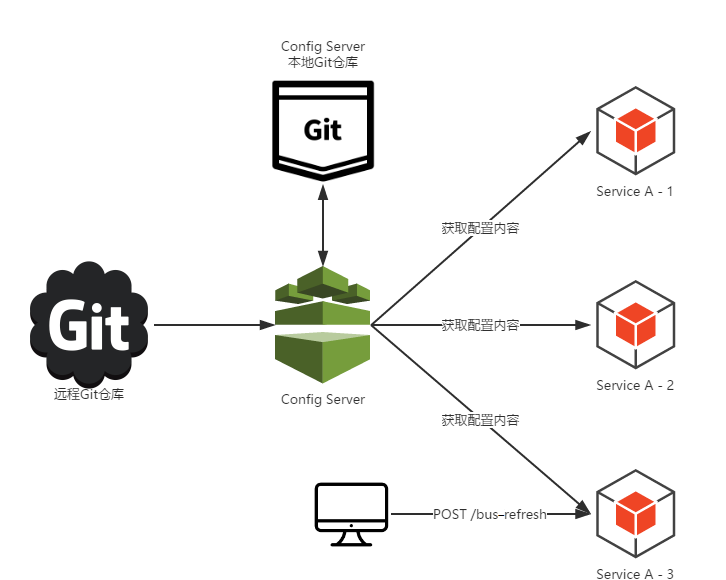
配置中心工作原理
开发人员将配置文件存储至 Git 远程仓库,或后期对 Git 远程仓库的文件进行修改。
如果远程仓库发生了版本改变,Config Server 会将 Git 远程仓库中的文件同步至本地仓库中。
大家仔细观察 Config Server 的控制台可以看到类似如下信息。

至此 Config 配置中心就讲解结束了。