本文是作者原创,版权归作者所有.若要转载,请注明出处.
springboot集成mybatis
1.新建Springboot项目(略)
2.导入相关依赖
<!--spring-boot-->
    <parent>
        <groupId>org.springframework.boot</groupId>
        <artifactId>spring-boot-starter-parent</artifactId>
        <version>2.1.6.RELEASE</version>
    </parent>
    <properties>
        <project.build.sourceEncoding>UTF-8</project.build.sourceEncoding>
        <project.reporting.outputEncoding>UTF8</project.reporting.outputEncoding>
        <java.version>1.8</java.version>
    </properties>

    <dependencies>
        <!--web-->
        <dependency>
            <groupId>org.springframework.boot</groupId>
            <artifactId>spring-boot-starter-web</artifactId>
        </dependency>
        <!--test-->
        <dependency>
            <groupId>org.springframework.boot</groupId>
            <artifactId>spring-boot-starter-test</artifactId>
            <scope>test</scope>
        </dependency>
        <!--mybatis-->
        <dependency>
            <groupId>org.mybatis.spring.boot</groupId>
            <artifactId>mybatis-spring-boot-starter</artifactId>
            <version>2.1.1</version>
        </dependency>
        <!--mysql-->
        <dependency>
            <groupId>mysql</groupId>
            <artifactId>mysql-connector-java</artifactId>
        </dependency>
        <!--Druid 数据源-->
        <dependency>
            <groupId>com.alibaba</groupId>
            <artifactId>druid</artifactId>
            <version>1.1.21</version>
        </dependency>
        <!--devtools热部署-->
        <dependency>
            <groupId>org.springframework.boot</groupId>
            <artifactId>spring-boot-devtools</artifactId>
            <optional>true</optional>
            <scope>true</scope>
        </dependency>
        <!-- swagger -->
        <dependency>
            <groupId>io.springfox</groupId>
            <artifactId>springfox-swagger2</artifactId>
            <version>2.9.2</version>
        </dependency>
        <!-- swagger-ui -->
        <dependency>
            <groupId>io.springfox</groupId>
            <artifactId>springfox-swagger-ui</artifactId>
            <version>2.9.2</version>
        </dependency>

    </dependencies>

    <build>
        <plugins>
            <!--maven插件-->
            <plugin>
                <groupId>org.springframework.boot</groupId>
                <artifactId>spring-boot-maven-plugin</artifactId>
            </plugin>
        </plugins>

        <!--加载xml等文件为资源文件-->
        <resources>
            <resource>
                <directory>src/main/resources</directory>
            </resource>
            <resource>
                <directory>src/main/java</directory>
                <includes>
                    <include>**/*.xml</include>
                    <include>**/*.properties</include>
                    <include>**/*.tld</include>
                </includes>
                <filtering>false</filtering>
            </resource>
        </resources>
    </build>
3. 修改application.yml配置文件
server:
  port: 5000 #端口号
  servlet:
    context-path: /pdzx #项目路径

spring:
  datasource:
    driver-class-name: com.mysql.cj.jdbc.Driver
    url: jdbc:mysql://localhost:3306/pdzx?characterEncoding=utf8&useSSL=false&allowMultiQueries=true&serverTimezone=GMT%2B8
    username: xxx
    password: xxx
  jackson:
    #格式化日期
    date-format:  yyyy-MM-dd HH:mm:ss
    #时区配置
    time-zone: Asia/Shanghai
  devtools:
      restart:
        enabled: true  #设置开启热部署
        additional-paths: src/main/java #重启资源目录

mybatis:
  type-aliases-package: com.pdzx.po #别名
  mapper-locations: classpath:com/pdzx/mapper/*.xml  #mybatis的sql文件xml路径配置
3. 新建包名,如下图

dao层
@Repository
public interface VideoInfoMapper {

    int deleteByPrimaryKey(Integer id);

    int insert(VideoInfo record);

    int insertSelective(VideoInfo record);

    VideoInfo selectByPrimaryKey(Integer id);

    int updateByPrimaryKeySelective(VideoInfo record);

    int updateByPrimaryKey(VideoInfo record);
}
service层
public interface VideoInfoService {
    VideoInfo selectByPrimaryKey(Integer id);
}
实现类
@Service
public class VideoInfoServiceImpl implements VideoInfoService {

    @Autowired
    private VideoInfoMapper videoInfoMapper;

    @Override
    public VideoInfo selectByPrimaryKey(Integer id) {
        return videoInfoMapper.selectByPrimaryKey(id);
    }
}
controller层
@RequestMapping("video")
@RestController
public class VideoInfoController {
    @Autowired
    private VideoInfoService videoInfoService;

    @GetMapping("/selectByPrimaryKey")
    public VideoInfo selectByPrimaryKey(Integer id){
        return videoInfoService.selectByPrimaryKey(id);
    }

    @GetMapping("/hello")
    public String hello(){
        return "hello springboot-mybatis-xml";
    }

    @GetMapping("/hi")
    public String hi(){
        return "hi springboot-mybatis-xml";
    }

}
7.生成文件后在启动类中添加注解@MapperScan
@MapperScan("com.pdzx.dao")
@SpringBootApplication
public class VideoApplication {

    public static void main(String[] args) {
        SpringApplication.run(VideoApplication.class);
    }

}
8.访问以下路径,测试
http://localhost:5000/pdzx/video/selectByPrimaryKey?id=83
看结果
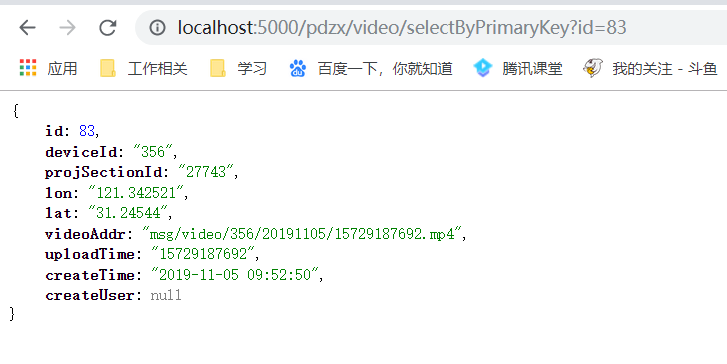
至此,springboot集成mybatis成功
springboot集成热部署
1.注意依赖
<!--devtools热部署-->
        <dependency>
            <groupId>org.springframework.boot</groupId>
            <artifactId>spring-boot-devtools</artifactId>
            <optional>true</optional>
            <scope>true</scope>
        </dependency>
2.注意配置
spring:
  devtools:
      restart:
        enabled: true  #设置开启热部署
        additional-paths: src/main/java #重启资源目录
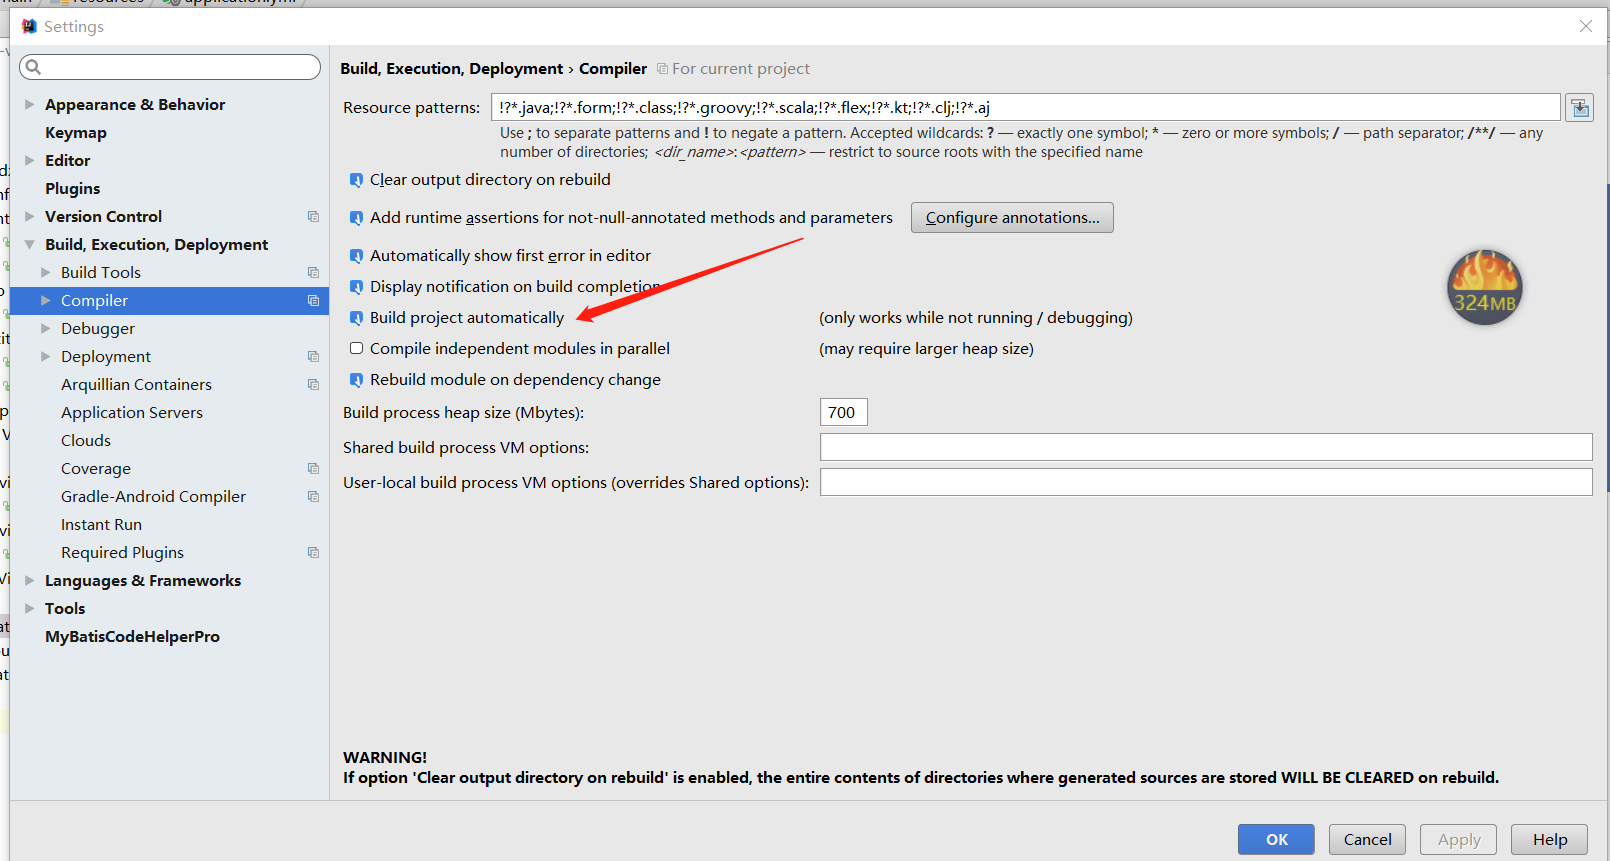
3.设置IDEA的自动编译:,如图
4.安装ctrl + shift + alt + /,选择Registry,勾上 Compiler autoMake allow when app running,如图
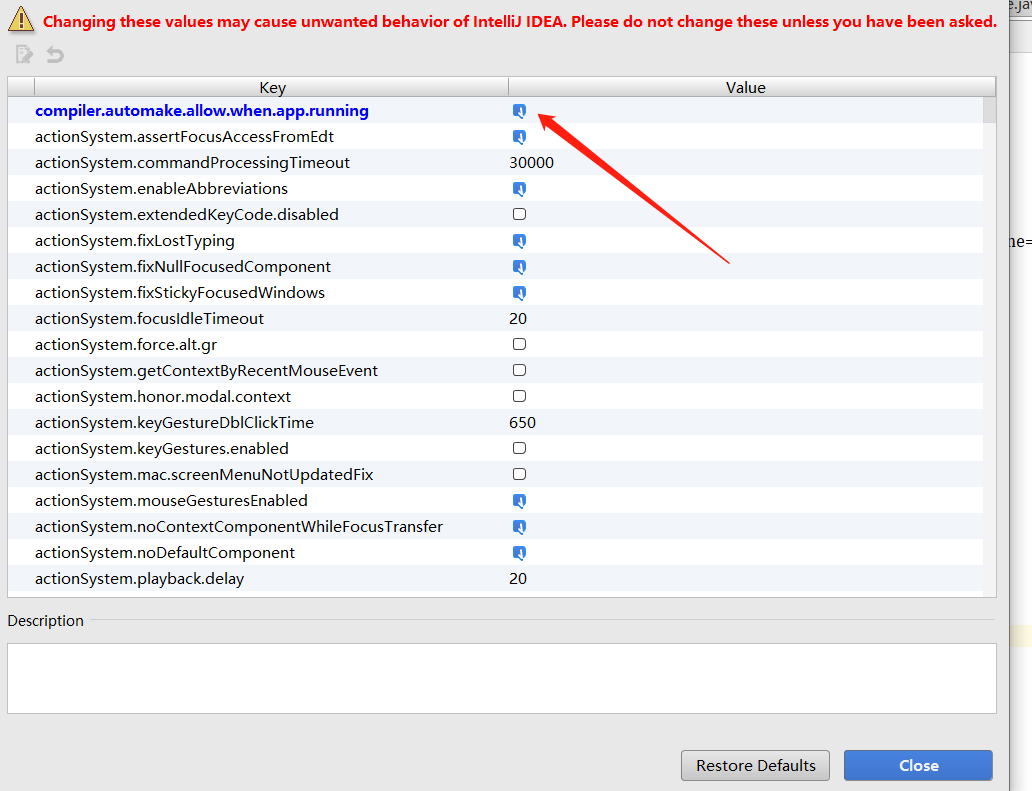
5.重启idea即可生效
SpringBoot整合Swagger2
1.两个Swagger2相关的依赖
     <!-- swagger -->
        <dependency>
            <groupId>io.springfox</groupId>
            <artifactId>springfox-swagger2</artifactId>
            <version>2.9.2</version>
        </dependency>
        <!-- swagger-ui -->
        <dependency>
            <groupId>io.springfox</groupId>
            <artifactId>springfox-swagger-ui</artifactId>
            <version>2.9.2</version>
        </dependency>
2.Swagger2配置
package com.pdzx.config;

import springfox.documentation.service.Contact;
import org.springframework.context.annotation.Bean;
import org.springframework.context.annotation.Configuration;
import springfox.documentation.builders.ApiInfoBuilder;
import springfox.documentation.builders.PathSelectors;
import springfox.documentation.builders.RequestHandlerSelectors;
import springfox.documentation.spi.DocumentationType;
import springfox.documentation.spring.web.plugins.Docket;
import springfox.documentation.swagger2.annotations.EnableSwagger2;

/**
 * Created by bianxh on 2019/1/21.
 */
@Configuration
@EnableSwagger2//启用Swagger2
public class SwaggerApp {

    //http://localhost:5000/pdzx/swagger-ui.html   项目路径/swagger-ui.html
    @Bean
    public Docket createRestApi() {
        return new Docket(DocumentationType.SWAGGER_2)
                .pathMapping("/")//配置映射路径和要扫描的接口的位置
                .select()
                .apis(RequestHandlerSelectors.basePackage("com.pdzx.controller"))//配置要扫描的接口的位置
                .paths(PathSelectors.any())
                .build().apiInfo(new ApiInfoBuilder()//配置一下Swagger2文档网站的信息
                        .title("SpringBoot整合Swagger")//网站的title
                        .description("本站是平大客户端的接口文档信息")//网站的描述
                        .version("9.0")//接口版本
                        .contact(new Contact("平大开发部","http://www.shpingda.com/","xxx@gmail.com"))//联系人的信息
                        .license("The Apache License")//使用的协议
                        .licenseUrl("http://www.baidu.com")//
                        .build());
    }
}
3.创建接口
@RestController
@Api(tags = "用户管理相关接口")//可以用来标记当前Controller的功能
@RequestMapping("/user")
public class UserController {

    @PostMapping("/addUser")
    @ApiOperation("添加用户的接口")//用来标记一个方法的作用
    @ApiImplicitParams(//如果有多个参数,多个@ApiImplicitParam注解需要放在一个@ApiImplicitParams注解中
            {
                //用来描述一个参数,可以配置参数的中文含义,也可以给参数设置默认值,这样在接口测试的时候可以避免手动输入
            @ApiImplicitParam(name = "username", value = "用户名", defaultValue = "李四"),
            //假如开发者需要指定一个参数必填,@RequestParam(required = true)注解不能省略
            @ApiImplicitParam(name = "address", value = "用户地址", defaultValue = "深圳", required = true)
            }
    )
    public User addUser(@RequestParam( "username") String username, @RequestParam( "address") String address) {
        User user = new User();
        user.setUsername(username);
        user.setAddress(address);
        return user;
    }

    @GetMapping("/getUserById")
    @ApiOperation("根据id查询用户的接口")
    @ApiImplicitParam(name = "id", value = "用户id", defaultValue = "99", required = true)
    public User getUserById(@RequestParam( "id")  Integer id) {
        User user = new User();
        user.setId(id);
        return user;
    }

    @PutMapping("/updateUserById")
    @ApiOperation("根据id更新用户的接口")//如果参数是一个对象(例如上文的更新接口),对于参数的描述也可以放在实体类中
    public User updateUserById(@RequestBody User user) {
        return user;
    }
}
user
@ApiModel
public class User {

    @ApiModelProperty(value = "用户id")
    private Integer id;
    @ApiModelProperty(value = "用户名")
    private String username;
    @ApiModelProperty(value = "用户地址")
    private String address;

    public Integer getId() {
        return id;
    }

    public void setId(Integer id) {
        this.id = id;
    }

    public String getUsername() {
        return username;
    }

    public void setUsername(String username) {
        this.username = username;
    }

    public String getAddress() {
        return address;
    }

    public void setAddress(String address) {
        this.address = address;
    }

}
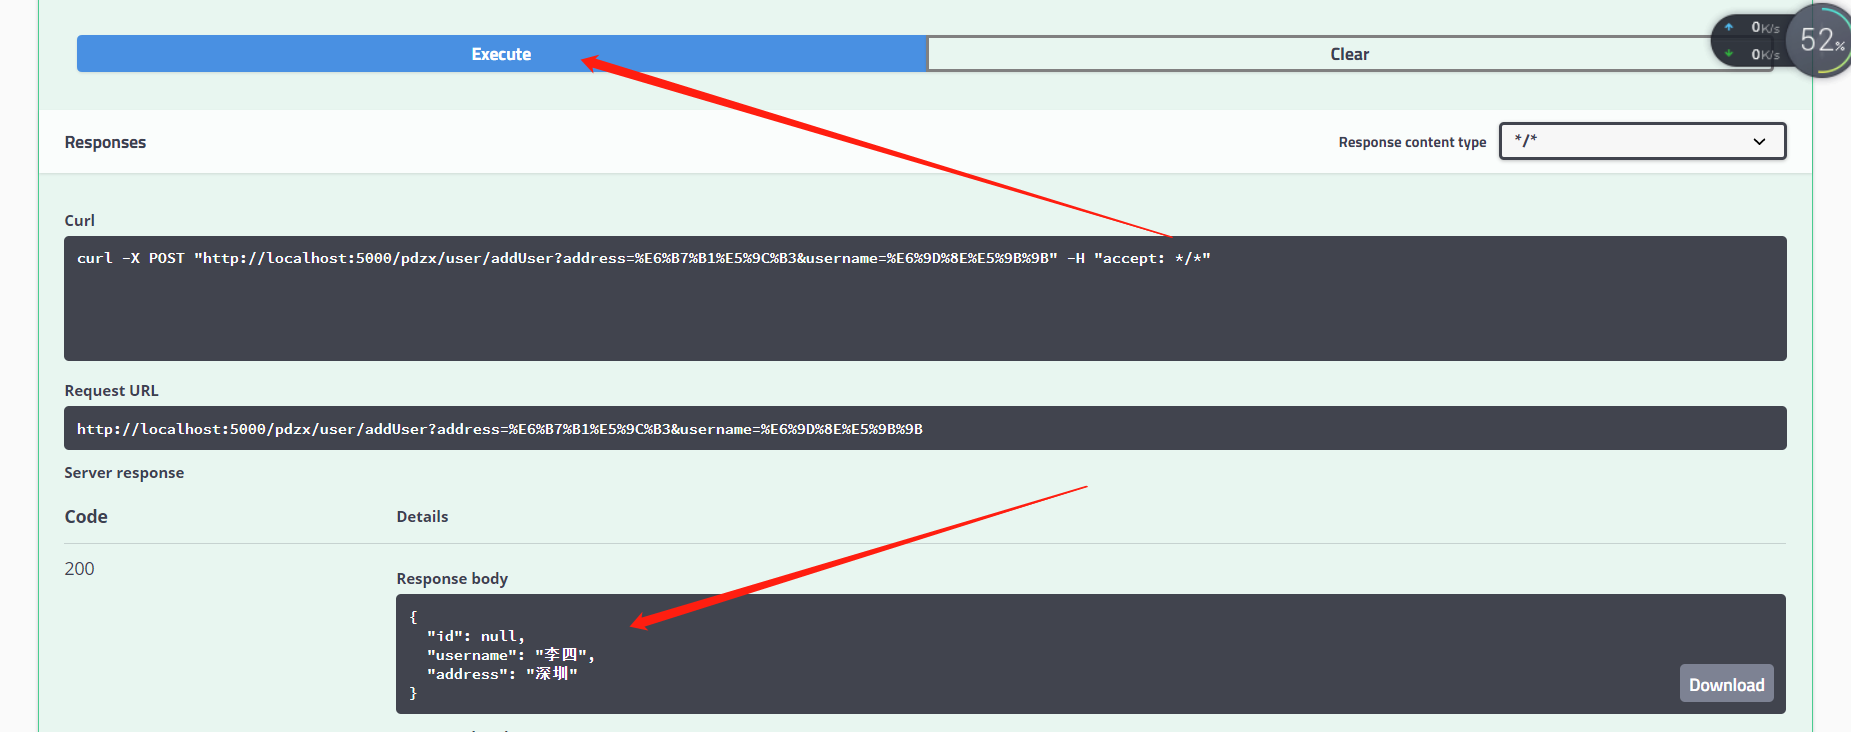
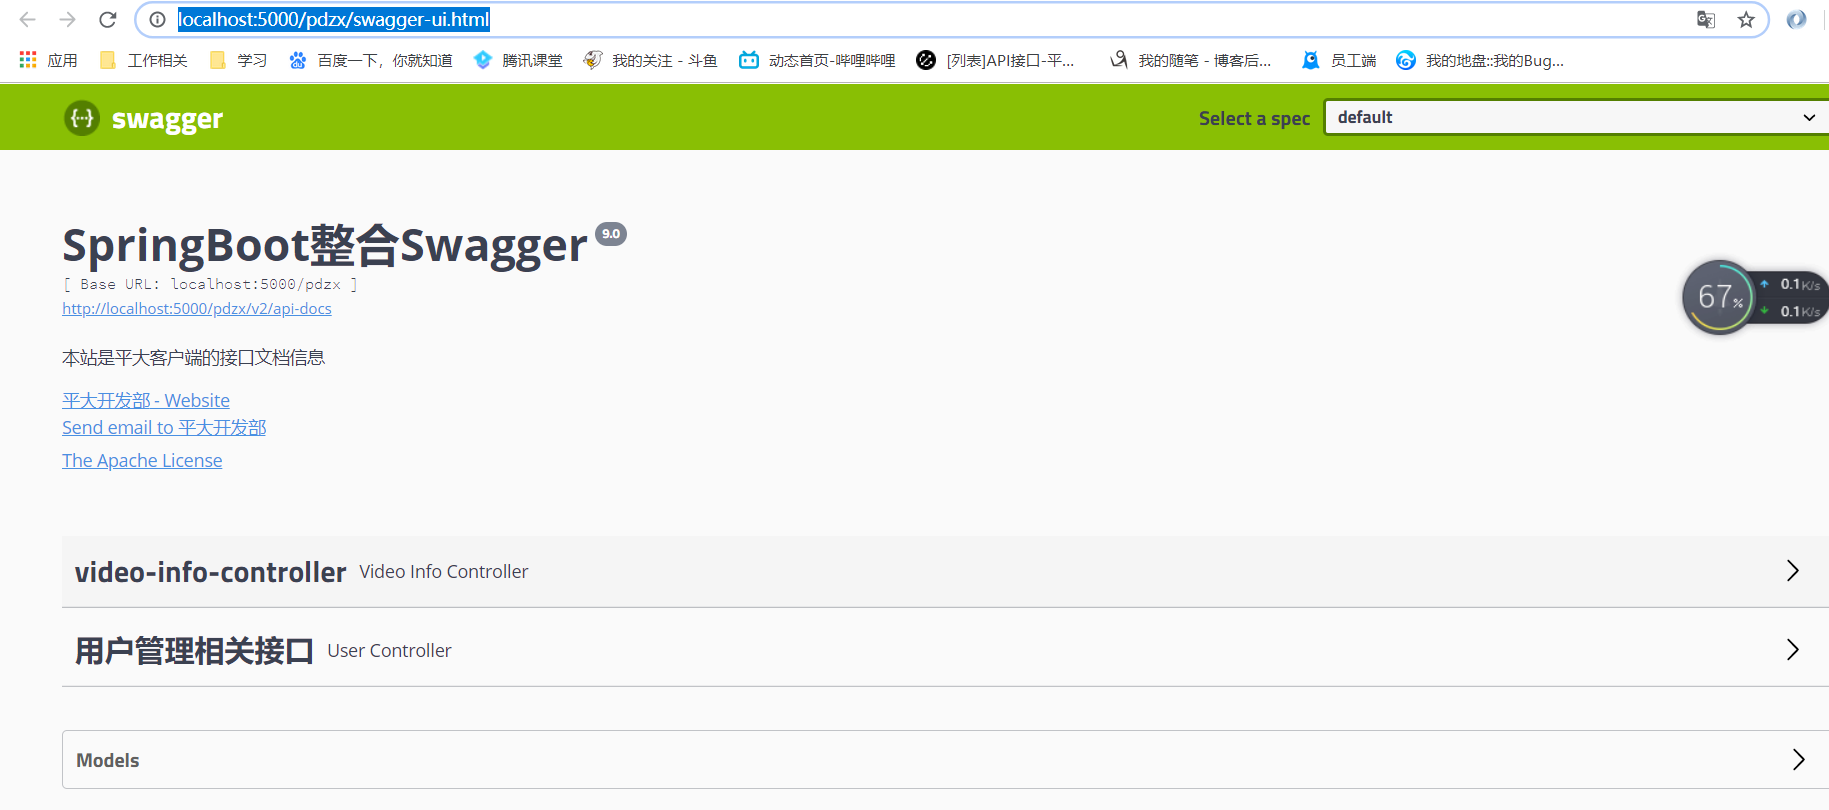
4.访问一下路径(项目路径/swagger-ui.html)
看结果
5.测试,点击Execute按钮,表示发送请求进行测试。测试结果会展示在下面的Response中