本文是作者原创,版权归作者所有.若要转载,请注明出处.
本文RabbitMQ版本为rabbitmq-server-3.7.17,erlang为erlang-22.0.7.请各位去官网查看版本匹配和下载,也可以留言,我发安装包
过期时间TTL(Time To Live)
过期时间TTL表示可以对消息设置预期的时间,在这个时间内都可以被消费者接收获取;过了之后消息将自动被删除。RabbitMQ可以对消息和队列设置TTL。目前有两种方法可以设置。
- 第一种方法是通过队列属性设置,队列中所有消息都有相同的过期时间。
- 第二种方法是对消息进行单独设置,每条消息TTL可以不同。
如果上述两种方法同时使用,则消息的过期时间以两者之间TTL较小的那个数值为准。消息在队列的生存时间一旦超过设置的TTL值,就称为dead message被投递到死信队列, 消费者将无法再收到该消息。
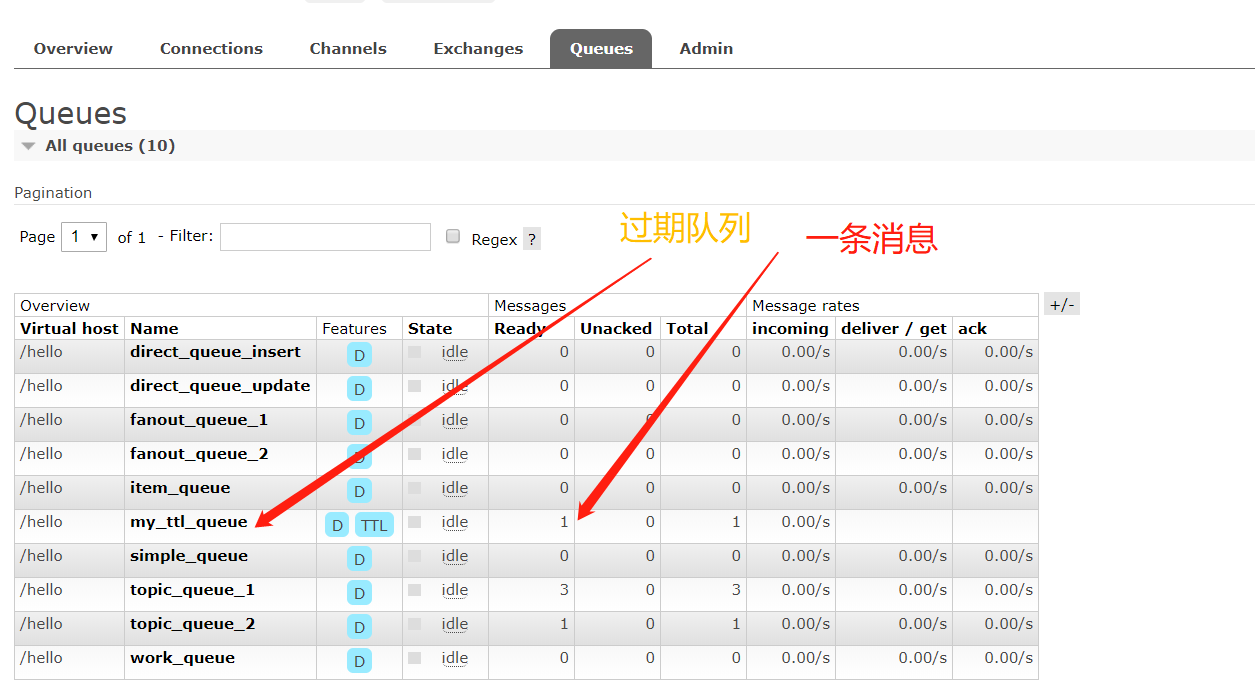
1. 设置队列TTL
配置resourcesspringspring-rabbitmq.xml 文件
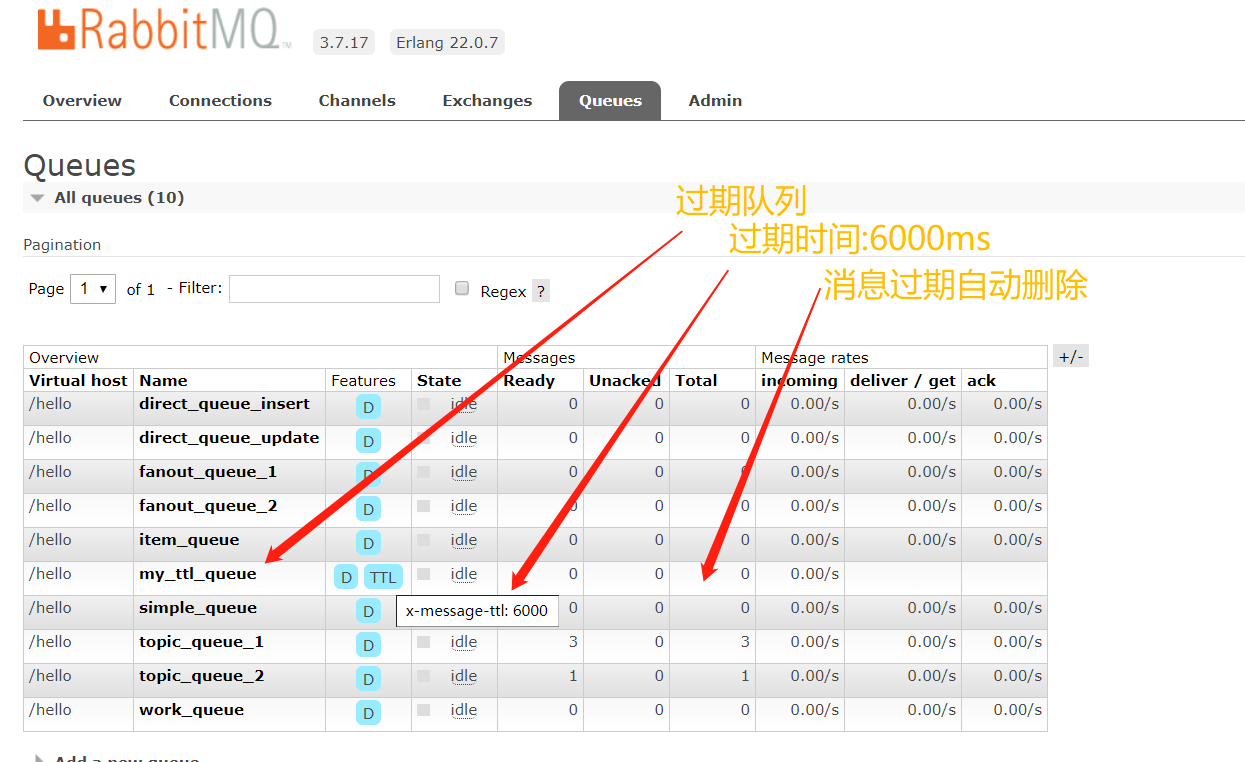
<?xml version="1.0" encoding="UTF-8"?>
<beans xmlns="http://www.springframework.org/schema/beans"
       xmlns:xsi="http://www.w3.org/2001/XMLSchema-instance"
       xmlns:rabbit="http://www.springframework.org/schema/rabbit"
       xsi:schemaLocation="
       http://www.springframework.org/schema/beans http://www.springframework.org/schema/beans/spring-beans.xsd
       http://www.springframework.org/schema/rabbit http://www.springframework.org/schema/rabbit/spring-rabbit.xsd">

    <!--定义过期队列及其属性,不存在则自动创建-->
    <rabbit:queue id="my_ttl_queue" name="my_ttl_queue" auto-declare="true">
        <rabbit:queue-arguments>
            <!--投递到该队列的消息如果没有消费都将在6秒之后被删除-->
            <entry key="x-message-ttl" value-type="long" value="6000"/>
        </rabbit:queue-arguments>
    </rabbit:queue>
<rabbit:connection-factory id="connectionFactory" host="192.168.75.163"
                           port="5672"
                           username="test01"
                           password="test01"
                           virtual-host="/hello"

/>
</beans>
参数 x-message-ttl 的值 必须是非负 32 位整数 (0 <= n <= 2^32-1) ,以毫秒为单位表示 TTL 的值。这样,值 6000 表示存在于 队列 中的当前 消息 将最多只存活 6 秒钟
如果不设置TTL,则表示此消息不会过期。如果将TTL设置为0,则表示除非此时可以直接将消息投递到消费者,否则该消息会被立即丢弃。
然后在测试类中编写如下方法发送消息到上述定义的队列:
@RunWith(SpringRunner.class)
@SpringBootTest
public class ProducerTest {

    @Autowired
    private RabbitTemplate rabbitTemplate;

    /**
     * 过期队列消息
     * 投递到该队列的消息如果没有消费都将在6秒之后被删除
     */
    @Test
    public void ttlQueueTest(){
        //路由键与队列同名
        rabbitTemplate.convertAndSend("my_ttl_queue", "发送到过期队列my_ttl_queue,6秒内不消费则不能再被消费。");
    }

}
启动类中导入配置文件
//导入配置文件
@ImportResource("classpath:/spring/spring-rabbitmq.xml")
@SpringBootApplication
public class ProducerApplication {

    public static void main(String[] args) {
        SpringApplication.run(ProducerApplication.class, args);
    }

}
执行单元测试,看结果
6秒后,再看结果
2. 设置消息TTL
消息的过期时间;只需要在发送消息(可以发送到任何队列,不管该队列是否属于某个交换机)的时候设置过期时间即可。
在测试类中编写如下方法发送消息并设置过期时间到队列:
/**
     * 过期消息
     * 该消息投递任何交换机或队列中的时候;如果到了过期时间则将从该队列中删除
     */
    @Test
    public void ttlMessageTest(){
        MessageProperties messageProperties = new MessageProperties();
        //设置消息的过期时间,3秒
        messageProperties.setExpiration("3000");
        Message message = new Message("测试过期消息,3秒钟过期".getBytes(), messageProperties);
        //路由键与队列同名
        rabbitTemplate.convertAndSend("my_ttl_queue", message);
    }
expiration 字段以微秒为单位表示 TTL 值。且与 x-message-ttl 具有相同的约束条件。因为 expiration 字段必须为字符串类型,broker 将只会接受以字符串形式表达的数字。
当同时指定了 queue 和 message 的 TTL 值,则两者中较小的那个才会起作用。
死信队列
DLX,全称为Dead-Letter-Exchange , 可以称之为死信交换机,也有人称之为死信邮箱。
当消息在一个队列中变成死信(dead message)之后,它能被重新发送到另一个交换机中,这个交换机就是DLX ,绑定DLX的队列就称之为死信队列。
消息变成死信,可能是由于以下的原因:
- 消息被拒绝
- 消息过期
- 队列达到最大长度
DLX也是一个正常的交换机,和一般的交换机没有区别,它能在任何的队列上被指定,实际上就是设置某一个队列的属性。
当这个队列中存在死信时,Rabbitmq就会自动地将这个消息重新发布到设置的DLX上去,进而被路由到另一个队列,即死信队列。
要想使用死信队列,只需要在定义队列的时候设置队列参数 x-dead-letter-exchange 指定交换机即可。

具体步骤如下
1. 定义死信交换机
<!--定义定向交换机中的持久化死信队列,不存在则自动创建-->
<rabbit:queue id="my_dlx_queue" name="my_dlx_queue" auto-declare="true"/>

<!--定义广播类型交换机;并绑定上述队列-->
<rabbit:direct-exchange id="my_dlx_exchange" name="my_dlx_exchange" auto-declare="true">
    <rabbit:bindings>
        <!--绑定路由键my_ttl_dlx、my_max_dlx,可以将过期的消息转移到my_dlx_queue队列-->
        <rabbit:binding key="my_ttl_dlx" queue="my_dlx_queue"/>
        <rabbit:binding key="my_max_dlx" queue="my_dlx_queue"/>
    </rabbit:bindings>
</rabbit:direct-exchange>
2. 队列设置死信交换机
<!--定义过期队列及其属性,不存在则自动创建-->
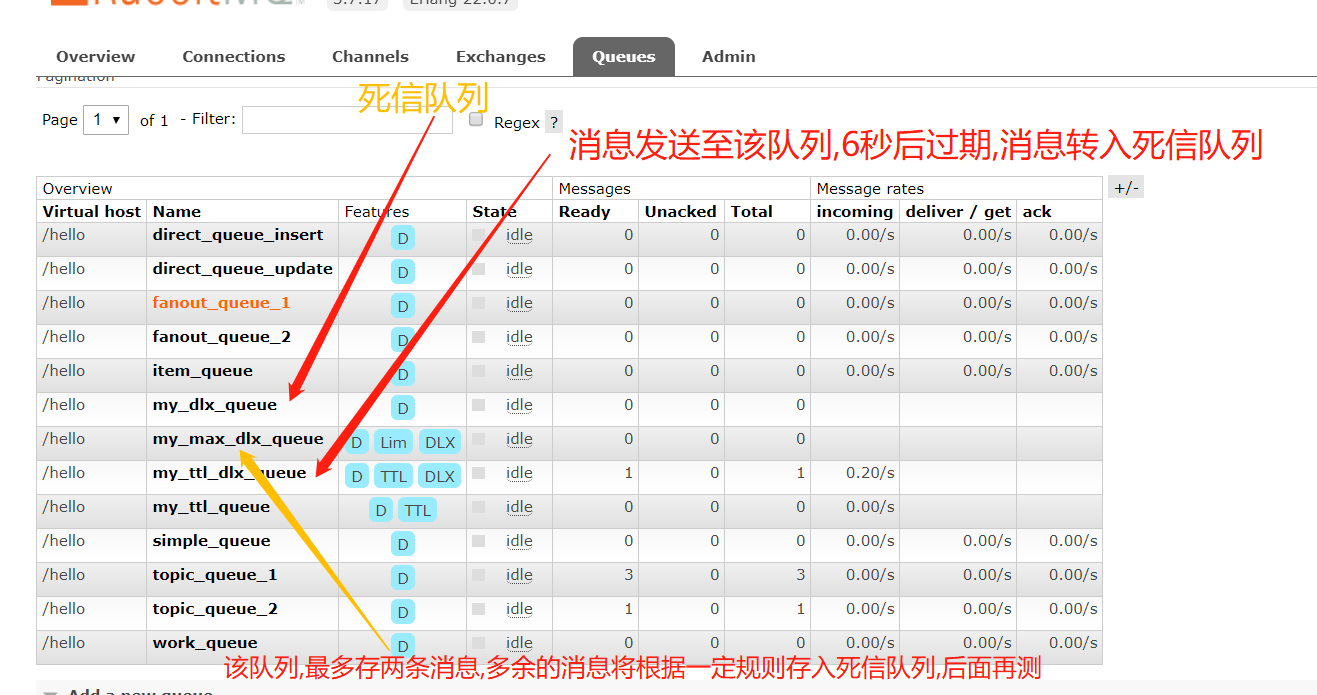
<rabbit:queue id="my_ttl_dlx_queue" name="my_ttl_dlx_queue" auto-declare="true">
<rabbit:queue-arguments>
<!--投递到该队列的消息如果没有消费都将在6秒之后被投递到死信交换机-->
<entry key="x-message-ttl" value-type="long" value="6000"/>
<!--设置当消息过期后投递到对应的死信交换机-->
<entry key="x-dead-letter-exchange" value="my_dlx_exchange"/>
</rabbit:queue-arguments>
</rabbit:queue>
<!--定义限制长度的队列及其属性,不存在则自动创建-->
<rabbit:queue id="my_max_dlx_queue" name="my_max_dlx_queue" auto-declare="true">
<rabbit:queue-arguments>
<!--投递到该队列的消息最多2个消息,如果超过则最早的消息被删除投递到死信交换机-->
<entry key="x-max-length" value-type="long" value="2"/>
<!--设置当消息过期后投递到对应的死信交换机-->
<entry key="x-dead-letter-exchange" value="my_dlx_exchange"/>
</rabbit:queue-arguments>
</rabbit:queue>
<!--定义定向交换机 根据不同的路由key投递消息-->
<rabbit:direct-exchange id="my_normal_exchange" name="my_normal_exchange" auto-declare="true">
<rabbit:bindings>
<rabbit:binding key="my_ttl_dlx" queue="my_ttl_dlx_queue"/>
<rabbit:binding key="my_max_dlx" queue="my_max_dlx_queue"/>
</rabbit:bindings>
</rabbit:direct-exchange>
3. 消息过期的死信队列测试
/**
     * 过期消息投递到死信队列
     * 投递到一个正常的队列,但是该队列有设置过期时间,到过期时间之后消息会被投递到死信交换机(队列)
     */
    @Test
    public void dlxTTLMessageTest(){
        rabbitTemplate.convertAndSend(
                "my_normal_exchange",
                "my_ttl_dlx",
                "测试过期消息;6秒过期后会被投递到死信交换机2222");
    }
运行看结果
6秒后

4. 消息溢出的死信队列测试
/**
     * 消息长度超过2,会投递到死信队列中
     */
    @Test
    public void dlxMaxMessageTest(){
        rabbitTemplate.convertAndSend(
                "my_normal_exchange",
                "my_max_dlx",
                "发送消息4:消息长度超过2,会被投递到死信队列中!");

        rabbitTemplate.convertAndSend(
                "my_normal_exchange",
                "my_max_dlx",
                "发送消息5:消息长度超过2,会被投递到死信队列中!");

        rabbitTemplate.convertAndSend(
                "my_normal_exchange",
                "my_max_dlx",
                "发送消息6:消息长度超过2,会被投递到死信队列中!");

    }
运行,看结果
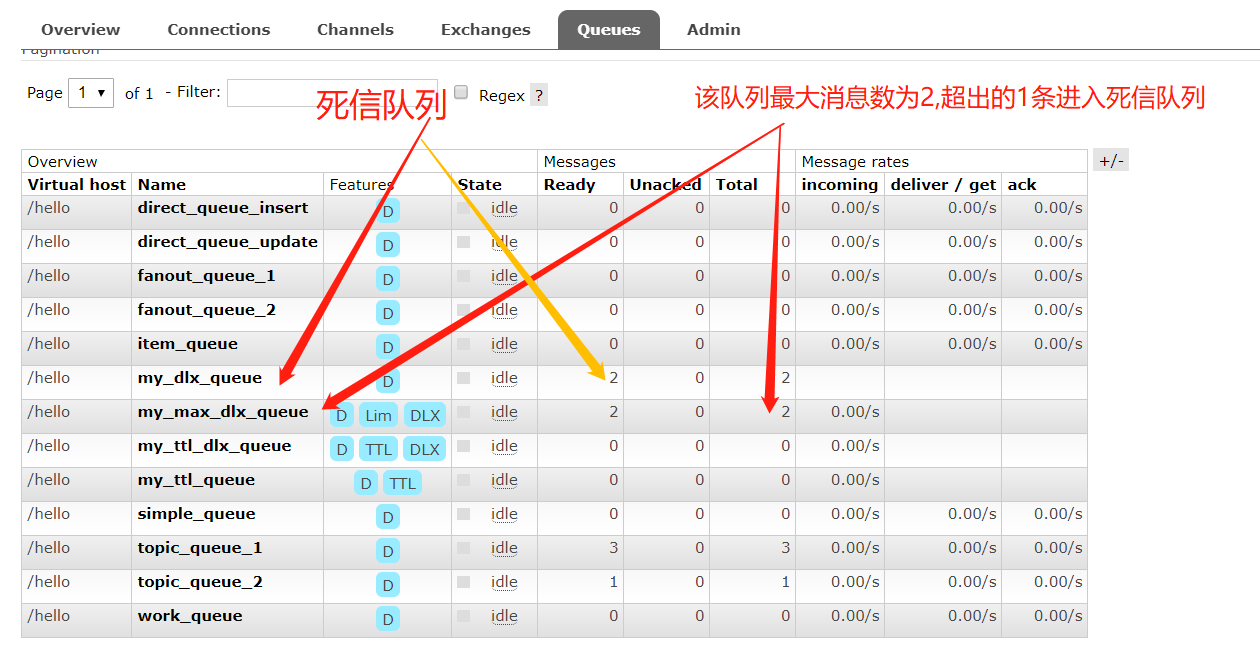
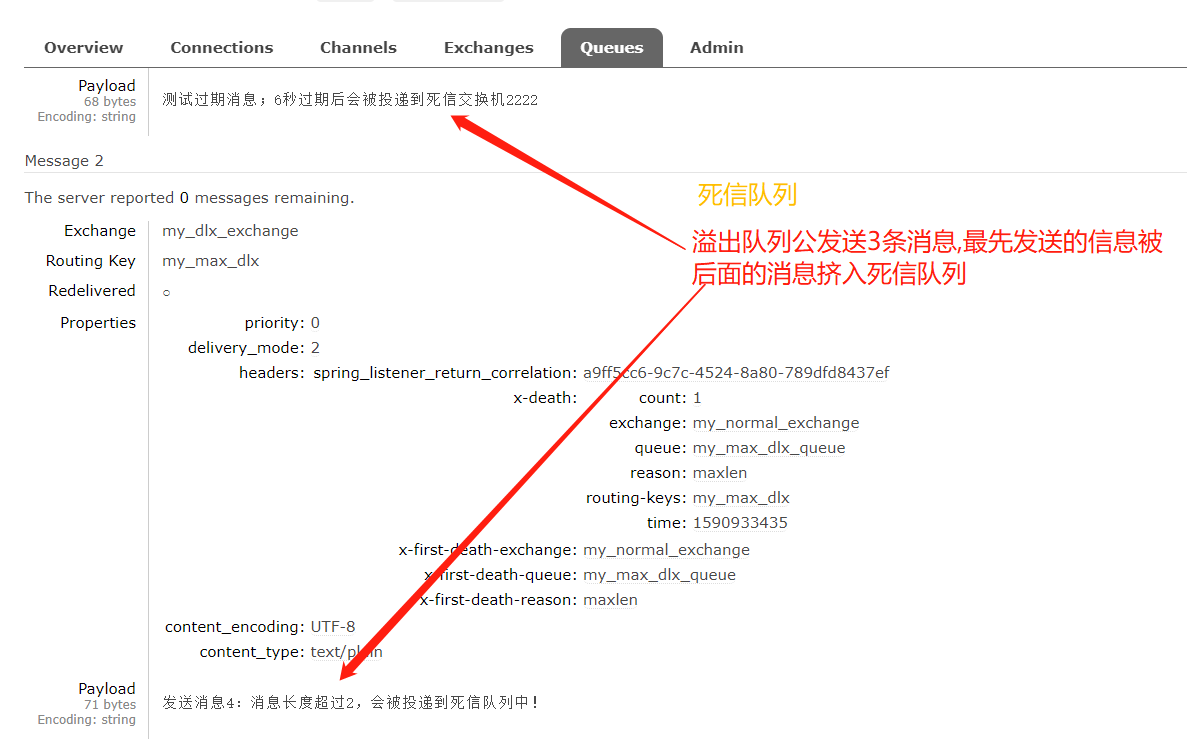
上面发送的3条消息中的第1条消息会被投递到死信队列中
延迟队列
延迟队列存储的对象是对应的延迟消息;所谓“延迟消息” 是指当消息被发送以后,并不想让消费者立刻拿到消息,而是等待特定时间后,消费者才能拿到这个消息进行消费。
在RabbitMQ中延迟队列可以通过 过期时间 + 死信队列 来实现

延迟队列的应用场景;如:
- 在电商项目中的支付场景;如果在用户下单之后的几十分钟内没有支付成功;那么这个支付的订单算是支付失败,要进行支付失败的异常处理(将库存加回去),这时候可以通过使用延迟队列来处理
- 在系统中如有需要在指定的某个时间之后执行的任务都可以通过延迟队列处理
具体代码不演示了
消息确认机制
确认并且保证消息被送达,提供了两种方式:发布确认和事务。(两者不可同时使用)在channel为事务时,不可引入确认模式;同样channel为确认模式下,不可使用事务。
1 发布确认
消息发送成功确认
connectionFactory 中启用消息确认:
<rabbit:connection-factory id="connectionFactory" host="192.168.75.163"
                               port="5672"
                               username="test01"
                               password="test01"
                               virtual-host="/hello"
                               publisher-confirms="true"
    />
配置消息确认回调方法如下:
<!-- 消息回调处理类 -->
<bean id="confirmCallback" class="com.itheima.rabbitmq.MsgSendConfirmCallBack"/>
<!--定义rabbitTemplate对象操作可以在代码中方便发送消息-->
<!-- confirm-callback="confirmCallback" 表示:消息失败回调 -->
<rabbit:template id="rabbitTemplate" connection-factory="connectionFactory"
        confirm-callback="confirmCallback"/>
消息确认回调方法如下:
public class MsgSendConfirmCallBack implements RabbitTemplate.ConfirmCallback {
    public void confirm(CorrelationData correlationData, boolean ack, String cause) {
        if (ack) {
            System.out.println("消息确认成功....");
        } else {
            //处理丢失的消息
            System.out.println("消息确认失败," + cause);
        }
    }
}
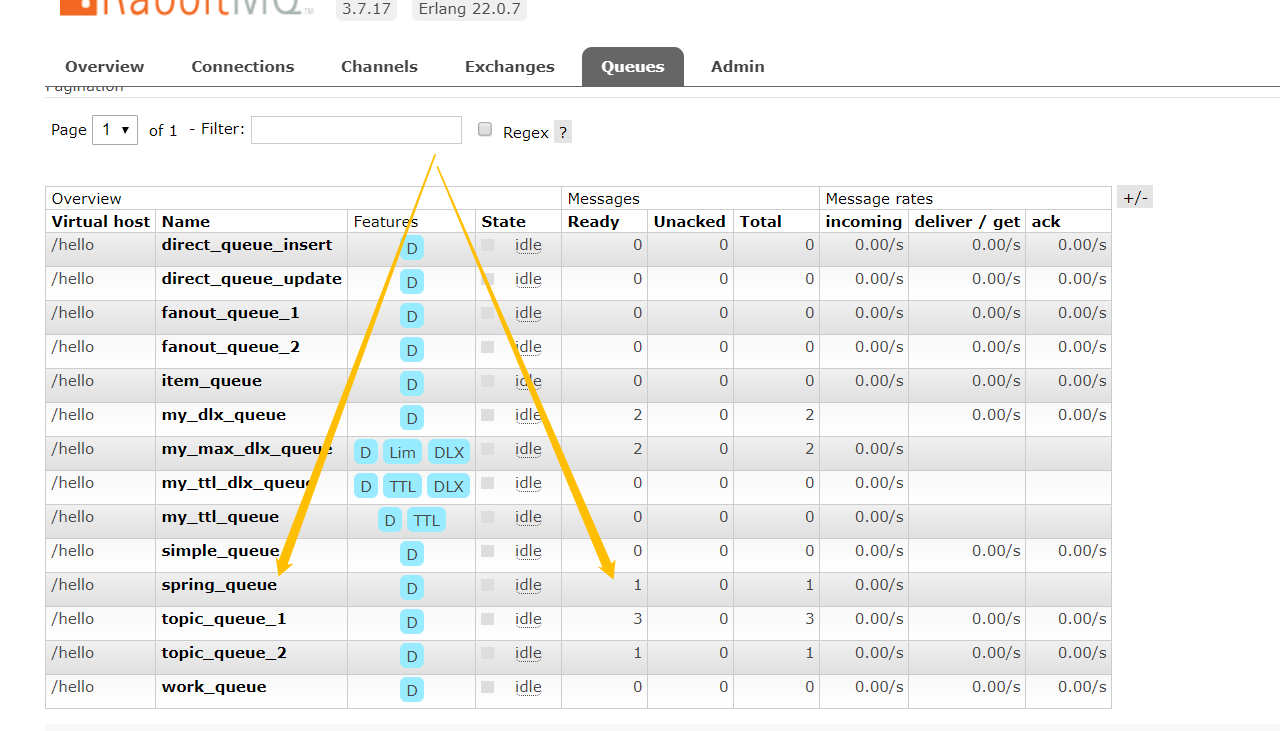
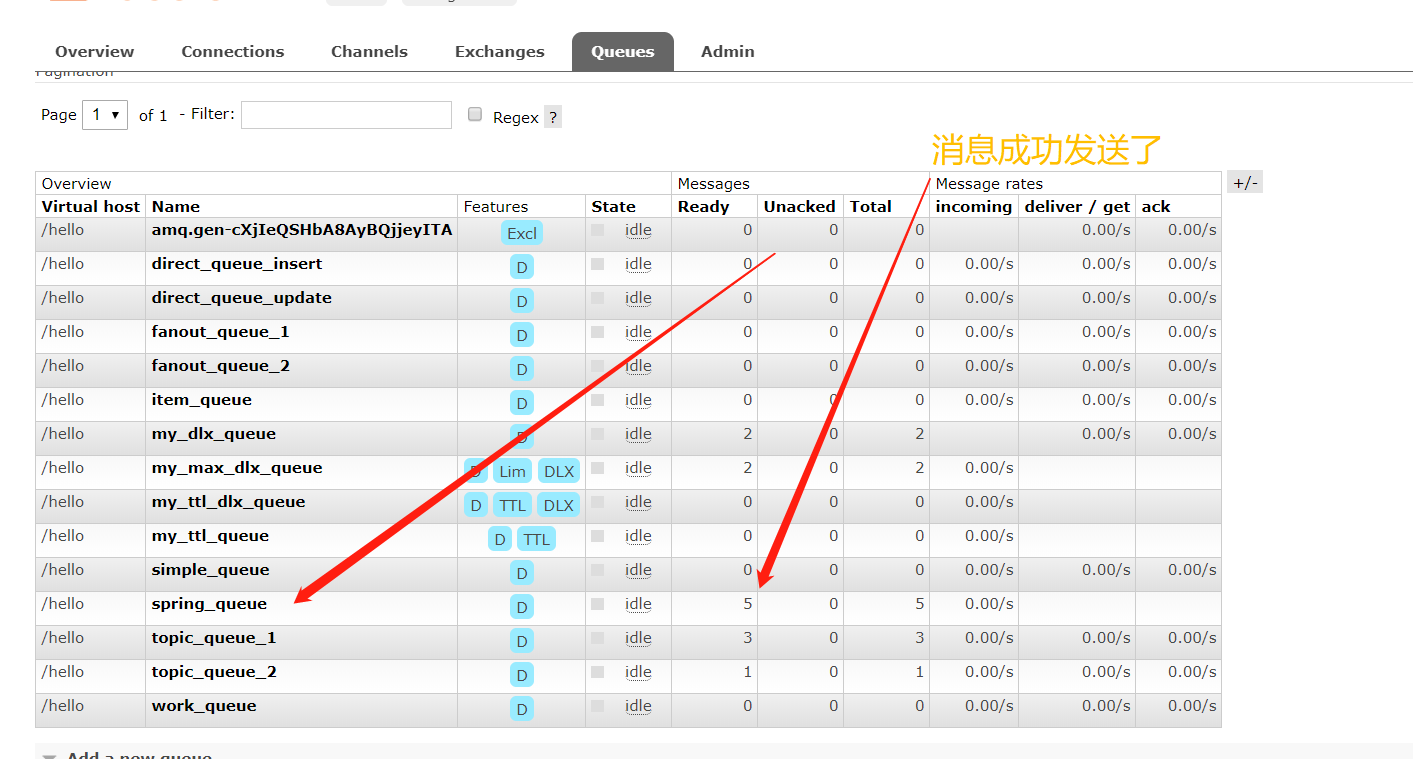
我们手动建一个spring_queue队列.并测试如下:
 @Test
    public void queueTest(){
        //路由键与队列同名
        rabbitTemplate.convertAndSend("spring_queue", "只发队列spring_queue的消息。");
    }
查看结果

消息发送失败回调
connectionFactory 中启用回调:
!-- publisher-returns="true" 表示:启用了失败回调 -->
<rabbit:connection-factory id="connectionFactory" host="${rabbitmq.host}"
        port="${rabbitmq.port}"
        username="${rabbitmq.username}"
        password="${rabbitmq.password}"
        virtual-host="${rabbitmq.virtual-host}"
        publisher-returns="true" />
配置消息失败回调方法如下:
<!-- 消息失败回调类 -->
<bean id="sendReturnCallback" class="com.itheima.rabbitmq.MsgSendReturnCallback"/>
<!-- return-callback="sendReturnCallback" 表示:消息失败回调 ,同时需配置mandatory="true",否则消息则丢失-->
<rabbit:template id="rabbitTemplate" connection-factory="connectionFactory"
        confirm-callback="confirmCallback" return-callback="sendReturnCallback"
        mandatory="true"/>
注意:同时需配置mandatory="true",否则消息则丢失
消息失败回调方法如下:
public class MsgSendReturnCallback implements RabbitTemplate.ReturnCallback {
    public void returnedMessage(Message message, int i, String s, String s1, String s2) {
        String msgJson  = new String(message.getBody());
        System.out.println("Returned Message:"+msgJson);
    }
}
模拟消息发送失败,功能测试如下:
@Test
public void testFailQueueTest() throws InterruptedException {
    //exchange 正确,queue 错误 ,confirm被回调, ack=true; return被回调 replyText:NO_ROUTE
    amqpTemplate.convertAndSend("test_fail_exchange", "", "测试消息发送失败进行确认应答。");
}
失败回调结果如下:

事务支持
场景:业务处理伴随消息的发送,业务处理失败(事务回滚)后要求消息不发送。rabbitmq 使用调用者的外部事务,通常是首选,因为它是非侵入性的(低耦合)。
外部事务的配置
<rabbit:template id="rabbitTemplate"
                     connection-factory="connectionFactory"

                     mandatory="true"
                     channel-transacted="true"
    />

    <!--平台事务管理器-->
    <bean id="transactionManager" class="org.springframework.amqp.rabbit.transaction.RabbitTransactionManager">
        <property name="connectionFactory" ref="connectionFactory"/>
    </bean>
测试类或者测试方法上加入@Transactional注解
   @Test
    @Transactional //开启事务
    //@Rollback(false)//在测试的时候,需要手动的方式制定回滚的策略
    public void queueTest2(){
        //路由键与队列同名
        rabbitTemplate.convertAndSend("spring_queue", "只发队列spring_queue的消息--02222222222222222222。");
        System.out.println("----------------dosoming:可以是数据库的操作,也可以是其他业务类型的操作---------------");
        //模拟业务处理失败
        //System.out.println(1/0);
        rabbitTemplate.convertAndSend("spring_queue", "只发队列spring_queue的消息--02。");
    }
运行看结果

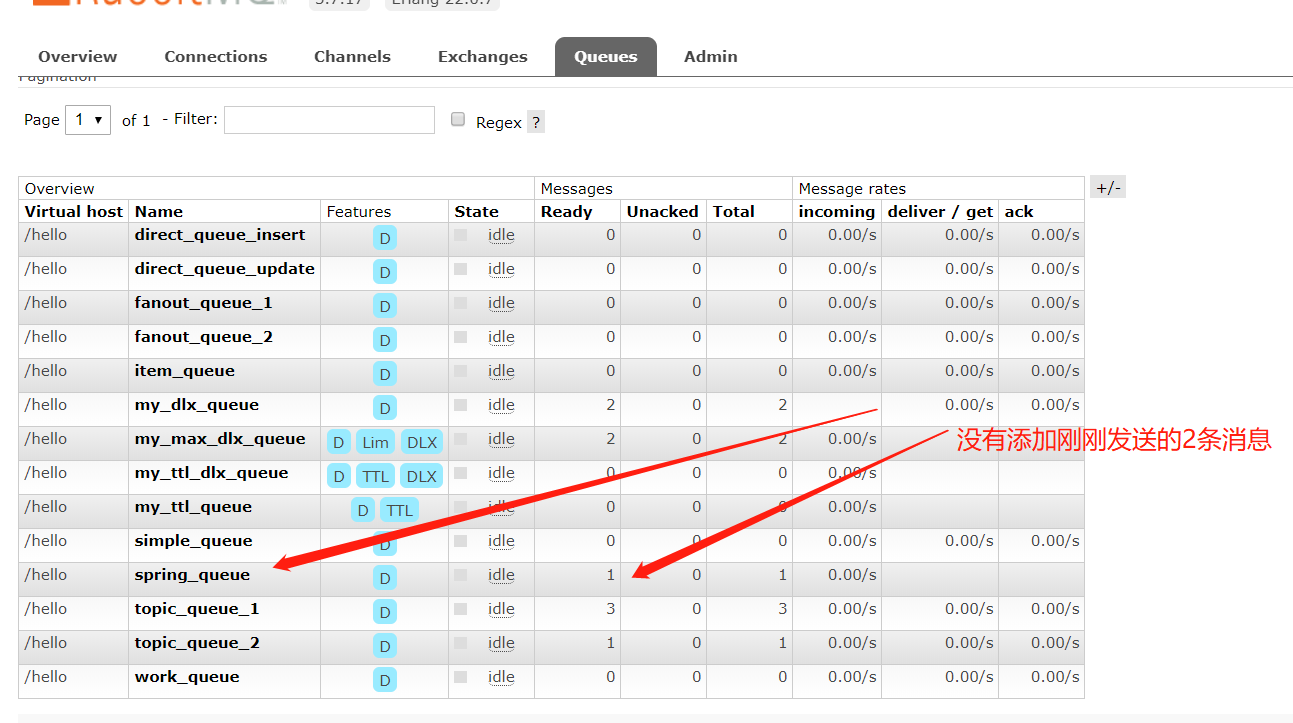
因为是测试类,所以spring自动回滚了,需要我们手动禁止回滚
   @Test
    @Transactional //开启事务
    @Rollback(false)//在测试的时候,需要手动的方式制定回滚的策略
    public void queueTest2(){
        //路由键与队列同名
        rabbitTemplate.convertAndSend("spring_queue", "只发队列spring_queue的消息--02222222222222222222。");
        System.out.println("----------------dosoming:可以是数据库的操作,也可以是其他业务类型的操作---------------");
        //模拟业务处理失败
        //System.out.println(1/0);
        rabbitTemplate.convertAndSend("spring_queue", "只发队列spring_queue的消息--02。");
    }
再执行一次测试类,查看结果
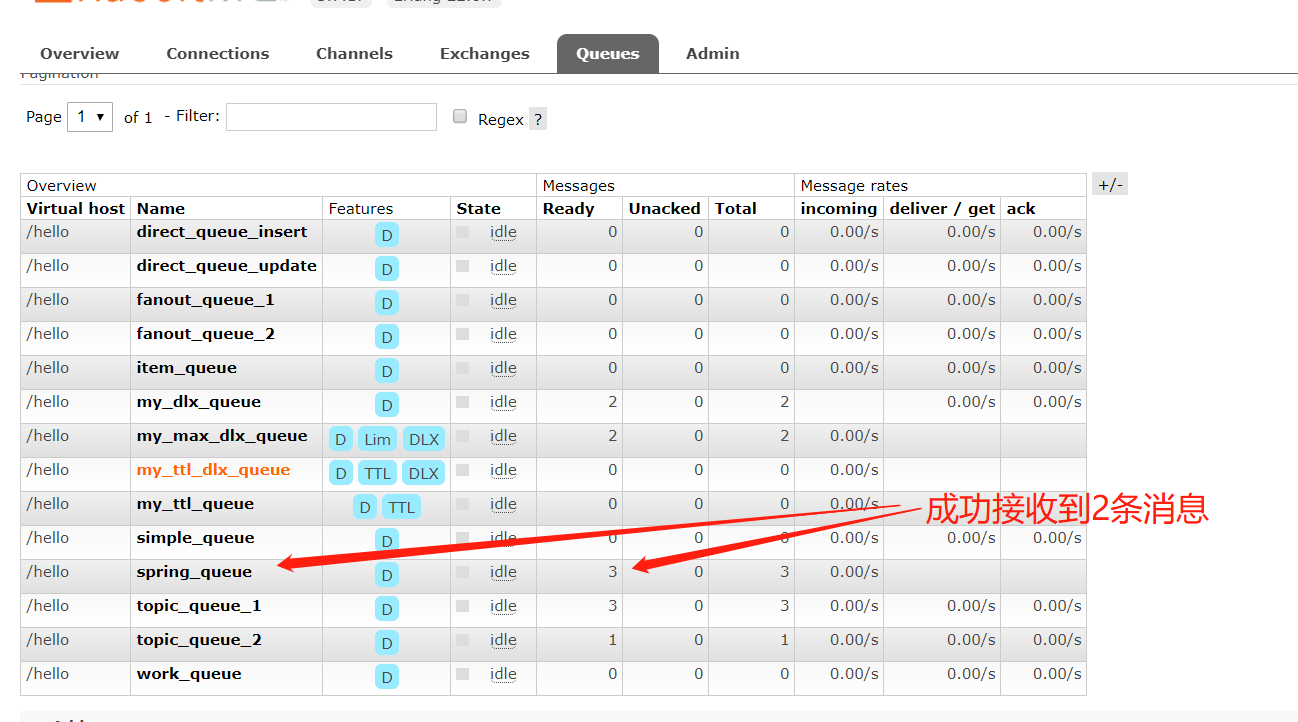
我们手动弄个异常,再试一次
  @Test
    @Transactional //开启事务
    @Rollback(false)//在测试的时候,需要手动的方式制定回滚的策略
    public void queueTest2(){
        //路由键与队列同名
        rabbitTemplate.convertAndSend("spring_queue", "只发队列spring_queue的消息--02222222222222222222。");
        System.out.println("----------------dosoming:可以是数据库的操作,也可以是其他业务类型的操作---------------");
        //模拟业务处理失败
        System.out.println(1/0);
        rabbitTemplate.convertAndSend("spring_queue", "只发队列spring_queue的消息--02。");
    }
看结果

这里4条是因为我手动禁止了回滚
结果应该是没问题的,就不测试了
消息追踪
1.消息追踪启用与查看
消息中心的消息追踪需要使用Trace实现,Trace是Rabbitmq用于记录每一次发送的消息,方便使用Rabbitmq的开发者调试、排错。可通过插件形式提供可视化界面。
Trace启动后会自动创建系统Exchange:amq.rabbitmq.trace ,每个队列会自动绑定该Exchange,绑定后发送到队列的消息都会记录到Trace日志。
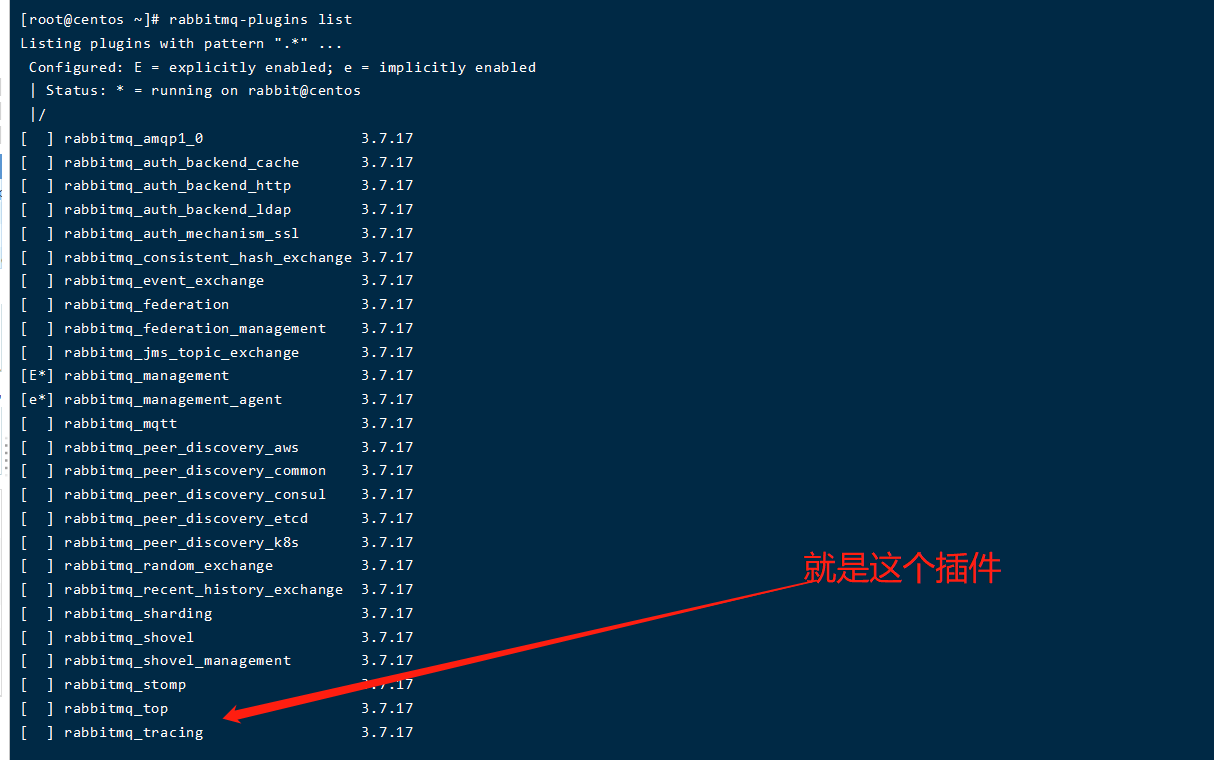
查看插件列表
rabbitmq-plugins list
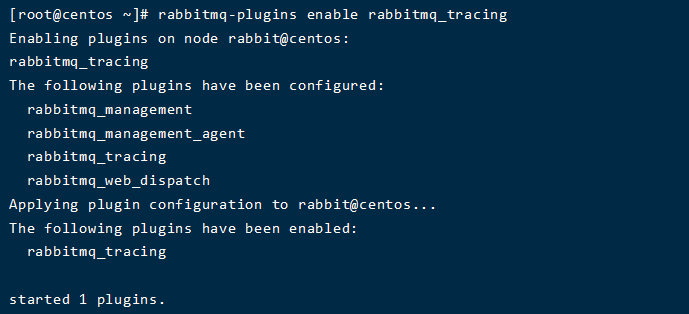
rabbitmq启用trace插件
rabbitmq-plugins enable rabbitmq_tracing
| 命令集 | 描述 |
|---|---|
| rabbitmq-plugins list | 查看插件列表 |
| rabbitmq-plugins enable rabbitmq_tracing | rabbitmq启用trace插件 |
| rabbitmqctl trace_on | 打开trace的开关 |
| rabbitmqctl trace_on -p test01 | 打开trace的开关(itcast为需要日志追踪的vhost) |
| rabbitmqctl trace_off | 关闭trace的开关 |
| rabbitmq-plugins disable rabbitmq_tracing | rabbitmq关闭Trace插件 |
| rabbitmqctl set_user_tags test01 administrator | 只有administrator的角色才能查看日志界面 |

安装插件并开启 trace_on 之后,会发现多个 exchange:amq.rabbitmq.trace ,类型为:topic。

2 日志追踪
首先重新登录管理控制台

第一步:发送消息
@Test
    public void queueTest3() throws InterruptedException {
        rabbitTemplate.convertAndSend("spring_queue", "只发队列spring_queue的消息--01。");
    }
第二步:查看trace
第三步:点击Tracing查看Trace log files

第四步:点击itest-log.log确认消息轨迹正确性
