上一篇中我们已经使用CoreData创建了一个SQLite数据库
CoreData的简单使用(一)数据库的创建
现在对数据库进行数据的CRUD(增删改查)
1.Data Model 的设置
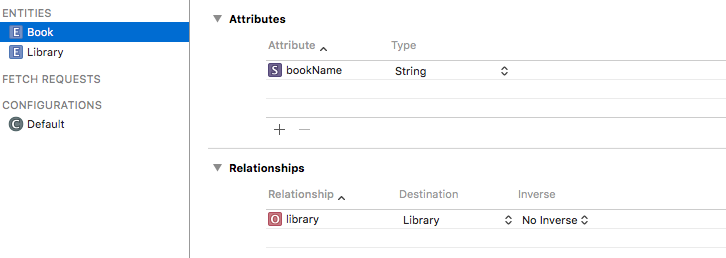
创建一个DataModel,取名CRUD.xcdatamodeld,添加Entity(Library和Book),添加属性,在Book中设置和Library的关联关系(一个Book可以存放在一个Library里)
Book的属性和关联关系(选择Destination为Library,关系名称取名为library)注意区分大小写

Library的属性:

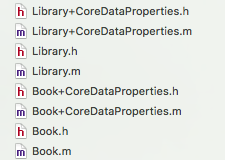
创建NSManagerObject subclass:

2. 在viewController.m来进行CRUD,注意方法的调用下面代码都抽离成方法,对数据进行操作都要创建_context对象(调用creatSQLite方法)
(1)导入头文件
#import "Library.h"
#import "Book.h"
#import <CoreData/CoreData.h>
(2)设置context属性,因为我们是利用context进行CRUD,所以把它设置成一个属性或者全局变量
@interface ViewController ()

@property (strong, nonatomic) NSManagedObjectContext *context;

@end
(3)创建数据库
|
1
2
3
4
5
6
7
8
9
10
11
12
13
14
15
16
17
18
19
20
21
|
- (void)creatSQLite{ //1.创建NSManagedObjectModel对象 NSURL *dataModelURL = [[NSBundle mainBundle] URLForResource:@"CRUD" withExtension:@"momd"]; NSManagedObjectModel *dataModel = [[NSManagedObjectModel alloc] initWithContentsOfURL:dataModelURL]; //2.创建NSPersistentStoreCoordinator对象 NSPersistentStoreCoordinator *psc = [[NSPersistentStoreCoordinator alloc] initWithManagedObjectModel:dataModel]; //设置数据库保存路径 NSString *path = [NSHomeDirectory() stringByAppendingString:@"/Documents/CRUD.sqlite"]; NSLog(@"%@",path); //注意这里不能用[NSURL URLWithString:<#(nonnull NSString *)#>]; NSURL *pathURL = [NSURL fileURLWithPath:path]; //配置库的类型为SQLite [psc addPersistentStoreWithType:NSSQLiteStoreType configuration:nil URL:pathURL options:nil error:nil]; //3.创建_context并与psc进行关联 _context = [[NSManagedObjectContext alloc] initWithConcurrencyType:NSMainQueueConcurrencyType]; _context.persistentStoreCoordinator = psc;} |
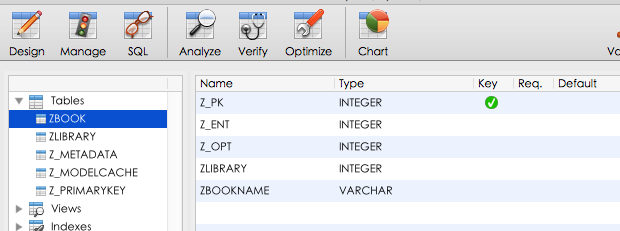
去沙盒里找到数据库,查看一下,成功创建,关联关系也已经建立好了,Book里有一个LIBRARY的属性

3.添加数据
|
1
2
3
4
5
6
7
8
9
10
11
12
13
14
15
16
17
18
19
20
21
22
23
24
25
|
- (void)creatManagerObject{ //NSManagerObject或它的子类都要用NSEntityDescription来描述 Library *libraryOne = [NSEntityDescription insertNewObjectForEntityForName:@"Library" inManagedObjectContext:_context]; libraryOne.libraryName = @"图书馆1"; Library *libraryTwo = [NSEntityDescription insertNewObjectForEntityForName:@"Library" inManagedObjectContext:_context]; libraryTwo.libraryName = @"图书馆2"; Book *bookOne = [NSEntityDescription insertNewObjectForEntityForName:@"Book" inManagedObjectContext:_context]; bookOne.bookName = @"时间简史"; bookOne.library = libraryOne; Book *bookTwo = [NSEntityDescription insertNewObjectForEntityForName:@"Book" inManagedObjectContext:_context]; bookTwo.bookName = @"全球通史"; bookTwo.library = libraryTwo; Book *bookThree = [NSEntityDescription insertNewObjectForEntityForName:@"Book" inManagedObjectContext:_context]; bookThree.bookName = @"鲁滨逊漂流记"; bookThree.library = libraryTwo; //利用_context同步数据至数据库 if ([_context save:nil]) { NSLog(@"添加数据成功"); }; } |
数据已经成功添加了 注意:ZBOOK中的ZLIBRARY对应的是ZLIBRARY的Z_PK,不要和代码中的1,2混淆,


4.查询数据
|
1
2
3
4
5
6
7
8
9
10
11
12
13
14
15
16
17
18
19
20
21
|
- (void)retrieveManagerObject{ //查询数据需要用到NSFetchRequest NSFetchRequest *fetchRequest = [NSFetchRequest fetchRequestWithEntityName:@"Book"]; //用谓词进行查询找出书名中最后一个是史字的图书 NSPredicate *predicate = [NSPredicate predicateWithFormat:@"bookName like '*史'"]; //fetchRequest与谓词关联 fetchRequest.predicate = predicate; //查询 NSArray *resultArr = [_context executeFetchRequest:fetchRequest error:nil]; //对查询到的结果进行遍历,打印书名 if (resultArr) { for (Book *book in resultArr) { NSLog(@"bookName = %@",book.bookName); } } } |
查询结果如下 注意:这里容易造成错误的就是谓词的使用,如果没有对应得属性就会造成崩溃;

5.修改数据
|
1
2
3
4
5
6
7
8
9
10
11
12
13
14
15
16
17
18
19
20
21
22
23
24
25
26
|
- (void)updateManagerObject{ //更新数据前需要先查询到数据 NSFetchRequest *fetchRequest = [NSFetchRequest fetchRequestWithEntityName:@"Book"]; NSPredicate *predicate = [NSPredicate predicateWithFormat:@"bookName = '鲁滨逊漂流记'"]; fetchRequest.predicate = predicate; NSArray *resultArr = [_context executeFetchRequest:fetchRequest error:nil]; if (!resultArr) { return; } //把查询到的书名全都替换成“生物医学工程” Book *book = [resultArr firstObject]; book.bookName = @"生物医学工程"; //同步数据到数据库 if([_context save:nil]) { NSLog(@"数据修改成功"); } else { NSLog(@"数据修改失败"); } } |
结果,已经把“鲁滨逊漂流记”的书名修改成了“生物医学工程”

6.删除数据
|
1
2
3
4
5
6
7
8
9
10
11
12
13
14
15
16
17
18
19
20
21
22
23
24
25
26
27
|
- (void)deleteManagerObject{ //删除数据前先要查询到需要删除的数据 NSFetchRequest *fetchRequest = [NSFetchRequest fetchRequestWithEntityName:@"Book"]; NSPredicate *predicate = [NSPredicate predicateWithFormat:@"bookName = '生物医学工程'"]; fetchRequest.predicate = predicate; NSArray *resultArr = [_context executeFetchRequest:fetchRequest error:nil]; if (!resultArr) { return; } Book *book = [resultArr firstObject]; //删除数据 [_context deleteObject:book]; //同步至数据库 if([_context save:nil]) { NSLog(@"删除数据成功"); } else { NSLog(@"删除数据失败"); } } |
结果,“生物医学工程”这本书已经被成功删除

7.版本迁移
模型文件的版本迁移:
1.原则:不能删除原来的模型文件,而是新增模文件的版本。
2.步骤:
(1)创建模型文件的新版本:Editor/Add Model Version
(2)设置Current Model Version为新版本。
(3)在配置NSPersistentStoreCoordinator时,添加设置字典,里面有相关键值对配置设置选项。
3.实现
(1)选中工程中的 xcdaramodeId 文件,Menu->Editor->Add Model Version
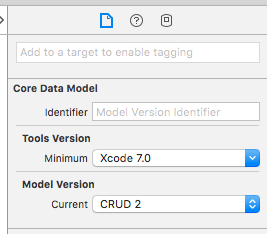
(2) 添加完成后,xcdaramodeId 文件可以展开,可以看到新增加的Model文件 ,在右侧工具栏选择Current Model Version 为新的Model文件


(3)在CRUD 2Z中添加新的实体和属性

(4)在ViewController.m - (void)creatSQLite方法中修代码,主要是NSPersistentStoreCoordinator的配置字典
之前 addPersistentStoreWithType: configuration: URL: options: error: 方法中options传的都是nil
修改后传入配置字典
|
1
2
3
4
5
6
7
8
9
|
NSDictionary *optionsDic = @{ //自动版本迁移 NSMigratePersistentStoresAutomaticallyOption : @YES, //自动映射 NSInferMappingModelAutomaticallyOption : @YES }; [psc addPersistentStoreWithType:NSSQLiteStoreType configuration:nil URL:pathURL options:optionsDic error:nil]; |
(5)运行,找到数据库进行查看Person已经被添加进来了,数据也都正确

上述代码只能是对数据模型增加实体或者可选属性时,才可以这样迁移(轻量级迁移 Lightweight Migration)