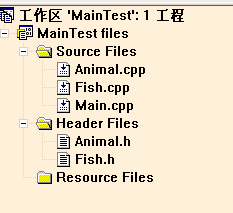
把程序的定义与实现部分用头文件与源文件分开
把不同类分别放到不同的头文件与源文件当中,以构造良好的程序的设计风格。
下边以一个简单的例子MainTest将不同类分别放到不同的头文件与源文件中。
在VC中建一个"MainTest工程",再新建添加如以下所需要的头文件及源文件;

Animal.h:
//使用预编译指令避免头文件被重复定义
#ifndef ANIMAL_H_H
#define ANIMAL_H_H
class Animal
{
public:
Animal(int height,int weight);
void eat();
//protected:
void sleep();
//private:
virtual void breathe();
};
#endif
Animal.cpp:
#include "Animal.h"
#include <iostream.h>
Animal::Animal(int height,int weight)
{
}
void Animal::eat()
{
cout<<"animal eat"<<endl;
}
void Animal::sleep()
{
cout<<"animal sleep"<<endl;
}
void Animal::breathe()
{
cout<<"animal breathe"<<endl;
}
Fish.h:
#include "Animal.h"
//使用预编译指令避免头文件被重复定义
#ifndef FISH_H_H
#define FISH_H_H
class Fish :public Animal
{
public:
Fish();
void breathe();
void test();
private:
const int a;
};
#endif
Fish.cpp:
#include "Fish.h"
#include <iostream.h>
Fish::Fish():Animal(400,300),a(1)
{
}
void Fish::breathe()
{
cout<<"fish bubble"<<endl;
}
void Fish::test()
{
sleep();
eat();
breathe();
}
Main.cpp:
#include<iostream.h>
//#include <stdlib.h>
#include<cstdlib>
#include "Animal.h"
#include "Fish.h"
//#include <stdio.h>
void fn(Animal *pAn)
{
pAn->breathe();
}
void main()
{
// Animal an;
// an.eat();
Fish fh;
Animal *pAn;
pAn=&fh;
fn(pAn);
//fh.breahte();
fh.test();
// fh.sleep();
}
//所有的类的声明与实现部分都写在一个源文件当中的情况
#include<iostream.h>
//#include <stdlib.h>
#include<cstdlib>
class Animal
{
public:
Animal(int height,int weight)
{
// cout<<"Animal construct"<<endl;
}
~Animal()
{
// cout<<"Animal deconstruct"<<endl;
}
void eat();
//protected:
void sleep()
{
cout<<"animal sleep!"<<endl;
}
//private:
virtual void breathe()//=0;
{
cout<<"animal breathe!"<<endl;
}
};
void Animal::eat()
{
cout<<"animal eat!"<<endl;
}
class Fish :public Animal
{
public:
Fish():Animal(400,300),a(1)
{
// cout<<"Fish construct"<<endl;
}
~Fish()
{
// cout<<"Fish deconstruct"<<endl;
}
void breathe()
{
//Animal::breathe();
cout<<"fish bubble"<<endl;
}
void test()
{
sleep();
// breathe();
}
private:
const int a;
};
void fn(Animal *pAn)
{
pAn->breathe();
}
void main()
{
// Animal an;
// an.eat();
Fish fh;
Animal *pAn;
pAn=&fh;
fn(pAn);
//fh.breahte();
fh.test();
// fh.sleep();
//补充=======================================================
//引用,引用不需要内存地址,这里的b就相当于变量a的一个别名,它们所代表的是同一个内存地址的内容;
//而指针变量本身则需要给其分配内存地址,只是指针是一种特殊的变量,即用来存放内存地址的变量。
int a=6;
int &b=a;
b=5;
int c=7;
b=c;
cout<<a<<endl<<b<<endl<<c<<endl;
system("pause");
//在前面加个头文件 #include <stdlib.h> //标准库头文件
//或者在前面加#include<cstdlib>
}