聊一聊切片
数组存在的问题
-
数组长度在定义的时候就已经定义好了,且不可以修改
-
数组长度属于类型的一部分,所以数组有很多的局限性
package main

import (
	"fmt"
	"reflect"
)

func main() {
	a := [3]int{1, 2, 3}

	fmt.Println(reflect.TypeOf(a))
}
// [3]int  就是a的类型
什么是切片
-
切片(Slice)是一个拥有相同类型元素的可变长度的序列
-
切片是基于数组类型做的一层封装
-
切片非常灵活: 支持自动扩容
切片的声明
// var names []T
* names是变量名
* T是切片中元素的类型
实际例子
package main

import "fmt"

func main() {
	// 定义一个名称为a,元素类型为string的切片
	var a []string
	// 定义一个名称为b,元素类型为int的切片,并初始化赋值
	b := []int{1, 2, 3, 4, 5}
	// 定义一个名称为c,元素类型为bool的切片,并初始化赋值
	c := []bool{true, false}
	// 通过make函数构造切片
	d := make([]string, 0, 10)

	fmt.Println(a, b, c, d)
}
切片 slice是引用类型,变量不能直接判断两个变量是否相等,只有: string、bool、int相关类型、array、struct可以直接判断
上面的切片申明有什么区别,如何选择?
如果可以对切片的容量大小有个概念的话建议使用make,因为他可以指定容量,目的就是提高性能(因为一旦容量满了就需要扩容影响性能)
make([]T, size, cap)
- T:切片的元素类型
- size:切片中元素的数量
- cap:切片的容量
package main

import "fmt"

func main() {
	d := make([]string, 0, 100)
	d = append(d, "alex", "eson")
	fmt.Println(len(d), cap(d))
}
在就是使用初始化赋值的方式了更直观一些
package main

import "fmt"

func main() {
	s := []string{"alex", "eson", "eric"}
	fmt.Println(s)
}
切片的本质
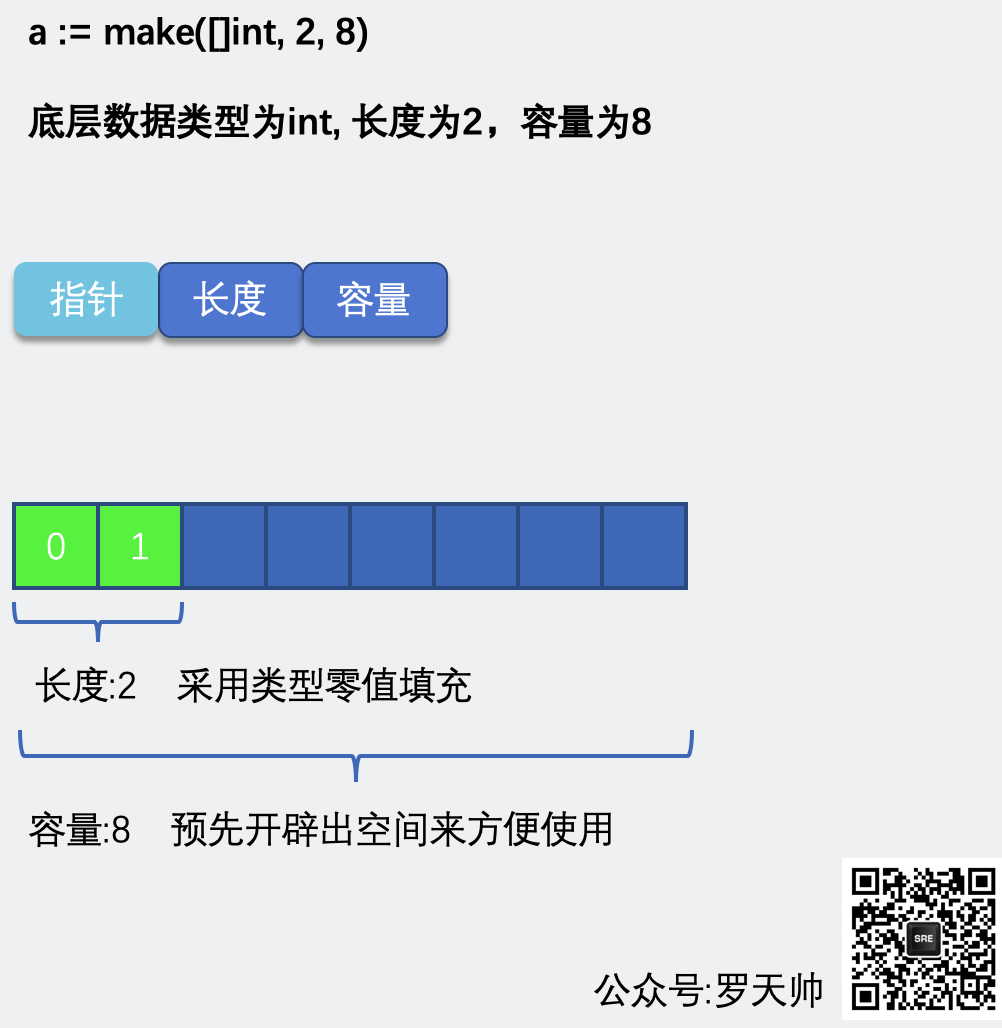
新创建切片

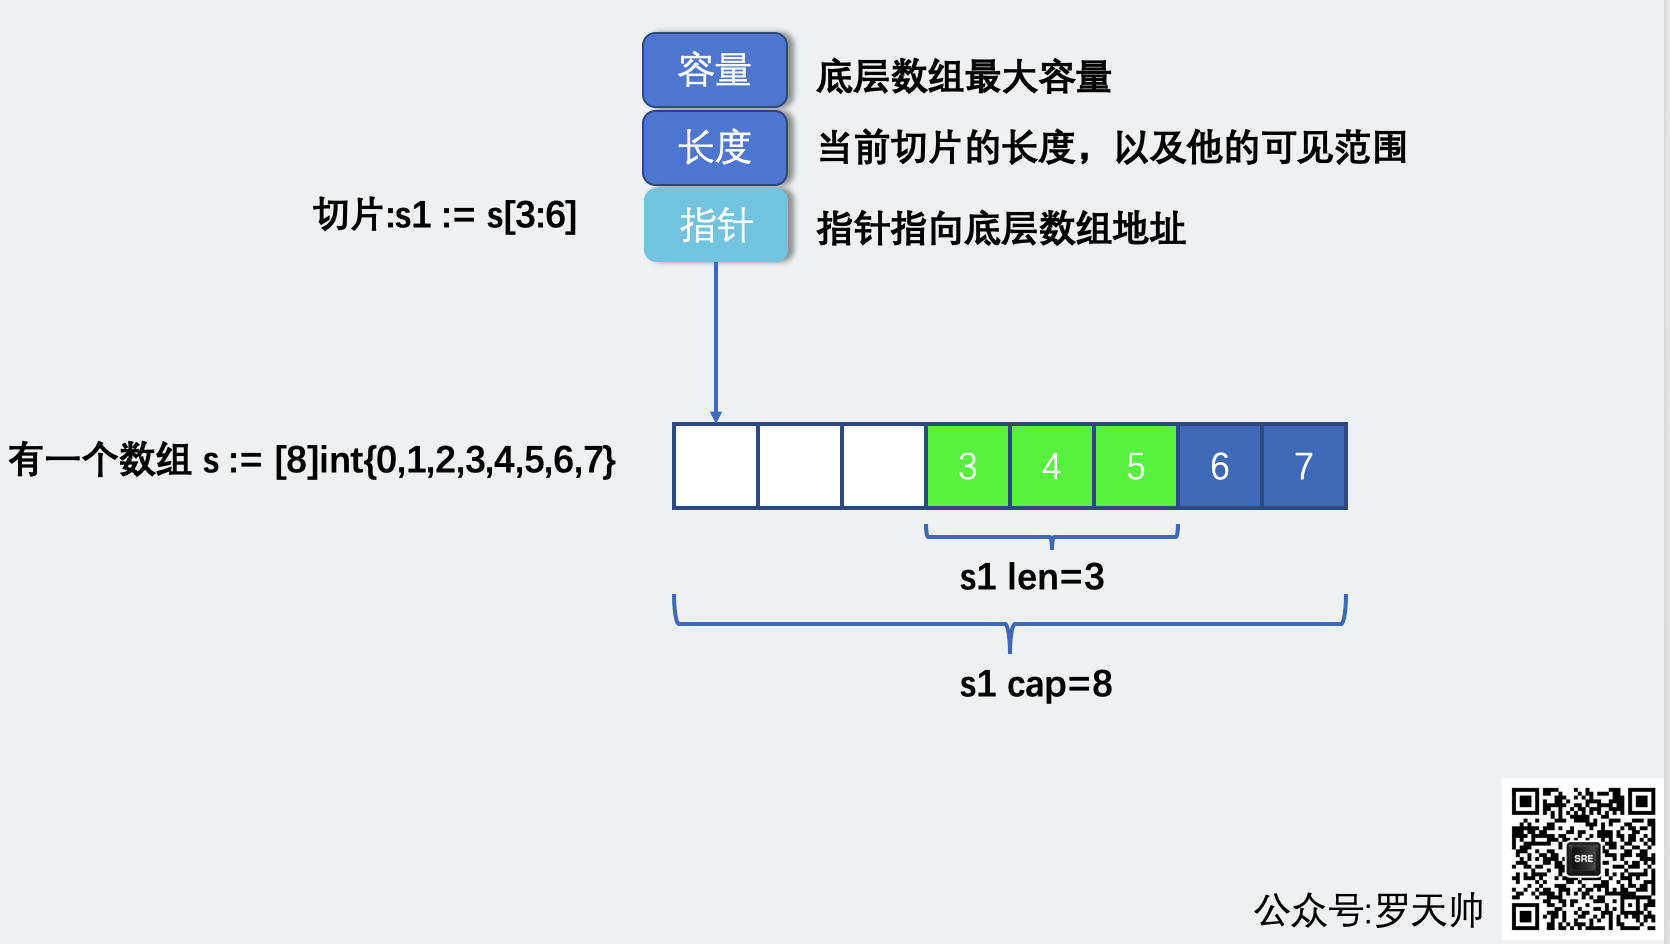
从数组创建切片
切片的本质就是对底层数组的封装,它包含了三个信息:底层数组的指针、切片的长度(len)和切片的容量(cap)
type slice struct {
    array unsafe.Pointer
    len   int
    cap   int
}
现在我有一个数组,[8]int{0,1,2,3,4,5,6,7}, 那么新创建一个切片
package main

import "fmt"

func main() {
	// s是一个数组
	s := [8]int{0, 1, 2, 3, 4, 5, 6, 7}
	// 切片的本质就是对底层数组的封装,它包含了三个信息:底层数组的指针、切片的长度(len)和切片的容量(cap)
	s1 := s[0:5]

	fmt.Printf("s-type:%T, s1-type:%T
", s, s1)
	fmt.Println(s, s1)
}

切片的操作
新、增、删、改、复制、循环、注意事项
切片声明
package main

import "fmt"

func main() {
	// 定义一个名称为a,元素类型为string的切片
	var a []string
	// 定义一个名称为b,元素类型为int的切片,并初始化赋值
	b := []int{1, 2, 3, 4, 5}
	// 定义一个名称为c,元素类型为bool的切片,并初始化赋值
	c := []bool{true, false}
	// 通过make函数构造切片
	d := make([]string, 0, 10)

	fmt.Println(a, b, c, d)
}
切片增加元素append
package main

import "fmt"

func main() {
	// 创建一个长度为0,容量为1的切片
	nums := make([]int, 0, 1)
	fmt.Printf("nums长度:%d, nums容量:%d, nums内存地址:%p
", len(nums), cap(nums), nums)
	for i := 0; i < 10; i++ {
		nums = append(nums, 1)
		fmt.Printf("nums长度:%d, nums容量:%d, nums内存地址:%p
", len(nums), cap(nums), nums)
	}
	// 添加多个元素
	nums = append(nums, 3, 3, 3, 3, 3, 3, 3, 3, 3, 3, 3, 3, 3)
	fmt.Printf("nums长度:%d, nums容量:%d, nums内存地址:%p
", len(nums), cap(nums), nums)
	fmt.Println(nums)
}
输出结果:
nums长度:0, nums容量:1, nums内存地址:0xc0000bc008
nums长度:1, nums容量:1, nums内存地址:0xc0000bc008
nums长度:2, nums容量:2, nums内存地址:0xc0000bc040
nums长度:3, nums容量:4, nums内存地址:0xc0000be040
nums长度:4, nums容量:4, nums内存地址:0xc0000be040
nums长度:5, nums容量:8, nums内存地址:0xc0000b4080
nums长度:6, nums容量:8, nums内存地址:0xc0000b4080
nums长度:7, nums容量:8, nums内存地址:0xc0000b4080
nums长度:8, nums容量:8, nums内存地址:0xc0000b4080
nums长度:9, nums容量:16, nums内存地址:0xc0000c2000
nums长度:10, nums容量:16, nums内存地址:0xc0000c2000
nums长度:23, nums容量:32, nums内存地址:0xc0000c4000
[1 1 1 1 1 1 1 1 1 1 3 3 3 3 3 3 3 3 3 3 3 3 3]
从结果可以看出:
- append每次把元素添加切片中
- 每次切片容量满的时候切片会自动扩容,容量会扩容为当前容量的2倍
切片的扩容策略 $GOROOT/src/runtime/slice.go中
	newcap := old.cap
	doublecap := newcap + newcap
	if cap > doublecap {
		newcap = cap
	} else {
		if old.len < 1024 {
			newcap = doublecap
		} else {
			// Check 0 < newcap to detect overflow
			// and prevent an infinite loop.
			for 0 < newcap && newcap < cap {
				newcap += newcap / 4
			}
			// Set newcap to the requested cap when
			// the newcap calculation overflowed.
			if newcap <= 0 {
				newcap = cap
			}
		}
	}
- 如果原切片长度小于1024,那么容量是当前的两倍
- 否则长度是:原长度+原长度的4分之一
删除元素
package main

import "fmt"

func main() {
	nums := []int{11, 12, 13, 14, 15}
	// 切片没有给删除元素单独指定方法,但是可以通过append以及切片特性来实现:
	// 删除索引为2的元素(索引是0开始的)
	nums = append(nums[:2], nums[3:]...)
	fmt.Println(nums) // 输出结果:[11 12 14 15]
}
修改元素
package main

import "fmt"

func main() {
	nums := []int{11, 12, 13, 14, 15}
	// 修改下标为1的元素
	nums[1] = 111
	fmt.Println(nums) // 输出结果:[11 111 13 14 15]
}
复制copy
因为切片类型的特性,它是一个引用类型,变量指向的并不是实际的数据,所以当我复制的时候其实相当于把指针复制了一遍
他们指向了相同的内存
package main

import "fmt"

func main() {
	n1 := []int{11, 12, 13, 14, 15}
	n2 := n1

	fmt.Printf("n1的内存地址:%p, n2的内存地址:%p", n1, n2)
	// 输出结果: n1的内存地址:0xc000138000, n2的内存地址:0xc000138000
        // 同理所以n1和n2是同一个内存指向,修改任意一个都会影响另外一个
}
所以需要一个函数来解决:Go语言内建的copy()函数可以迅速地将一个切片的数据复制到另外一个切片空间中
package main

import "fmt"

func main() {
	n1 := []int{11, 12, 13, 14, 15}
	n2 := make([]int, 5, 5)
	// copy接收两个参数目标和源
	copy(n2, n1)

	fmt.Printf("n1的内存地址:%p, n2的内存地址:%p
", n1, n2)
	// 输出结果: n1的内存地址:0xc00001c0f0, n2的内存地址:0xc00001c120
	// 两个不同的内存
	// 现在修改n1和n2就不会互相影响了
	n1[0] = 123
	n2[0] = 321

	fmt.Printf("n1的值:%v  n1的内存地址:%p
", n1, n1)
	fmt.Printf("n2的值:%v  n2的内存地址:%p
", n2, n2)
	// 输出结果:
	// n1的值:[123 12 13 14 15]  n1的内存地址:0xc00001c0f0
	// n2的值:[321 12 13 14 15]  n2的内存地址:0xc00001c120
}
循环切片
package main

import "fmt"

func main() {
	n1 := []int{11, 12, 13, 14, 15}

	// 第一种循环通过切片长度
	for i := 0; i < len(n1); i++ {
		fmt.Printf("n1的当前下标是:%d, n1当前下标元素值是: %d
", i, n1[i])
	}

	// 第二种通过range
	for index, value := range n1 {
		fmt.Printf("n1的当前下标是:%d, n1当前下标元素值是: %d
", index, value)
	}
}