三、 字符设备驱动程序之查询方式的按键驱动程序(第五节课)
程序框架

按键驱动程序(second_chrdev.c)
#include <linux/module.h>
#include <linux/kernel.h>
#include <linux/fs.h>
#include <linux/init.h>
#include <linux/delay.h>
#include <asm/uaccess.h>
#include <asm/irq.h>
#include <asm/io.h>
#include <asm/arch/regs-gpio.h>
#include <asm/hardware.h>
/*
 * eint 0  GPF0
 * eint 2  GPF2
 * eint 11 GPG3
 * eint 19 GPG11
 */
static struct class *second_chrdev_class;
static struct class_device *second_chrdev_class_dev;

volatile unsigned int *gpfcon = NULL;
volatile unsigned int *gpfdat = NULL;

volatile unsigned int *gpgcon = NULL;
volatile unsigned int *gpgdat = NULL;


static int second_chrdev_open(struct inode *inode, struct file *file)
{
    printk("second_chrdev_open

");
    *gpfcon &= ~((3<<(0*2)) | (3<<(2*2)));
    *gpgcon &= ~((3<<(3*2)) | (3<<(11*2)));
    return 0;
}


static ssize_t second_chrdev_read(struct file *file, const char __user *buf, size_t count, loff_t * ppos)
{
    unsigned char keyvals[4];
    int regval;

    if (count != sizeof(keyvals))
        return -EINVAL;

//    printk("second_chrdev_read

");
    regval = *gpfdat;
    keyvals[0] = (regval & (1<<0))  ? 0x01: 0x81;
    keyvals[1] = (regval & (1<<2))  ? 0x02: 0x82;

    regval = *gpgdat;
    keyvals[2] = (regval & (1<<3))  ? 0x03: 0x83;
    keyvals[3] = (regval & (1<<11)) ? 0x04: 0x84;

    copy_to_user(buf, (const void*)keyvals, sizeof(keyvals));

    return sizeof(keyvals);
}


static struct file_operations second_chrdev_fops = {
    .owner  =   THIS_MODULE,    /* 这是一个宏,推向编译模块时自动创建的__this_module变量 */
    .open   =   second_chrdev_open,
    .read   =   second_chrdev_read,
};


int major;
static int second_chrdev_init(void)
{
    major = register_chrdev(0, "second_chrdev", &second_chrdev_fops);  //注册
    second_chrdev_class = class_create(THIS_MODULE, "secondchrdev");
    second_chrdev_class_dev = class_device_create(second_chrdev_class, NULL, MKDEV(major, 0), NULL, "second_chrdev");

    gpfcon = (volatile unsigned int *)ioremap(0x56000050, 16);
    gpfdat = gpfcon + 1;

    gpgcon = (volatile unsigned int *)ioremap(0x56000060, 16);
    gpgdat = gpgcon + 1;
    return 0;
}

static void second_chrdev_exit(void)
{
    unregister_chrdev(major, "second_chrdev");                    //卸载
    class_device_unregister(second_chrdev_class_dev);
    class_destroy(second_chrdev_class);
    iounmap(gpfcon);
    iounmap(gpgcon);
}

module_init(second_chrdev_init);
module_exit(second_chrdev_exit);

MODULE_LICENSE("GPL");
测试程序(second_chrdev_test.c)
#include <sys/types.h>
#include <sys/stat.h>
#include <fcntl.h>
#include <stdio.h>

int main(int argc, char **argv)
{
    int fd,cnt=0;
    unsigned char keyvals[4];
    fd = open("/dev/second_chrdev",O_RDWR);
    if(fd < 0)
    printf("can't open!
");

    while(1)
    {
        read(fd,keyvals,sizeof(keyvals));
        if(0x81==keyvals[0]||0x82==keyvals[1]||0x83==keyvals[2]||0x84==keyvals[3])
        {
            printf("%04d key pressed: 0x%x 0x%x 0x%x 0x%x
", cnt++, keyvals[0], keyvals[1], keyvals[2], keyvals[3]);
        }

    }
    return 0;
}
测试
- 修改Makefile
- 编译并拷贝到(first_fs)目录
- 加载模块(insmod ./second_chrdev.ko)
- 运行测试程序(./second_chrdev_test)


弊端:当使用top命令查看资源情况时,发现大量cpu资源被消耗。因为在 main 函数中我们使用了死循环

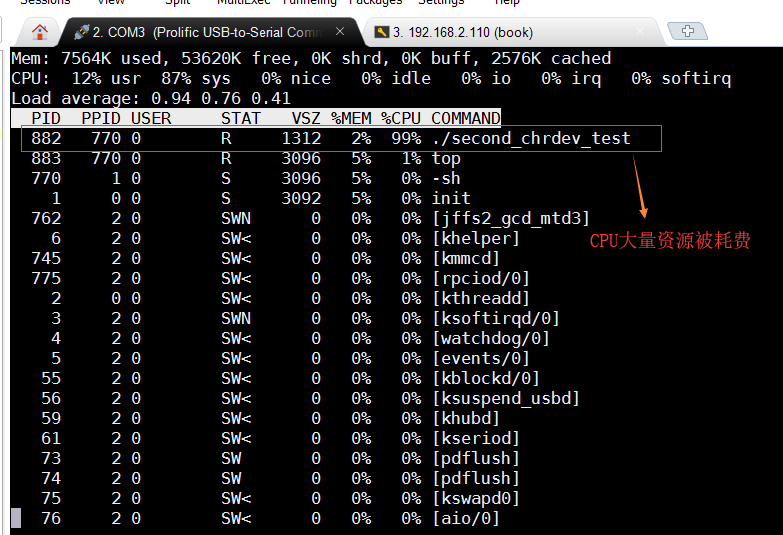
改进方法:使用中断
四、 字符设备驱动程序之中断方式的按键驱动_Linux异常处理(第六课)
将2440作为单片机下的中断方式获取键值
- 按键按下时。
- CPU发生中断(强制的跳到异常的入口执行)。
- 向量标号下的入口函数:
a. 保存被中断的现场(各种寄存器的值)
b. 执行中断处理函数
c. 恢复被中断的现场(恢复寄存器的值)
Linux 中的中断处理方式
Linux下的异常向量表(映射后的向量表)
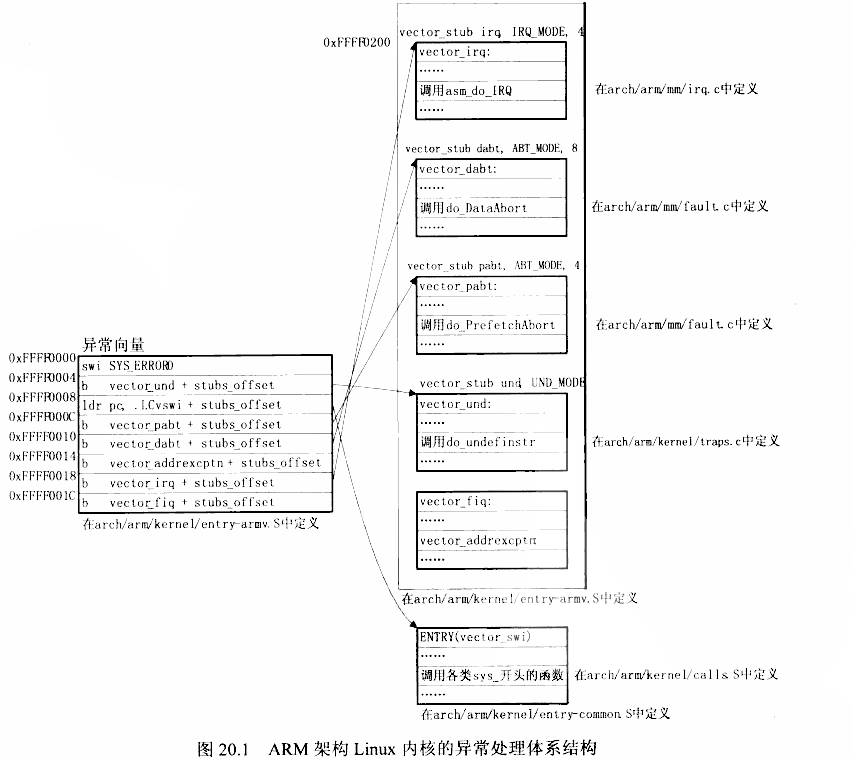
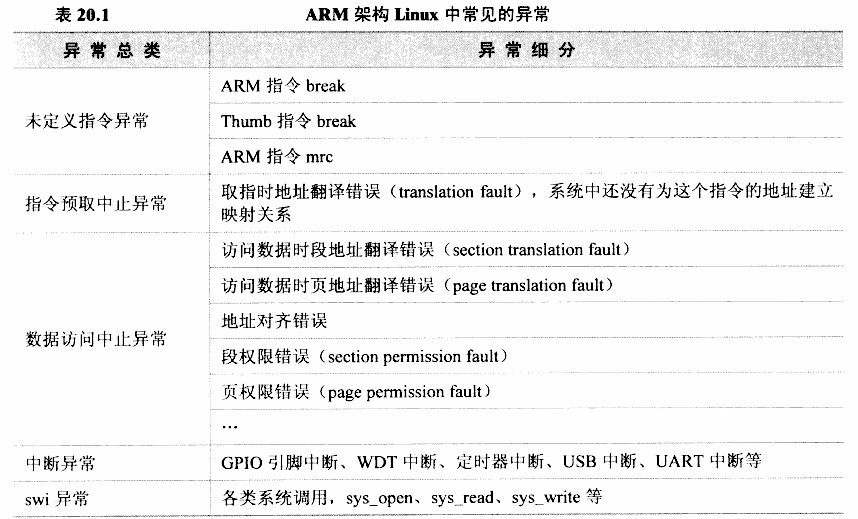
内核在 start_kernel 函数(源码在 init/main.c中)调用 trap_init(arch/arm/kernel/trap.c)、init_IRQ 两个函数来设置异常的处理函数
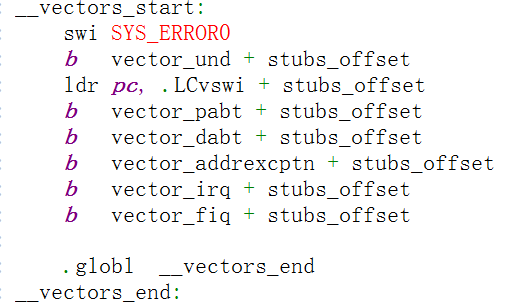
所谓的"向量"就是一些被安放在固定位置的代码,当发生异常时,CPU会执行这些固定位置上的指令。ARM架构CPU的异常向量基址可以是 0x00000000,也可以是0xffff0000,Linux内核使用后者。


问:这个(__vectors_start)是在哪儿被定义的呢?
答:它们在(arch/arm/kernel/entry-armv.S)中定义
以irq中断为例:(vector_irq)这是一个宏
vector_irq的定义

我们找到它的原型并把这个宏展开,这个(vector_stub)宏的功能为:计算处理完异常后的返回地址、保存一些寄存器,然后进入管理模式,最后根据被中断的模式调用第935~950行中的某个跳转分支
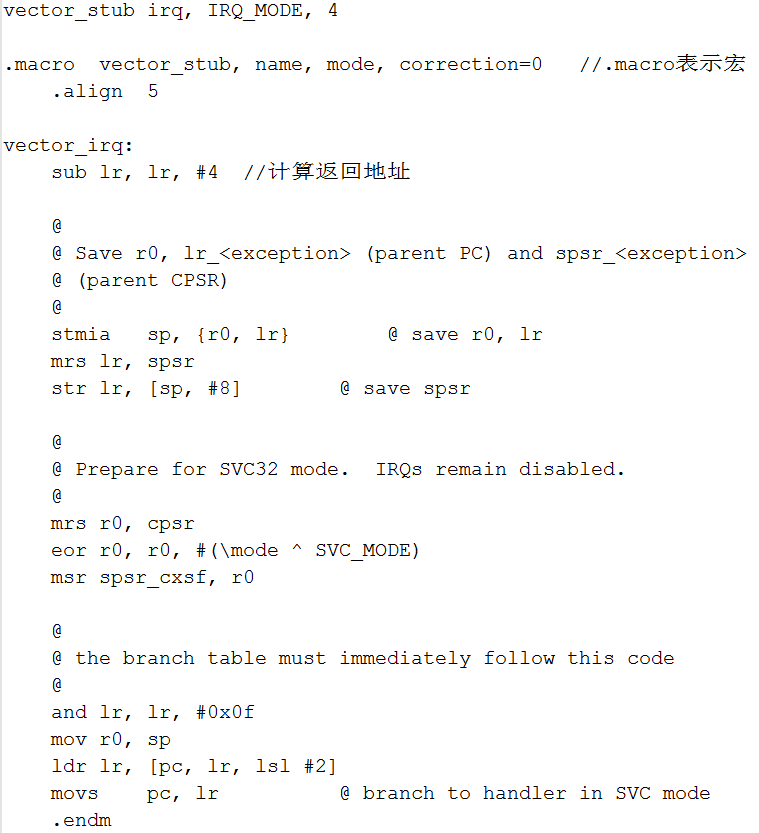

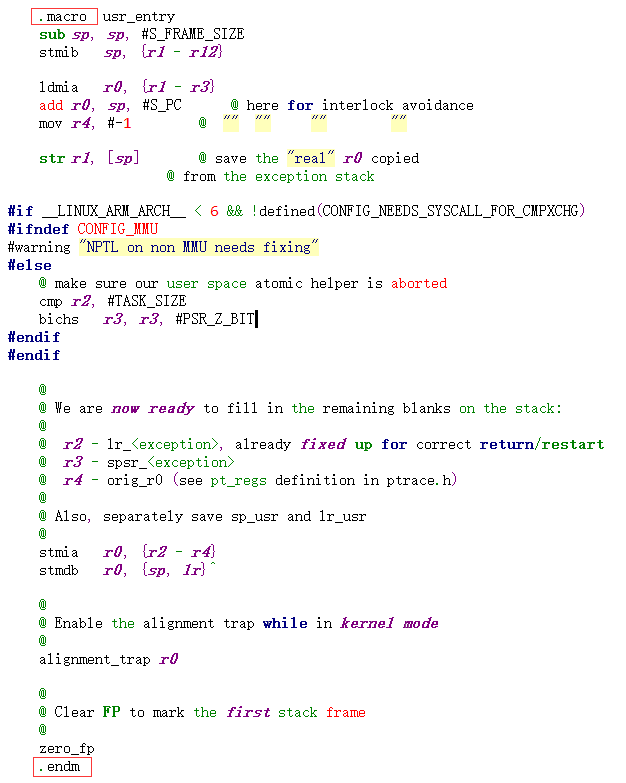
假如我们是用户模式的中断异常,我们一路跟踪下去


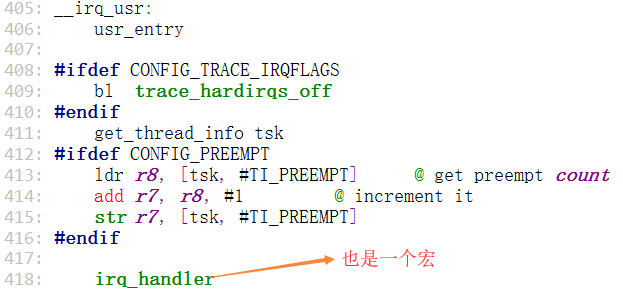
这个(usr_entyr)也是一个宏,搜索标号

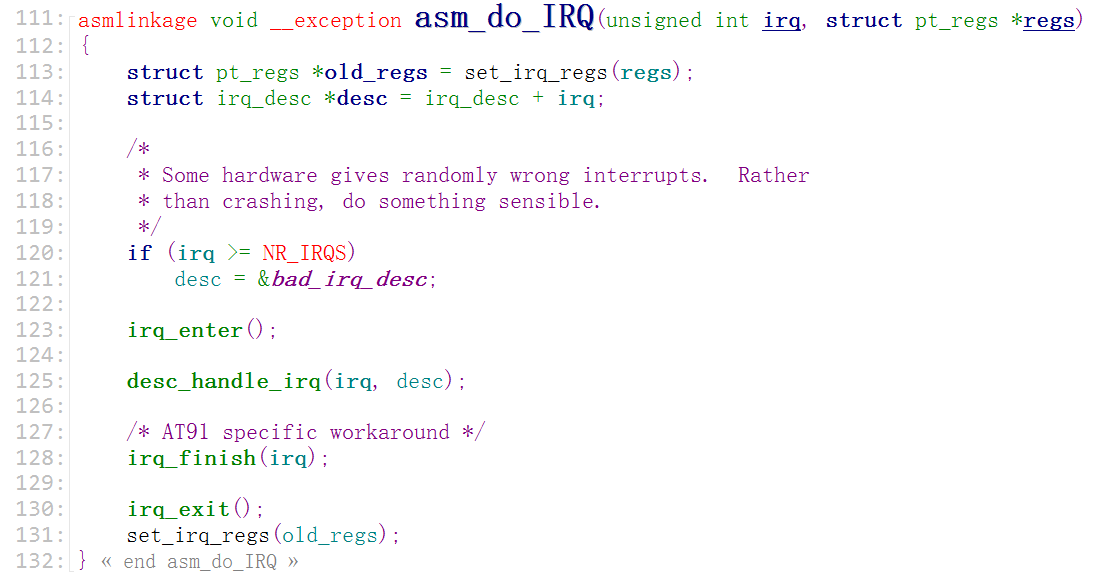
紧接着进行(irq_handler)的跳转,这个(irq_handler)也是一个宏,也会保存寄存器变量,然后跳转执行(asm_do_IRQ)
找到这个宏的索引,调用(asm_do_IRQ),调用完后恢复现场

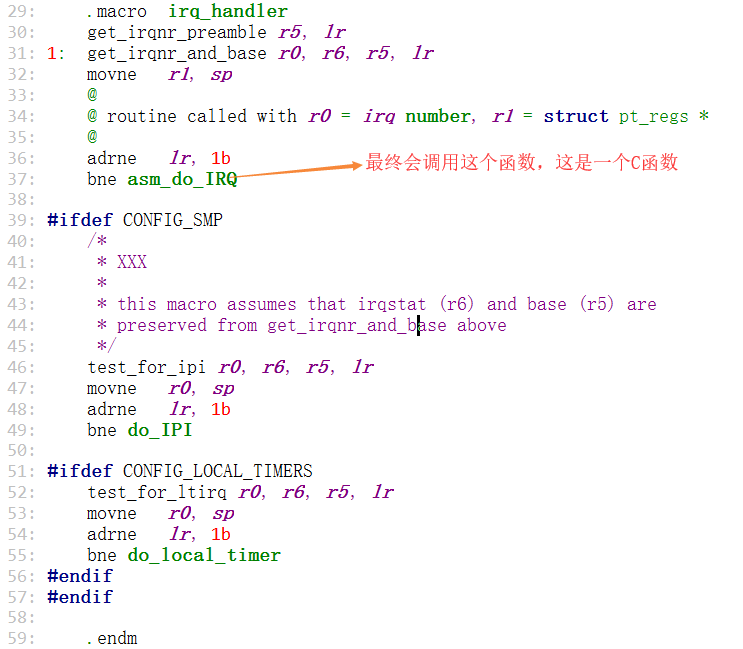
比较复杂的代码我们会在这个C函数里面实现
五、 字符设备驱动程序之中断方式的按键驱动_Linux中断处理(第七课)
单片机下的中断处理
- 分辨是哪个中断
- 调用处理函数
- 清中断
Linux内核下的处理函数:上面的3项都是(asm_do_IRQ)这个函数实现的
首先通过参数1(IRQ的中断号)来找到是哪一个数组

iqr_desc 是一个数组,在(handle.c)中定义
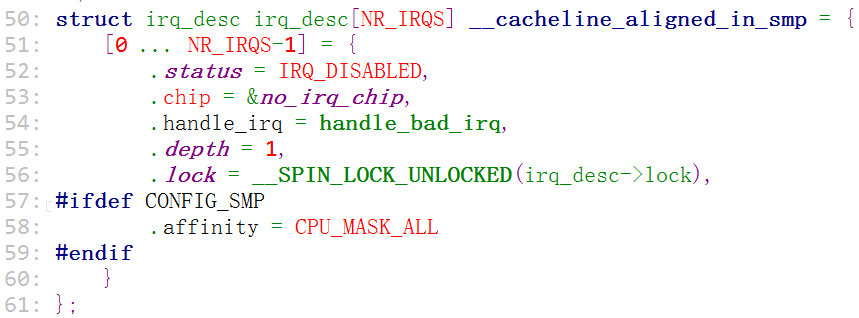
然后会进入到(desc_handle_irq)函数进行处理

irq_desc 这个结构体中的(handle_irq)是在哪儿被设置进去的呢?

在(__set_irq_handler)函数里被设置进去


那么这个函数又是被谁调用的呢?


那(set_irq_handler)函数又是在什么地方被调用?

发现在(arch/arm/plat-s3c24xx/irq.c)中找到函数

以外部中断为例

跟踪到这里说明当中断发生时,就会调用(s3c24xx...)这个初始化函数里的(handle_edge_irq)边沿触发中断函数
在(handle_dege_irq)函数里会清除中断并且调用中断处理函数


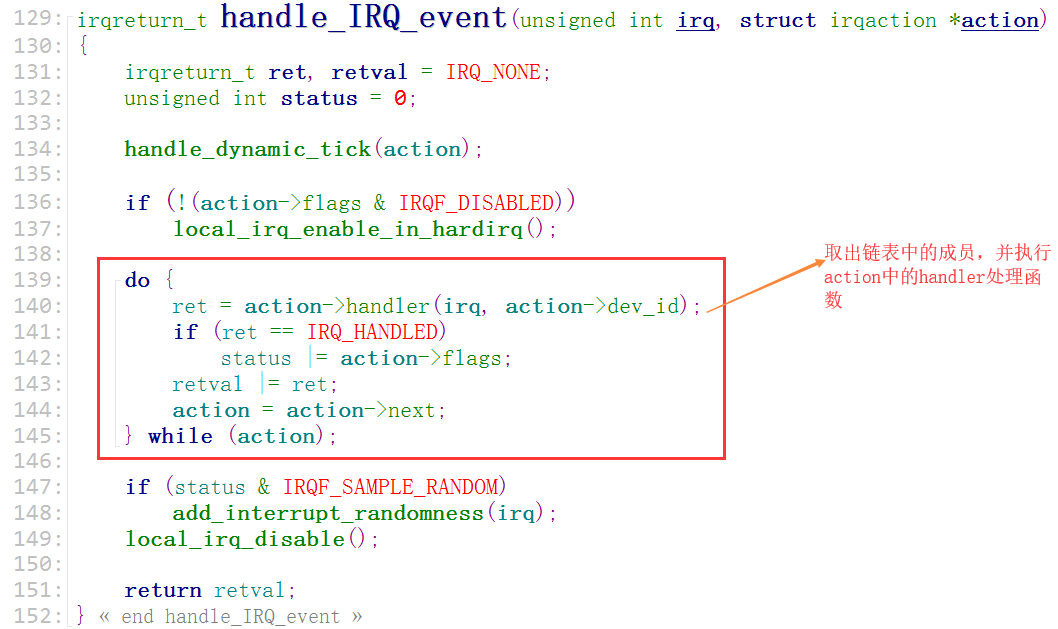
在(handle_IRQ_event)函数中执行action链表中的handler处理函数
Linux中断处理体系结构
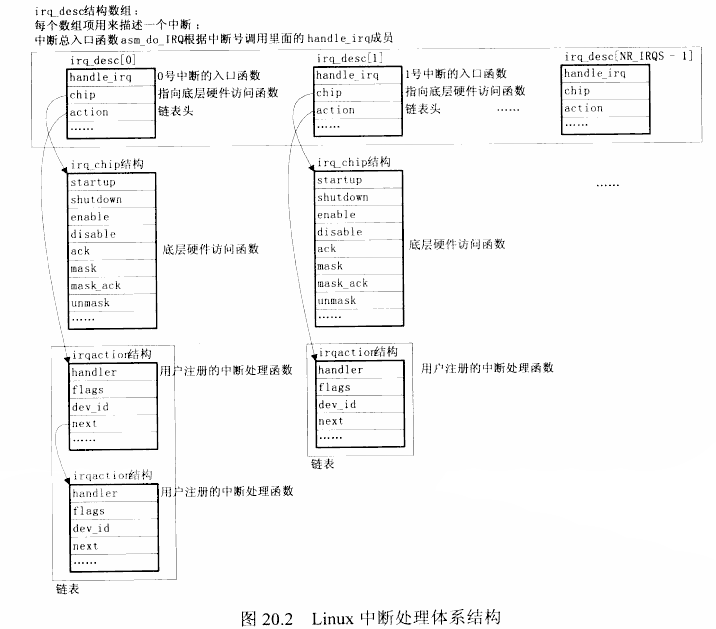
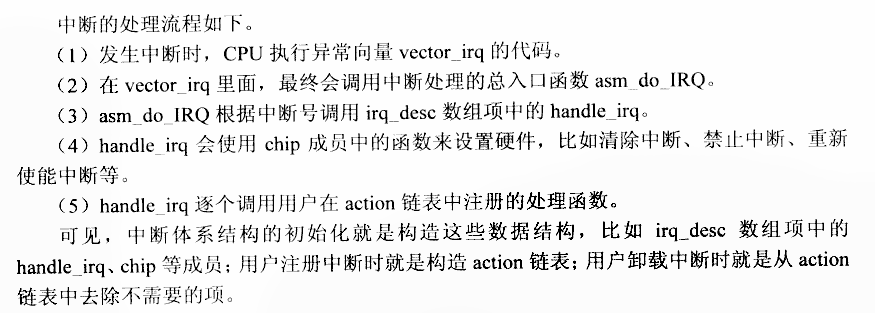
所以以上都是系统做好的,这便是系统的"中断处理框架"。而我们写中断处理时,是想执行我们自己的中断代码。那么我们的代码就应该放在"action->handler"里面
所以我们要用"request_irq()"来告诉内核我们的处理函数是什么。
分析(request_irq)函数

- irq:中断号。
- handler:处理函数。
- irqflags:触发方式(上升沿,下降沿,边沿)。
- devname:中断名。通常是设备驱动程序的名字。该值用在 (/proc/interrupt) 系统文件上,或者内核发生中断错误时使用。
- dev_id:可作为共享时的中断区别参数,也可以用来指定中断服务函数需要参考的数据地址。


- 分配一个 "irqaction" 结构。
- 申请的结构把传入的 "handler" 处理函数等都记录下来。

- 最后调用 "setup_irq" 函数,设置中断。
分析(setup_irq)函数

判断新建的 irqaction 结构和链表中的 irqaction 结构所表示的中断类型是否一致;即是否都声明为 "可共享的(IRQF_SHARED)" 、是否都使用相同的触发方式,若一致则加入irqaction 链表,否则执行(goto mismatch)。
共享中断:它的来源有很多种,但它们共享同一个引脚。

加入 irqaction 链表,并将共享标志置为一

若是共享中断表明之前已经有人挂上去了,之前已经有人设置了这些参数了;若不是共享中断(第一次条件就成立,也就是链表为空),就会调用一些默认的函数

把引脚设置为中断引脚,并设置触发方式

问:这个(desc->chip->set_type)是在哪儿被设置进去的呢?答:在我们的(s3cxx...)这个初始化函数里


函数的实现


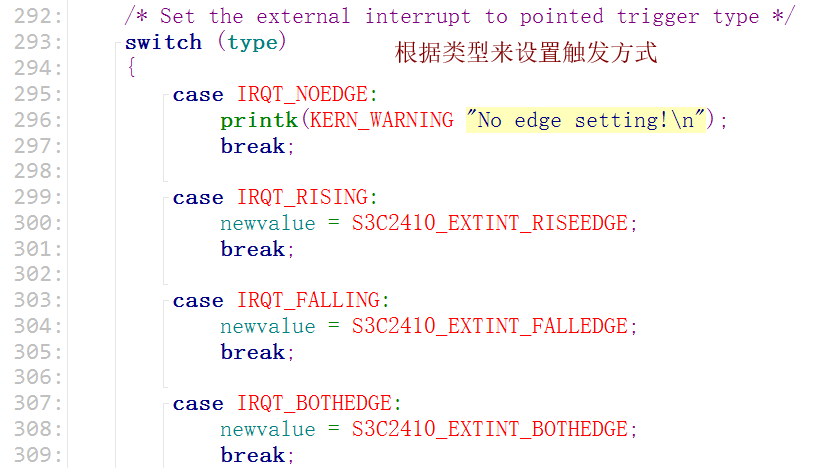
使能中断

把处理函数注册进去

用(free_irq)来卸载中断处理程序

判断irqaction链表结构里的dev_id是否与我们传入的dev_id参数一致

判断这个链表是否已经空了,若已经空了,则屏蔽掉中断

释放内存

request_irq 总结:
    1. 分配一个irqaction结构。
    2. 将分配好的结构放到 irq_desc[irq]数组项中的 action 链表中。
    3. 设置引脚成为中断引脚,使能中断
    总之,执行 request_irq 函数之后,中断就可以发生并能够被处理了。
free_irq 总结:
    1. 根据中断号irq、dev_id从 action 中找到该结构,并将其移除。
    2. 禁止中断(在 action 链表中没有其他成员结构 irqaction 时)。
六、 字符设备驱动程序之中断方式的按键驱动_编写代码(第八课)
我们可以查看搜索一下"request_irq"怎么使用的,然后仿造一下

随便选择一项然后仿造写出代码

我们仿造一下中断处理函数的框架


使用休眠模式,线看一下(s3c24xx_buttons.c)中是如何使用的

这个宏是在什么地方被声明的呢?搜索完包含该宏的文件后使用关键字"define" 可以快速的找到该宏的声明位置


使用该宏把休眠进程放进队列后,那么该如何调用休眠函数进行休眠,又如何调用唤醒函数进行唤醒呢?


按键中断驱动程序(third_chrdev.c)
#include <linux/module.h>
#include <linux/kernel.h>
#include <linux/fs.h>
#include <linux/init.h>
#include <linux/delay.h>
#include <linux/irq.h>
#include <asm/uaccess.h>
#include <asm/irq.h>
#include <asm/io.h>
#include <asm/arch/regs-gpio.h>
#include <asm/hardware.h>
/*
 * eint 0  GPF0
 * eint 2  GPF2
 * eint 11 GPG3
 * eint 19 GPG11
 */
static struct class *third_chrdev_class;
static struct class_device *third_chrdev_class_dev;

static volatile unsigned char key_val;

static DECLARE_WAIT_QUEUE_HEAD(button_waitq);

/* 中断事件标志, 中断服务程序将它置1,s3c24xx_buttons_read将它清0 */
static volatile int ev_press = 0;    //为1时表示唤醒,为0时表示休眠

struct pin_desc{
        unsigned int pin;
        unsigned int key_val;
    };
struct pin_desc pins_desc[4] = {
        {S3C2410_GPF0,  0x01},
        {S3C2410_GPF2,  0x02},
        {S3C2410_GPG3,  0x03},
        {S3C2410_GPG11, 0x04},
    };

static irqreturn_t button_irq(int irq, void *dev_id)
{
    struct pin_desc *pindesc = (struct pin_desc *)dev_id;
    unsigned char pinval;
    printk("irq = %d

", irq);
    pinval = s3c2410_gpio_getpin(pindesc->pin);
    if(pinval)
    {
        /* 松开 */
        key_val = pindesc->key_val;
    }
    else
    {
        /* 按下 */
        key_val = 0x80|pindesc->key_val;
    }
       wake_up_interruptible(&button_waitq);   /* 唤醒休眠的进程 */
        ev_press = 1;
    return IRQ_HANDLED;
}


static int third_chrdev_open(struct inode *inode, struct file *file)
{
    printk("third_chrdev_open

");
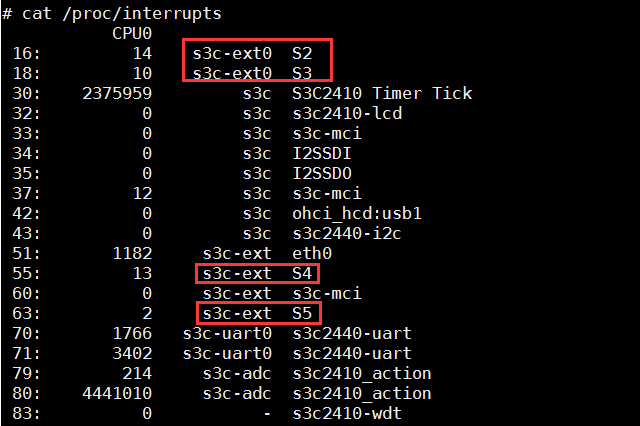
    request_irq(IRQ_EINT0,   button_irq, IRQT_BOTHEDGE, "S2", &pins_desc[0]);
    request_irq(IRQ_EINT2,   button_irq, IRQT_BOTHEDGE, "S3", &pins_desc[1]);
    request_irq(IRQ_EINT11, button_irq, IRQT_BOTHEDGE, "S4", &pins_desc[2]);
    request_irq(IRQ_EINT19, button_irq, IRQT_BOTHEDGE, "S5", &pins_desc[3]);

    return 0;
}


static ssize_t third_chrdev_read(struct file *file, const char __user *buf, size_t count, loff_t * ppos)
{
    if (count != 1)
        return -EINVAL;

    /* 如果没有按键动作, 休眠 */
    wait_event_interruptible(button_waitq, ev_press);

    copy_to_user(buf, &key_val, 1);
    ev_press = 0;

    return 1;
}

int third_chrdev_release(struct inode *inode, struct file *file)
{
    printk("third_chrdev_release

");
    free_irq(IRQ_EINT0,   &pins_desc[0]);
    free_irq(IRQ_EINT2,   &pins_desc[1]);
    free_irq(IRQ_EINT11, &pins_desc[2]);
    free_irq(IRQ_EINT19, &pins_desc[3]);

    return 0;
}


static struct file_operations third_chrdev_fops = {
    .owner    =  THIS_MODULE,    /* 这是一个宏,推向编译模块时自动创建的__this_module变量 */
    .open     =  third_chrdev_open,
    .read     =  third_chrdev_read,
    .release  =  third_chrdev_release,
};


int major;
static int third_chrdev_init(void)
{
    major = register_chrdev(0, "third_chrdev", &third_chrdev_fops);  //注册
    third_chrdev_class = class_create(THIS_MODULE, "thirdchrdev");
    third_chrdev_class_dev = class_device_create(third_chrdev_class, NULL, MKDEV(major, 0), NULL, "third_chrdev");

    return 0;
}

static void third_chrdev_exit(void)
{
    unregister_chrdev(major, "third_chrdev");                    //卸载
    class_device_unregister(third_chrdev_class_dev);
    class_destroy(third_chrdev_class);
}

module_init(third_chrdev_init);
module_exit(third_chrdev_exit);

MODULE_LICENSE("GPL");
测试驱动程序:
- 修改Makefile
- 编译并拷贝到(first_fs)目录
- 加载模块(insmod ./third_chrdev.ko)
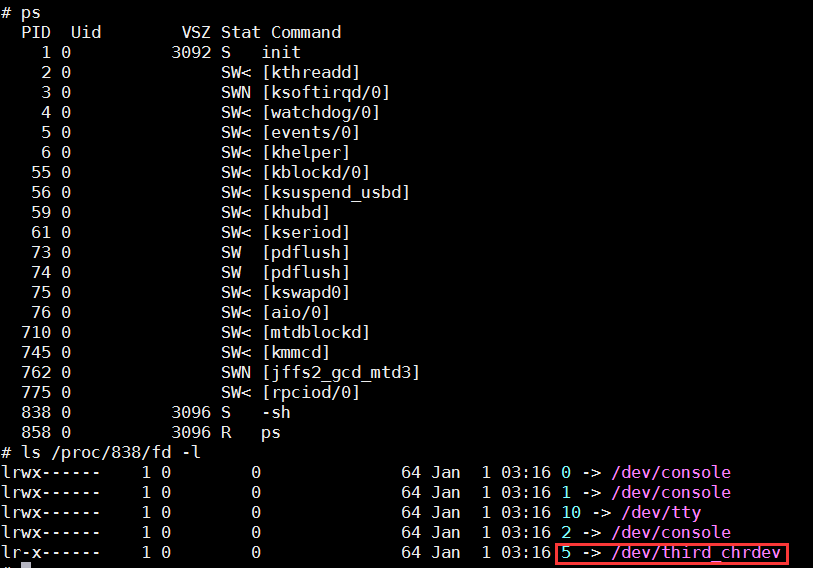
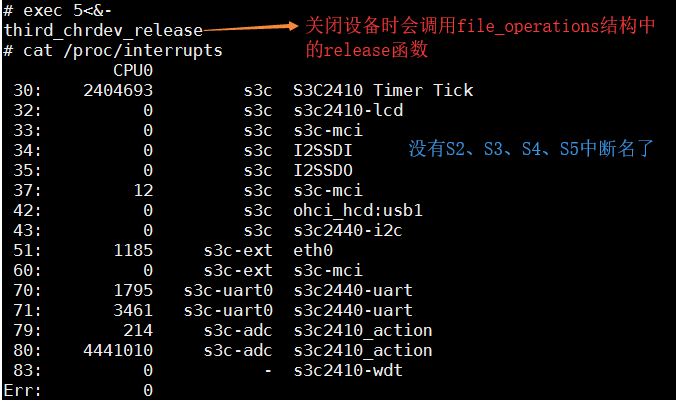
exec 5</dev/third_chrdev:打开这个设备并把它定位到5去,等价于执行了open函数
差看5这个软链接:首先使用ps命令查看当前的sh进程,然后进入到(/proc/[-sh]/fd)目录即可查看
cat /proc/interrupt:查看中断
exec 5<&-:关闭设备
加入测试程序(third_chrdev_test.c)
#include <sys/types.h>
#include <sys/stat.h>
#include <fcntl.h>
#include <stdio.h>

int main(int argc, char **argv)
{
    int fd;
    volatile unsigned char key_val;
    fd = open("/dev/third_chrdev",O_RDWR);
    if(fd < 0)
    printf("can't open!
");

    while(1)
    {
        read(fd,&key_val,1);
        printf("key_val = 0x%x

", key_val);
        printf("

");
    }
    return 0;
}
再次测试
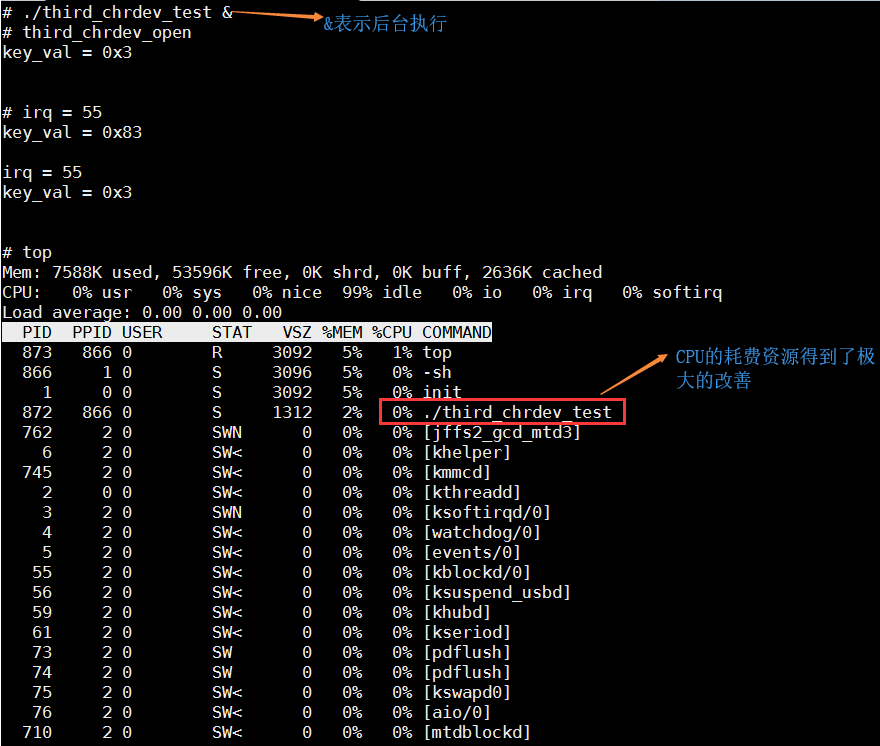
    kill pid:表示杀死这个进程
    kill -9 pid:(-9表示绝对终止)表示彻底杀死这个进程

<wiz_tmp_tag id="wiz-table-range-border" contenteditable="false" style="display: none;">