在讲述自定义命令之前,先了解一下与命令有关的几个要素,就像我们常说的“记叙文六要素”一样,一个完整的命令应当包括:
1、命令,这当然是核心部分了;
2、命令源:命令是谁发出的;
3、目标,命令作用在哪些元素上,如往文本框中粘贴内容,那么该TextBox就是命令目标;
严格上说,命令是实现了ICommand接口的类,但是,在际使用中,我们不必这样做,一种有效的方法是在某个类中直接声明一个RouteCommand类的成员字段即可,一般使用Static关键字,这样可以使得命令只与类有关,而不必理会其属于哪个实例。
下面,我们一起动手完成一个实例:
1、新建一个WPF应用程序,如何新建?(略);
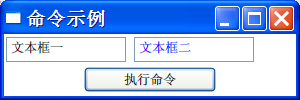
2、布局好主窗体,我们重点是需要两个文本框和一个按钮,其它的自己喜欢;
3、使用CommadBinding把命令添加到窗体类的CommandBindings集合中。
4、在按钮上设置Command属性。
- <Window x:Class="CommandSample.MainWindow"
- xmlns="http://schemas.microsoft.com/winfx/2006/xaml/presentation"
- xmlns:x="http://schemas.microsoft.com/winfx/2006/xaml"
- xmlns:c="clr-namespace:CommandSample"
- Title="命令示例" Height="100" Width="300">
- <!-- 添加命令绑定 -->
- <Window.CommandBindings>
- <CommandBinding Command="{x:Static c:MainWindow.MyCommand}"
- CanExecute="MyCmd_CanExecute"
- Executed="MyCmd_Executed"/>
- </Window.CommandBindings>
- <Grid>
- <Grid.RowDefinitions>
- <RowDefinition Height="auto"/>
- <RowDefinition Height="auto"/>
- </Grid.RowDefinitions>
- <StackPanel Orientation="Horizontal" Grid.Row="0" Height="25" Margin="0,3,0,0" >
- <TextBox x:Name="txt01" Margin="2,0,0,0" Text="文本框一" Width="120"/>
- <TextBox x:Name="txt02" Margin="8,0,0,0" Text="文本框二" Width="120"/>
- </StackPanel>
- <Button x:Name="btnTest" Grid.Row="1"
- Margin="80,5,80,0" Height="25" Content="执行命令"
- Command="{x:Static c:MainWindow.MyCommand}"/>
- </Grid>
- </Window>
- // 命令
- public static RoutedCommand MyCommand = new RoutedCommand();
- public MainWindow()
- {
- InitializeComponent();
- }
- private void MyCmd_CanExecute(object sender, CanExecuteRoutedEventArgs e)
- {
- if (e.Source != null)
- {
- e.CanExecute = true;
- }
- else { e.CanExecute = false; }
- }
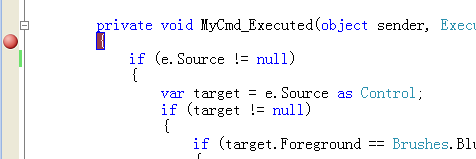
- private void MyCmd_Executed(object sender, ExecutedRoutedEventArgs e)
- {
- if (e.Source != null)
- {
- var target = e.Source as Control;
- if (target != null)
- {
- if (target.Foreground == Brushes.Blue)
- {
- target.Foreground = Brushes.Black;
- }
- else
- {
- target.Foreground = Brushes.Blue;
- }
- }
- }
- }
这样我们会有一个疑问,事件的引发者是谁?命令目标又是谁?
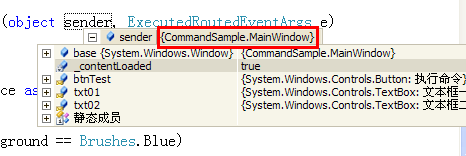
我们在Executed事件处理程序的开始处下一个断点,然后单步跟入。
得到的结果如下:
sender是主窗体。
ExecutedRoutedEventArgs的Source属性就是命令目标。
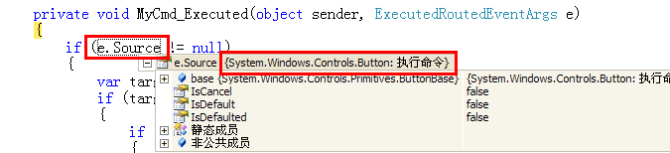
但是,当我们运行的时候,我们发现字体变成蓝色的并不是文本框,而是按钮,为什呢?
我们仔细阅读一下MSDN文档及相关说明就知道了,因为我们没有设置Target,所以,默认的是当前获得焦点的元素将成为命令目标。
下面我们改一个上面的XAML让Button的CommandTarget指向第二个文本框。
- <Button x:Name="btnTest" Grid.Row="1"
- Margin="80,5,80,0" Height="25" Content="执行命令"
- Command="{x:Static c:MainWindow.MyCommand}"
- CommandTarget="{Binding ElementName=txt02}"/>
现在运行一下,可以发现,点击按钮后,第二个文本框的前景色就变成蓝色了。
CanExecute事件和Executed事件都是路由事件,当然,RouteCommand类也包含遂道事件,至于什么是路由事件,什么是遂道事件,不在本文讲述的范围之中。
以路由事件为例,下面我们来做第二个示例。这个示例,窗体上有一个StackPanel,里面包含一个按钮,同时,把CommandBinding添加到该StackPanel上,而该StackPanel里面再嵌套一个DockPanel,同样,把同一个命令也添加到DockPanel上,DockPanel里面再包含一个Canvas,但是Canvas不添加CommandBinding,然后,在Executed事件处理程序中分别输出引发事件的类型,命令目标类型和目标的Name属性的值。
[XAML]
- <Window x:Class="Cmd_Smpl2.Window1"
- xmlns="http://schemas.microsoft.com/winfx/2006/xaml/presentation"
- xmlns:x="http://schemas.microsoft.com/winfx/2006/xaml"
- xmlns:c="clr-namespace:Cmd_Smpl2"
- Title="Window1" Height="300" Width="300">
- <Grid>
- <StackPanel Orientation="Vertical">
- <StackPanel.CommandBindings>
- <CommandBinding Command="{x:Static c:Window1.MyCmdRoute}"
- CanExecute="Cmd_CanExecuteHandler"
- Executed="Cmd_ExecutedHandler"/>
- </StackPanel.CommandBindings>
- <Button x:Name="btnTest1" Width="100" Height="25"
- Content="执行命令1"
- Command="{x:Static c:Window1.MyCmdRoute}"/>
- <DockPanel>
- <DockPanel.CommandBindings>
- <CommandBinding Command="{x:Static c:Window1.MyCmdRoute}"
- CanExecute="Cmd_CanExecuteHandler"
- Executed="Cmd_ExecutedHandler"/>
- </DockPanel.CommandBindings>
- <Button x:Name="btnTest2" DockPanel.Dock="Top"
- Content="执行命令2"
- Command="{x:Static c:Window1.MyCmdRoute}"/>
- <Canvas>
- <Button x:Name="btnTest3"
- Canvas.Top="3" Canvas.Left="5"
- Width="100" Height="25"
- Content="执行命令3"
- Command="{x:Static c:Window1.MyCmdRoute}"/>
- </Canvas>
- </DockPanel>
- </StackPanel>
- </Grid>
- </Window>
[C# Code]
- public static RoutedCommand MyCmdRoute = new RoutedCommand();
- public Window1()
- {
- InitializeComponent();
- }
- private void Cmd_CanExecuteHandler(object sender, CanExecuteRoutedEventArgs e)
- {
- e.CanExecute = e.Source == null ? false : true;
- }
- private void Cmd_ExecutedHandler(object sender, ExecutedRoutedEventArgs e)
- {
- if (e.Source != null && sender != null)
- {
- string msg = "引发事件的类型:{0},命令目标的类型:{1},命令目标的Name:{2}";
- System.Diagnostics.Debug.WriteLine(
- string.Format(msg,
- sender.GetType().Name,
- e.Source.GetType().Name,
- (e.Source as FrameworkElement).Name
- ));
- }
- }
然后,我们运行程序,依次点击这三个按钮,接着打开“输出”窗口观察一下。
得到的结果如下:
- 引发事件的类型:StackPanel,命令目标的类型:Button,命令目标的Name:btnTest1
- 引发事件的类型:DockPanel,命令目标的类型:Button,命令目标的Name:btnTest2
- 引发事件的类型:DockPanel,命令目标的类型:Button,命令目标的Name:btnTest3
发现了什么?从调试信息中看到,后两次执行命令,引发事件的类型都是DockPanel,这也符合路由事件沿可视化树往上冒泡的原则了。
因为Canvas中我们没有绑定命令,所以在Canvas上无法引发事件,于是,向上路由到DockPanel,所以后两次事件的触发者都是DockPanel。
接下来,我们还要动手做第三个示例,示例不通过控件来执行命令,而是通过快捷键Ctrl + Alt + Y来激活。
- public partial class Window1 : Window
- public static RoutedCommand MyCmd = new RoutedCommand();
- public Window1()
- {
- InitializeComponent();
- // 绑定事件
- CommandManager.AddCanExecuteHandler(this, this.Cmd_CanExeHandler);
- CommandManager.AddExecutedHandler(this, this.Cmd_ExeHandler);
- // 绑定命令
- this.InputBindings.Add(new KeyBinding(
- MyCmd,
- Key.Y,
- ModifierKeys.Control | ModifierKeys.Alt));
- }
- private void Cmd_CanExeHandler(object sender, CanExecuteRoutedEventArgs e)
- {
- e.CanExecute = true;
- }
- private void Cmd_ExeHandler(object sender, ExecutedRoutedEventArgs e)
- {
- MessageBox.Show("命令已执行。");
- }
运行程序,当窗口处于活动状态,然后按下Ctrl + Alt + Y,你就看到效果了。