本文为学习极客时间《nginx核心知识100讲》的学习笔记
https://time.geekbang.org/course/intro/100020301
一、编译出适合自己的nginx

1、下载nginx
[root@nginx ~]# wget http://nginx.org/download/nginx-1.14.2.tar.gz
2、介绍各目录
1、contrib 会有vim语法高亮颜色
[root@nginx nginx-1.14.2]# pwd
/usr/local/src/nginx-1.14.2
[root@nginx nginx-1.14.2]# ls contrib/
geo2nginx.pl  README  unicode2nginx  vim
[root@nginx nginx-1.14.2]# cp -r ./contrib/vim/* /root/.vim

3、./configure
1、查看帮助文件
[root@nginx nginx-1.14.2]# ./configure --help|more
......
第一类

--prefix=PATH

第二类:使用哪些和不使用哪些模块

--with-http_ssl_module          #默认是不编译进nginx的
--without-http_charset_module   #默认是编译进nginx,加这个参数就是卸载这个模块

第三类:特殊优化参数
  --with-cc=PATH                     set C compiler pathname
  --with-cpp=PATH                    set C preprocessor pathname
  --with-cc-opt=OPTIONS              set additional C compiler options
  --with-ld-opt=OPTIONS              set additional linker options
  --with-cpu-opt=CPU
报错一:
[root@nginx nginx-1.14.2]# ./configure --prefix=/usr/local/nginx
checking for OS
+ Linux 3.10.0-957.el7.x86_64 x86_64
checking for C compiler ... not found

./configure: error: C compiler cc is not found
解决方法
yum -y install gcc gcc-c++ autoconf automake make
报错二:
[root@nginx nginx-1.14.2]# ./configure --prefix=/usr/local/nginx
......
./configure: error: the HTTP rewrite module requires the PCRE library.
You can either disable the module by using --without-http_rewrite_module
option, or install the PCRE library into the system, or build the PCRE library
statically from the source with nginx by using --with-pcre=<path> option.
[root@nginx nginx-1.14.2]# ./configure --prefix=/usr/local/nginx
解决方法
yum -y install openssl openssl-devel pcre-devel -y
4、中间文件介绍
1、生成中间文件在什么地方?
[root@nginx objs]# pwd
/usr/local/src/nginx-1.14.2/objs
[root@nginx objs]# ll
total 3780
-rw-r--r--. 1 root root 17763 Feb 29 17:44 autoconf.err
-rw-r--r--. 1 root root 39478 Feb 29 17:44 Makefile
-rwxr-xr-x. 1 root root 3746432 Feb 29 17:50 nginx
-rw-r--r--. 1 root root 5341 Feb 29 17:50 nginx.8
-rw-r--r--. 1 root root 6804 Feb 29 17:44 ngx_auto_config.h
-rw-r--r--. 1 root root 657 Feb 29 17:44 ngx_auto_headers.h
-rw-r--r--. 1 root root 5725 Feb 29 17:47 ngx_modules.c        #所有的模块都放在 ngx_modules.c
-rw-r--r--. 1 root root 31872 Feb 29 17:50 ngx_modules.o
drwxr-xr-x. 9 root root 91 Feb 29 17:44 src
2、为什么要知道nginx编译中间文件是放在这里呢?
左nginx版本升级,这个时候我们不能make instal 需要把中间文件拷贝到安装目录下
3、c语言编辑生成的所有中间目录都会放在src目录中
/usr/local/src/nginx-1.14.2/objs/src
[root@nginx src]# ll
total 8
drwxr-xr-x. 2 root root 4096 Feb 29 17:50 core
drwxr-xr-x. 3 root root 168 Feb 29 17:50 event
drwxr-xr-x. 4 root root 4096 Feb 29 17:50 http
drwxr-xr-x. 2 root root 6 Feb 29 17:44 mail
drwxr-xr-x. 2 root root 6 Feb 29 17:44 misc
drwxr-xr-x. 4 root root 31 Feb 29 17:44 os
drwxr-xr-x. 2 root root 6 Feb 29 17:44 stream
如果使用了动态模块、生成的so文件也会放在这个目录下
5、编译安装
[root@nginx nginx-1.14.2]# make && make install
首次安装可以使用这个命令 make install
二、Nginx配置语法
1、语法配置

语法示例
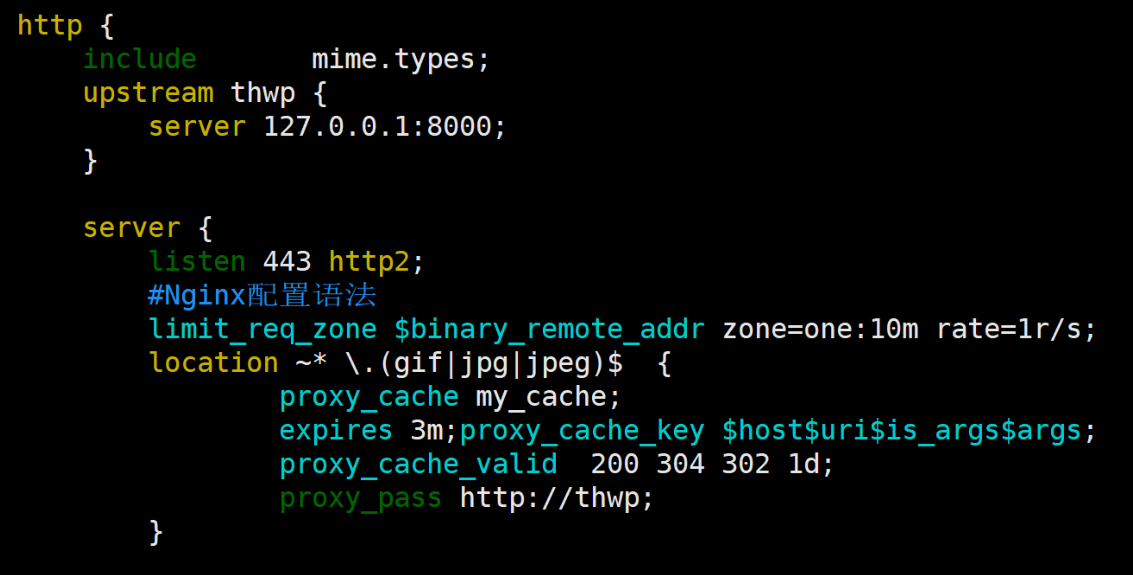
2、http配置指令块

语法示例

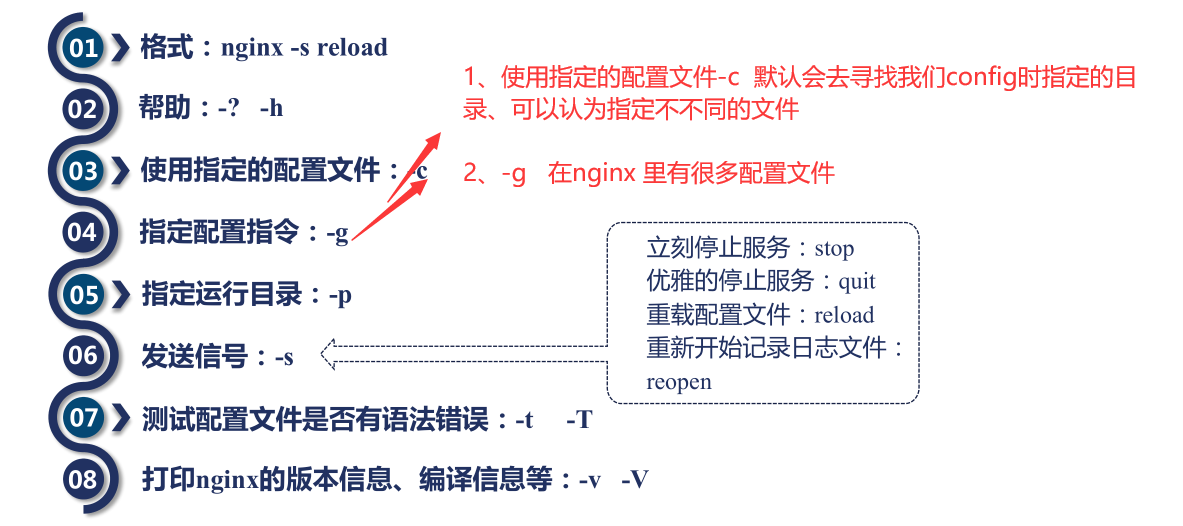
三、nginx的命令行
1、命令行
四、命令行演示
1、重载配置文件
[root@nginx conf]# ps -ef|grep nginx
root       9597      1  0 15:05 ?        00:00:00 nginx: master process ../sbin/nginx
nobody     9598   9597  0 15:05 ?        00:00:00 nginx: worker process
root       9600   9461  0 15:05 pts/0    00:00:00 grep --color=auto nginx
[root@nginx conf]# vim nginx.conf
开启:tcp_nopush     on;
[root@nginx conf]# ../sbin/nginx -s reload
[root@nginx conf]# ps -ef|grep nginx
root       9597      1  0 15:05 ?        00:00:00 nginx: master process ../sbin/nginx
nobody     9603   9597  0 15:05 ?        00:00:00 nginx: worker process
root       9605   9461  0 15:05 pts/0    00:00:00 grep --color=auto nginx
2、热部署
1、nginx运行状态
[root@nginx sbin]# ps -ef|grep nginx
root 19530 1 0 18:34 ? 00:00:00 nginx: master process ./nginx
nobody 19531 19530 0 18:34 ? 00:00:00 nginx: worker process
root 19533 9802 0 18:34 pts/0 00:00:00 grep --color=auto nginx
2、备份二进制文件
[root@nginx sbin]# cp nginx nginx.old
[root@nginx sbin]# cd /usr/local/src/nginx-1.14.2
[root@nginx nginx-1.14.2]# cd objs/
[root@nginx objs]# ll
total 3780
-rw-r--r--. 1 root root 17763 Feb 29 17:44 autoconf.err
-rw-r--r--. 1 root root 39478 Feb 29 17:44 Makefile
-rwxr-xr-x. 1 root root 3746432 Feb 29 17:50 nginx
-rw-r--r--. 1 root root 5341 Feb 29 17:50 nginx.8
-rw-r--r--. 1 root root 6804 Feb 29 17:44 ngx_auto_config.h
-rw-r--r--. 1 root root 657 Feb 29 17:44 ngx_auto_headers.h
-rw-r--r--. 1 root root 5725 Feb 29 17:47 ngx_modules.c
-rw-r--r--. 1 root root 31872 Feb 29 17:50 ngx_modules.o
drwxr-xr-x. 9 root root 91 Feb 29 17:44 src
3、更新nginx二进制文件
[root@nginx objs]# cp -r nginx /usr/local/nginx/ -f #更新nginx二进制文件
[root@nginx objs]# ps -ef|grep nginx
root 19530 1 0 18:34 ? 00:00:00 nginx: master process ./nginx
nobody 19531 19530 0 18:34 ? 00:00:00 nginx: worker process
root 19540 9802 0 18:37 pts/0 00:00:00 grep --color=auto nginx
4、发送一个信号 、master会用新的二进制文件新启动一个进程
[root@nginx objs]# kill -USR2 19530
[root@nginx objs]# ps -ef|grep nginx
root 19530 1 0 18:34 ? 00:00:00 nginx: master process ./nginx
nobody 19531 19530 0 18:34 ? 00:00:00 nginx: worker process
root 19541 19530 0 18:38 ? 00:00:00 nginx: master process ./nginx
nobody 19542 19541 0 18:38 ? 00:00:00 nginx: worker process
root 19544 9802 0 18:38 pts/0 00:00:00 grep --color=auto nginx
新的master会生成新的work,老的master和work也在运行,他们会平滑的把所有的请求过度到新的二进制文件启的进程中
老的master和work已经不再监听80和443端口 所以新的请求,新的连接会进入新的nginx
5、告诉它请优雅的关闭你的所有的work进程
[root@nginx objs]# kill -WINCH 19530 #
[root@nginx objs]# ps -ef|grep nginx
root 19530 1 0 18:34 ? 00:00:00 nginx: master process ./nginx
root 19541 19530 0 18:38 ? 00:00:00 nginx: master process ./nginx
nobody 19542 19541 0 18:38 ? 00:00:00 nginx: worker process
root 19546 9802 0 18:39 pts/0 00:00:00 grep --color=auto nginx
- 老的master进程还在运行、所有的请求已经转接到新的nginx上了 但是我们又可能会发生一些问题
- 新版本退回到老版本,所以我们还可以给老的master发送信号重新把老的work拉起来
- 是不会自动退出 允许我们做版本回退
3、切割日志文件
[root@nginx logs]# mv access.log luoahong.log
[root@nginx logs]# ll
total 16
-rw-r--r--. 1 root root 520 Feb 29 18:38 error.log
-rw-r--r--. 1 root root 501 Feb 29 18:35 luoahong.log
-rw-r--r--. 1 root root   6 Feb 29 18:38 nginx.pid
-rw-r--r--. 1 root root   6 Feb 29 18:34 nginx.pid.oldbin
[root@nginx logs]# ../sbin/nginx -s reopen
[root@nginx logs]# ll
total 20
-rw-r--r--. 1 nobody root 292 Feb 29 19:01 access.log
-rw-r--r--. 1 nobody root 581 Feb 29 19:00 error.log
-rw-r--r--. 1 root   root 501 Feb 29 18:35 luoahong.log
-rw-r--r--. 1 root   root   6 Feb 29 18:38 nginx.pid
-rw-r--r--. 1 root   root   6 Feb 29 18:34 nginx.pid.oldbin
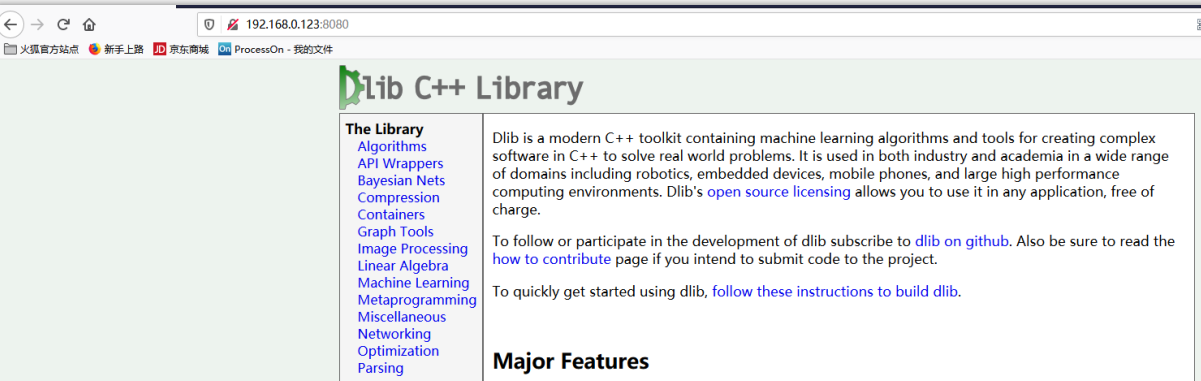
五、静态资源服务演示
1、location
代码
    server {
        listen       8080;
        server_name  www.luoahong.com;

        #charset koi8-r;

        access_log  logs/access.log  main;

        location / {
            alias    dlib/;
        }
截图
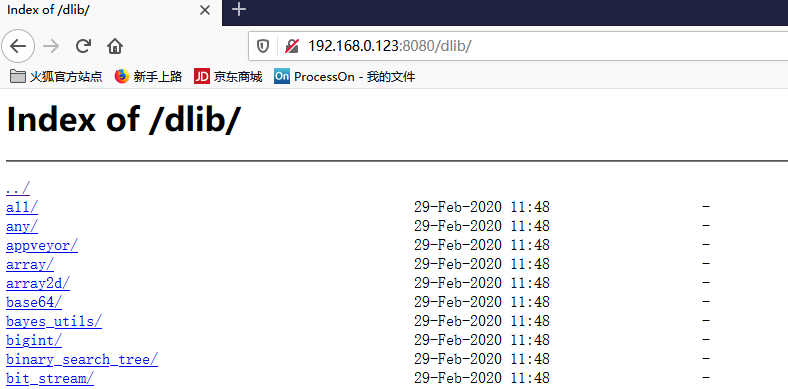
2、设置目录浏览autoindex on;
实现代码
    server {
        listen       8080;
        server_name  www.luoahong.com;

        #charset koi8-r;

        access_log  logs/access.log  main;

        location / {
            alias    dlib/;
            autoindex on;
        }
效果截图
3、控制速度set $limit_rate 1k;
Nginx的http核心模块ngx_http_core_module中提供limit_rate这个指令可以用于控制速度,limit_rate_after用于设置http请求传输多少字节后开始限速。
实现代码
    server {
        listen       8080;
        server_name  www.luoahong.com;

        #charset koi8-r;

        access_log  logs/access.log  main;

        location / {
            alias    dlib/;
            autoindex on;
			set $limit_rate 1k;

        }
效果截图

4、压缩
代码实现
http {
......

    gzip  on;
    gzip_min_length 1;
    gzip_comp_level 2;
    gzip_types text/plain application/x-javascript text/css application/xml text/javascript application/x=httpd-php image/jpeg image/gif image/png;

    server {
......
        }
效果截图
