在线编辑器xheditor,测试感觉不错,特把使用方法记录如下 :
先看看基本使用方法,然后用实例来操作
1、xheditor 地址
2、下载最新编辑器源码

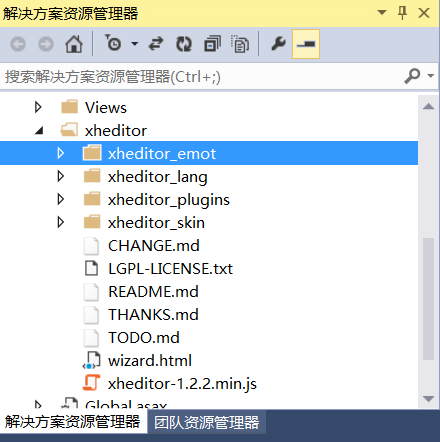
3、将下载的压缩文件解压缩,上传其中的xheditor.min.js以及xheditor_lang、xheditor_emot、xheditor_plugins和xheditor_skin四个文件夹到网站相应文件夹xheditor中。
注:如果您网站中没有使用jQuery框架,也请一并上传jquery文件夹中的jquery-1.4.4.min.js

4、在需要调用xhEditor编辑器的网页head标签结束之前添加以下代码:
<script src="~/Scripts/jquery-3.1.1.min.js"></script>
<script src="~/xheditor/xheditor-1.2.2.min.js"></script>
<script src="~/xheditor/xheditor_lang/zh-cn.js"></script>
5、在需要实现可视化的文本框textarea属性中添加:
class="xheditor"

例如:<textarea name="content" id="content" class="xheditor">test</textarea>
上面是用class完成的,也可以用js:
$('#content').xheditor();
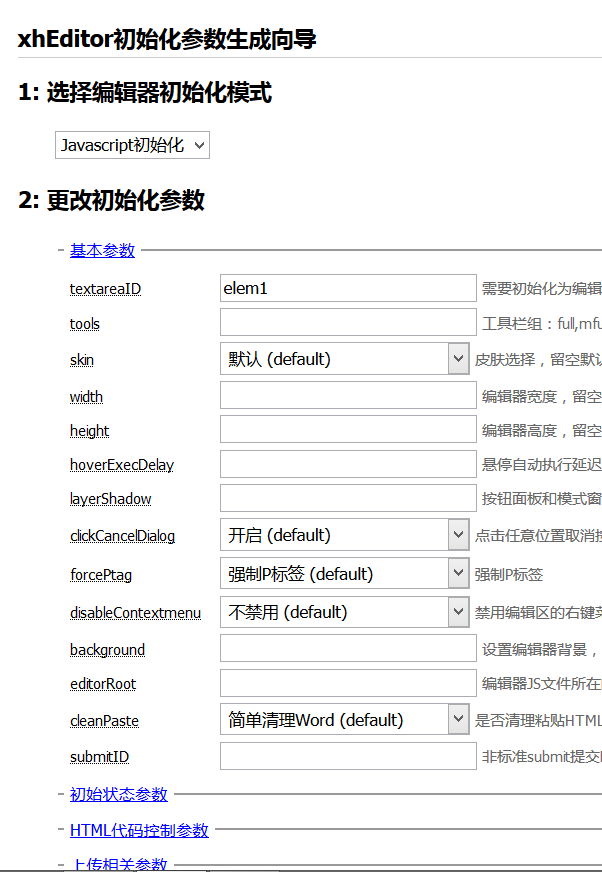
6、参数调整,比如编辑大小,菜单项,上传图片执行文件等
http://xheditor.com/wizard.html
打开上面地址,在线可视化生成参数。

把生成的代码放回自己程序中就可以了,比如 class="xheditor-simple {'650',height:'300'}"
下面使用.net mvc4操作实现一个简单的增删改查功能的例子
1、首选Demo的数据库结构,如下,数据库中有一个表test,就是本实例的数据表

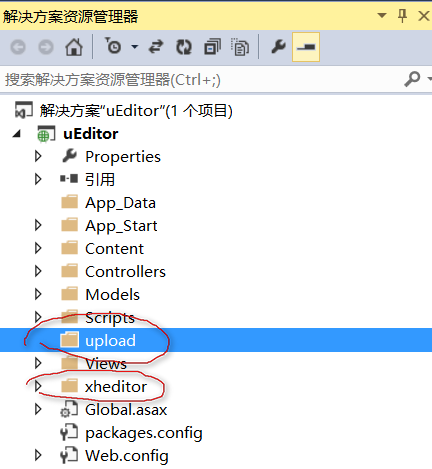
2、VS创建实例,并创建 xheditor 和upload文件夹,upload文件夹后面会用到,就是上传图片到此文件夹下。

3、下载xheditor,并解压缩,上传其中的xheditor.min.js以及xheditor_lang、xheditor_emot、xheditor_plugins和xheditor_skin四个文件夹到网站相应文件夹xheditor中
4、下面开始编程,实现功能,首先在控制器中创建Home控制器,并创建增册改查功能,这里不详细说明了,我把源码提供一下,自己研究吧,数据库的连接我用的是EF,不知道的可以看我以前的博文。
    public class HomeController : Controller
    {

        testEntities db = new testEntities();
        public ActionResult Index()
        {
            return View(db.tests.OrderByDescending(x => x.id));
        }
        //创建
        public ActionResult create()
        {
            return View();
        }
        //添加
        [HttpPost]
        [ValidateInput(false)]
        public ActionResult add(test t)
        {
            if (string.IsNullOrEmpty(t.title))
                return Content("名称不能为空");
            if (string.IsNullOrEmpty(t.ucontent))
                return Content("内容不能为空");
            try
            {
                db.tests.Add(t);
                db.SaveChanges();
            }
            catch (Exception ex)
            {
                return Content(ex.Message);
            }
            return Content("ok");
        }
        //浏览新闻
        public ActionResult news(int id)
        {
            return View(db.tests.Find(id));
        }
        //编辑
        public ActionResult edit(int id)
        {
            return View(db.tests.Find(id));
        }
        //编辑保存
        [HttpPost]
        [ValidateInput(false)]
        public ActionResult edit(test t)
        {
            db.Entry(t).State = System.Data.EntityState.Modified;
            db.SaveChanges();
            return Content("ok");
        }
        //删除
        public ActionResult del(int id)
        {
            var item = db.tests.Find(id);
            db.tests.Remove(item);
            return Content("ok");
        }
    }
5、网页模板
<!DOCTYPE html>
<html>
<head>
    <meta charset="utf-8" />
    <meta name="viewport" content="width=device-width" />
    <title>@ViewBag.Title</title>
    <script src="~/Scripts/jquery-3.1.1.min.js"></script>
    <script src="~/xheditor/xheditor-1.2.2.min.js"></script>
    <script src="~/xheditor/xheditor_lang/zh-cn.js"></script>
</head>
<body>
    @RenderBody()

    @RenderSection("scripts", required: false)
</body>
</html>
6、列表页
<h2>列表</h2>
<a href="/home/create">创建</a>
<ul>

@foreach (var item in Model)
{
    <li><a href="/home/edit/@item.id">编辑</a> <a href="/home/del/@item.id">删除</a> <a href="/home/news/@item.id"> @item.title </a></li>
}
</ul>
7、创建页
@{
    ViewBag.Title = "create";
}
<h2>create</h2>
<a href="/home">返回</a>
<form id="myform">
    <div>
        <input placeholder="标题" id="title" name="title" />
    </div>
    <textarea name="ucontent" id="ucontent">test</textarea>
</form>
<button class="btnOk">提交</button>
<br />
<script>
    $('#ucontent').xheditor({ tools: 'mfull',  '600', height: '200', upImgUrl: "/images/XhUpload", upImgExt: "jpg,jpeg,gif,png" });

    $(".btnOk").click(function () {
        $.post("/home/add", $("#myform").serialize(), function (data) { alert(data); });
    });
</script>
8、编辑页
@model uEditor.Models.test
@{
    ViewBag.Title = "edit";
}

<h2>edit</h2>
<a href="/home">返回</a>
<form id="myform">
    <div>
        <input type="hidden" name="id" value="@Model.id" />
        <input placeholder="标题" id="title" name="title" value="@Model.title" />
    </div>
    <textarea name="ucontent" id="ucontent">@Model.ucontent</textarea>
</form>
<button class="btnOk">提交</button>
<script>
    $('#ucontent').xheditor({ tools: 'mfull',  '600', height: '200', upImgUrl: "/images/XhUpload", upImgExt: "jpg,jpeg,gif,png" });

    $(".btnOk").click(function () {
        $.post("/home/edit", $("#myform").serialize(), function (data) {
            alert(data);
        })
    });
</script>
9、浏览页
<h2>news</h2>

<h4>@Model.title</h4>
<div>
    @Html.Raw(Model.ucontent)
</div>
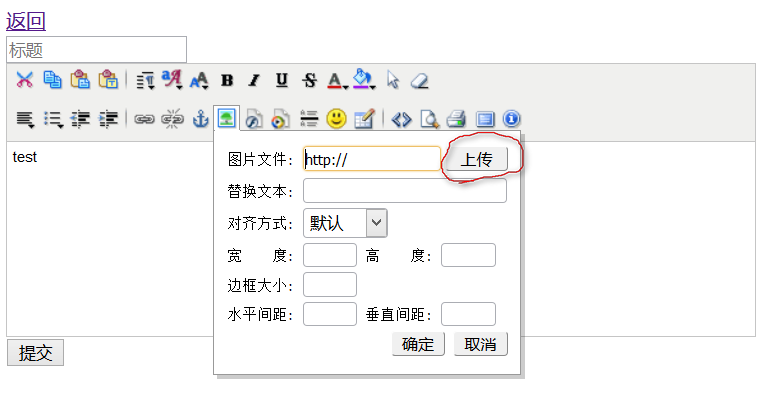
10、上传图片功能需要自己写代码,如果不实现,则无法在编辑器中上传图片,实现上传功能后会在编辑上传图片右侧多出上传按钮,如下

首先在编辑器页面中添加参数:upImgUrl: "/images/XhUpload", upImgExt: "jpg,jpeg,gif,png" }
/images/XhUpload 就是上传功能的文件,在控制器中创建images控制器,然后创建XhUpload,代码如下:
 public class ImagesController : Controller
    {
        #region XhEditor网页编辑器图片上传【HTML5+】
        /// <summary>
        /// XhEditor网页编辑器图片上传【HTML5+】
        /// </summary>
        /// <param name="fileData"></param>
        /// <returns></returns>
        [HttpPost]
        public ActionResult XhUpload(HttpPostedFileBase fileData)
        {
            Response.Charset = "UTF-8";

            // 初始化一大堆变量
            //string inputname = "filedata";//表单文件域name
            string xheditorUpload = "upload";     //配置文件: 上传文件保存路径,结尾不要带/
            string imagesDomain = "";         //配置文件:网站域名
            int dirtype = 1;                 // 1:按天存入目录 2:按月存入目录 3:按扩展名存目录  建议使用按天存
            int maxattachsize = 2097152;     // 最大上传大小,默认是2M
            string upext = "txt,rar,zip,jpg,jpeg,gif,png,swf,wmv,avi,wma,mp3,mid";    // 上传扩展名
            int msgtype = 2;                 //返回上传参数的格式:1,只返回url,2,返回参数数组
            string immediate = Request.QueryString["immediate"];//立即上传模式,仅为演示用
            byte[] file;                     // 统一转换为byte数组处理
            string localname = "";
            string disposition = Request.ServerVariables["HTTP_CONTENT_DISPOSITION"];

            string err = "";
            string msg = "''";

            if (disposition != null)
            {
                // HTML5上传
                file = Request.BinaryRead(Request.TotalBytes);
                localname = Server.UrlDecode(Regex.Match(disposition, "filename="(.+?)"").Groups[1].Value);// 读取原始文件名
            }
            else
            {
                //HttpFileCollectionBase filecollection = Request.Files;
                //HttpPostedFileBase fileData = filecollection.Get(inputname);

                // 读取原始文件名
                localname = fileData.FileName;
                // 初始化byte长度.
                file = new Byte[fileData.ContentLength];

                // 转换为byte类型
                System.IO.Stream stream = fileData.InputStream;
                stream.Read(file, 0, fileData.ContentLength);
                stream.Close();

                //filecollection = null;
            }

            if (file.Length == 0) err = "无数据提交";
            else
            {
                if (file.Length > maxattachsize) err = "文件大小超过" + maxattachsize + "字节";
                else
                {
                    string attach_dir, attach_subdir, filename, extension, target;

                    // 取上载文件后缀名
                    extension = GetFileExt(localname);

                    if (("," + upext + ",").IndexOf("," + extension + ",") < 0) err = "上传文件扩展名必需为:" + upext;
                    else
                    {
                        switch (dirtype)
                        {
                            case 2:
                                attach_subdir = "month_" + DateTime.Now.ToString("yyMM");
                                break;
                            case 3:
                                attach_subdir = "ext_" + extension;
                                break;
                            default:
                                attach_subdir = "day_" + DateTime.Now.ToString("yyMMdd");
                                break;
                        }
                        attach_dir = xheditorUpload.Replace("~/", "") + "/" + attach_subdir + "/";

                        // 生成随机文件名
                        Random random = new Random(DateTime.Now.Millisecond);
                        filename = DateTime.Now.ToString("yyyyMMddhhmmss") + random.Next(10000) + "." + extension;

                        target = attach_dir + filename;
                        try
                        {
                            CreateFolder(Server.MapPath("~/" + attach_dir));

                            System.IO.FileStream fs = new System.IO.FileStream(Server.MapPath("~/" + target), System.IO.FileMode.Create, System.IO.FileAccess.Write);
                            fs.Write(file, 0, file.Length);
                            fs.Flush();
                            fs.Close();
                        }
                        catch (Exception ex)
                        {
                            err = ex.Message.ToString();
                        }

                        // 立即模式判断
                        if (immediate == "1") target = "!" + target;
                        target = jsonString(target);
                        if (msgtype == 1)
                        {
                            msg = "'" + imagesDomain + "/" + target + "'";
                        }
                        else
                        {
                            //url必须为绝对路径
                            msg = "{'url':'" + imagesDomain + "/" + target + "','localname':'" + jsonString(localname) + "','id':'1'}";
                        }
                    }
                }
            }

            file = null;

            //Response.Write("{'err':'" + jsonString(err) + "','msg':" + msg + "}");
            return this.Content("{'err':'" + jsonString(err) + "','msg':" + msg + "}");
        }


        string jsonString(string str)
        {
            str = str.Replace("\", "\\");
            str = str.Replace("/", "\/");
            str = str.Replace("'", "\'");
            return str;
        }


        string GetFileExt(string FullPath)
        {
            if (FullPath != "") return FullPath.Substring(FullPath.LastIndexOf('.') + 1).ToLower();
            else return "";
        }

        void CreateFolder(string FolderPath)
        {
            if (!System.IO.Directory.Exists(FolderPath)) System.IO.Directory.CreateDirectory(FolderPath);
        }
        #endregion

    }
上面的上传文件夹upload就在这里对应,也可以换成其它上传路径。
这样,一个简单的带有图片上传功能的新闻发布系统就完成了。