问题描述
在前两篇博文中,对NodeJS Express应用 使用MSAL + AAD实现用户登录并获取用户信息,获取Authorization信息 ( ID Token, Access Token).
- 【Azure 应用服务】NodeJS Express + MSAL 应用实现AAD集成登录并部署在App Service Linux环境中的实现步骤
- 【Azure 应用服务】NodeJS Express + MSAL 应用实现AAD登录并获取AccessToken -- cca.acquireTokenByCode(tokenRequest)
而在当前这篇博文中,我们将会实现以下目的:
1)为NodeJS API应用配置Bearer Token验证组件 passport 和 passport-azure-ad
2)实现使用idToken验证并访问API

实现步骤
在完成Azure AD中的注册应用配置后,并且根据博文“ NodeJS Express + MSAL 应用实现AAD登录并获取AccessToken -- cca.acquireTokenByCode(tokenRequest): https://www.cnblogs.com/lulight/p/16357246.html” 完成用户登录的前端应用,
参考官方示例 “Enable authentication in your own Node.js web API by using Azure Active Directory B2C : https://docs.microsoft.com/en-us/azure/active-directory-b2c/enable-authentication-in-node-web-app-with-api” 准备API端的代码。
第一步:下载示例代码
git clone https://github.com/Azure-Samples/active-directory-b2c-javascript-nodejs-webapi.git
Install app dependencies
cd active-directory-b2c-javascript-nodejs-webapi

npm install

npm update
下载后的文件结构为:
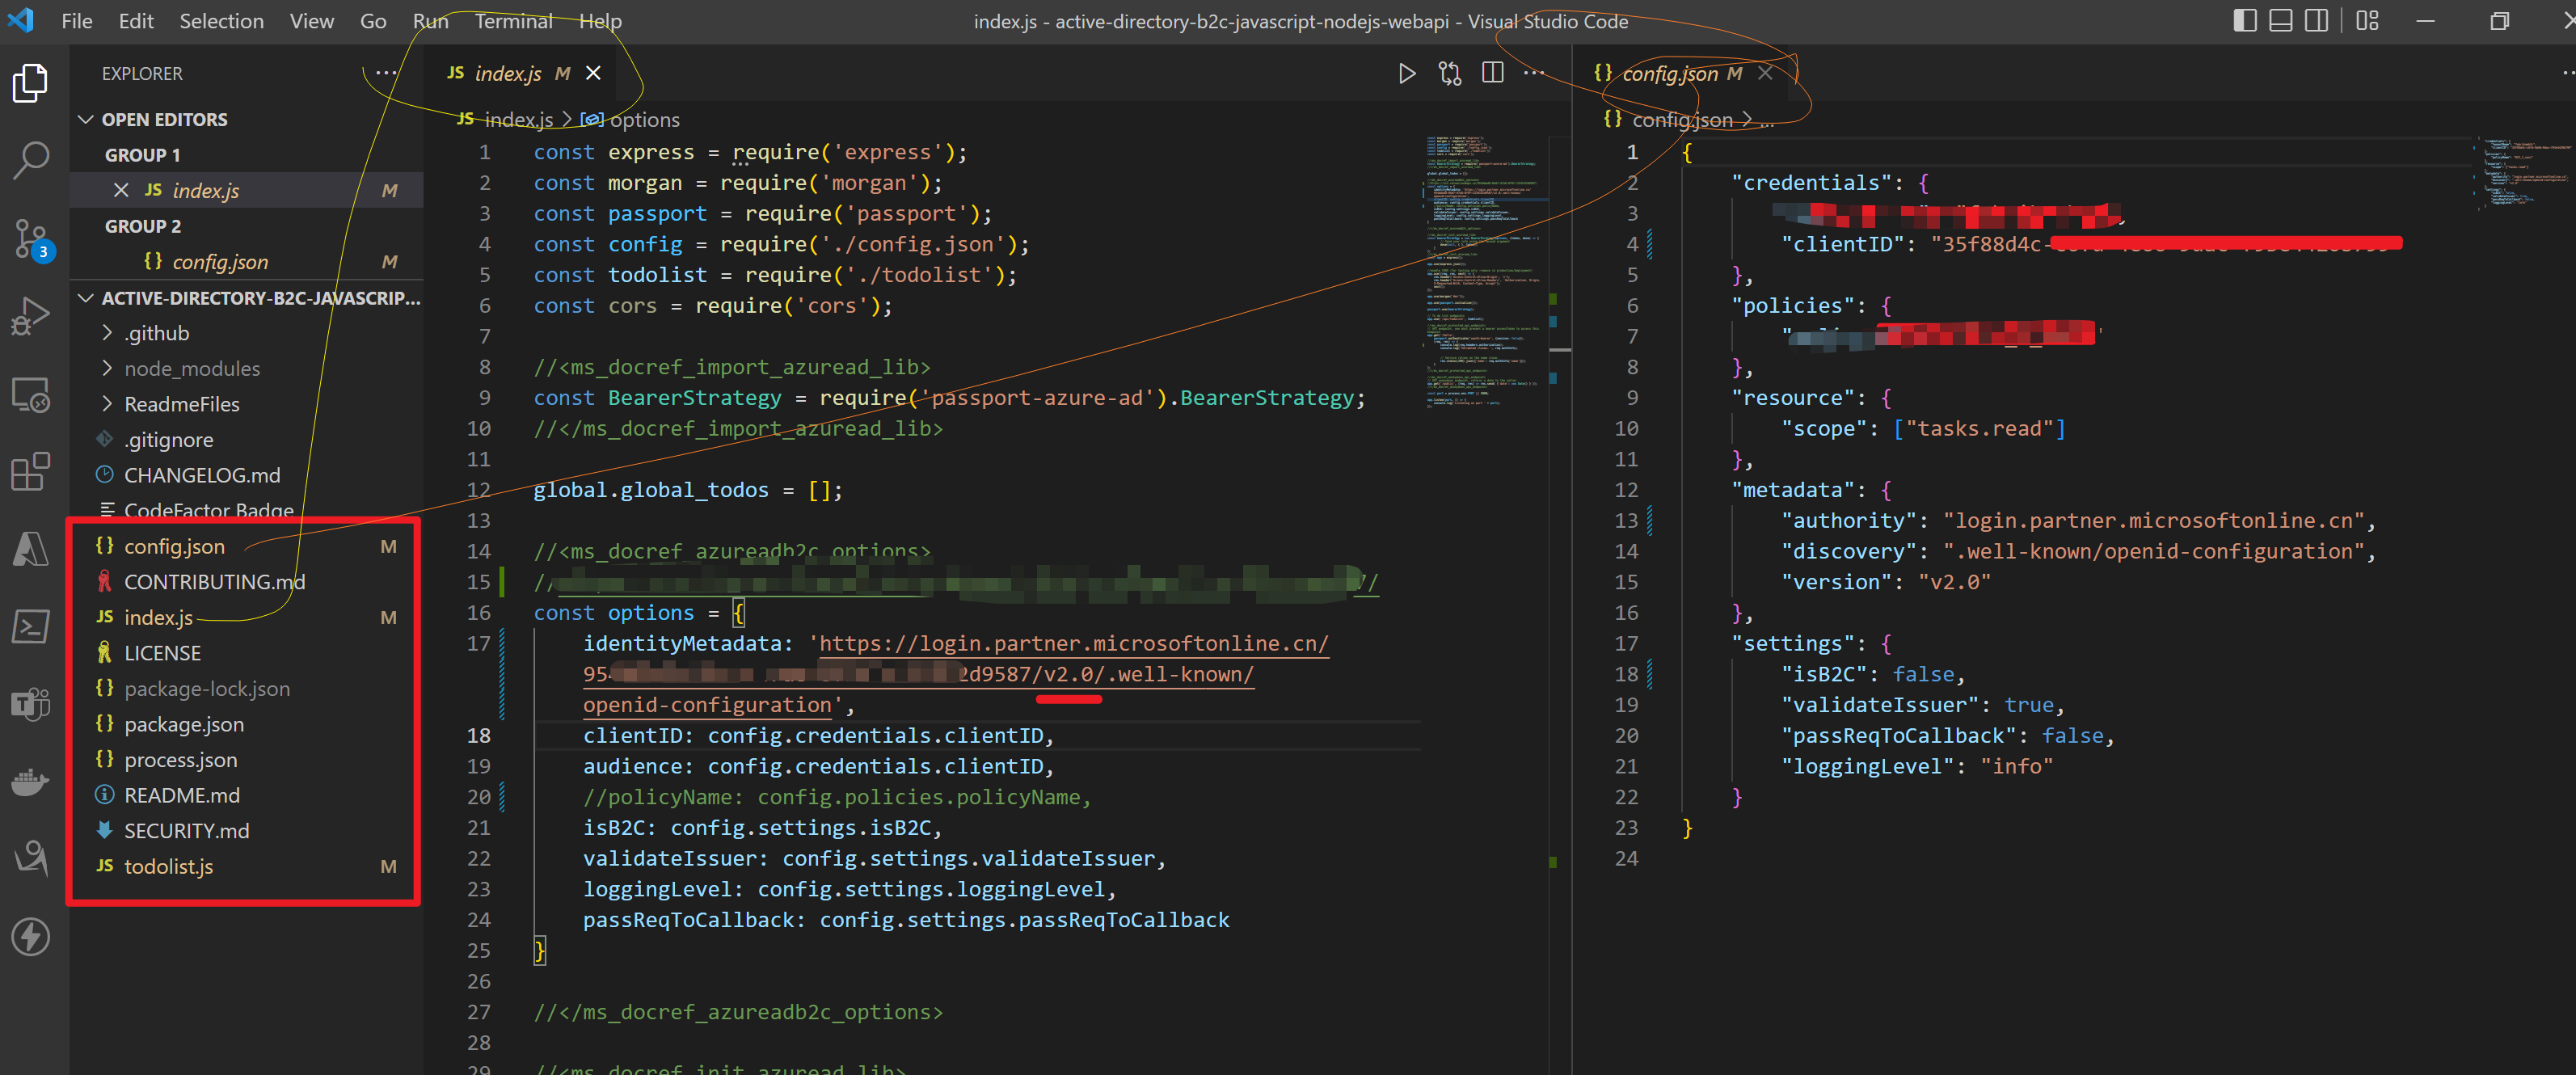
第二步:修改config.json 文件和index.js中的 identityMetadata 值
options中即为 BearerStrategy的配置参数,因为当前不适用AAD B2C,而是直接使用AAD,所以isB2C就需要设置为false,
const options = {
    identityMetadata: 'https://login.partner.microsoftonline.cn/xxxxxxxx-66d7-xxxx-8f9f-xxxxxxxxxxxx/v2.0/.well-known/openid-configuration',
    clientID: ##clientID,
    audience: ##clientID,
    validateIssuer: true,
    loggingLevel: 'info',
    passReqToCallback: false
}
因为参考文档中使用的试AAD B2C来认证Token,而本示例中使用的是AAD来认证Token,所以很多参数配置有一点差别。
本次实验中使用的参数说明如下:
identityMetadata(必须字段):填写进行OAuth 2.0 认证的 Openid-configuration地址,如在中国区的地址为 'https://login.partner.microsoftonline.cn/<your tenant id>/v2.0/.well-known/openid-configuration'clientID(必须字段): 为AAD中注册应用的Application ID- audience(可选):为一个字符串或者字符串数组,默认值为注册应用的Client ID
- validateIssuer(可选):如果不需要验证Issuer这个参数,需要设置为false。默认值为true。当使用AAD的Openid-configuration信息,它会通过identitymetadata中获取 issuer信息
- loggingLevel(可选):AAD Validation 的日志输出级别,有info,error,warn可供设置
- passReqToCallback(可选):默认值为false,用户当请求的第一个参数中提供了验证函数时,需要设置为true
关于BearerStrategy参数更多详细说明请参考链接:https://github.com/AzureAD/passport-azure-ad#42-bearerstrategy
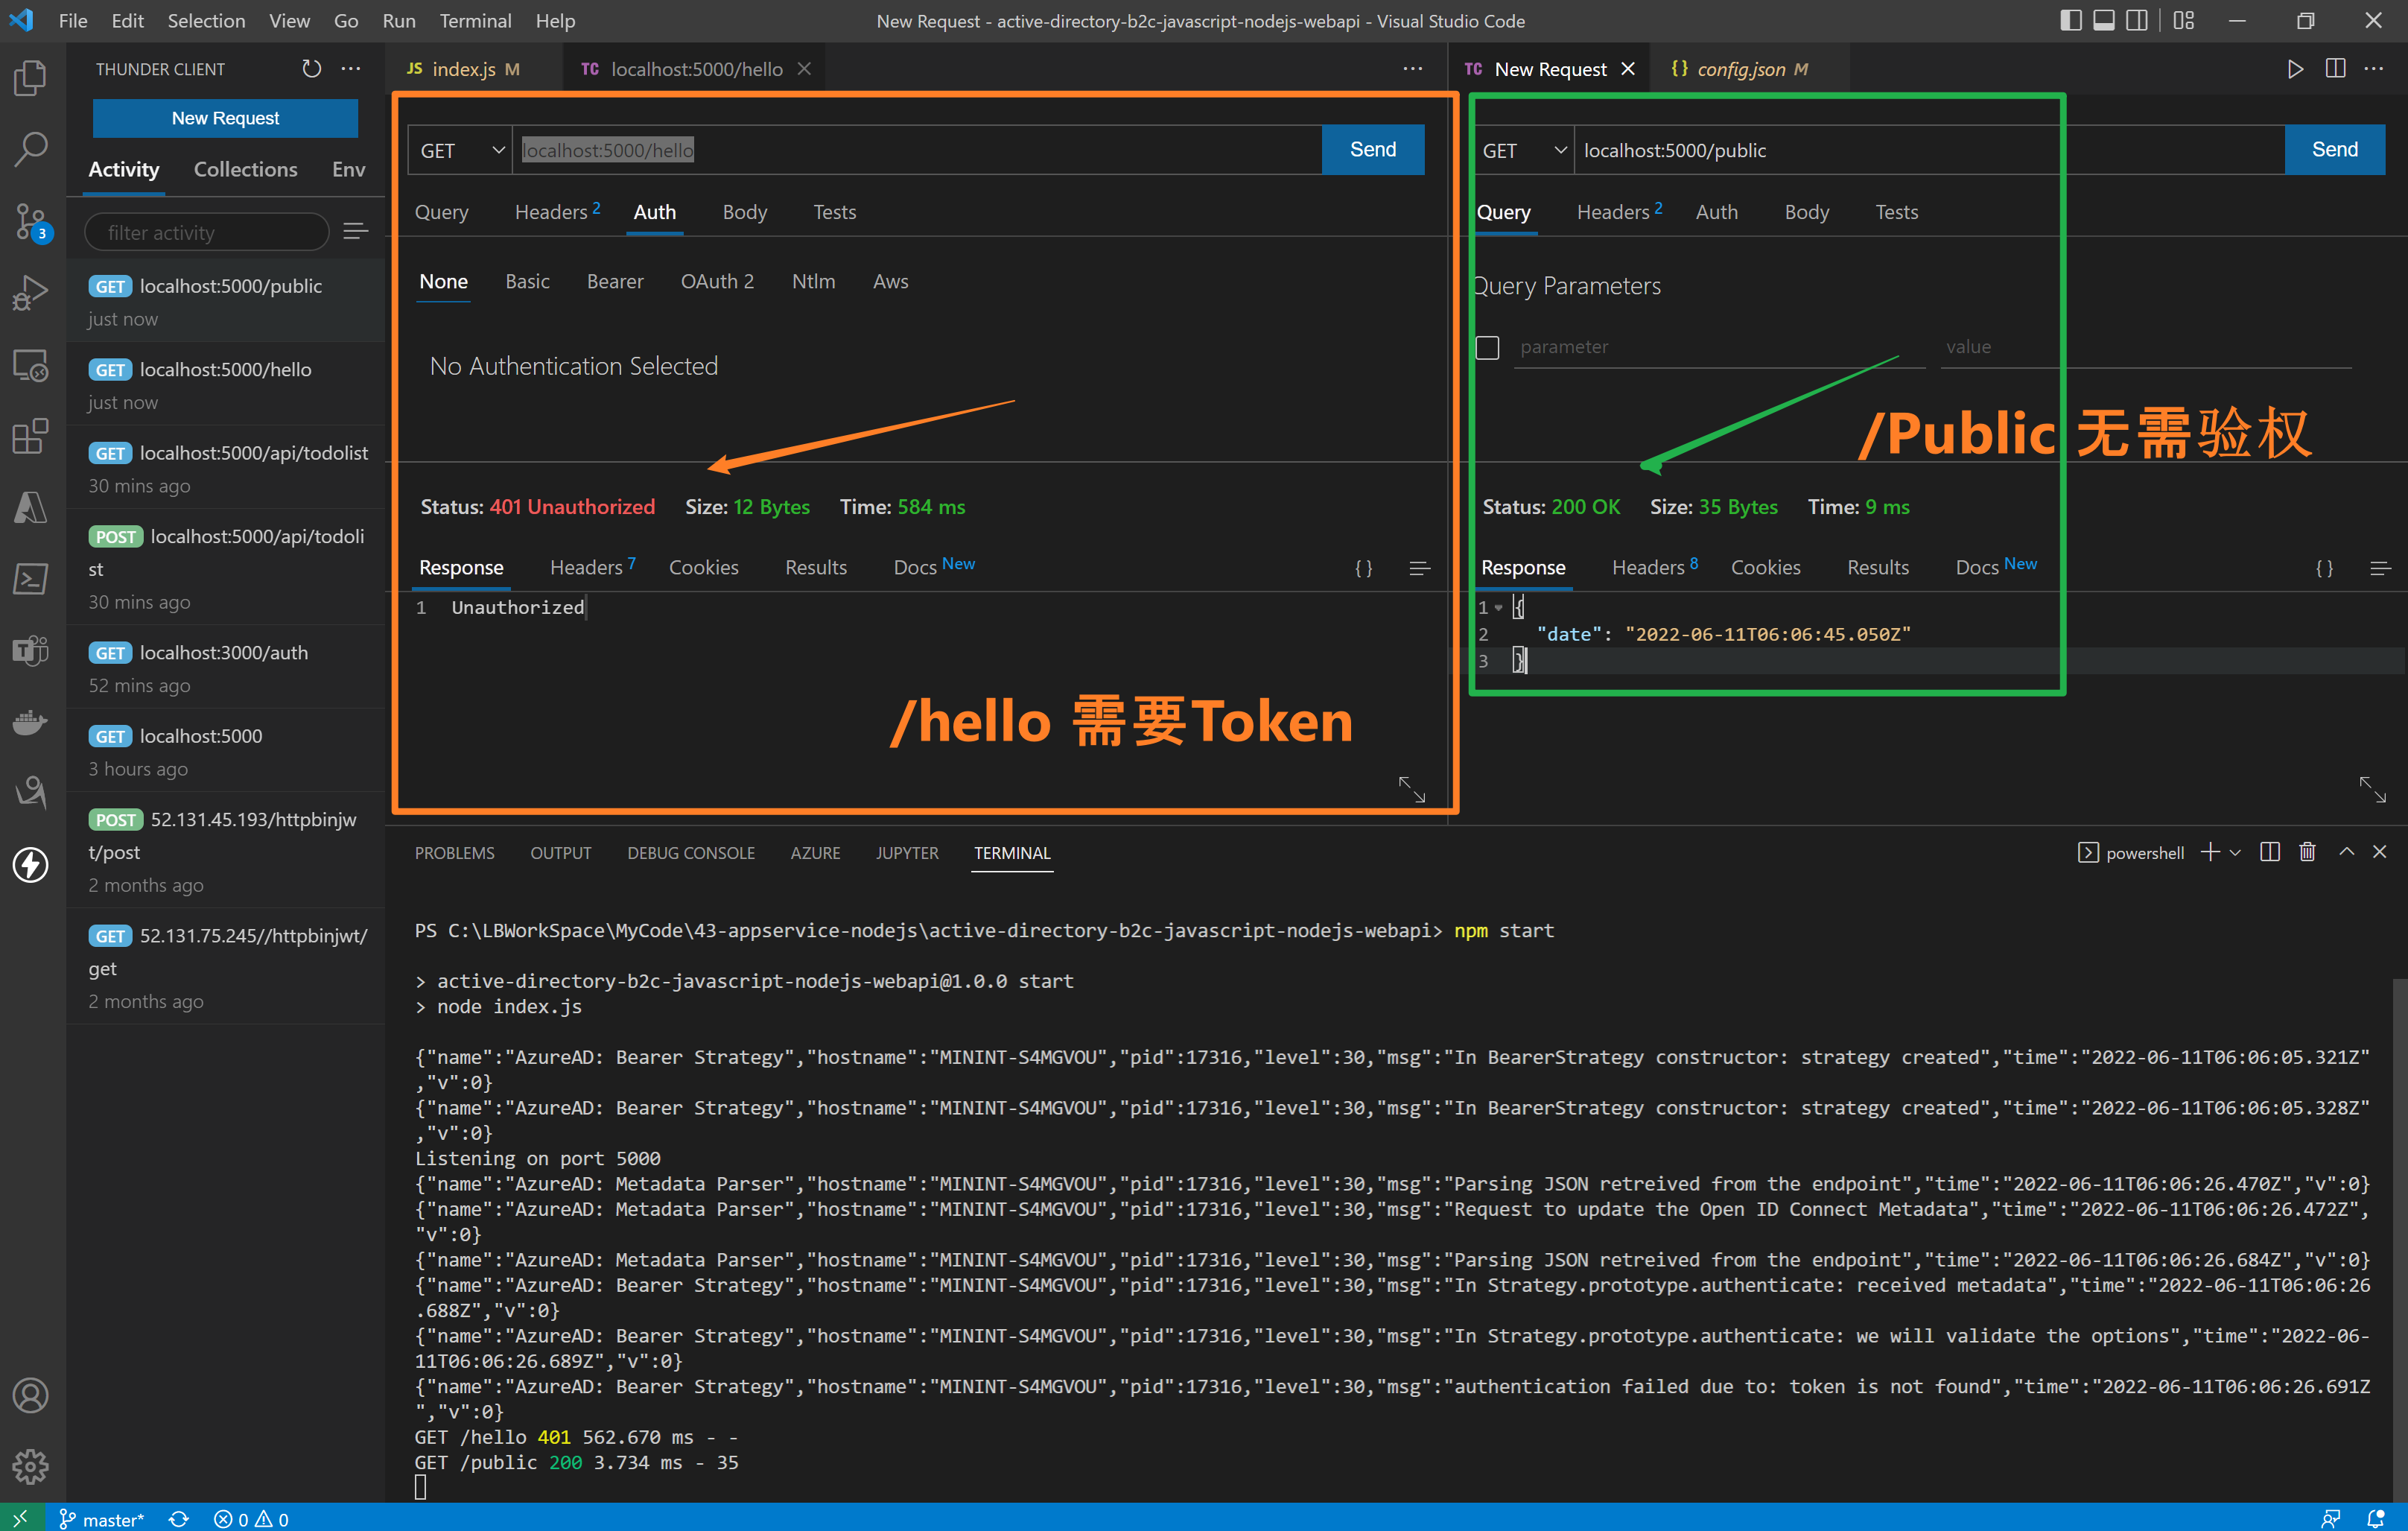
第三步:访问API接口(/hello 需要Authorization, /public 不需要Authorization)
在index.js代码中,实现了两个接口 /hello 和 /public。 /hello 接口添加了passport.authenticate认证,访问需要携带Authorization (JWT Token),而/public则无需认证。
//<ms_docref_protected_api_endpoint>
// API endpoint, one must present a bearer accessToken to access this endpoint
app.get('/hello',
    passport.authenticate('oauth-bearer', {session: false}),
    (req, res) => {
        console.log(req.headers.authorization);
        console.log('Validated claims: ', req.authInfo);


        // Service relies on the name claim.
        res.status(200).json({'name': req.authInfo['name']});
    }
);
//</ms_docref_protected_api_endpoint>

//<ms_docref_anonymous_api_endpoint>
// API anonymous endpoint, returns a date to the caller.
app.get('/public', (req, res) => res.send( {'date': new Date() } ));
//</ms_docref_anonymous_api_endpoint>
验证效果:
第四步:验证 idToken 和 accessToken
在前端UI页面通过登录后获取到Token信息, http://localhost:3000/auth

验证展示动画:
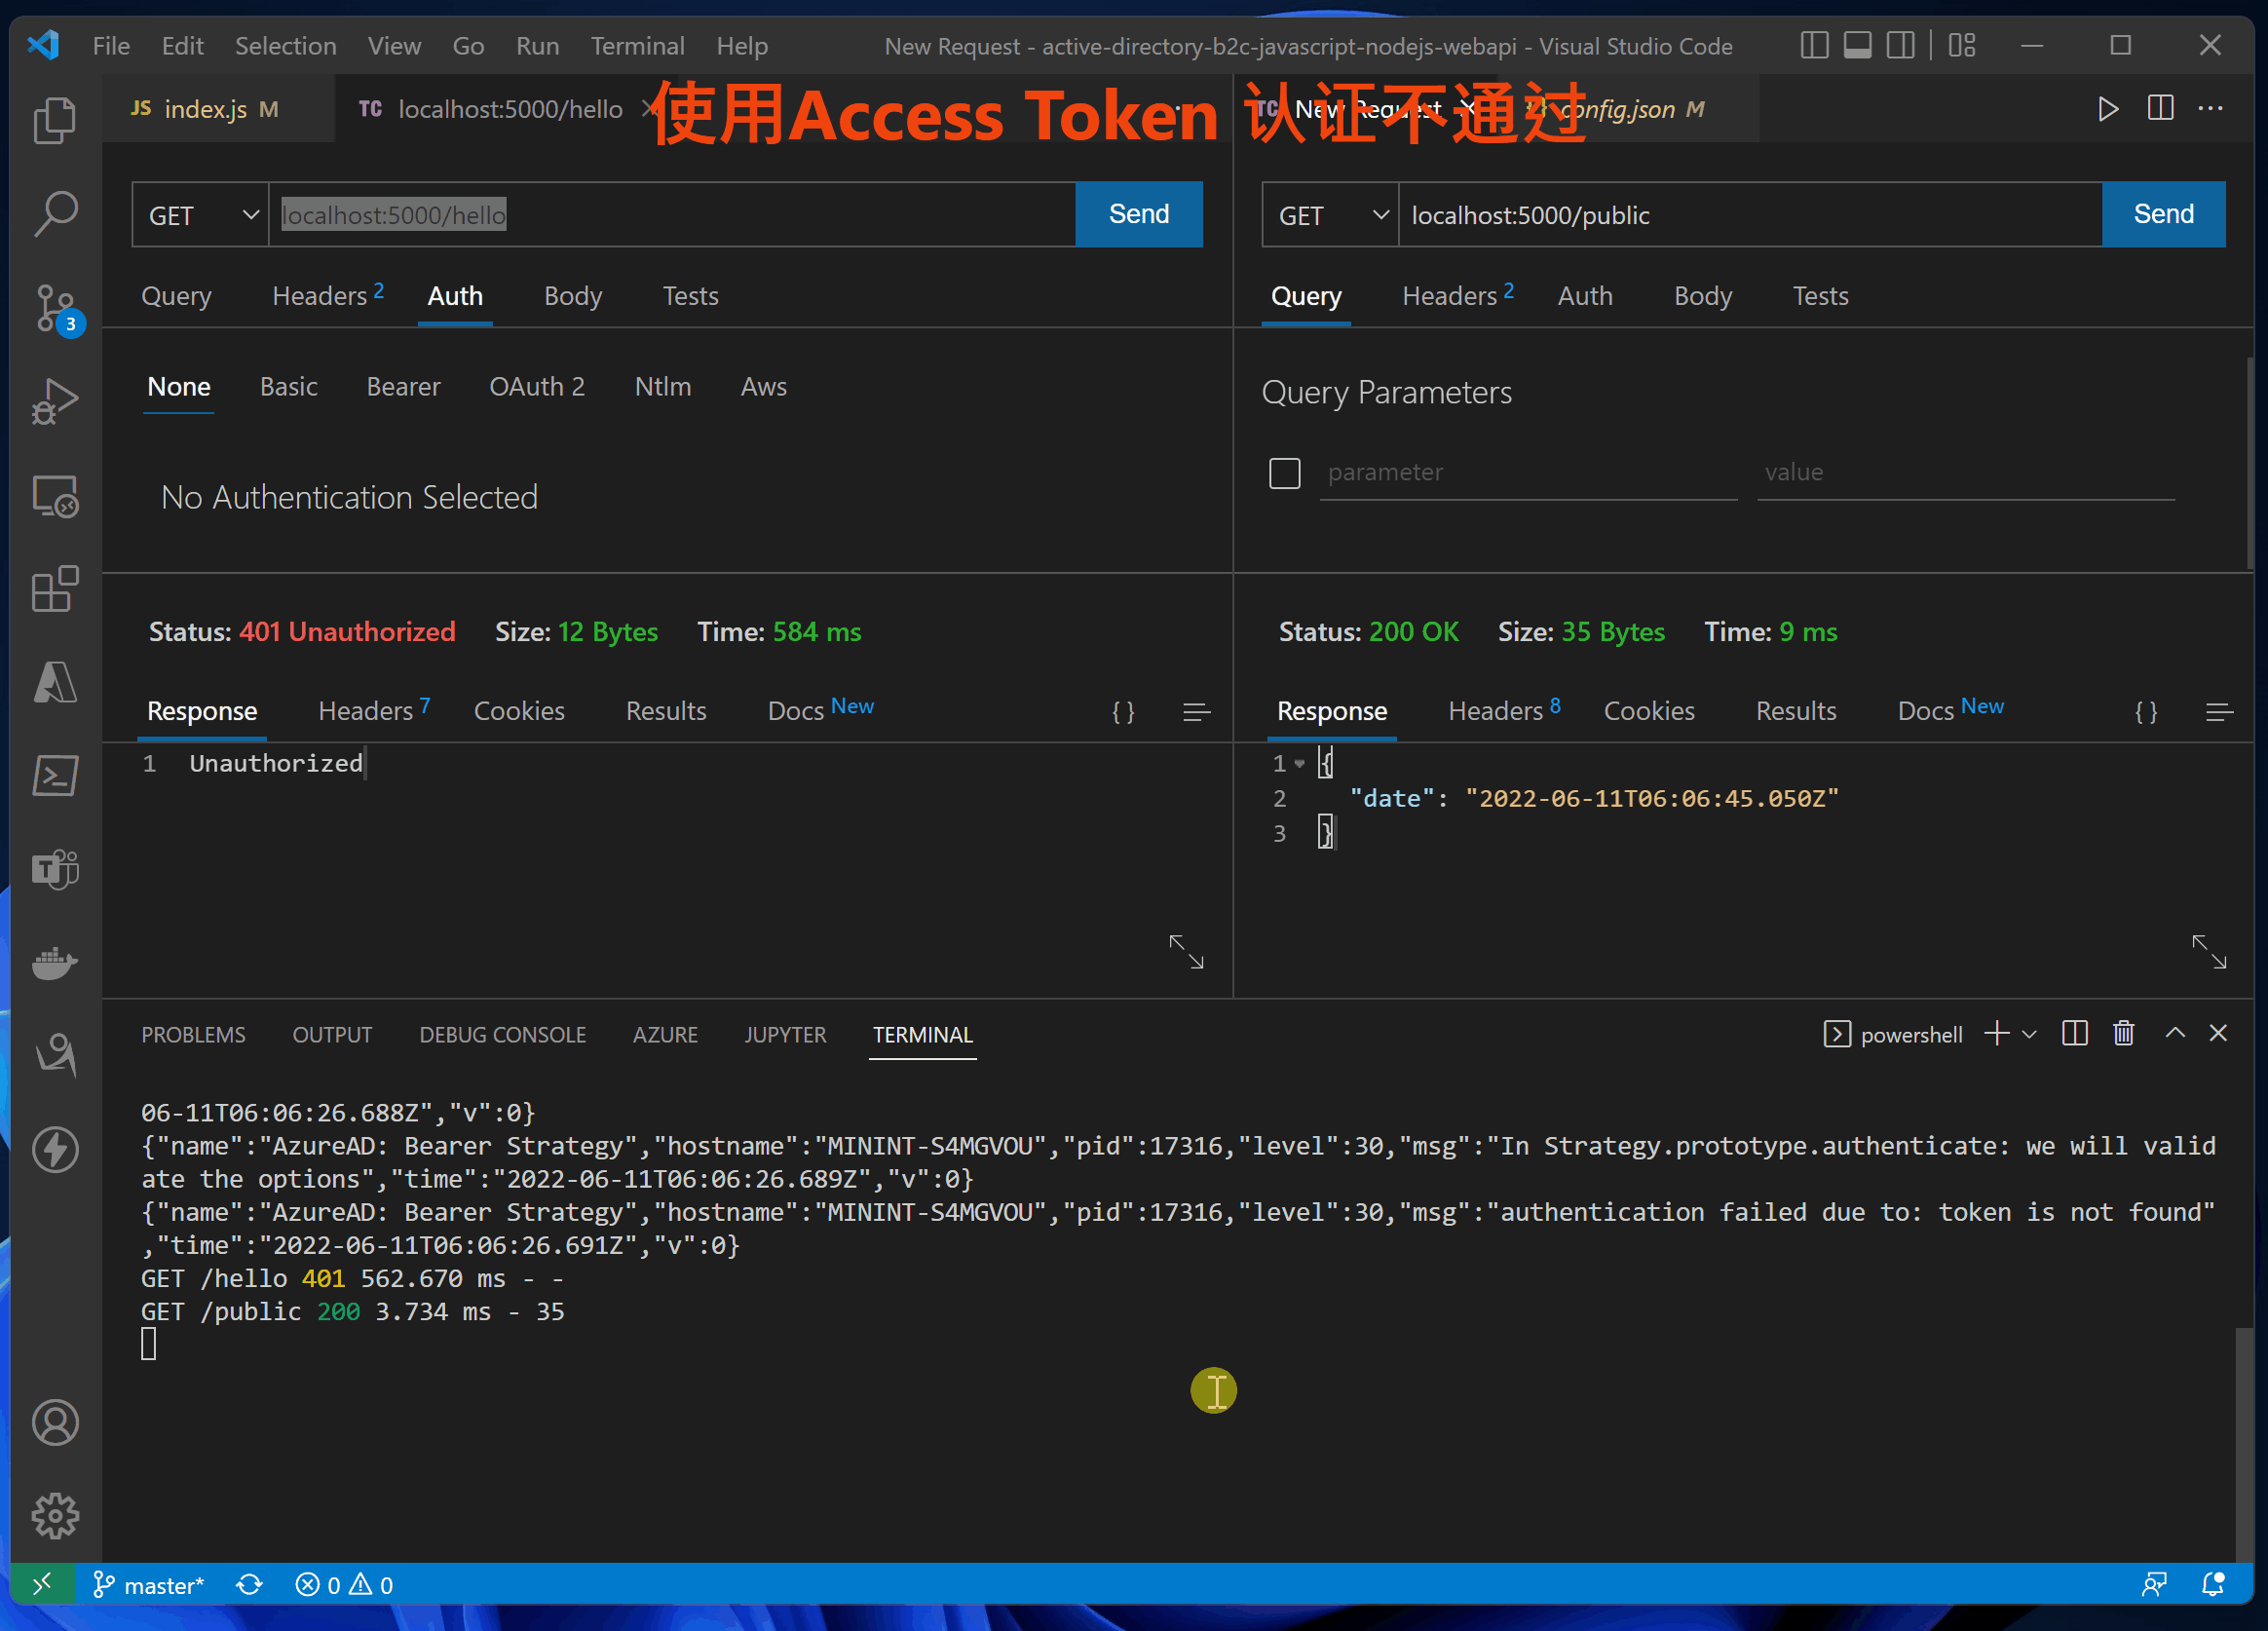
使用accessTokne的错误日志
{"name":"AzureAD: Bearer Strategy","hostname":"MININT-S4MGVOU","pid":17316,"level":30,"msg":"In Strategy.prototype.authenticate: received metadata","time":"2022-06-11T06:15:43.024Z","v":0}
{"name":"AzureAD: Bearer Strategy","hostname":"MININT-S4MGVOU","pid":17316,"level":30,"msg":"In Strategy.prototype.authenticate: we will validate the options","time":"2022-06-11T06:15:43.025Z","v":0}
{"name":"AzureAD: Bearer Strategy","hostname":"MININT-S4MGVOU","pid":17316,"level":30,"msg":"In Strategy.prototype.authenticate: access_token is received from request header","time":"2022-06-11T06:15:43.025Z","v":0}
{"name":"AzureAD: Bearer Strategy","hostname":"MININT-S4MGVOU","pid":17316,"level":30,"msg":"In Strategy.prototype.jwtVerify: token is decoded","time":"2022-06-11T06:15:43.027Z","v":0}
{"name":"AzureAD: Metadata Parser","hostname":"MININT-S4MGVOU","pid":17316,"level":30,"msg":"working on key","time":"2022-06-11T06:15:43.028Z","v":0}
{"name":"AzureAD: Bearer Strategy","hostname":"MININT-S4MGVOU","pid":17316,"level":30,"msg":"PEMkey generated","time":"2022-06-11T06:15:43.033Z","v":0}
{"name":"AzureAD: Bearer Strategy","hostname":"MININT-S4MGVOU","pid":17316,"level":30,"msg":"authentication failed due to: In Strategy.prototype.jwtVerify: cannot verify token","time":"2022-06-11T06:15:43.036Z","v":0}
GET /hello 401 1.556 ms - -
使用idToken的正确日志
{"name":"AzureAD: Bearer Strategy","hostname":"MININT-S4MGVOU","pid":17316,"level":30,"msg":"In Strategy.prototype.authenticate: received metadata","time":"2022-06-11T06:16:25.102Z","v":0}
{"name":"AzureAD: Bearer Strategy","hostname":"MININT-S4MGVOU","pid":17316,"level":30,"msg":"In Strategy.prototype.authenticate: we will validate the options","time":"2022-06-11T06:16:25.102Z","v":0}
{"name":"AzureAD: Bearer Strategy","hostname":"MININT-S4MGVOU","pid":17316,"level":30,"msg":"In Strategy.prototype.authenticate: access_token is received from request header","time":"2022-06-11T06:16:25.103Z","v":0}
{"name":"AzureAD: Bearer Strategy","hostname":"MININT-S4MGVOU","pid":17316,"level":30,"msg":"In Strategy.prototype.jwtVerify: token is decoded","time":"2022-06-11T06:16:25.104Z","v":0}
{"name":"AzureAD: Metadata Parser","hostname":"MININT-S4MGVOU","pid":17316,"level":30,"msg":"working on key","time":"2022-06-11T06:16:25.104Z","v":0}
{"name":"AzureAD: Bearer Strategy","hostname":"MININT-S4MGVOU","pid":17316,"level":30,"msg":"PEMkey generated","time":"2022-06-11T06:16:25.105Z","v":0}
{"name":"AzureAD: Bearer Strategy","hostname":"MININT-S4MGVOU","pid":17316,"level":30,"msg":"In Strategy.prototype.jwtVerify: token is verified","time":"2022-06-11T06:16:25.107Z","v":0}
{"name":"AzureAD: Bearer Strategy","hostname":"MININT-S4MGVOU","pid":17316,"level":30,"msg":"In Strategy.prototype.jwtVerify: We did not pass Req back to Callback","time":"2022-06-11T06:16:25.107Z","v":0}
Validated claims:  {
  aud: 'xxxxx-c6fd-xxx-9dac-xxxxxx',
  iss: 'https://login.partner.microsoftonline.cn/xxxxx-c6fd-xxx-9dac-xxxxxx/v2.0',
  iat: 1654924192,
  nbf: 1654924192,
  exp: 1654928092,
  name: 'your name here',
  oid: 'xxxxx-c6fd-xxx-9dac-xxxxxx',
  preferred_username: 'xxxx@xxxx.partner.onmschina.cn',
  rh: '0.xxxxxxxxx-xxxxxxxxxxxxxx.',
  sub: 'xxxxxxxxxxxxxxxxxxxxxxxxxxxx',
  tid: 'x-66d7-47a8-xx-xxx',
  uti: 'xxxxxxxxxxxxxxxxxxxxxxxxx',
  ver: '2.0'
}
GET /hello 200 11.557 ms - 16
[可选]第五步:修改AAD注册应用的accessTokenAcceptedVersion
因为中国区AAD目前生成的Token为OAuth v1.0, 而在API应用中 identityMetadata 使用的是v2.0的openid-configration。所以需要在ADD中修改当前注册应用的清单文件(Mainfest)中
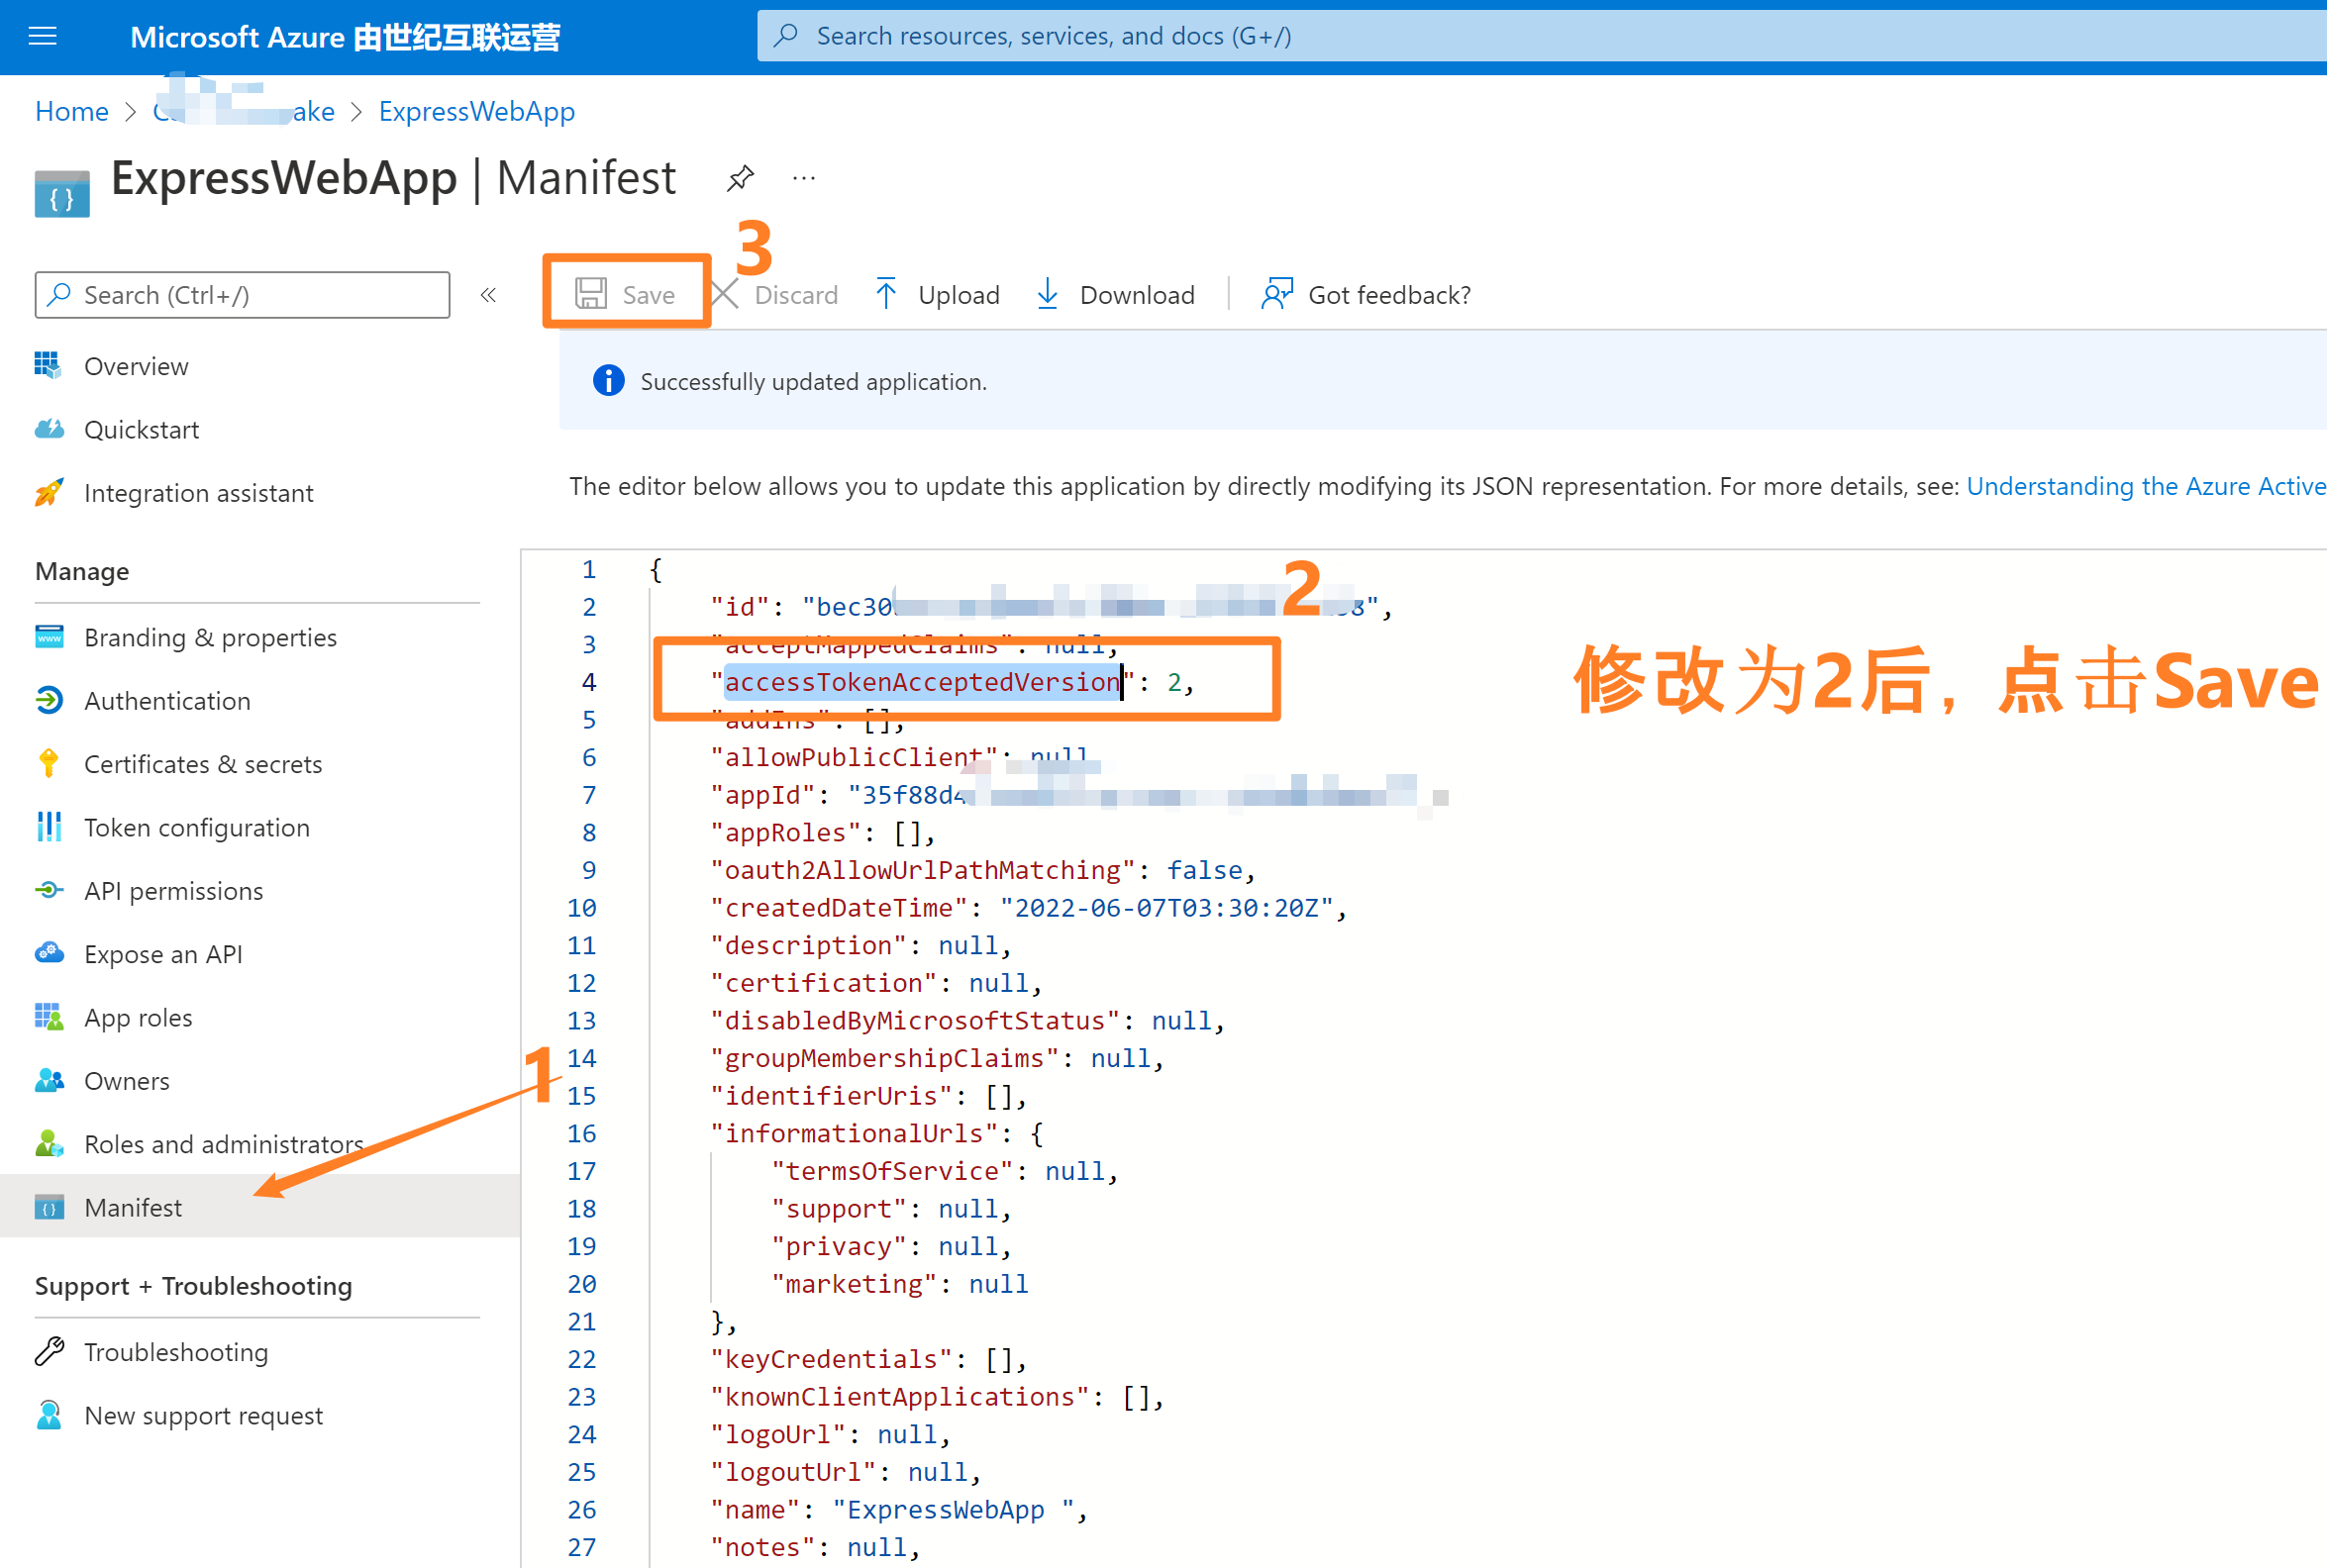
- 登录Azure 门户,选择Azure AD。
- 点击 App registrations 并选择自己的应用,如本示例中的“ExpressWebApp”
- 进入应用Overview页面后,选择左侧导航中“Manifest”清单页面。修改 accessTokenAcceptedVersion 的值为2,保存即可。
参考资料
Configure authentication in a sample Node.js web API by using Azure Active Directory B2C: https://docs.microsoft.com/en-us/azure/active-directory-b2c/configure-authentication-in-sample-node-web-app-with-api#step-4-get-the-web-api-sample-code
Microsoft Azure Active Directory Passport.js Plug-In:https://github.com/AzureAD/passport-azure-ad#42-bearerstrategy
Tutorial: Sign in users and acquire a token for Microsoft Graph in a Node.js & Express web app: https://docs.microsoft.com/en-us/azure/active-directory/develop/tutorial-v2-nodejs-webapp-msal
Example: Acquiring tokens with ADAL Node vs. MSAL Node:https://docs.microsoft.com/en-us/azure/active-directory/develop/msal-node-migration#example-acquiring-tokens-with-adal-node-vs-msal-node
NodeJS Express + MSAL 应用实现AAD集成登录并部署在App Service Linux环境中的实现步骤:https://www.cnblogs.com/lulight/p/16353145.html
NodeJS Express + MSAL 应用实现AAD登录并获取AccessToken -- cca.acquireTokenByCode(tokenRequest):https://www.cnblogs.com/lulight/p/16357246.html