选择器的优先级问题
1.选择器相同 就近原则
2.选择器不同
行内 > id选择器 > 类选择器 > 标签选择器
除此之外还可以通过添加 !important方式来强制让样式生效,但并不推荐使用。因为如果过多的使用!important会使样式文件混乱不易维护。
万不得已可以使用!important


<!DOCTYPE html>
<html lang="en">
<head>
    <meta charset="UTF-8">
    <title>Title</title>
<!--    <style>-->
<!--        p {-->
<!--            color: red;-->
<!--        }-->
<!--    </style>-->
<!--    <link rel="stylesheet" href="mycss.css">-->
    <style>
        /*.c1 {*/
        /*    color: blue;*/
        /*}*/
        /*p {*/
        /*    color: deeppink;*/
        /*}*/
        #d1 {
            color: red;
        }
    </style>
</head>
<body>
<!--<p style="color: aqua">今天周五啦 马上就要放假了</p>-->
<!--1.选择器相同  引入方式不同    就近原则-->
<p id="d1" class="c1" style="color: yellow">今天周五啦 马上就要放假了</p>
<!--2.选择器不同  引入方式相同-->
</body>
</html>
以下为mycss.css
/*p {*/
/*    color: green;*/
/*}*/
#d1 {
    color: red;
}
如何调节标签样式
宽和高
长宽 只能给块儿级标签设置
行内标签是无法设置长宽
<!DOCTYPE html>
<html lang="en">
<head>
    <meta charset="UTF-8">
    <title>Title</title>
    <style>
        div{
            width: 200px;
            height:400px;
        }
        span{       /*行标签无法修改长宽*/
            width: 200px;
            height: 400px;
        }
    </style>
</head>
<body>
<div>
    效率第一
</div>
<span>
    坚持就是胜利
</span>
</body>
</html>
字体属性
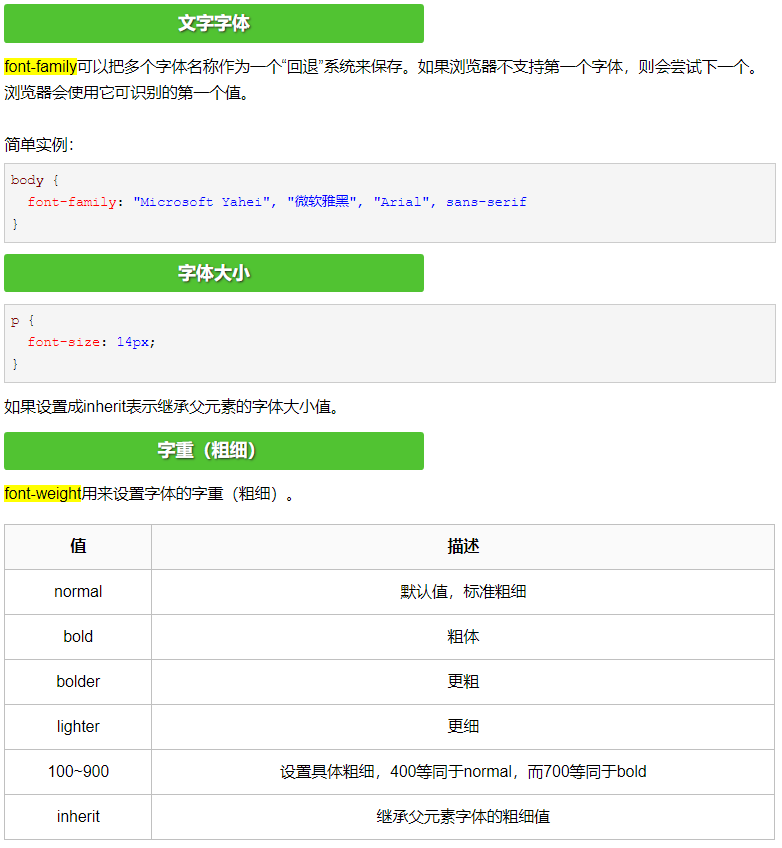
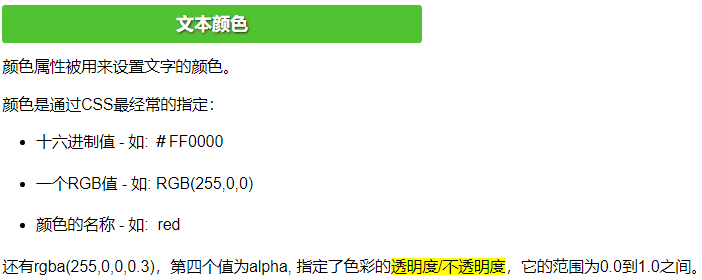
<!DOCTYPE html>
<html lang="en">
<head>
    <meta charset="UTF-8">
    <title>Title</title>
    <style>
        p{
            font-family: 'Consolas', 'Monaco', 'Bitstream Vera Sans Mono', monospace;   /*字体*/
            font-size: 48px;    /*大小*/
            font-weight:bold;   /*加粗*/
            color: rgba(255,103,0,0.4);
        }
    </style>
</head>
<body>
<p>how are you I am fine thankyou</p>
</body>
</html>
文字属性
缩进与水平对齐方式对行标签无效
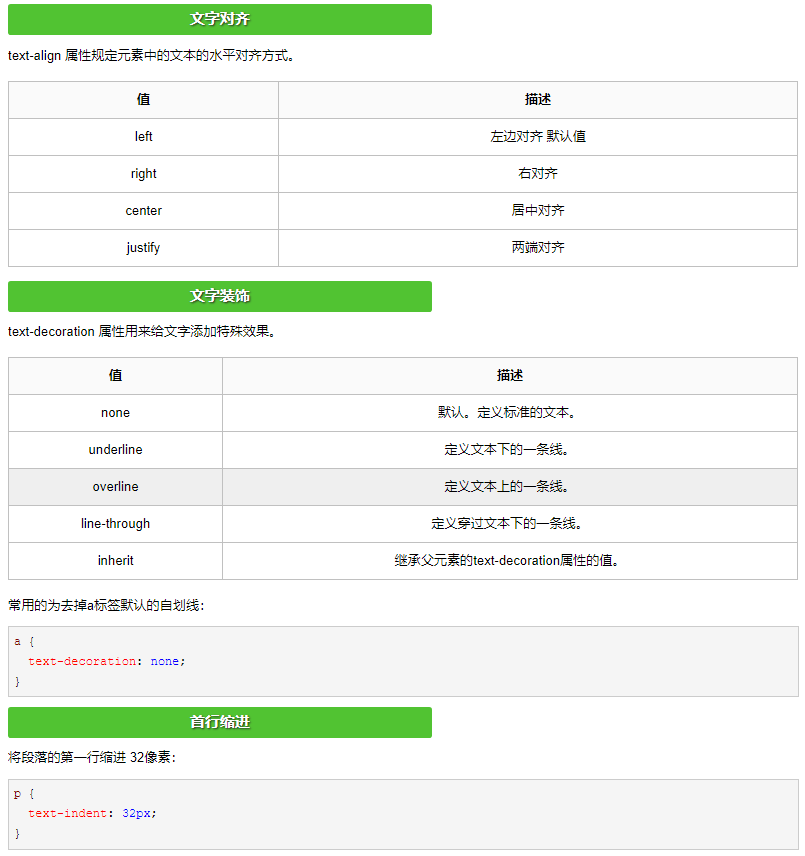
<!DOCTYPE html>
<html lang="en">
<head>
    <meta charset="UTF-8">
    <title>Title</title>
    <style>
        p{
            /*text-align: center;*/
            /*text-decoration: underline;*/
            /*text-decoration: overline;*/
            text-decoration: line-through;
            font-size: 16px;    /*字体大小*/
            text-indent: 32px;
        }
        a{
            text-decoration: none;  /*取消下划线*/
            color: green;
        }
    </style>
</head>
<body>
<p>今天天气真的不错</p>
<a href="">点我</a>
</body>
</html>
背景属性
<!DOCTYPE html>
<html lang="en">
<head>
    <meta charset="UTF-8">
    <title>Title</title>
    <style>
        /*div{*/
        /*    background-color: black;    !*背景*!*/
        /*    color: white;   !*字体颜色*!*/
        /*}*/
        .c1{
            width:400px;
            height: 400px;
            /*background-color: grey;*/
            /*background-image: url("宝马i6.jpeg");*/
            /*background-repeat: no-repeat;*/
            /*background-position: 100px 10px; !*第一个调节左右  第二个调节上下*!*/
            /*支持简写*/
            background: center center url("宝马i6.jpeg") yellow no-repeat;

        }
    </style>
</head>
<body>
    <div>
        今天是周五
    </div>
<div class="c1"></div>
</body>
</html>

背景图片应用案例(类似小米浏览器的广告显示...页面滚动,广告不动,在最下面)
<!DOCTYPE html>
<html lang="en">
<head>
    <meta charset="UTF-8">
    <title>Title</title>
    <style>
        #d1{
            background-image: url("宝马i6.jpeg");
            background-attachment: fixed;   /*固定图片,页面移动,图片不动*/
        }
    </style>
</head>
<body>
<div style="height: 500px;background-color: red"></div>
<div style="height: 500px;background-color: gray"></div>
<div style="height: 500px;" id="d1"></div>
<div style="height: 500px;background-color: yellow" ></div>
</body>
</html>

边框
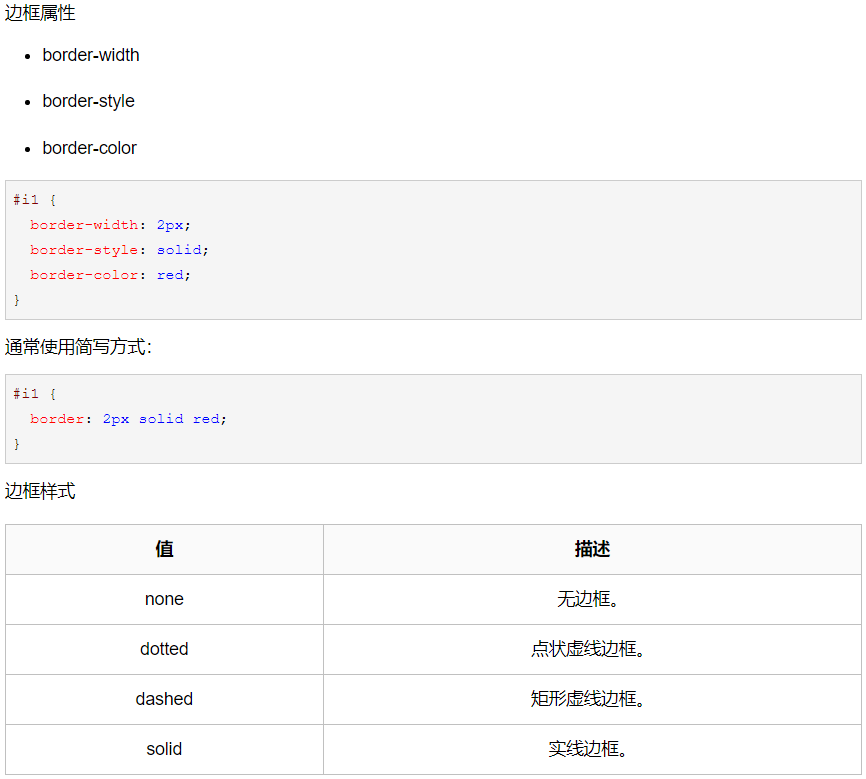
<!DOCTYPE html>
<html lang="en">
<head>
    <meta charset="UTF-8">
    <title>Title</title>
    <style>
        p{
            /*border-style: dotted;*/
            /*border-color: red;*/
            /*border-10px;*/
            /*border-left: solid; !*左面设置为实线*!*/
            /*border-right: dashed;   !*左面设置为矩形虚线*!*/
            /*border-top: dotted; !*左面设置为点状虚线*!*/
            /*border-bottom: solid;*/
            /*border-left-color: deeppink;*/
            /*!*边框有四边 每一边都可以设置独有的样式 颜色 粗细*!*/

            /*简写*/
            border:solid 3px red;   /*只要把参数写进去就可以  不需要考虑顺序*/
        }
        div {
            height: 500px;
            width: 500px;
            border: 3px solid red;
        }
        span {
            height: 200px;
            width: 200px;
            border: 5px solid green;
        }
    </style>
</head>
<body>
<p>圣诞节过完了</p>
<div>接下来就是元旦</div>
<span>然后就是春节</span>
</body>
</html>
画圆
将border-radius设置为长或高的一半即可得到一个圆形。
<!DOCTYPE html>
<html lang="en">
<head>
    <meta charset="UTF-8">
    <title>Title</title>
    <style>
        div{
            height:200px;
            width:200px;
            border-radius:50%;  /*半径*/
            background-image: url("111.png");
            background-repeat: no-repeat;
        }
    </style>
</head>
<body>
<div></div>
</body>
</html>
display属性

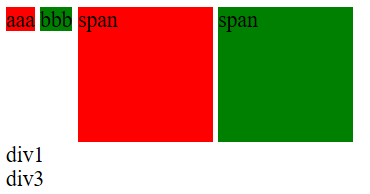
<!DOCTYPE html>
<html lang="en">
<head>
    <meta charset="UTF-8">
    <title>Title</title>
</head>
<body>
<div style="height:50px;50px;background-color: red;display: inline">aaa</div>
<div style="height: 50px;50px;background-color: green;display: inline">bbb</div>
<span style="background-color: red;height: 100px; 100px;display: inline-block">span</span>
<span style="background-color: green;height: 100px; 100px;display: inline-block">span</span>
<!--inline-block能够让一个标签即有快二级标签可以设置长宽的特点 又有行内标签在一行展示的特点-->
<div>div1</div>
<div style="display: none">div2</div>
<!--<div style="visibility: hidden">div2</div>-->
<div>div3</div>

<!--display: none隐藏标签 并且标签所占的位置也要让出来-->
</body>
</html>
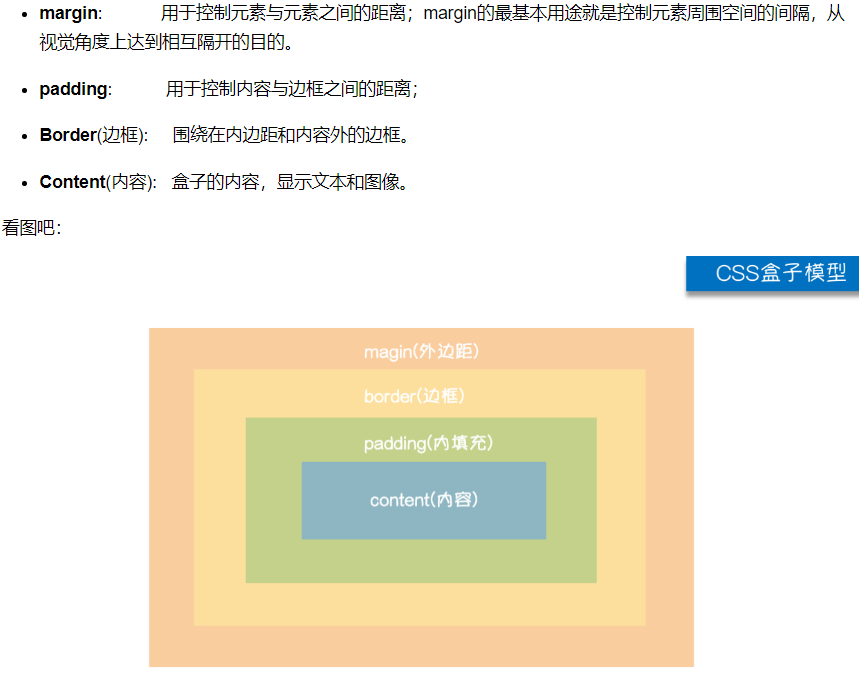
盒子模型
<!DOCTYPE html> <html lang="en"> <head> <meta charset="UTF-8"> <title>Title</title> <style> body { margin: 0; /*取消body标签自带的8px的外边距*/ } /*div {*/ /* border: 5px solid red;*/ /*}*/ .c1 { height: 100px; width: 100px; background-color: red; /*margin-bottom: 50px;*/ /*margin-left: 100px;*/ /*margin: 20px; !*上下左右*!*/ /*margin: 20px 40px; !*第一个是上下 第二个是左右*!*/ /*margin: 20px 40px 60px; !*上 左右 下*!*/ /*margin: 20px 40px 60px 80px; !*上 右 下 左 顺时针*!*/ /*margin: 0 auto; !*水平居中*!*/ } .c2 { margin-top: 20px; height: 100px; width: 100px; background-color: green; } .c3 { border: 3px solid black; height: 400px; width: 400px; /*padding-top: 20px;*/ /*padding-left: 40px;*/ /*padding: 20px;*/ padding: 20px 40px; /*padding: 20px;*/ /*padding: 20px;*/ /*padding跟margin简写规律一致*/‘ } p { margin: 0; } ul { padding-left: 0; } </style> </head> <body> <!--<div>啥都卡死的十大科技打卡</div>--> <!--<div class="c3">--> <!-- <div class="c1" id="d1"></div>--> <!--<!– <div class="c2" id="d2"></div>–>--> <!--</div>--> <p>sakjdsadslad</p> <p>sakjdsadslad</p> <p>sakjdsadslad</p> <p>sakjdsadslad</p> <p>sakjdsadslad</p> <ul> <li>111</li> <li>222</li> <li>333</li> </ul> </body> </html>
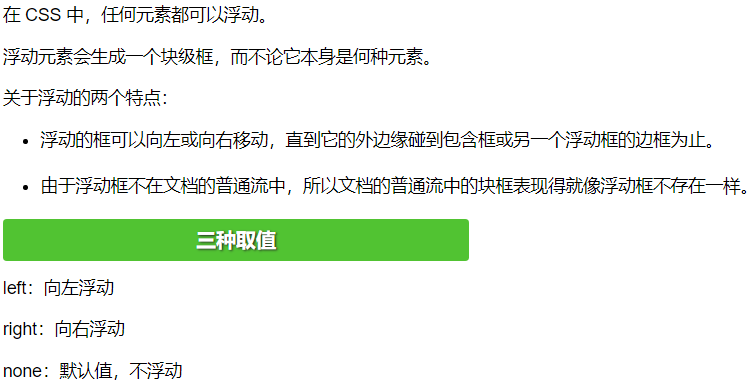
浮动
浮动的元素是脱离正常文档流的 自身多大就会占多大 不再有独占一行的概念
浮动多用于页面的前期布局(!!!!!!!)
<!DOCTYPE html>
<html lang="en">
<head>
      <meta charset="UTF-8">
    <title>Title</title>
    <style>
        body{
            margin:0;
        }
        .c1{
            height:100px;
            width: 100px;
            background-color: red;
            float:left;
        }
        .c2{
            height: 100px;
            width: 100px;
            background-color: green;
            float: right;   /*浮动到上方没有标签,或只有浮动标签行*/
        }

    </style>
</head>
<body>
<div class="c1"></div>
<div class="c2"></div>
</body>
</html>
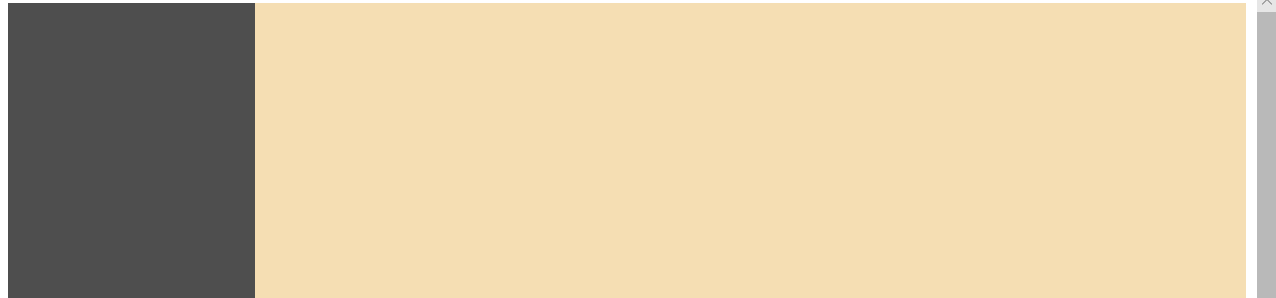
浮动简单应用
<!DOCTYPE html>
<html lang="en">
<head>
    <meta charset="UTF-8">
    <title>Title</title>
    <style>
        .left-menu{
            background-color: #4e4e4e;
            width: 20%;
            height: 1000px;
            float: left;
        }
        .right-menu{
            background-color: wheat;
            width: 80%;
            height: 2000px;
            float: right;
        }
    </style>
</head>
<body>
<div class="left-menu"></div>
<div class="right-menu"></div>
</body>
</html>
浮动带来的影响
浮动会造成父标签塌陷的问题
clear属性
专门用来清除浮动所带来的负面影响 父标签塌陷的问题

注意:.clearfix并非固定类,可以自己定义名字
<!DOCTYPE html>
<html lang="en">
<head>
    <meta charset="UTF-8">
    <title>Title</title>
    <style>
        body{
            margin: 0;
        }
        #d1{
            border: 3px solid black;
        }
        .c1{
            height: 100px;
            width: 100px;
            background-color: red;
            float: left;
        }
        .c2{
            height: 100px;
            width: 100px;
            background-color: green;
            float: left;
        }
        /*.c3{*/             /*方法一:通过c3来撑起外面的黑框*/
        /*    height: 150px;*/
        /*    100px;*/
        /*    background-color: orange;*/
        /*}*/
        .clearfix:after{    /*方法二(推荐):通过查找没有浮动标签,插入,来撑起外面黑框*/
            content: "";
            display: block;
            clear: both;
        }
    </style>
</head>
<body>
<div id="d1" class="clearfix">
    <div class="c1"></div>
    <div class="c2"></div>
<!--    <div class="c3">我是C3</div>-->
</div>
</body>
</html>
结论:谁塌陷了 就给谁加上clearfix样式类
溢出属性

<!DOCTYPE html>
<html lang="en">
<head>
    <meta charset="UTF-8">
    <title>Title</title>
    <style>
        .c1{
            height: 50px;
            width: 50px;
            border: 1px solid black;
            overflow: auto;
        }
    </style>
</head>
<body>
<div class="c1">
    今天周五了 可惜明天不放假
    今天周五了 可惜明天不放假
    今天周五了 可惜明天不放假
    今天周五了 可惜明天不放假
    今天周五了 可惜明天不放假
    今天周五了 可惜明天不放假
    今天周五了 可惜明天不放假
</div>
</body>
</html>

圆形头像示例
<!DOCTYPE html>
<html lang="en">
<head>
    <meta charset="UTF-8">
    <title>Title</title>
    <style>
        body{
            margin: 0;
            background-color: antiquewhite;
        }
        .c1{
            height: 100px;
            width: 100px;
            border-radius: 50%;
            border:5px solid white;
            overflow: hidden;
        }
        img{
            max-width: 100%; /*显示的最大宽度*/
        }
    </style>
</head>
<body>
<div class="c1">
    <img src="111.png" alt="">
</div>
</body>
</html>

定位
所有的标签默认情况下都是静态的(static) 无法做位置的修改
如果你想要修改标签位置 你需要先将静态改为可以修改的状态

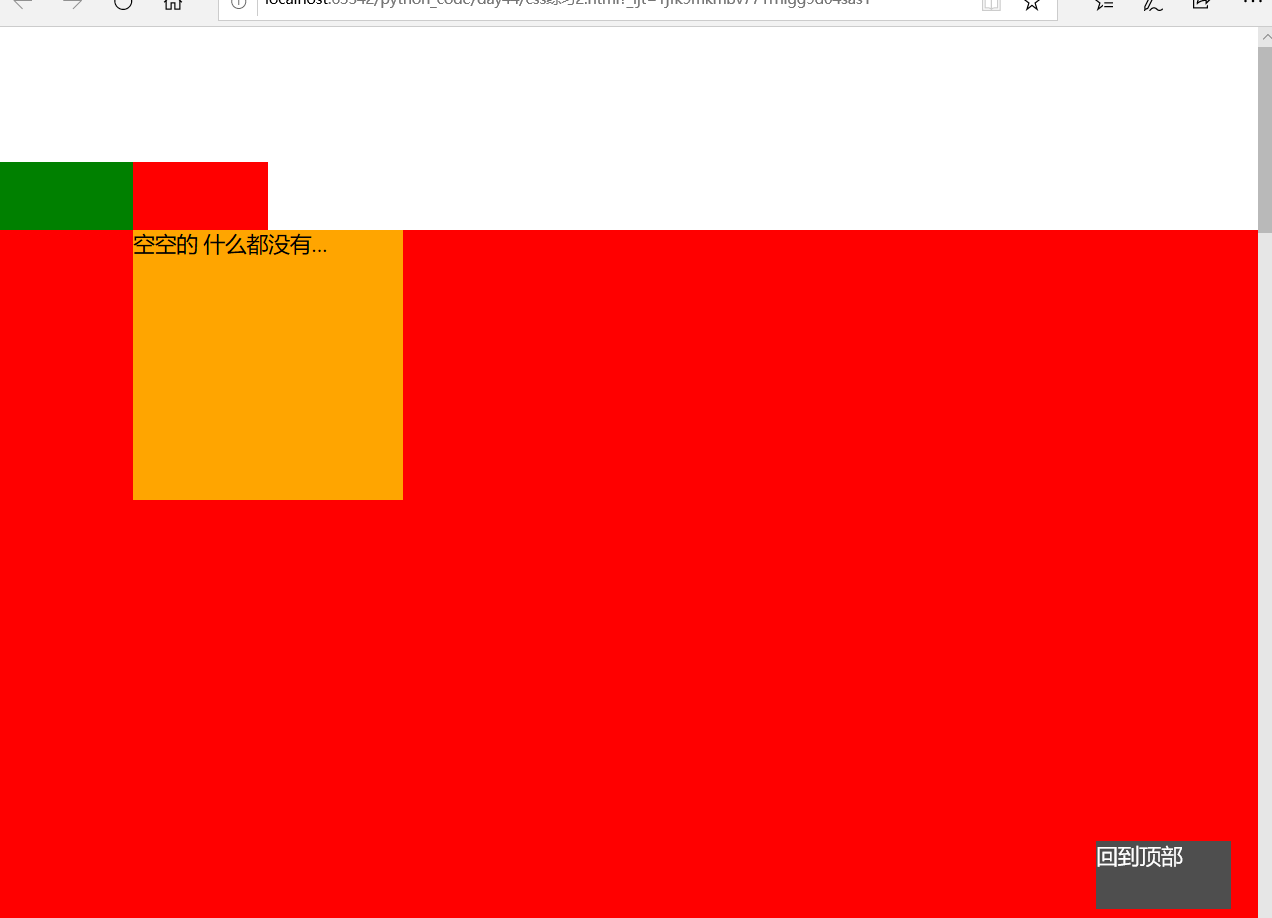
相对定位 relative
相当于标签原有的位置做偏移

绝对定位 absolute
相当于已经定位过的(static>>>relative)父标签做偏移
例:小米购物车

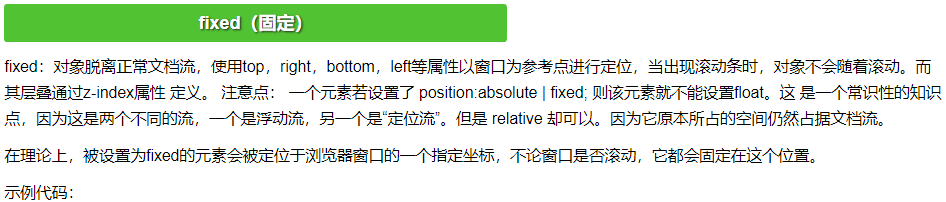
相当于浏览器窗口固定在某个位置始终不变
例:回到顶部
<!DOCTYPE html>
<html lang="en">
<head>
    <meta charset="UTF-8">
    <title>Title</title>
    <style>
        body{
            margin: 0;
        }
        .c1{
            height: 100px;
            width: 100px;
            background-color: red;
             /*position: static;  !*默认值*!*/
            position: relative; /*相对定位*/
            left: 100px;
            top:100px;
        }
        .c2{
            height: 50px;
            width: 100px;
            background: green;
            position: relative;
        }
        .c3{    /*相对于c2左上角进行定位*/
            position: absolute;
            height: 200px;
            width: 200px;
            background-color: orange;
            left: 100px;
            top: 50px;
        }
        .cc{
            height: 50px;
            width: 100px;
            background-color: #4e4e4e;
            color: white;   /*字体颜色*/
            position: fixed;
            bottom: 20px;
            right: 20px;
        }
    </style>
</head>
<body>
<div class="c1"></div>
<div class="c2">
    <div class="c3">空空的 什么都没有...</div>
</div>
<div style="height: 1000px;background-color: red"></div>
<div style="height: 1000px;background-color: green"></div>
<div style="height: 1000px;background-color: orange"></div>
<div class="cc">回到顶部</div>
</body>
</html>
是否脱离文件流
脱离文档流:
绝对定位
固定定位
不脱离文档流:
相对定位
<!DOCTYPE html>
<html lang="en">
<head>
    <meta charset="UTF-8">
    <title>Title</title>
    <style>
        .c1 {
            background-color: red;
            height: 50px;
            width: 50px;
            /*position: relative;*/
        }
        .c2 {
            background-color: green;
            height: 50px;
            width: 50px;
            /*position: absolute;*/
            position: fixed;
            bottom: 20px;
            right: 20px;
        }
        .c3 {
            background-color: orange;
            height: 50px;
            width: 50px;
        }
    </style>
</head>
<body>
<div class="c1"></div>
<div class="c2"></div>
<div class="c3"></div>
</body>
</html>
z-index
控制z轴的距离
设置对象的层叠顺序。
- z-index 值表示谁压着谁,数值大的压盖住数值小的,
- 只有定位了的元素,才能有z-index,也就是说,不管相对定位,绝对定位,固定定位,都可以使用z-index,而浮动元素不能使用z-index
- z-index值没有单位,就是一个正整数,默认的z-index值为0如果大家都没有z-index值,或者z-index值一样,那么谁写在HTML后面,谁在上面压着别人,定位了元素,永远压住没有定位的元素。
- 从父现象:父亲怂了,儿子再牛逼也没用
<!DOCTYPE html>
<html lang="en">
<head>
    <meta charset="UTF-8">
    <title>Title</title>
    <style>
        .modal{
            background-color: #808080;
            position: fixed;
            left: 0;
            top: 0;
            bottom: 0;
            right: 0;
            z-index: 999;
            opacity: 0.4;
        }
        .form{
            background-color: white;
            height: 200px;
            width: 100px;
            position: fixed;
            top: 50%;
            left: 50%;
            z-index: 1000;
            margin-top:-100px;
            margin-left: -50px;
        }
    </style>
</head>
<body>
<div>我是最底下的那个</div>
<div class="modal"></div>
<div class="form"></div>
</body>
</html>

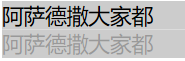
透明度
用来定义透明效果。取值范围是0~1,0是完全透明,1是完全不透明。
optacity既可以该颜色也可以改文本
rgba只能该颜色
<!DOCTYPE html>
<html lang="en">
<head>
    <meta charset="UTF-8">
    <style>
        .c1{
            background-color: rgba(128,128,128,0.4);
        }
        .c2{
            background-color: rgb(128,128,128);
            opacity: 0.4;
        }
    </style>
</head>
<body>
<div class="c1">阿萨德撒大家都</div>
<div class="c2">阿萨德撒大家都</div>
</body>
</html>