IOS开发和Web开发一样,网络请求方式包括Get和Post方式。Get和Post两者有和特点和区别,在本篇博客中不做过多的论述,本篇的重点在于如何GET数据和POST数据。下面还会提到如何在我们的项目中使用CocoaPods, CocoaPods的安装和使用教程请参考链接http://code4app.com/article/cocoapods-install-usage。上面详细的介绍了CocoaPods的安装过程和如何通过CocoaPods引入第三方类库。在本篇博客中提到CocoaPods,是因为我们需要用CocoaPods来引入AFNetWorking,然后在网络请求中使用AFNetWorking来实现我们图片的提交。
下面用的API是由新浪微博提供的官方API,链接地址:http://open.weibo.com/wiki/微博API, 想使用新浪微博的API首先得注册成开发者获取一个和自己新浪微博绑定的access_token,我们可以通过这个令牌来使用新浪微博提供的API.
1.Get方式的请求
(1)下面会使用公共服务的国家,省份,和城市的接口,来学习一下GET请求方式

(2)我们要完成什么要的任务呢?少说点吧,上几张图最为直接

(3)上面的数据是通过API获取的,获取完后再显示在我们的tableView中,将会提供一些关键的实现代码,准备工作是新建三个TabelViewController然后配置相应的cell。下面就以第一个TableView为例,因为后两个和第一个差不多,所以就不做赘述,下面是网路请求的关键代码:
 1     //网络请求用的API
 2     NSString *urlString = @"https://api.weibo.com/2/common/get_country.json?access_token=你自己的access_token";
 3
 4     //把urlString转换成url
 5     NSURL *url = [NSURL URLWithString:urlString];
 6
 7     //创建URL请求
 8     NSURLRequest *request = [NSURLRequest requestWithURL:url];
 9
10     //copy_self在Block中使用,避免强引用循环
11     __weak __block ChinaTableViewController *copy_self = self;
12
13     //执行请求
14     [NSURLConnection sendAsynchronousRequest:request queue:[NSOperationQueue mainQueue] completionHandler:^(NSURLResponse *response, NSData *data, NSError *connectionError) {
15
16         //连接失败时
17         if (connectionError) {
18             NSLog(@"%@", [connectionError localizedDescription]);
19             return ;
20         }
21
22
23         NSError *error = nil;
24         //把json转换成数组
25         copy_self.dataSource = [NSJSONSerialization JSONObjectWithData:data options:NSJSONReadingAllowFragments error:&error];
26
27         //转换失败
28         if (error) {
29             NSLog(@"%@", [error localizedDescription]);
30             return;
31         }
32
33         //tableView的重载
34         [copy_self.tableView reloadData];
35
36     }];
代码说明:
1.创建要请求的API,根据你要获取的数据参考API来拼接你要的URL.
2.根据拼接的URL来创建URL请求对象;
3.发送请求,上面用的是异步请求方式,同步请求会阻塞线程。
4.在block回调中把返回的JSON解析成数组并加载到我们的表示图
(4).把数据显示在表视图上
 1 - (NSInteger)numberOfSectionsInTableView:(UITableView *)tableView
 2 {
 3     return 1;
 4 }
 5
 6 - (NSInteger)tableView:(UITableView *)tableView numberOfRowsInSection:(NSInteger)section
 7 {
 8     return self.dataSource.count;
 9 }
10
11
12 - (UITableViewCell *)tableView:(UITableView *)tableView cellForRowAtIndexPath:(NSIndexPath *)indexPath
13 {
14     UITableViewCell *cell = [tableView dequeueReusableCellWithIdentifier:@"Cell" forIndexPath:indexPath];
15
16     NSString *key = [NSString stringWithFormat:@"%03d",indexPath.row+1];
17     cell.textLabel.text = self.dataSource[indexPath.row][key];
18
19
20     return cell;
21 }
(5)因为在下一个页面要请求数据的时候得用到第一个页面的数据,也就是在请求省份的时候得知道国家的编码,所以要把国家的编码传到第二个页面中,第三个页面和第二个页面也是类似。下面是通过KVC传值的代码
 1 // In a storyboard-based application, you will often want to do a little preparation before navigation
 2 - (void)prepareForSegue:(UIStoryboardSegue *)segue sender:(id)sender
 3 {
 4
 5     UITableViewCell *cell = sender;
 6
 7     //获取点击Cell的索引
 8     NSIndexPath * indexPath = [self.tableView indexPathForCell:cell];
 9
10     //获取请求的数据
11     NSDictionary *dic = self.dataSource[indexPath.row];
12
13     id vc = [segue destinationViewController];
14     [vc setValue:dic forKey:@"country"];
15
16 }
后两个显示页面和上面的代码相似,在这就不做赘述,Get数据的关键是读懂API,通过API获取你想要的数据
2.POST请求方式
我们下面通过调用新浪微博发微博的API来了解一下通过POST提交表单中的数据,在用第三方的类库AFNetWorking来提交图片,至于发微博的API如何使用请参照新浪官方的API开发文档。
(1)通过POST提交纯表单数据
a.用POST方式提交,不需要往URL中拼接参数,首先我们要获取url(API中提供的发布微博的URL,下面用的宏定义的URL)
    //获取url
    NSURL *url = [NSURL URLWithString:SendMessage];
b.通过URL创建一个可变的请求:
    //创建POST请求
    NSMutableURLRequest *request = [NSMutableURLRequest requestWithURL:url];
c.把请求方式设置成POST
     //设置POST请求
    [request setHTTPMethod:@"POST"];
d.拼接要提交的参数
    //拼接要POST提交的字符串
    NSString *string = [NSString stringWithFormat:@"access_token=%@&status=%@", access_token, self.blogTextField.text];
e.在网络传输中我们使用的时二进制所以要转换成NSData类型
   //把string转变成NSData类型
    NSData *bodyData = [string dataUsingEncoding:NSUTF8StringEncoding];
f.把参数添加到请求中
  //把bodyData添加到request中
    request.HTTPBody = bodyData;
g.发送请求
    //执行request

    [NSURLConnection sendAsynchronousRequest:request queue:[NSOperationQueue mainQueue] completionHandler:^(NSURLResponse *response, NSData *data, NSError *connectionError) {

        NSError *error;

        NSDictionary *dic =[NSJSONSerialization JSONObjectWithData:data options:NSJSONReadingAllowFragments error:&error];

        if (error) {

            NSLog(@"%@", [error localizedDescription]);

        }

        NSLog(@"%@", dic);

    }];
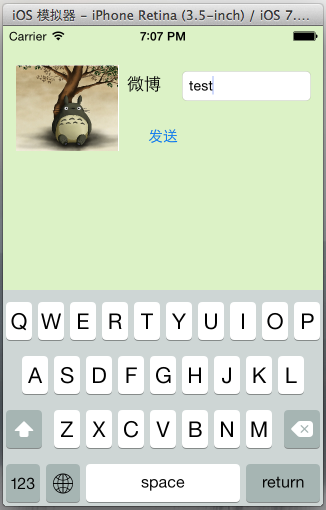
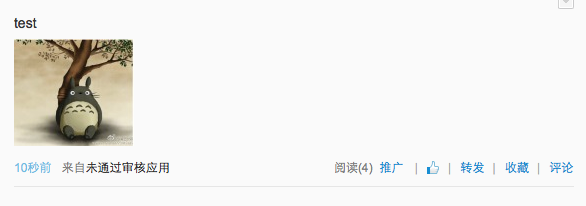
到此微博发送成功,会在我们自己的新浪微博的主页中显示我们在模拟器中的文本输入的东西了,因为我添加的应用的access_token没有申请审核,所以会显示“来自未通过审核应用”,截图如下:

2.我们如何通过调用可以发图片的API上传本地图片呢?为了简化我们APP的图片的上传,我们就得用到AFNetWorking中的东西了,如何配置和使用CocoaPods请参考上面的链接。
a.用AFHTTPRequestOperationManager来组织我们的数据,数据是存储在字典中的
NSDictionary *dic = @{@"access_token": access_token, @"status":self.blogTextField.text};
b.获取请求操作,并传入字典,POST后面跟的时API中提供的URL。 self.manager是我们之前定义的属性@property (strong, nonatomic) AFHTTPRequestOperationManager * manager; 并在viewDidLoad中分配内存
    AFHTTPRequestOperation *op = [self.manager POST:SendImage parameters:dic constructingBodyWithBlock:^(id<AFMultipartFormData> formData) {

        //把图片转换成NSData类型的数据
        NSData *imageData = UIImagePNGRepresentation(self.buttonImage.imageView.image);

        //把图片拼接到数据中
        [formData appendPartWithFileData:imageData name:@"pic" fileName:@"123" mimeType:@"image/png"];

    } success:^(AFHTTPRequestOperation *operation, id responseObject) {

        NSLog(@"%@", responseObject);

    } failure:^(AFHTTPRequestOperation *operation, NSError *error) {

        NSLog(@"%@",[error localizedDescription]);

    }];
c.得启动才可提交
    //配置解析过程

    op.responseSerializer = [AFCompoundResponseSerializer serializer];

    //启动请求

    [op start];
效果如下:
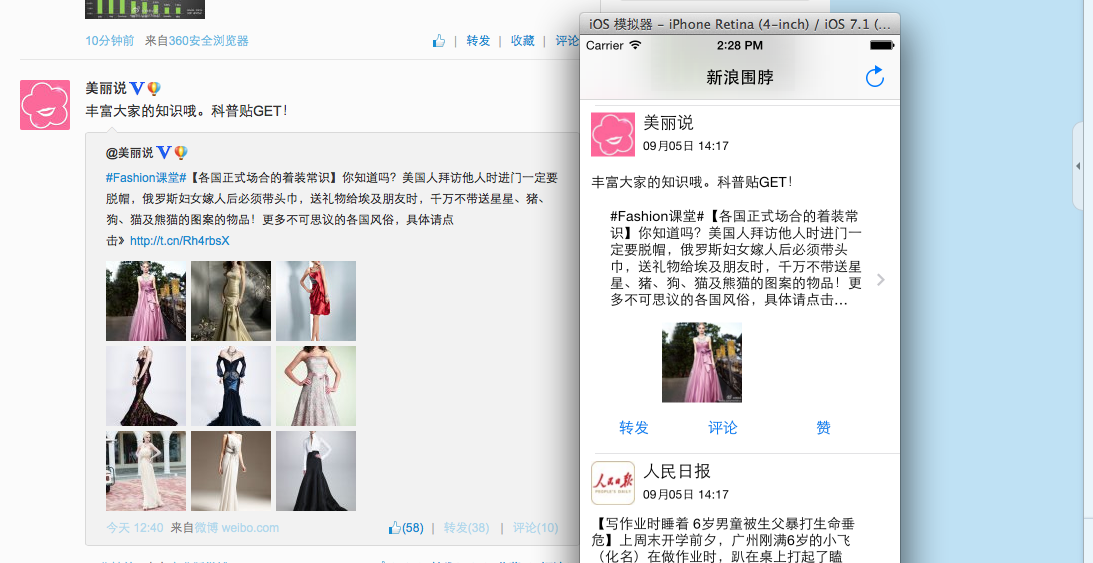
3.如果我们的围脖到这那不太简单了蛮,如果到这就结束的话,下面又该有小伙伴评论“这有什么意义呢?”,下面就请求一下我的围脖的内容,点进去是本条围脖的评论,效果图如下:
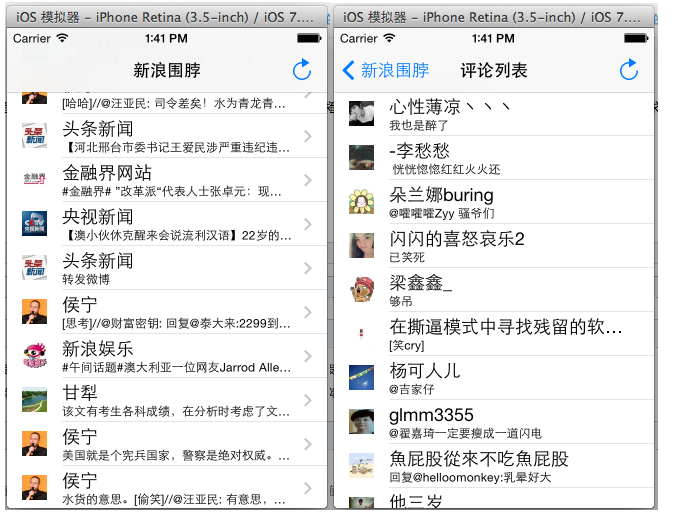
上面的内容是用新浪微博提供的API用我自己的token请求的内容,和我登陆围脖账号的首页是一样的数据,点进去是该微博的所有评论,当然啦,上面为了省事,我们用Cell是在Storyboard中设置的。真正实现起来需要新建TableViewCell根据数据来定制我们想要的cell, 之后在TableViewController中进行注册一下就可以用了。获取微博内容的代码和上面国家的代码类似,在这就不往上贴代码了。我们往cell中添加网络请求的图片时用的时AFNetWorking中的UIKit+AFNetworking.h类目,大大简化了我们网络请求图片的操作。设置图片的代码如下:
1     NSURL *url = [NSURL URLWithString:dic[@"user"][@"profile_image_url"]];
2     [cell.imageView setImageWithURL:url];
如果你感觉到这这篇博文就结束啦?不可能的啦!!上面的博文都显示不出来,还有发布时间,图片等最基本的信息都没有。在之前的博客中有一篇“IOS开发之自动布局显示网络请求内容” ,用的网络请求是模拟的微博请求,博文的内容也是模拟的,接下来要用到上一篇博文的知识:根据请求内容来动态的设置Cell的高度。下面就让我们自定义两种Cell来把上面的TableView完善一下吧:
1.创建两种Cell,并给Cell中的各个控件设置约束

2.上面的cell是我们自定义的cell,需要关联两个UITableViewCell类,然后在Cell对象中进行控件的配置和赋值,其中的一个自定义Cell的关键代码如下,在TableView中我们只需要调用setCellContent方法把存有数据的字典传到cell中中由cell赋值即可:
 1 @interface TextTableViewCell()
 2
 3 @property (strong, nonatomic) IBOutlet UIImageView *image;
 4
 5
 6 @property (strong, nonatomic) IBOutlet UILabel *titleLable;
 7 @property (strong, nonatomic) IBOutlet UILabel *dateLabel;
 8 @property (strong, nonatomic) IBOutlet UILabel *contentLable;
 9
10 @end
11
12 @implementation TextTableViewCell
13
14 -(void)setCellContent:(NSDictionary *)dic
15 {
16
17     NSDateFormatter *iosDateFormater=[[NSDateFormatter alloc]init];
18     iosDateFormater.dateFormat=@"EEE MMM d HH:mm:ss Z yyyy";
19     //必须设置,否则无法解析
20     iosDateFormater.locale=[[NSLocale alloc]initWithLocaleIdentifier:@"en_US"];
21     NSDate *date=[iosDateFormater dateFromString:dic[@"created_at"]];
22
23     //目的格式
24     NSDateFormatter *resultFormatter=[[NSDateFormatter alloc]init];
25     [resultFormatter setDateFormat:@"MM月dd日 HH:mm"];
26
27     self.dateLabel.text = [resultFormatter stringFromDate:date];
28
29     self.titleLable.text = dic[@"user"][@"name"];
30
31     self.contentLable.text = dic[@"text"];
32
33     NSURL *imgURL = [NSURL URLWithString:dic[@"user"][@"profile_image_url"]];
34     [self.image setImageWithURL:imgURL];
35
36 }
3、我们需要在原来显示微博的TableView中根据请求的数据来选择用哪一个Cell,选择代码如下:
 1 //选择判断用哪个cell
 2 -(UITableViewCell *)selectCell:(NSDictionary *)dic cellForRowAtIndexPath:(NSIndexPath *)indexPath
 3 {
 4     UITableViewCell *cell = nil;
 5
 6     //根据下面是否有图片来判断选择哪一个Cell
 7     if (dic[@"thumbnail_pic" ] == nil)
 8     {
 9         cell = [self.tableView dequeueReusableCellWithIdentifier:@"textCell" forIndexPath:indexPath];
10     }
11     else
12     {
13         cell = [self.tableView dequeueReusableCellWithIdentifier:@"imageCell" forIndexPath:indexPath];
14     }
15
16     return cell;
17 }
4.根据微博内容来动态的调整cell的高度:
//根据博文的内容调整cell的高度
-(CGFloat)tableView:(UITableView *)tableView heightForRowAtIndexPath:(NSIndexPath *)indexPath
{
    NSDictionary *dic = self.array[indexPath.row];
    NSString *text = dic[@"text"];
    //用字典设置字体的大小
    NSDictionary * dic1 = @{NSFontAttributeName: [UIFont systemFontOfSize:14]};

    CGRect frame = [text boundingRectWithSize:CGSizeMake(276, 1000) options:NSStringDrawingUsesLineFragmentOrigin attributes:dic1 context:nil];

    CGFloat height = frame.size.height;


    //不同类型的cell高度不同
    if (dic[@"thumbnail_pic" ] == nil)
    {
        height = height + 59 + 25;
    }
    else
    {
        height = height + 59 + 25+ 105;
    }
    return height;

}
5.上面是添加的代码,下面我们需要把获取cell的方法进行修改,如下:
 1 - (UITableViewCell *)tableView:(UITableView *)tableView cellForRowAtIndexPath:(NSIndexPath *)indexPath
 2 {
 3     NSDictionary *dic = self.array[indexPath.row];
 4
 5     UITableViewCell *cell = [self selectCell:dic cellForRowAtIndexPath:indexPath];
 6
 7     //把值给我们的cell,让cell设置其自己的属性
 8     [cell setCellContent:dic];
 9
10     return cell;
11 }
上面的时核心代码,加入后我们在来看一下我们请求的效果吧,是不是看着像那么一回事儿啦,今天的博客的内容先到这吧,以后会继续完善我们的围脖的:

如果有小伙伴感觉上面太简单的化,可以来的复杂的,如果微博是转发的把转发的微博显示出来,下面我们把转发的带图片的和不带图片的博文显示出来,并在下面加上转发,评论和赞的按钮。
需求难点:
1.cell的高度根据本博文和转发博文的多少而改变,就是在cell中有两部分内容的高度是变化的,需要用代码来动态控制其高度。先给自己发的博文设置一个垂直约束,下面转发的博文只设置编辑约束,不设置高度约束。我们根据博文文字的多少来用代码动态的改变垂直约束,至于如何用代码改变约束的值,请参照以前的博客IOS开发之绝对布局和相对布局(屏幕适配),在这就不做过多的论述,下面主要讲如何给我们的cell添加多个按钮,然后在点击按钮的时候我们知道是那个Cell的那个button被点击了。
(1)为了区分按钮,我们需要给每个按钮设置tag,然后在TableViewController中获取Tag的值,我们就知道是那个按钮被点击了。
(2)难点在于我们如何判断被点击的按钮位于那个cell上。这个得用block回调来解决问题啦。
a.在我们Cell的类中需要定义一个block块的类型变量,用于在TableViewController中回调使用,在block回调时,我们就可以把那个Cell以及Cell中被点击的按钮传到TableViewController中啦,至于想深入的了解一下block回调,请参考前面的博客Objective-C中的Block回调模式。下面是在Cell对应的类中,声明Block块类型的代码:
//创建cell的block块把按钮的tag传到ViewController中
typedef void (^CellBlock) (ReTextTableViewCell * cell, int buttonTag);
b.在Cell中添加CellBlock类型的变量,用于接收回调
1 @property (strong, nonatomic) CellBlock block;
c.添加设置block的setter方法,参数是要传入的block块
1 -(void)setTagButtonBlock:(CellBlock)cellBlock
2 {
3     self.block = cellBlock;
4 }
d.点击不同的button是给传入的block设置不同的值,也就是把Button的tag传入到block中。添加的三个按钮对应着一个回调方法,代码如下:
1 - (IBAction)tapComment:(id)sender {
2     UIButton *button = sender;
3
4     self.block(self, button.tag);
5 }
(3)在我们的TableView中实现Cell的回调,给据回调参数Button.tag的值的不同,去执行相应的业务逻辑,回调的代码如下:
- (UITableViewCell *)tableView:(UITableView *)tableView cellForRowAtIndexPath:(NSIndexPath *)indexPath
{
    NSDictionary *dic = self.array[indexPath.row];

    UITableViewCell *cell = [self selectCell:dic cellForRowAtIndexPath:indexPath];


    //把值给我们的cell,让cell设置其自己的属性
    [cell setCellContent:dic];

    __weak __block NSDictionary *copy_dic = dic;
    __weak __block SinaBlogTableViewController  *copy_self = self;

    if ([cell isKindOfClass:[ReTextTableViewCell class]] || [cell isKindOfClass:[ReImageTableViewCell class]]) {
        ReTextTableViewCell * cellTemp =( ReTextTableViewCell *) cell;
        [cellTemp  setTagButtonBlock:^(ReTextTableViewCell *cell, int buttonTag) {

            switch (buttonTag) {
                case 1:
                {

                    NSLog(@"转发");
                    NSString *str = @"https://api.weibo.com/2/statuses/repost.json";

                    NSDictionary *dic = @{@"access_token":@"你自己的令牌"
                                          ,@"id":[NSString stringWithFormat:@"%@",copy_dic[@"id"]]};
                    //用AFHTTPRequestOperationManager来组织我们的数据,数据是存储在字典中的

                    AFHTTPRequestOperation *op = [self.manager POST:str parameters:dic success:^(AFHTTPRequestOperation *operation, id responseObject) {
                        NSLog(@"%@",responseObject);
                    } failure:^(AFHTTPRequestOperation *operation, NSError *error) {
                        NSLog(@"%@",[error localizedDescription]);
                    }];

                    //配置解析过程
                   op.responseSerializer = [AFJSONResponseSerializer serializer];

                    //启动请求
                    [op start];


                }
                    break;

                case 2:
                {
                     NSLog(@"评论");

                    UIStoryboard *storyboard = [UIStoryboard storyboardWithName:@"Main" bundle:[NSBundle mainBundle]];

                    id vc = [storyboard instantiateViewControllerWithIdentifier:@"Comments"];

                    [vc setValue:copy_dic forKey:@"userInfo"];
                    [copy_self.navigationController pushViewController:vc animated:YES];

                }

                    break;

                case 3:
                    NSLog(@"赞");
                    break;

                default:
                    break;
            }


        }];
    }


    return cell;
}
经过上面的那些代码的修饰,我们的新浪微博的效果如下,因为令牌是用我自己的微博账号申请的,所以显示的东西和我新浪微博的主页是一样的: