Spring Boot可以非常简单的发布和调用RESTful web service,下面参考官方指导体验一下
1.首先访问 http://start.spring.io/ 生成Spring Boot基础项目
或者使用git clone https://github.com/spring-guides/gs-rest-service.git
这里使用Maven导入IDEA如下:

此时项目已经可以启动,但是没有任何功能,可以看到启动日志中嵌入tomcat的信息:

2.添加代码:


@JsonIgnoreProperties(ignoreUnknown = true)
public class Greeting {

    private final long id;
    private final String content;

    public Greeting(long id, String content) {
        this.id = id;
        this.content = content;
    }

    public long getId() {
        return id;
    }

    public String getContent() {
        return content;
    }
}
---
@RestController
public class GreetingController {

    private static final String template = "Hello, %s!";
    private final AtomicLong counter = new AtomicLong();

    //@CrossOrigin(origins = "http://localhost:8081")
    @RequestMapping("/greeting")
    public Greeting greeting(@RequestParam(value="name", defaultValue="World") String name) {
        System.out.println("getName:"+name);
        return new Greeting(counter.incrementAndGet(),
                            String.format(template, name));
    }
}
---
此时再启动,然后使用浏览器访问 http://localhost:8080/greeting
浏览器显示
{"id":1,"content":"Hello, World!"}
可见Spring使用Jackson JSON自动将Greeting对象转为json
@RequestMapping注解将Http请求指向greeting()方法,可以通过@RequestMapping(method=GET)指定请求方式
@RequestParam注解将查询参数name绑定到greeting方法的name参数上,并指定了默认值。
@RestController注解相当于@Controller加@ResponseBody的效果。
接下来是调用WebService,通过Spring提供的RestTemplate类
添加代码:
public class Application {

    private static final Logger log = LoggerFactory.getLogger(Application.class);

    public static void main(String args[]) {
        RestTemplate restTemplate = new RestTemplate();
        for (int k = 0 ; k< 10;k++) {
            Greeting greeting = restTemplate.getForObject("http://localhost:8080/greeting?name=luangeng"+k, Greeting.class);
            System.out.println("getName "+greeting.toString());
        }
    }

}
---
使用AJAX调用WebService
写一个简单的Html页面:
<!DOCTYPE html>
<html>
    <head>
        <title>ws test</title>
        <script src="https://ajax.googleapis.com/ajax/libs/jquery/1.10.2/jquery.min.js"></script>
    </head>

    <body>
        <div>
            <p class="greeting-id">The ID is: </p>
            <p class="greeting-content">The content is: </p>
        </div>
    </body>
</html>

<script>
$().ready(function() {
    $.ajax({
        url: "http://localhost:8080/greeting?name=luangeng"
    }).then(function(data) {
       $('.greeting-id').append(data.id);
       $('.greeting-content').append(data.content);
    });
});
</script>
---
添加到jetty的webapp中,在8081端口启动jetty :java -jar ../start.jar jetty.http.port=8081 ,使用浏览器访问 http://localhost:8081/test.html 可看到浏览器控制台如下报错信息:

可知报错原因为8080拒绝访问,8080和8081端口不同源导致的。
打开跨域访问:在greeting方法上加@CrossOrigin(origins = "http://localhost:8081")注解即可
再次尝试即可看到浏览器界面显示如下:
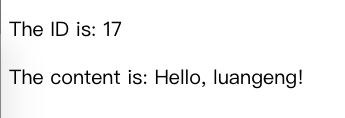
说明调用WS成功。
通过以上Spring官网的几个简单的例子可以看到使用SpringBoot发布和调用RESTful WebService是非常容易的。
常用注解:
@RestController :避免了每个方法都要添加@ResponseBody注解。@RestController 内部包含@ResponseBody注解,可以认为是 @Controller 和 @ResponseBody的组合。
@RequestBody : 如果方法参数被 @RequestBody注解,Spring将绑定HTTP请求体到那个参数上。Spring将根据请求中的ACCEPT或者 Content-Type header使用 HTTP Message converters 来将http请求体转化为domain对象。
@ResponseBody : 如果方法加上了@ResponseBody注解,Spring返回值到响应体。Spring将根据请求中的 Content-Type header(私下)使用 HTTP Message converters 来将domain对象转换为响应体。
ResponseEntity: HTTP响应(response)对象,可以指定状态码、头信息和响应体。包含要构建的HTTP Response 的全部信息。
@PathVariable: 参数注解,表示方法参数绑定到一个url变量中
end