这是我自己封装的一个activity,主要作为所有Activity的基类,可以一键关掉所有的activity, 并共享一个自定义actionbar.直接切入主题吧。
第一步就是创建自定义标题的布局文件
<?xml version="1.0" encoding="utf-8"?>
<RelativeLayout xmlns:android="http://schemas.android.com/apk/res/android"
    android:id="@+id/rel_bar_container"
    android:layout_width="match_parent"
    android:layout_height="match_parent">

    <ImageView
        android:id="@+id/left_icon"
        android:layout_width="wrap_content"
        android:layout_height="wrap_content"
        android:layout_centerVertical="true"
        android:layout_marginLeft="8dp"
        android:visibility="gone" />

    <TextView
        android:id="@+id/bar_left_btn"
        android:layout_width="wrap_content"
        android:layout_height="wrap_content"
        android:layout_centerVertical="true"
        android:layout_marginLeft="4dp"
        android:layout_toRightOf="@id/left_icon"
        android:text=""
        android:textColor="@android:color/white"
        android:textSize="18sp" />

    <TextView
        android:id="@+id/bar_second_left_btn"
        android:layout_width="wrap_content"
        android:layout_height="wrap_content"
        android:layout_centerVertical="true"
        android:layout_marginLeft="6dp"
        android:layout_toRightOf="@id/bar_left_btn"
        android:text=""
        android:textColor="@android:color/white"
        android:textSize="18sp" />

    <TextView
        android:id="@+id/bar_title"
        android:layout_width="wrap_content"
        android:layout_height="wrap_content"
        android:layout_centerInParent="true"
        android:ellipsize="end"
        android:maxWidth="150dp"
        android:singleLine="true"
        android:text=""
        android:textColor="@android:color/white"
        android:textSize="18sp" />


    <TextView
        android:id="@+id/bar_right_btn"
        android:layout_width="wrap_content"
        android:layout_height="wrap_content"
        android:layout_centerVertical="true"
        android:layout_toLeftOf="@+id/right_icon"
        android:textColor="@android:color/white"
        android:textSize="18sp"
        android:visibility="gone" />

    <ImageView
        android:id="@+id/right_icon"
        android:layout_width="wrap_content"
        android:layout_height="wrap_content"
        android:layout_alignParentRight="true"
        android:layout_centerVertical="true"
        android:layout_marginRight="8dp" />

</RelativeLayout>
从左至右,依次分为左图标,左标题,标题,右标题,右图标。。。可以根据需要来显示或隐藏
再来代码实现自定义标题
            ActionBar actionBar = this.getSupportActionBar();
            actionBar.setDisplayOptions(16);
            actionBar.setDisplayShowCustomEnabled(true);
            actionBar.setCustomView(layout.action_bar_layout1);     //这个当然是上面定义的布局文件咯
            this.mRelBarContainer = (RelativeLayout)actionBar.getCustomView().findViewById(id.rel_bar_container);
            this.mTvLeft = (TextView)actionBar.getCustomView().findViewById(id.bar_left_btn);
            this.mTitle = (TextView)actionBar.getCustomView().findViewById(id.bar_title);
            this.mIvLeftIcon = (ImageView)actionBar.getCustomView().findViewById(id.left_icon);
            this.mIvRightIcon = (ImageView)actionBar.getCustomView().findViewById(id.right_icon);
            this.mTvRight = (TextView)actionBar.getCustomView().findViewById(id.bar_right_btn);
            this.mTvSecLeft = (TextView)actionBar.getCustomView().findViewById(id.bar_second_left_btn);
            this.initBarButtonListener(); //为每个按钮定义监听事件接收方法
activity继承support.v7的activity, 用到的actionbar也就是android.support.v7.app.ActionBar。接着再来看监听事件方法实现
import android.support.v7.app.AppCompatActivity;
/**
 * Created by 28205 on 2016/6/3.
 */
public class CustomActionBarActivity extends AppCompatActivity {
        ...
        private void initBarButtonListener() {
        View.OnClickListener leftListener = new View.OnClickListener() {
            @Override
            public void onClick(View v) {
                onLeftClick();
            }
        };

        View.OnClickListener leftSecListener = new View.OnClickListener() {
            @Override
            public void onClick(View v) {
                onLeftSecondClick();
            }
        };

        View.OnClickListener leftIconListener = new View.OnClickListener() {
            @Override
            public void onClick(View v) {
                onLeftIconClick();
            }
        };

        View.OnClickListener rightListener = new View.OnClickListener() {
            @Override
            public void onClick(View v) {
                onRightClick();
            }
        };

        View.OnClickListener rightIconListener = new View.OnClickListener() {
            @Override
            public void onClick(View v) {
                onRightIconClick();
            }
        };
        //set listener
        mTvLeft.setOnClickListener(leftListener);
        mIvLeftIcon.setOnClickListener(leftIconListener);
        mTvSecLeft.setOnClickListener(leftSecListener);
        mTvRight.setOnClickListener(rightListener);
        mIvRightIcon.setOnClickListener(rightIconListener);
    }
    public void setBarBg(int resid) {
        mRelBarContainer.setBackgroundResource(resid);
    }
}
很明显,该类还得要定义几个空的事件监听方法来让子类继承,以达到子类来重写自己的监听方法。不过这里并没有将其设为接口或虚方法来强制用户来重写这几个方法,而是记子类根据需要自己来决定重写,如不重写,当然就是点击不响应咯。
public void onLeftClick() {
    }

    public void onLeftSecondClick() {
    }

    public void onLeftIconClick() {
    }

    public void onRightClick() {
    }

    public void onRightIconClick() {
    }
好了,标题这块基本上完了,再来看一键关所有activity,这个在面试的时候经常会被问到,我之前就在这上面吃了大亏,伤心。。。在这我是通过广播的方式来做到,只要收到自定义的“关闭所有”的广播就将自己关掉,而所有的activity都是继承这个基类,所以
也就是能做到所有的activity能同时关闭了。代码简单,一目了然
public class CustomActionBarActivity extends AppCompatActivity {

    public static final String ACTION = "FINISH_ALL";
    private FinishReceiver mFinishReceiver;

    @Override
    protected void onCreate(Bundle savedInstanceState) {
        super.onCreate(savedInstanceState);
       ...

        mFinishReceiver = new FinishReceiver();
        startMonitoring();
    }

    protected void startMonitoring() {
        IntentFilter intentFilter = new IntentFilter(ACTION);
        registerReceiver(mFinishReceiver, intentFilter);   //简单的广播注册
    }

    protected void stopMonitoring() {
        unregisterReceiver(mFinishReceiver);
    }

    /**
     * 关闭所有的Activity
     */
    public void finishAll() {                  // 只要在子类调用该方法,就能关闭所有activity了,除非你不是该类的子类
        sendBroadcast(new Intent(ACTION));
    }

    @Override
    protected void onDestroy() {
        super.onDestroy();
        stopMonitoring();
    }

    /**
     * 退出监听
     */
    class FinishReceiver extends BroadcastReceiver {

        @Override
        public void onReceive(Context context, Intent intent) {
            // 监听退出消息
            if (intent.getAction() == ACTION) {
                finish();
            }
        }
    }
上面的代码可以做成jar包供自己使用,以后就不需要每次都要重写了,最后看看怎么使用。这里只说说自定义的标题的使用和配置,首先得为标题设置一个自己的theme, 不然就会用系统默认的
<resources xmlns:tools="http://schemas.android.com/tools">

    <!-- Base application theme. -->
    <style name="AppTheme" parent="Theme.AppCompat.Light.DarkActionBar">
        <!-- Customize your theme here. -->
    </style>


    <style name="Theme.Custom.AppCompat" parent="@style/Theme.AppCompat.Light">
        <item name="android:actionBarSize">50dp</item>       //actionbar高度
        <item name="android:windowContentOverlay">@null</item>
        <item name="actionBarStyle">@style/bc</item>
    </style>

    <style name="bc" parent="@style/Widget.AppCompat.ActionBar">
        <item name="background">@android:color/holo_blue_dark</item>
        <item name="contentInsetStart">10dp</item>   //以下4个选项必须为0, 否则会在两边留白,这里我故意设为10dp,对比下效果
        <item name="contentInsetEnd">0dp</item>
        <item name="android:paddingLeft">0dp</item>
        <item name="android:paddingRight">0dp</item>
        <item name="elevation">0dp</item>
    </style>

</resources>
例子
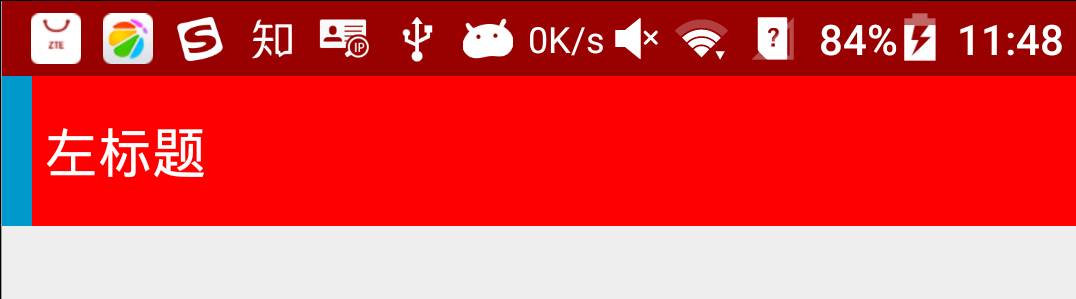
public class BaseActionBarActivity extends CustomActionBarActivity {
    private static final String TAG = "BaseActionBarActivity";
    Dialog dialog;
    @Override
    protected void onCreate(Bundle savedInstanceState) {
        super.onCreate(savedInstanceState);
        setTheme(R.style.Theme_Custom_AppCompat);
        setBarBg(R.color.red);   // 这个方法就是指定标题的背景色,如果没有指定,背景色就使用上一句的theme里定义的颜色,如果有则会覆盖。
//        setStatusBarColor(R.color.app_theme_color);
        setLeftTitle("左标题");
    }

    @Override
    public void onLeftClick() {
        super.onLeftClick();
        Log.d(TAG, "onLeftClick 左标题被点了");
    }
}
效果是这样的
很显然,actionbar左边有10dp的没有覆盖住,这就是在theme里定义的<item name="contentInsetStart">10dp</item> 的效果。
最后再美化一下界面,加入沉浸式状态栏,让状态栏背景与actionbar颜色一致。这个功能是谷歌在android4.4版本后推出的。这里使用三方库SystemBarTint
链接:https://github.com/jgilfelt/SystemBarTint
android studio导入方法
// 沉侵模式菜单
    compile 'com.readystatesoftware.systembartint:systembartint:1.0.3'
代码块实现
package com.blueto.cn.myutils.activity;

import com.readystatesoftware.systembartint.SystemBarTintManager;


/**
 * Created by 28205 on 2016/6/3.
 */
public class CustomActionBarActivity extends AppCompatActivity {
    private SystemBarTintManager tintManager;

    @Override
    protected void onCreate(Bundle savedInstanceState) {
        super.onCreate(savedInstanceState);
            ...
            initSystemBar(this);
    }

    private void initSystemBar(Activity activity) {
        if (Build.VERSION.SDK_INT >= Build.VERSION_CODES.KITKAT) {
            if (!showSystemBar) return;
            setTranslucentStatus(activity, true);

            tintManager = new SystemBarTintManager(activity);

            tintManager.setStatusBarTintEnabled(true);
        }
    }

    public void setStatusBarColor(int color) {
        tintManager.setStatusBarTintResource(color);
    }

    @TargetApi(19)
    private void setTranslucentStatus(Activity activity, boolean on) {
        Window win = activity.getWindow();
        WindowManager.LayoutParams winParams = win.getAttributes();
        final int bits = WindowManager.LayoutParams.FLAG_TRANSLUCENT_STATUS;
        if (on) {
            winParams.flags |= bits;
        } else {
            winParams.flags &= ~bits;
        }
        win.setAttributes(winParams);
    }
}
之后在子类中就可以随意指定状态栏的颜色了
public class BaseActionBarActivity extends CustomActionBarActivity {
    private static final String TAG = "BaseActionBarActivity";
    Dialog dialog;
    @Override
    protected void onCreate(Bundle savedInstanceState) {
        super.onCreate(savedInstanceState);
        setTheme(R.style.Theme_Custom_AppCompat);
        setBarBg(R.color.red);
        setStatusBarColor(R.color.red);
        setLeftTitle("左标题");

    }
}
值得注意的是,在使用沉浸式状态栏的时候,对actionbarsize这个属性有硬性要求,如果没有配置就会报错 : android.content.Resources$NotFoundException ..., 我是在这被坑了好久,最后才找到原因,因为原码里有这么一段
@TargetApi(14)
        private int getActionBarHeight(Context context) {
            int result = 0;
            if (Build.VERSION.SDK_INT >= Build.VERSION_CODES.ICE_CREAM_SANDWICH) {
                TypedValue tv = new TypedValue();
                context.getTheme().resolveAttribute(android.R.attr.actionBarSize, tv, true);
                result = context.getResources().getDimensionPixelSize(tv.resourceId);
            }
            return result;
        }
在初始化statusbar的时候,首先需要去获取actionBarSize的值,如果找不到那肯定就报错资源未找到,不过资源未找到让我把所有资源文件都确认了一次。。。
    <style name="Theme.Custom.AppCompat" parent="@style/Theme.AppCompat.Light">
        <item name="actionBarSize">50dp</item>      //报错前,这里写成了 android:actionBarSize, 郁闷啊,这错找了我一晚上
        <item name="android:windowContentOverlay">@null</item>
        <item name="actionBarStyle">@style/bc</item>
    </style>
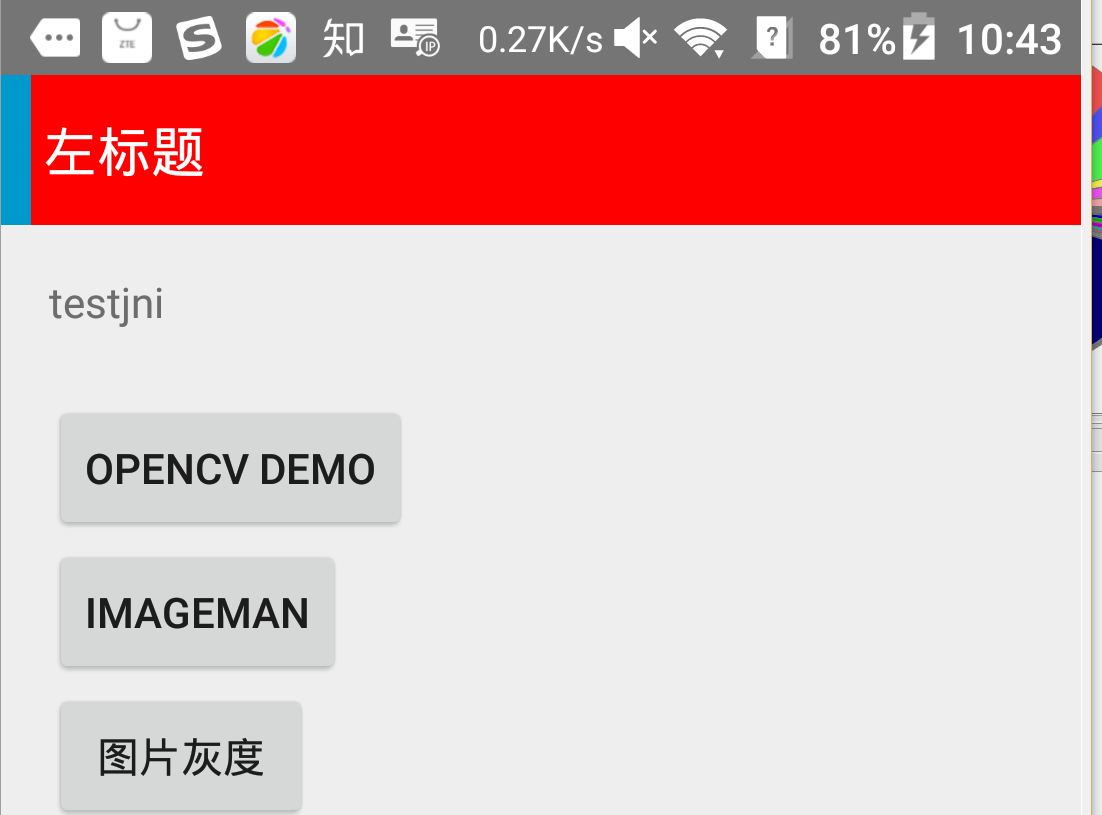
最终效果是这样的,测试机是ZTE5.1.1版本,图中与actionbar颜色有点差异,但是在其他机型上则是完全一样的。可能还需要对这个机型做些特殊处理才能达到完全一样的效果,不过目前这个效果还是挺美的,我感觉比全一个色要好看,这样更有层次感,除非产品非要搞成一样。。