1、需要有一个公众号,拿到AppID和AppSecret;
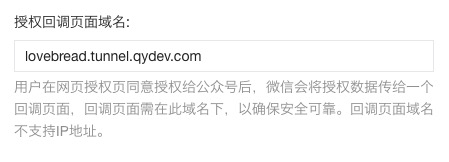
2、进入公众号开发者中心页配置授权回调域名。具体位置:接口权限-网页服务-网页账号-网页授权获取用户基本信息-修改
注意,这里仅需填写全域名(如www.qq.com、www.baidu.com),勿加 http:// 等协议头及具体的地址字段;
这个域名需要是一个备案过的域名。这个条件比较难办,幸好热心的网友qydev为我们无私地提供了一个备案过的域名,我们可以通过使用Ngrok来虚拟一个域名映射到本地开发环境,简直是web开发神器啊。。
qydev版Ngrok使用说明及下载地址:http://www.qydev.com/
本文以 lovebread.tunnel.qydev.com 域名为例:
3、如果嫌手机上测试麻烦,可以使用微信官方提供的web开发者工具直接在浏览器中进行调试。
前提是需要在微信公众号中绑定开发者账号:登录公众号-开发者工具-进入web开发者工具-绑定web开发者微信账号
使用说明及下载地址:https://mp.weixin.qq.com/wiki?action=doc&id=mp1455784140&t=0.7272727088156665&token=&lang=zh_CN#6
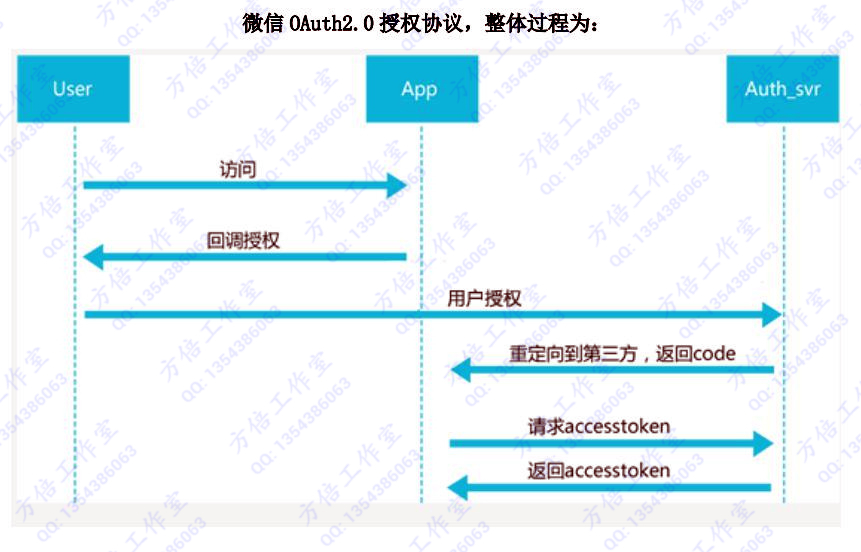
授权步骤:
1、引导用户进入授权页面同意授权,获取code
2、通过code换取网页授权access_token(与基础支持中的access_token不同)
3、通过网页授权access_token和openid获取用户基本信息
Java实现:
1、引导用户进入授权页面同意授权,获取code
这一步其实就是将需要授权的页面url拼接到微信的认证请求接口里面,比如需要用户在访问页面 lovebread.tunnel.qydev.com/auth 时进行授权认证,那么拼接后的授权验证地址为:
https://open.weixin.qq.com/connect/oauth2/authorize?appid=wx88888888&redirect_uri=http://lovebread.tunnel.qydev.com/auth&response_type=code&scope=snsapi_base&state=xxxx_state#wechat_redirect
这里面需要替换appid、redirect_uri为实际的信息。其中的scope参数有两个值:
snsapi_base:只能获取到用户openid。好处是静默认证,无需用户手动点击认证按钮,感觉上像是直接进入网站一样。
snsapi_userinfo:可以获取到openid、昵称、头像、所在地等信息。需要用户手动点击认证按钮。
相关代码:
   /**
     * 生成用于获取access_token的Code的Url
     *
     * @param redirectUrl
     * @return
     */
    public String getRequestCodeUrl(String redirectUrl) {
        return String.format("https://open.weixin.qq.com/connect/oauth2/authorize?appid=%s&redirect_uri=%s&response_type=code&scope=%s&state=%s#wechat_redirect",
                             APPID, redirectUrl, "snsapi_userinfo", "xxxx_state");
    }
2、通过第一步获取的code换取网页授权access_token(与基础支持中的access_token不同)
这一步需要在控制器中获取微信回传给我们的code,通过这个code来请求access_token。
   /**
     * 路由控制
     *
     * @param request
     * @param code
     * @return
     */
    @GET
    @Path("auth")
    public Response auth(@Context HttpServletRequest request,
                         @QueryParam("code") String code) {
        Map<String, String> data = new HashMap();
        Map<String, String> result = wechatUtils.getUserInfoAccessToken(code);//通过这个code获取access_token
        String openId = result.get("openid");
        if (StringUtils.isNotEmpty(openId)) {
            logger.info("try getting user info. [openid={}]", openId);
            Map<String, String> userInfo = wechatUtils.getUserInfo(result.get("access_token"), openId);//使用access_token获取用户信息
            logger.info("received user info. [result={}]", userInfo);
            return forward("auth", userInfo);
        }
        return Response.ok("openid为空").build();
    }
   /**
     * 获取请求用户信息的access_token
     *
     * @param code
     * @return
     */
    public Map<String, String> getUserInfoAccessToken(String code) {
        JsonObject object = null;
        Map<String, String> data = new HashMap();
        try {
            String url = String.format("https://api.weixin.qq.com/sns/oauth2/access_token?appid=%s&secret=%s&code=%s&grant_type=authorization_code",
                                       APPID, APPSECRET, code);
            logger.info("request accessToken from url: {}", url);
            DefaultHttpClient httpClient = new DefaultHttpClient();
            HttpGet httpGet = new HttpGet(url);
            HttpResponse httpResponse = httpClient.execute(httpGet);
            HttpEntity httpEntity = httpResponse.getEntity();
            String tokens = EntityUtils.toString(httpEntity, "utf-8");
            Gson token_gson = new Gson();
            object = token_gson.fromJson(tokens, JsonObject.class);
            logger.info("request accessToken success. [result={}]", object);
            data.put("openid", object.get("openid").toString().replaceAll(""", ""));
            data.put("access_token", object.get("access_token").toString().replaceAll(""", ""));
        } catch (Exception ex) {
            logger.error("fail to request wechat access token. [error={}]", ex);
        }
        return data;
    }
请求access_token返回样例:
[result={
"access_token":"OezXcEiiBSKSxW0eoylIeK6mXnzDdGmembMkERL1o1PtpJBEFDaCSwseSTzvZhiKK7Q35O-YctaOFfyJYSPMMEsMq62zw8T6VDljgKJY6g-tCMdTr3Yoeaz1noL6gpJeshMPwEXL5Pj3YBkw",
"expires_in":7200,
"refresh_token":"OezXcEiiBSKSxW0eoylIeK6mXnzDdGmembMkERL1o1PtpJBEFDaCSwseSTOIGqz3ySJRe-lv124wxxtrBdXGd3X1YGysFJnCxjtIE-jaMkvT7aN-12nBa4YtDvr5VSKCU-_UeFFnfW0K3JmZGRA",
"openid":"oN9UryuC0Y01aQt0jKxZXbfe658w",
"scope":"snsapi_userinfo"}]
通过access_token和openid获取用户基本信息:/** * 获取用户信息 * * @param accessToken * @param openId * @return */ public Map<String, String> getUserInfo(String accessToken, String openId) { Map<String, String> data = new HashMap(); String url = "https://api.weixin.qq.com/sns/userinfo?access_token=" + accessToken + "&openid=" + openId + "&lang=zh_CN"; logger.info("request user info from url: {}", url); JsonObject userInfo = null; try { DefaultHttpClient httpClient = new DefaultHttpClient(); HttpGet httpGet = new HttpGet(url); HttpResponse httpResponse = httpClient.execute(httpGet); HttpEntity httpEntity = httpResponse.getEntity(); String response = EntityUtils.toString(httpEntity, "utf-8"); Gson token_gson = new Gson(); userInfo = token_gson.fromJson(response, JsonObject.class); logger.info("get userinfo success. [result={}]", userInfo); data.put("openid", userInfo.get("openid").toString().replaceAll(""", "")); data.put("nickname", userInfo.get("nickname").toString().replaceAll(""", "")); data.put("city", userInfo.get("city").toString().replaceAll(""", "")); data.put("province", userInfo.get("province").toString().replaceAll(""", "")); data.put("country", userInfo.get("country").toString().replaceAll(""", "")); data.put("headimgurl", userInfo.get("headimgurl").toString().replaceAll(""", "")); } catch (Exception ex) { logger.error("fail to request wechat user info. [error={}]", ex); } return data; }
获取用户信息返回样例:
[result={
"openid":"oN9UryuC0Y01aQt0jKxZXbfe658w",
"nickname":"lovebread",
"sex":1,
"language":"zh_CN",
"city":"",
"province":"",
"country":"中国",
"headimgurl":"http://wx.qlogo.cn/mmopen/bRLXzTf2f6HNfBTd72heAA7vNKsGKvK3dfreewrewsPff9OaMWib0GibbA8daQmNQvQhagtiaicf4vNC5nYU3ia821QQ/0",
"privilege":[]}]