根据设计需求,写了一个自定义的下拉框,主要分上下两部分
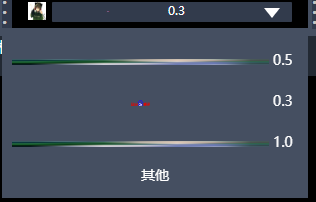
先对界面进行布局,主要是分上下两部分
子组件代码:
//上半部分
<div class="lay-select">
            <img class="lay-img" :src="curimg" />
            <label class="lay-title">{{ curtext }}</label>
            <div class="lay-triangle"></div>
        </div>
//下半部分
        <div class="lay-detailed" v-show="seldetailed">
            <div
                class="detailed-content"
                v-for="(item, index) in listData"
                :key="index"
            >
                <img class="delete-img" :src="item.img" />
                <label class="detailed-number">{{ item.lab }}</label>
            </div>
            <div>
                <p class="detailed-number">其他</p>
            </div>
        </div>
然后js部分
 return {
            seldetailed: false,  //先将下拉框隐藏
        };
methods: {
selectClick() {
this.seldetailed = !this.seldetailed; //点击显示或隐藏下拉框
},
},
props: {
avatar: {
type: String,
default: "",
},
text: {
type: String,
default: "",
},
item: {
type: Object,
default: function() {
return {};
},
},
listData: {
type: Array,
default: function() {
return [];
},
},
},
css样式部分


style scoped lang="scss">
.lay-img {
     100px;
    height: 1px;
    float: left;
    margin: 9px 0 0 6px;
}
.lay-select {
     240px;
    height: 20px;
    display: inline-block;
    background: #323b4c;
    border-radius: 1px;
    margin: 0px 0px -2px 8px;
    cursor: pointer;
    .lay-title {
        font-size: 12px;
        color: #ffffff;
        display: block;
        text-align: left;
        margin-left: 10px;
        float: left;
    }
    .lay-triangle {
        border: 8px solid transparent;
        border-top: 10px white solid;
         0px;
        height: 0px;
        display: inline-block;
        float: right;
        margin: 6px 12px 0 0px;
    }
}
.lay-detailed {
     306px;
    position: absolute;
    background: #454f61;
    z-index: 1;
    .detailed-number {
        font-size: 14px;
        text-align: center;
    }
    .delete-img {
         84%;
        height: 6px;
        margin: 0 4px 0 10px;
    }
    .detailed-content {
         306px;
        margin-top: 20px;
        cursor: pointer;
    }
}
</style>
然后在父组件引用
 <Layer
            v-for="(item, index) in dataList"
            :text="item.text"
            :avatar="
                'https://ss0.bdstatic.com/70cFuHSh_Q1YnxGkpoWK1HF6hhy/it/u=3330880565,1498738947&fm=26&gp=0.jpg'
            "
            :item="item"
            :key="index"
            :listData="item.listData"
        />


  //绑定数据
  dataList: [
                {
                    img: "",
                    text: "lay1",
                    listData: [
                        {
                            id: 1,
                            img:
                                "https://ss2.bdstatic.com/70cFvnSh_Q1YnxGkpoWK1HF6hhy/it/u=3735306676,1718844686&fm=26&gp=0.jpg",
                            lab: "0.5",
                        },
                        {
                            id: 2,
                            img:
                                "https://fanyi-cdn.cdn.bcebos.com/static/translation/img/header/logo_40c4f13.svg",
                            lab: "0.3",
                        },
                        {
                            id: 3,
                            img:
                                "https://ss2.bdstatic.com/70cFvnSh_Q1YnxGkpoWK1HF6hhy/it/u=3735306676,1718844686&fm=26&gp=0.jpg",
                            lab: "1.0",
                        },
                    ],
                },
                {
                    img: "",
                    text: "lay2",
                    listData: [
                        {
                            id: 4,
                            img:
                                "https://ss2.bdstatic.com/70cFvnSh_Q1YnxGkpoWK1HF6hhy/it/u=3735306676,1718844686&fm=26&gp=0.jpg",
                            lab: "",
                        },
                        {
                            id: 5,
                            img:
                                "https://fanyi-cdn.cdn.bcebos.com/static/translation/img/header/logo_40c4f13.svg",
                            lab: "",
                        },
                        {
                            id: 6,
                            img:
                                "https://ss2.bdstatic.com/70cFvnSh_Q1YnxGkpoWK1HF6hhy/it/u=3735306676,1718844686&fm=26&gp=0.jpg",
                            lab: "",
                        },
                    ],
                },

                },
            ],
这里的datalist里面的listdata绑定这块,我当时试了很久,最后才发现一段代码就搞定了,只需要 :listData="item.listData" 就可以了,因为listdata里面的某一项数据,就是datalist的某一项数据。
然后就需要些一个点击事件,获取某一项下拉框的数据:这个点击事件在子组件操作即可。
先在return里面定义一个历史的text数据,设置为空,然后在mounted(数据第一次加载的时候),获取到下拉框的第一条数据,最后在将点击的数据传到刚刚return里面定义的历史数据上面。
 return {
            seldetailed: false,
            curimg: "",
        };


  mounted() {
    //这里需要对listdata数据进行长度判断,要不然当长度为0的时候,会报错
        if (this.listData.length > 0) {
            this.curimg = this.listData[0].img;   //这里是listdata的第一条数据就赋给了curimg
 }

    },

 selectName(item) {
            this.curimg = item.img;this.seldetailed = false;
        },
然后在界面进行绑定

这样子一个完整的下拉框组件就完成了。