上一节中我介绍了如何使用Opencv自带的opencv_traincascade.exe来做训练,接下来介绍如何使用训练生成的cascade.xml模型文件来检测车脸。
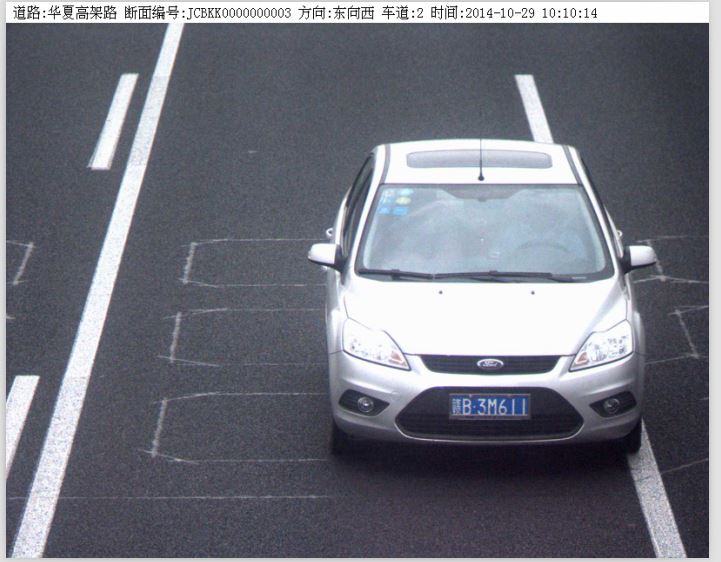
首先需要说明的是我这里的训练数据是卡口数据是在监控下面的照片,主要为了截取卡口摄像头拍摄下的照片的车脸部分,如下图是待检测图像:
这里主要基于了opencv中自带的检测函数,可以对目标物检测有一个较好的认识,读者可以用cmake生成Opencv的源码工程来细看具体实现细节(Cmake真是个神器)。这里用到了timer头文件,可以计算平均的检测时间。
一下是主要的代码部分,程序可以输出定位出来的坐标到txt文件中,同时也可以通过开关用imshow显示具体的截取效果。
给出工程链接github工程链接此处有链接!!
我的车是数据大部分都是如下,是卡口监控的拍摄图片

截出的车脸示意图,也可以用绿线在原图上标出,代码中已经将ROI部分截出,以下是代码部分。

// facedetection.cpp : 定义控制台应用程序的入口点。
#include<opencv/cv.h>
#include<opencv2/core/core.hpp>
#include<opencv2/highgui/highgui.hpp>
#include<opencv2/opencv.hpp>
#include <opencv2/opencv.hpp>
#include <stdio.h>
#include <stdlib.h>
#include <string>
#include <assert.h>
#include <math.h>
#include <float.h>
#include <limits.h>
#include <time.h>
#include <ctype.h>
#include<vector>
#include<fstream>
#include<sstream>
#include<iostream>
#include "timer.h"
using namespace std;
using namespace cv;
vector<string> testSamples;
cv::CascadeClassifier cascade;
const int detectSizeX = 320;//用来标明是将图缩放到在320*240
const int detectSizeY = 240;
const int detectRecXStart = 80;//检测窗口的起始大小
const int detectRecYStart = 80;
const int detectRecYEnd = 220;//检测窗口的终止大小
//const int detectRecYEnd = 220;
//***************************************************************
// 名称: find_overlap
// 功能: 计算矩形框的overlap
// 权限: public
// 返回值: float
// 参数: Rect x
// 参数: Rect y
//***************************************************************
float find_overlap(Rect x,Rect y)//判断框出图像的重叠面积
{
float endx=max(x.x+x.width,y.x+y.width);
float startx=min(x.x,y.x);
float endy=max(x.y+x.height,y.y+y.height);
float starty=min(x.y,y.y);
float w=x.width+y.width-(endx-startx);
float h=x.height+y.height-(endy-starty);
if (w<=0||h<=0)
return 0;
else
{
float area=w*h;
return area/(x.width*x.height);
}
}
//***************************************************************
// 名称: readFileList
// 功能: 待检测的图像列表
// 权限: public
// 返回值: void
// 参数: string testImgFile txt文件包含待检测图像
// 参数: string basePath 基地址,用来连接到txt中的相对位置构成绝对地址
//***************************************************************
//void readFileList(string testImgFile = "D:\DataSet\CarFaceTestDataSet\CarFace_ImageList.txt", string basePath="")
void readFileList(string testImgFile, string basePath)
{
string buffer;
std::ifstream fIn(testImgFile.c_str());
while (fIn)
{
if (getline(fIn,buffer))
{
testSamples.push_back(basePath + buffer);
}
}
cout<<"Load FileList Successfully"<<endl;
}
//***************************************************************
// 名称: loadCascadeModel
// 功能: 载入cascade模型文件
// 权限: public
// 返回值: void
// 参数: string xmlPath
//***************************************************************
void loadCascadeModel(string xmlPath)
{
cascade.load(xmlPath.c_str());
if (!cascade.empty())
{
cout<<"Load Cascade Model Successfully"<<endl;
}
}
void detecctObject(string savePath)
{
TM_STATE timer;//用来计算检测的时间
TM_COUNTER start, end;
double duration, max_duration, total_duration, average_duration;
max_duration = total_duration = 0.;
ofstream fout;
fout.open(savePath + "\cascade_detect_result.txt");//存储框出图像的坐标文件名
int num=0;
for (int i = 0; i < testSamples.size(); i++)
{
start_timer (&timer, &start);//启动计时器
IplImage * img = cvLoadImage(testSamples[i].c_str());
vector<cv::Rect> detectedRect;//存储检测到的图像
IplImage * copyImg = cvCreateImage(cvSize(detectSizeX,detectSizeY), 8, 3);//图像缩放到detectSizeX*detectSizeY,自己设置合适的数值,不能再原始图上检测,太慢,还会引入误差
cvResize(img, copyImg,1 );
IplImage * grayImage = cvCreateImage(cvGetSize(copyImg), 8, 1);
cvCvtColor(copyImg, grayImage, CV_BGR2GRAY);//转换到灰度图检测
detectedRect.clear();
cascade.detectMultiScale(grayImage, detectedRect, 1.1, 3, CV_HAAR_SCALE_IMAGE | CV_HAAR_DO_CANNY_PRUNING, cvSize(detectRecXStart, detectRecXStart), cvSize(detectRecYEnd, detectRecYEnd));//检测函数
fout<<testSamples[i].c_str()<<" "<<detectedRect.size()<<" ";
cout<<testSamples[i].c_str()<<" "<<detectedRect.size()<<" ";
for (vector<cv::Rect>::iterator k= detectedRect.begin(); k != detectedRect.end(); k++)
{
Rect r = *k;
vector<cv::Rect>::iterator j= detectedRect.begin();
for (j= detectedRect.begin(); j != detectedRect.end(); j++)
{
if ( k != j && (r & *j) == r)//用来消除嵌套的,一个矩形在另一个矩形框中的情况
break;
if(find_overlap(*k, *j)>0.6 && k->height*k->width < j->height*j->width)//用来消除检测中两个宽重叠超过0.6的框,一般视为误检测
break;
}
if(j ==detectedRect.end())
{
//此处将框出的图像放大了0.03倍 使用画矩阵函数可以看到
//cvRectangle(img, cvPoint(k->x*img->width/detectSizeX-k->width*img->width/detectSizeX*0.03, k->y*img->width/detectSizeX-k->width*img->width/detectSizeX*0.03), cvPoint(k->x*img->width/detectSizeX + k->width*img->width/detectSizeX + k->width*img->width/detectSizeX*0.03, k->y*img->width/detectSizeX + k->height*img->width/detectSizeX +k->width*img->width/detectSizeX*0.03),Scalar(0, 255, 0));
//cvRectangle(img, cvPoint(k->x*img->width/detectSizeX, k->y*img->width/detectSizeX), cvPoint(k->x*img->width/detectSizeX + k->width*img->width/detectSizeX, k->y*img->width/detectSizeX + k->height*img->width/detectSizeX),Scalar(0, 255, 0));
fout << k->x*img->width/detectSizeX-k->width*img->width/detectSizeX*0.03 << " "<<k->y*img->height/detectSizeY-k->width*img->width/detectSizeX*0.03<<" "<<k->width*img->width/detectSizeX + k->width*img->width/detectSizeX*0.06<<" "<<k->height*img->height/detectSizeY + k->width*img->width/detectSizeX*0.06<<" ";
cout << k->x*img->width/detectSizeX-k->width*img->width/detectSizeX*0.03 << " "<<k->y*img->height/detectSizeY-k->width*img->width/detectSizeX*0.03<<" "<<k->width*img->width/detectSizeX + k->width*img->width/detectSizeX*0.06<<" "<<k->height*img->height/detectSizeY + k->width*img->width/detectSizeX*0.06<<" ";
//用来截取车脸设定ROI
cvSetImageROI(img, cvRect(k->x*img->width/detectSizeX - k->width*img->width/detectSizeX*0.03,k->y*img->height/detectSizeY - k->width*img->width/detectSizeX*0.03,k->width*img->width/detectSizeX+ k->width*img->width/detectSizeX*0.06,k->width*img->width/detectSizeX+ k->width*img->width/detectSizeX*0.06));
//cvSetImageROI(img, cvRect(k->x*img->width/detectSizeX,k->y*img->height/detectSizeY,k->width*img->width/detectSizeX,k->width*img->width/detectSizeX));
string filePartName=testSamples[i].substr(testSamples[i].find_first_of("/\") + 1 ,testSamples[i].find(".jpg") -testSamples[i].find_last_of("/\") - 1);
std::stringstream ss;
string numstr;
ss<<num;
ss>>numstr;
num++;
string name=savePath+filePartName+"_"+numstr+".jpg";//存储图像命名
cout<<name<<endl;
cvSaveImage(name.c_str(),img);
}
}
fout <<endl;
cout<<endl;
stop_timer (&end);
duration = elapsed_time (&timer, &start, &end);
if (duration > max_duration)
max_duration = duration;
total_duration += duration;
cout<<"duration"<<duration<<" max_duration"<<max_duration<<" total_duration"<<total_duration<<endl;
////显示窗口
cvNamedWindow("output");
cvShowImage("output",copyImg);
cvShowImage("output",img);
waitKey(0);
cvReleaseImage(&img);
cvReleaseImage(&grayImage);
cvReleaseImage(©Img);
}
fout.close();
}
void main ()
{
string testImgFile = "D:\DataSet\CarFaceTestDataSet\CarFace_ImageList.txt";
string basePath="";
string xmlPath = "D:\WorkSpace\VS_Projects\facedetection\cascade.xml";
string savePath = "D:\DataSet\CarFaceTestDataSet\result";
readFileList(testImgFile,basePath);
loadCascadeModel(xmlPath);
detecctObject(savePath);
}