前言:
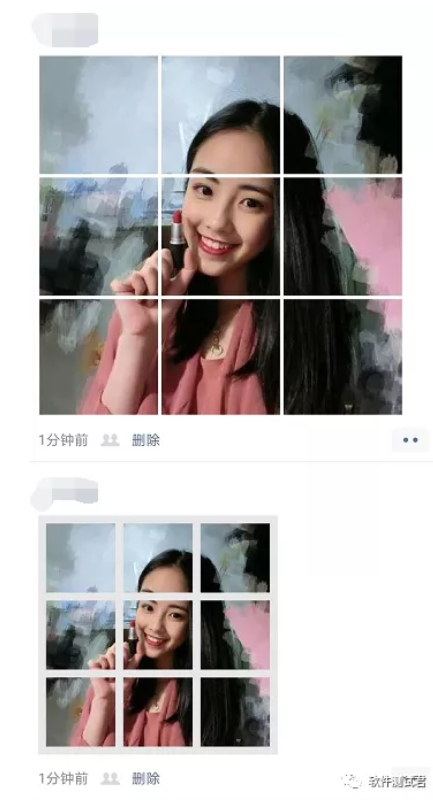
晚上刷朋友圈,看到这样一条朋友圈挺有意思的,如下:

于是,我点开文章后,大概看了下文章的意思,其实就是把一个图片分成九宫图,即拼图的碎片,既然Python都能实现,作为回应,java也是可以做到的。
接着,一时技痒,整理了下思路。就马上打开IDEA开始编码,就有了这篇文章。
某号的实现:
将一张完整的图片分割成9张小图片,制作成朋友圈九宫格的图片,从而在朋友圈晒出不一样的美景。
我的追加实现:
将分割成的九个小图片,在生成一个拼图头像图片。
最终实现效果:
主要思路:
1、 一个待绘制的BufferedImage,长宽都是原图的1/3
2、使用graphics,通过偏移量选择绘制原图的区域
3、绘制结束就可以输出到文件
4、通过两层循环,绘制9个位置的全部图片
5、将生成九个拼图碎片进行图片合成
实现代码:
1、生成拼图碎片
具体示例代码如下:
import com.sun.image.codec.jpeg.JPEGCodec;
import com.sun.image.codec.jpeg.JPEGImageEncoder;

import javax.imageio.ImageIO;
import java.awt.*;
import java.awt.image.BufferedImage;
import java.io.File;
import java.io.FileOutputStream;

/**
 * @author rongrong
 * @version 1.0
 * @description 将图片分成九个拼图碎片
 * @date 2020/7/28 20:20
 */
public class SetImage {
    public static void main(String[] args) {
        File imgfile;
        Image originimg;
        BufferedImage image;
        Graphics g;
        FileOutputStream out;
        JPEGImageEncoder encoder;
        try {
            // 获取原始图片
            imgfile = new File("D:\picture\original.jpg");
            originimg = ImageIO.read(imgfile);
            // 获取原始图片的宽和高
            int width = originimg.getWidth(null);
            int height = originimg.getHeight(null);
            // 如果输入为长方形,重新计算长宽
            int outputwidth = width > height ? height : width;
            int outputheight = outputwidth;
            for (int i = 0; i < 3; i++) {
                for (int j = 0; j < 3; j++) {
                    // 九宫格,每张图片大小都为原来的1/3
                    // 长方形,新建图片大小为计算后的正方型的1/3
                    image = new BufferedImage(outputwidth / 3,
                            outputheight / 3, BufferedImage.TYPE_INT_RGB);
                    // 创建图片
                    g = image.createGraphics();
                    // 绘制图片
                    // 长方形,计算偏移量的数据采用计算后的正方形
                    g.drawImage(originimg, outputwidth * -i / 3, outputheight
                            * -j / 3, width, height, null);
                    // 图片绘制完成,关闭g
                    g.dispose();
                    // 输出流和输出文件
                    out = new FileOutputStream("D:\log\" + (i+1)+ "-" + j + ".jpg");
                    // 下面代码将输出图片转换为JPEG、JPG文件
                    encoder = JPEGCodec.createJPEGEncoder(out);
                    encoder.encode(image);
                    out.close();
                    System.out.println("拼图碎片已分拆成功");
                }
            }
        } catch (Exception e) {
            e.printStackTrace();
        }

    }
}
2、利用生成拼图碎片合成头像图片
具体示例代码如下:
import javax.imageio.ImageIO;
import java.awt.*;
import java.awt.geom.AffineTransform;
import java.awt.image.AffineTransformOp;
import java.awt.image.BufferedImage;
import java.io.File;
import java.io.IOException;
import java.net.URL;
import java.util.ArrayList;
import java.util.List;
/**
 * @description 将九个拼图生成头像
 * @author rongrong
 * @version 1.0
 * @date 2020/7/28 21:18
 */
public class MakeGropHeadPic {
    /**图片宽度*/
    private final Integer PIC_WIDTH = 422;
    /**图片高度*/
    private final Integer PIC_HEIGHT = 422;
    /**空白宽度*/
    private final Integer PIC_SPACE = 14;

    /**小图片宽度*/
    private Double LUMP_WIDTH = null;
    /**小图片起始点横坐标*/
    private Double LUMP_POINT_X = null;
    /**小图片起始点纵坐标*/
    private Double LUMP_POINT_Y = null;


    // 围边使用的灰色
    private final int [] COLOR_GREY_BGR = new int[] {230, 230, 230};

    //校对数组使用下标
    private int flg = 0;

    public static void main(String[] args) {
        MakeGropHeadPic picUtil = new MakeGropHeadPic();
        //添加拼图图片
        List<String> pics = new ArrayList<>();
        pics.add("D:\picture\1-0.jpg");
        pics.add("D:\picture\2-0.jpg");
        pics.add("D:\picture\3-0.jpg");
        pics.add("D:\picture\1-1.jpg");
        pics.add("D:\picture\2-1.jpg");
        pics.add("D:\picture\3-1.jpg");
        pics.add("D:\picture\1-2.jpg");
        pics.add("D:\picture\2-2.jpg");
        pics.add("D:\picture\3-2.jpg");
        picUtil.getCombinationOfhead(pics,"D:\picture\","拼图头像");
    }

    /**
     * @param pics 图片列表
     * @param path 存储路径
     * @param fileName 存储图片名称
     * @return 成功 OR 失败
     */
    public boolean getCombinationOfhead(List<String> pics, String path, String fileName){
        List<BufferedImage> bufferedImages = new ArrayList<BufferedImage>();

        // BufferedImage.TYPE_INT_RGB可以自己定义可查看API
        BufferedImage outImage = new BufferedImage(PIC_WIDTH, PIC_HEIGHT, BufferedImage.TYPE_INT_RGB);

        Graphics2D gra = outImage.createGraphics();
        //设置背景为蓝灰色
        gra.setColor(toColor(COLOR_GREY_BGR));
        //填满图片
        gra.fillRect(0, 0, PIC_WIDTH, PIC_HEIGHT);

        // 开始拼凑 根据图片的数量判断该生成哪种样式组合头像

        Integer size = pics.size();//图片数量
        Integer sqrt = (int)Math.ceil(Math.sqrt(size));//宽度  一行几张图片
        //计算出 单张图片宽度
        LUMP_WIDTH = (PIC_WIDTH - ((sqrt + 1.0) * PIC_SPACE))/sqrt;

        System.out.println(LUMP_WIDTH);

        // 压缩图片所有的图片生成尺寸同意的 为 125*125
        for (int i = 0; i < pics.size(); i++) {
            BufferedImage resize2 = resize2(pics.get(i), LUMP_WIDTH.intValue(), LUMP_WIDTH.intValue(), true);
            bufferedImages.add(resize2);
        }

        //缺几个满伍
        int lack = 0;
        //计算起始点坐标
        if(size < sqrt*(sqrt-1)){//少一行 不满伍
            //缺几个满伍
            lack = sqrt*(sqrt-1) - size;
            //向右边偏移量
            LUMP_POINT_X = PIC_SPACE.doubleValue() + lack * (LUMP_WIDTH + PIC_SPACE) / 2;
            //向下偏移量
            LUMP_POINT_Y = PIC_SPACE.doubleValue() + LUMP_WIDTH/2.;
         }else if (size == sqrt*(sqrt-1)){//满伍少一行
            //向右边偏移量
            LUMP_POINT_X = PIC_SPACE.doubleValue();
            //向下偏移量
            LUMP_POINT_Y = PIC_SPACE.doubleValue() + LUMP_WIDTH/2.;
         }else if(size < sqrt*sqrt){//不满伍
            //缺几个满伍
            lack = sqrt*sqrt - size;
            //向右边偏移量
            LUMP_POINT_X = PIC_SPACE.doubleValue()+ lack * (LUMP_WIDTH + PIC_SPACE) / 2;
            LUMP_POINT_Y = PIC_SPACE.doubleValue();
         }else if (size == sqrt*sqrt){//满伍
            LUMP_POINT_X = PIC_SPACE.doubleValue();
            LUMP_POINT_Y = PIC_SPACE.doubleValue();
         }

        int line = lack==0?-1:0; //第几行图片
        int row = 0; //第几列图片
        for (int i = 0; i < bufferedImages.size(); i++){
            if ((i + lack) % sqrt == 0){
                line ++;
                row = 0;
            }
            if(line == 0){
                gra.drawImage(bufferedImages.get(i), LUMP_POINT_X.intValue() + (row++ * (PIC_SPACE+LUMP_WIDTH.intValue()))
                        , LUMP_POINT_Y.intValue(), null);
            }else{
                gra.drawImage(bufferedImages.get(i), PIC_SPACE + (row++ * (PIC_SPACE+LUMP_WIDTH.intValue()))
                        , LUMP_POINT_Y.intValue() + (line * (PIC_SPACE+LUMP_WIDTH.intValue())), null);
            }
        }

        File file = new File(path+fileName+".png");
        //文件如果存在先删除,再创建
        try {
            if(!file.getParentFile().exists()) {
                file.getParentFile().mkdirs();
                if(file.exists()) {
                    file.delete();
                    if(!file.createNewFile()) {
                        System.out.println("创建失败!");
                    }
                }
            }
        }catch(IOException e) {
            e.printStackTrace();
        }

        //将图片写到文件
        try {
            return ImageIO.write(outImage, "png", file);
        } catch (IOException e) {
            return false;
        }
    }


    /**
     * 图片缩放
     * @param picPath 本地或网络图片路径
     * @param height 缩放后高度
     * @param width 缩放后宽度
     * @param fill 是否填充灰色
     * @return BufferedImage
     */
    public BufferedImage resize2(String picPath, Integer height, Integer width, boolean fill){
        try {
            BufferedImage imageBuff =null;
            if(picPath.indexOf("https://")==0 || picPath.indexOf("http://")==0){ //简单判断是网络图片还是本地图片
                imageBuff = ImageIO.read(new URL(picPath));
            }else{
                imageBuff = ImageIO.read(new File(picPath));
            }

            Image itemp = imageBuff.getScaledInstance(width, height, Image.SCALE_SMOOTH);

            double ratio = 0; // 缩放比例
            // 计算比例
            if ((imageBuff.getHeight() > height) || (imageBuff.getWidth() > width)) {
                if (imageBuff.getHeight() > imageBuff.getWidth()) {
                    ratio = height.doubleValue()/ imageBuff.getHeight();
                } else {
                    ratio = width.doubleValue() / imageBuff.getWidth();
                }
                AffineTransformOp op = new AffineTransformOp(AffineTransform.getScaleInstance(ratio, ratio), null);

                itemp = op.filter(imageBuff, null);
            }

            if (fill) {
                BufferedImage image = new BufferedImage(width, height,
                        BufferedImage.TYPE_INT_RGB);

                Graphics2D g = image.createGraphics();

                g.setColor(toColor(COLOR_GREY_BGR));

                g.fillRect(0, 0, width, height);

                if (width == itemp.getWidth(null))
                    g.drawImage(itemp, 0, (height - itemp.getHeight(null)) / 2,
                            itemp.getWidth(null), itemp.getHeight(null),
                            Color.white, null);
                else
                    g.drawImage(itemp, (width - itemp.getWidth(null)) / 2, 0,
                            itemp.getWidth(null), itemp.getHeight(null),
                            Color.white, null);
                g.dispose();
                itemp = image;
            }
            return (BufferedImage) itemp;
        } catch (IOException e) {
            e.printStackTrace();
        }
        return null;
    }

    /**
     * @toColor 颜色索引转为颜色
     * @param colorRoot 颜色索引
     * @return 颜色
     */
    private Color toColor(int[] colorRoot) {
        if(colorRoot.length>=3) {
            return new Color(colorRoot[0], colorRoot[1], colorRoot[2]);
        }else {
            return null;
        }
    }
}
整个过程分为两个部分:
1、转换图片、切割图片和保存图片
2、切割图片合成新图片
体验:
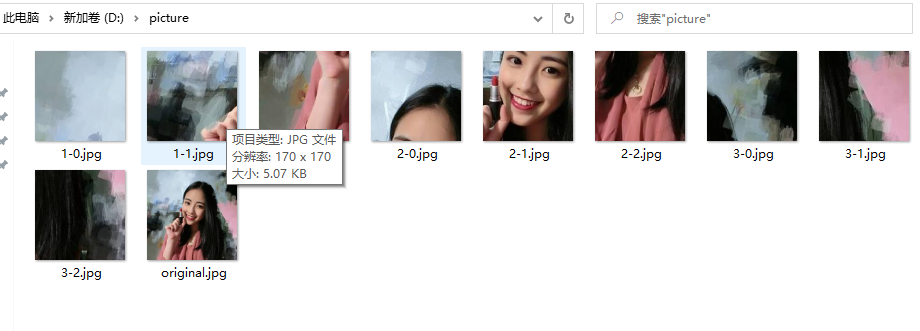
最后,我们找一张图片来做测试,比如我把源文件放到D盘的picture文件夹下,如下图:

1、首先,运行先生成拼图图片,即九宫格的碎片。结果如下图所示:
从截图我们可以看到,我们的图片切割精准都是正方形,所以这段代码拿去尽管去用即可。
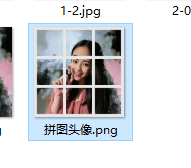
2、将九张拼图合成一个图片头像,在来运行第二个类,结果如下图所示:
最后
以上便是一个生成拼图碎片,再生成拼图头像的过程。感兴趣的朋友,还不赶紧去试试?
大家如果觉得喜欢,点个“在看”并分享给更多的朋友吧!