个人认为学习一个陌生的框架,最好从例子开始,所以我们也从一个例子开始。
学习本教程之前,你需要首先对卷积神经网络算法原理有些了解,而且安装好了caffe
卷积神经网络原理参考:http://cs231n.stanford.edu/syllabus.html
Ubuntu安装caffe教程参考:http://caffe.berkeleyvision.org/install_apt.html
先讲解一下caffe设计的架构吧:

训练mnist数据集使用 build/tools/caffe
训练步骤:
准备数据:
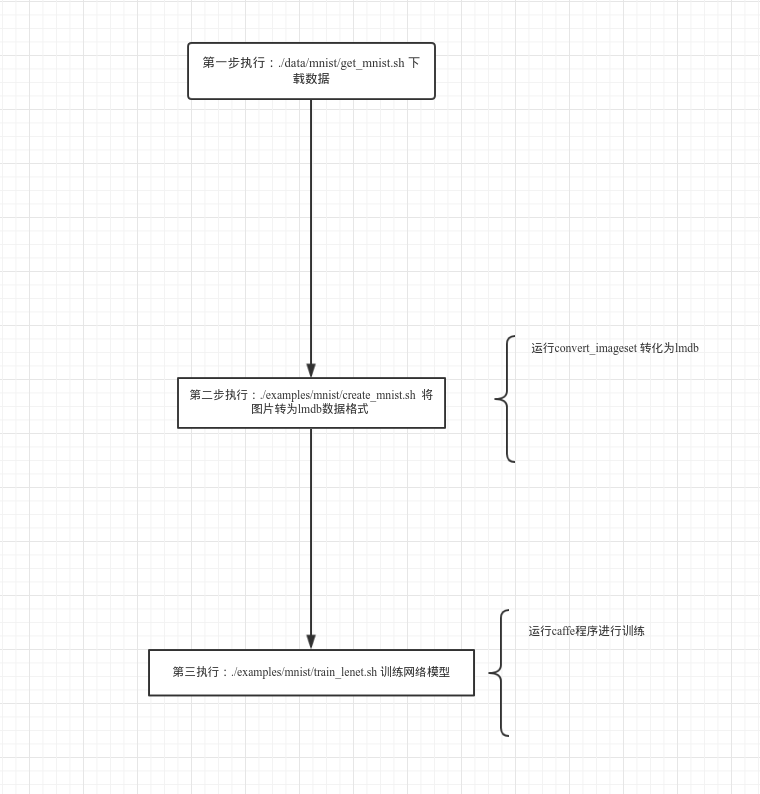
cd $CAFFE_ROOT //安装caffe的根目录./data/mnist/get_mnist.sh //下载mnist数据集
./examples/mnist/create_mnist.sh //将图片转为lmdb数据格式
定义网络模型:
首先定义数据层:
  layer {
    name: "mnist"  //名字可以随便写 字符串类型
    type: "Data"  //类型 必须是 Data 字符串类型
    transform_param {
      scale: 0.00390625
    }
    data_param {
      source: "mnist_train_lmdb"
      backend: LMDB
      batch_size: 64
    }
    top: "data"
    top: "label"
  }

  定义卷基层:
  layer {
    name: "conv1"
    type: "Convolution"
    param { lr_mult: 1 } #定义w参数的学习率
    param { lr_mult: 2 } #定义b参数的学习率
    convolution_param {
      num_output: 20    #定义输出map数量
      kernel_size: 5
      stride: 1
      weight_filler {
        type: "xavier"
      }
      bias_filler {
        type: "constant"
      }
    }
    bottom: "data"
    top: "conv1"
  }
定义pool层:
  layer {
    name: "pool1"
    type: "Pooling"
    pooling_param {
      kernel_size: 2
      stride: 2
      pool: MAX
    }
    bottom: "conv1"
    top: "pool1"
  }
 定义全连接层:
  layer {
    name: "ip1"
    type: "InnerProduct"
    param { lr_mult: 1 }
    param { lr_mult: 2 }
    inner_product_param {
      num_output: 500
      weight_filler {
        type: "xavier"
      }
      bias_filler {
        type: "constant"
      }
    }
    bottom: "pool2"
    top: "ip1"
  }
  定义relu层:
layer { name: "relu1" type: "ReLU" bottom: "ip1" top: "ip1" }
再定义一个全连接层: 注意这里的输出为 分类的个数layer {
    name: "ip2"
    type: "InnerProduct"
    param { lr_mult: 1 }
    param { lr_mult: 2 }
    inner_product_param {
      num_output: 10    #表示有10个类别 从0-9个数字
      weight_filler {
        type: "xavier"
      }
      bias_filler {
        type: "constant"
      }
    }
    bottom: "ip1"
    top: "ip2"
  }

  最后定义 损失函数
  layer {
    name: "loss"
    type: "SoftmaxWithLoss"
    bottom: "ip2"
    bottom: "label"
  }
定义好网络模型后,需要定义 模型训练的策略, solver
# The train/test net protocol buffer definition
net: "examples/mnist/lenet_train_test.prototxt"
# test_iter specifies how many forward passes the test should carry out.
# In the case of MNIST, we have test batch size 100 and 100 test iterations,
# covering the full 10,000 testing images.
test_iter: 100
# Carry out testing every 500 training iterations.
test_interval: 500
# The base learning rate, momentum and the weight decay of the network.
base_lr: 0.01
momentum: 0.9
weight_decay: 0.0005
# The learning rate policy
lr_policy: "inv"
gamma: 0.0001
power: 0.75
# Display every 100 iterations
display: 100
# The maximum number of iterations
max_iter: 10000
# snapshot intermediate results
snapshot: 5000
snapshot_prefix: "examples/mnist/lenet"
# solver mode: CPU or GPU
solver_mode: GPU #使用gpu进行训练
开始训练网络:
cd $CAFFE_ROOT
./examples/mnist/train_lenet.sh
你会看到类似下面的输出:
I1203 net.cpp:66] Creating Layer conv1
I1203 net.cpp:76] conv1 <- data
I1203 net.cpp:101] conv1 -> conv1
I1203 net.cpp:116] Top shape: 20 24 24
I1203 net.cpp:127] conv1 needs backward computation.
。。。。。
I1203 net.cpp:142] Network initialization done.
I1203 solver.cpp:36] Solver scaffolding done.
I1203 solver.cpp:44] Solving LeNet
。。。。。
I1203 solver.cpp:84] Testing net I1203 solver.cpp:111] Test score #0: 0.9897 I1203 solver.cpp:111] Test score #1: 0.0324599 I1203 solver.cpp:126] Snapshotting to lenet_iter_10000 I1203 solver.cpp:133] Snapshotting solver state to lenet_iter_10000.solverstate I1203 solver.cpp:78] Optimization Done.
结束
运行结构图:
接下来的教程会结合源码详细展开 这三部做了什么 看懂caffe源码
欢迎加入深度学习交流群,群号码:317703095