AJAX
1、AJAX简介
- AJAX = Asynchronous JavaScript and XML(异步的JavaScript 和 XML);
- AJAX不是新的编程语言,而是一种使用现有标准的新方法;
- AJAX最大的优点式在不重新加载整个页面的情况下,可以与服务器交换数据并更新部分网页内容;
- AJAX不需要任何浏览器插件,但是需要用户允许JavaScript在浏览器上执行。
- 传统的网页(即不用ajax技术的网页),想要更新内容或者提交一个表单,都需要加载整个网页
- 使用ajax技术的网页,通过在后台服务器进行少量的数据交换,就可以实现异步局部更新。
- 使用Ajax,用户可以创建接近本地桌面应用的直接、高可用、更丰富、更动态的Web用户界面。
2、伪造Ajax
我们可以使用前端的一个标签来伪造一个ajax的样子。iframe标签
1、新建项目,导入web支持
2、编写一个html页面,使用iframe测试
<!DOCTYPE html>
<html lang="en">
<head>
<meta charset="UTF-8">
<title>ajax初体验</title>
<script>
function f() {
//获取url框的value即url
var url = document.getElementById("url").value;
//将获取到的url赋值给iframe的属性src
document.getElementById("iframe").src=url;
}
</script>
</head>
<body>
<div>
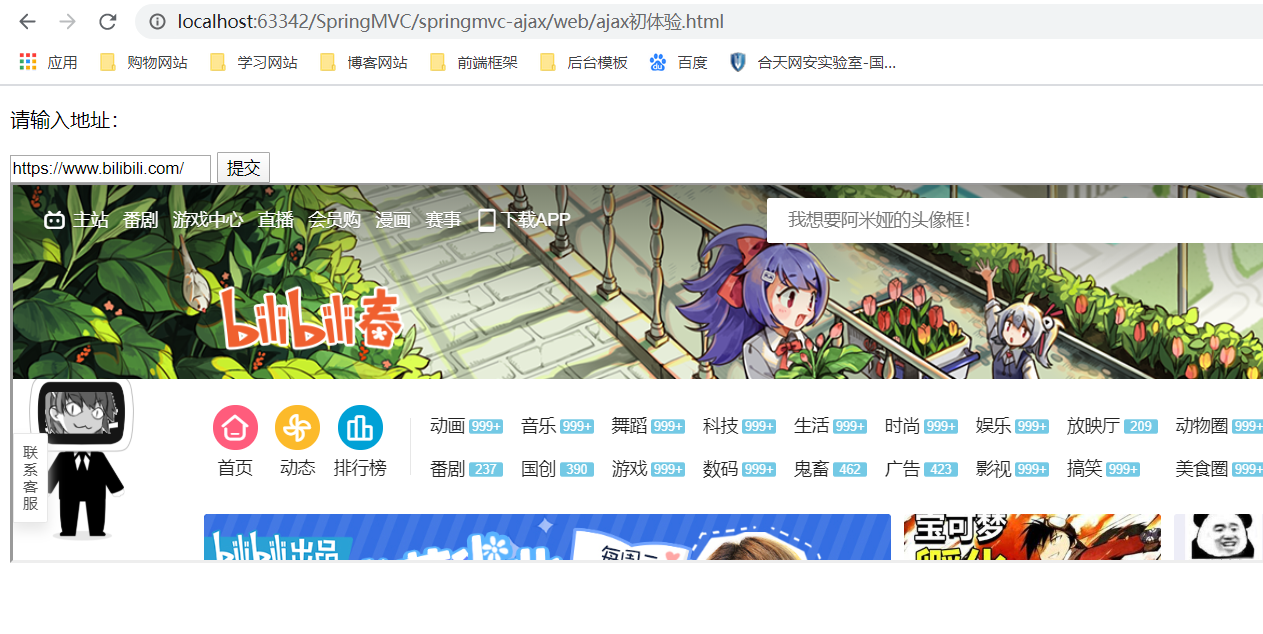
<p>请输入地址:</p>
<input type="url" id="url">
<!--onclick 按下按钮发生的事件-->
<input type="button" id="button" value="提交" onclick="f()">
</div>
<div>
<iframe id="iframe" style=" 100%;height: 500px" ></iframe>
</div>
</body>
</html>
测试:url中输入哔哩哔哩的网址,点击提交按钮
3、利用AJAX可以做的事
- 注册时,输入用户名自动检测用户是否已经存在;
- 登陆时,提示用户密码错误;
- 删除数据行,将行ID发送到后台,后台在数据库中删除,数据库删除成功后,在页面DOM中将数据行也删除;
- ......等等
4、jQuery.ajax
- 使用jquery提供的ajax,方便学习和使用,避免重复造轮子;
- Ajax的核心是XMLHttpRequest对象(XHR)。XHR为像服务器发送请求和解析服务器提供了接口。能够以衣服方式从服务器获取新数据
- jQuery提供多个与AJAX有关的方法
- 通过jQuery AJAX方法,能够使用HHTP Get 和 Post从远程服务器上请求文本、HTML、XML或JSON;
- jQuery Ajax本质就是 XMLHttpRequest,对他进行了封装,方便调用!
jQuery.ajax(...)
       部分参数:
              url:请求地址
             type:请求方式,GET、POST(1.9.0之后用method)
          headers:请求头
             data:要发送的数据
      contentType:即将发送信息至服务器的内容编码类型(默认: "application/x-www-form-urlencoded; charset=UTF-8")
            async:是否异步
          timeout:设置请求超时时间(毫秒)
       beforeSend:发送请求前执行的函数(全局)
         complete:完成之后执行的回调函数(全局)
          success:成功之后执行的回调函数(全局)
            error:失败之后执行的回调函数(全局)
          accepts:通过请求头发送给服务器,告诉服务器当前客户端课接受的数据类型
         dataType:将服务器端返回的数据转换成指定类型
            "xml": 将服务器端返回的内容转换成xml格式
           "text": 将服务器端返回的内容转换成普通文本格式
           "html": 将服务器端返回的内容转换成普通文本格式,在插入DOM中时,如果包含JavaScript标签,则会尝试去执行。
         "script": 尝试将返回值当作JavaScript去执行,然后再将服务器端返回的内容转换成普通文本格式
           "json": 将服务器端返回的内容转换成相应的JavaScript对象
          "jsonp": JSONP 格式使用 JSONP 形式调用函数时,如 "myurl?callback=?" jQuery 将自动替换 ? 为正确的函数名,以执行回调函数
我们进行一个简单的测试,使用最原始的HttpServletRequest处理1
1、编写的配置文件
web.xml
<?xml version="1.0" encoding="UTF-8"?>
<web-app xmlns="http://xmlns.jcp.org/xml/ns/javaee"
         xmlns:xsi="http://www.w3.org/2001/XMLSchema-instance"
         xsi:schemaLocation="http://xmlns.jcp.org/xml/ns/javaee http://xmlns.jcp.org/xml/ns/javaee/web-app_4_0.xsd"
         version="4.0">

    <servlet>
        <servlet-name>DispatcherServlet</servlet-name>
        <servlet-class>org.springframework.web.servlet.DispatcherServlet</servlet-class>
        <!--关联一个SpringMVC的配置文件-->
        <init-param>
            <param-name>contextConfigLocation</param-name>
            <param-value>classpath:springmvc-servlet.xml</param-value>
        </init-param>
        <!--服务器启动的时候就启动-->
        <load-on-startup>1</load-on-startup>
    </servlet>
    <!--
        /  匹配所有的请求  不包括.jsp
        /*  匹配所有的请求  包括.jsp
    -->
    <servlet-mapping>
        <servlet-name>DispatcherServlet</servlet-name>
        <url-pattern>/</url-pattern>
    </servlet-mapping>

    <filter>
        <filter-name>encoding</filter-name>
        <filter-class>org.springframework.web.filter.CharacterEncodingFilter</filter-class>
        <init-param>
            <param-name>encoding</param-name>
            <param-value>utf-8</param-value>
        </init-param>
    </filter>
    <filter-mapping>
        <filter-name>encoding</filter-name>
        <url-pattern>/*</url-pattern>
    </filter-mapping>

</web-app>
springmvc-servlet.xml
<?xml version="1.0" encoding="UTF-8"?>
<beans xmlns="http://www.springframework.org/schema/beans"
       xmlns:mvc="http://www.springframework.org/schema/mvc"
       xmlns:context="http://www.springframework.org/schema/context"
       xmlns:xsi="http://www.w3.org/2001/XMLSchema-instance"
       xsi:schemaLocation="http://www.springframework.org/schema/beans
        https://www.springframework.org/schema/beans/spring-beans.xsd
        http://www.springframework.org/schema/mvc
        https://www.springframework.org/schema/mvc/spring-mvc.xsd
        http://www.springframework.org/schema/context
        https://www.springframework.org/schema/context/spring-context.xsd">

    <!--扫描包配置,控制层,和前端交互 controller-->
    <context:component-scan base-package="com.star.controller"/>
    <!--开启注解扫描-->
    <mvc:annotation-driven/>
    <!--静态资源过滤-->
    <mvc:default-servlet-handler/>

    <!--添加视图解析器-->
    <bean id="internalResourceViewResolver" class="org.springframework.web.servlet.view.InternalResourceViewResolver">
        <property name="prefix" value="/WEB-INF/views/"/>
        <property name="suffix" value=".jsp"/>
    </bean>

</beans>
2、编写一个AjaxController
package com.star.controller;

import org.springframework.web.bind.annotation.RequestMapping;
import org.springframework.web.bind.annotation.RestController;

import javax.servlet.http.HttpServletResponse;
import java.io.IOException;

@RestController
public class ajaxController {

    @RequestMapping("/t1")
    public void test2(String name, HttpServletResponse response) throws IOException {
        System.out.println("test2:param=>" + name);
        if ("lenStar".equals(name)){
            response.getWriter().print("true");
        }else{
            response.getWriter().print("false");
        }
    }

}
3、导入jQuery
可使用在线的CDN,也可以下载导入;
<script src="${pageContext.request.contextPath}/statics/js/jquery-3.4.1.js"></script>
4、编写index.jsp测试
<%@ page contentType="text/html;charset=UTF-8" language="java" %>
<html>
<head>
<title>$Title$</title>
<script src="${pageContext.request.contextPath}/statics/js/jquery-3.4.1.js"></script>
<script>
function a(){
$.post({
url:"${pageContext.request.contextPath}/t1",
data:{"name":$("#username").val()},//这里的data是传给后端的值
success:function (data,status) {
//这里的data是后台传来的数据
console.log(data);
console.log(status)
}
});
}
</script>
</head>
<body>
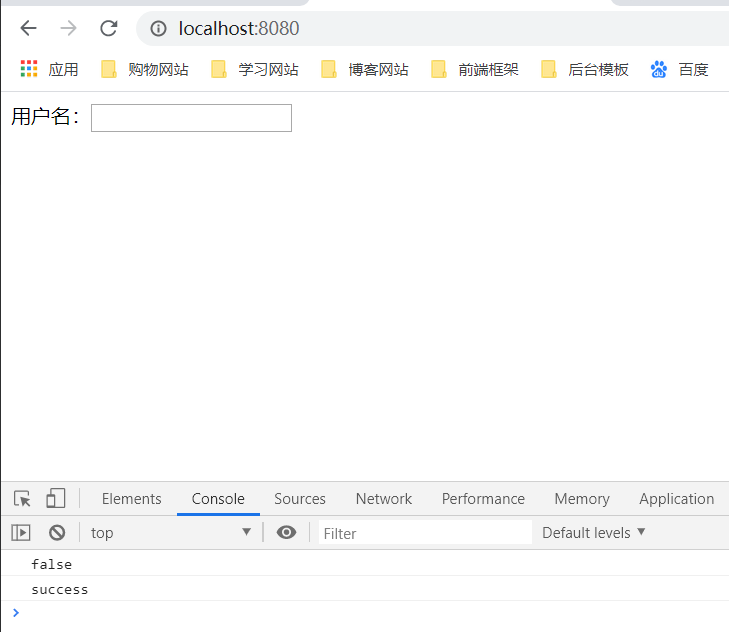
<%--失去焦点的时候发起一个请求(携带信息)到后台--%>
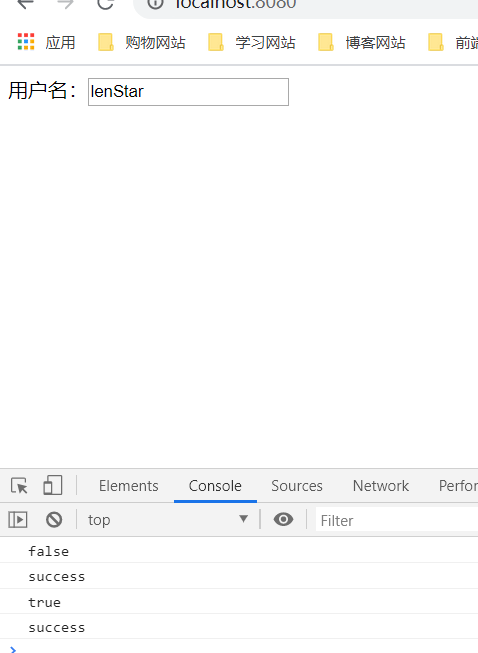
用户名:<input type="text" id="username" onblur="a()">
</body>
</html>
5、启动tomcat测试!
打开浏览器的控制台,当我们鼠标离开输入框的时候,可以看到发出来一个ajax的请求!是后台返回给我们的结果!
输入lenStar时:
5、SpringMVC实现
1、编写实体类User
package com.star.pojo;

import lombok.AllArgsConstructor;
import lombok.Data;
import lombok.NoArgsConstructor;

@Data
@AllArgsConstructor
@NoArgsConstructor
public class User {
    private String name;
    private int age;
    private String sex;
}
2、获取一个集合对象,展示到前端页面
    @RequestMapping("/t2")
    public List<User> test3(){
        List<User> users = new ArrayList<User>();
        users.add(new User("张三",2,"男"));
        users.add(new User("李四",3,"女"));
        users.add(new User("王五",4,"男"));
        users.add(new User("赵六",5,"女"));
        return users;
    }
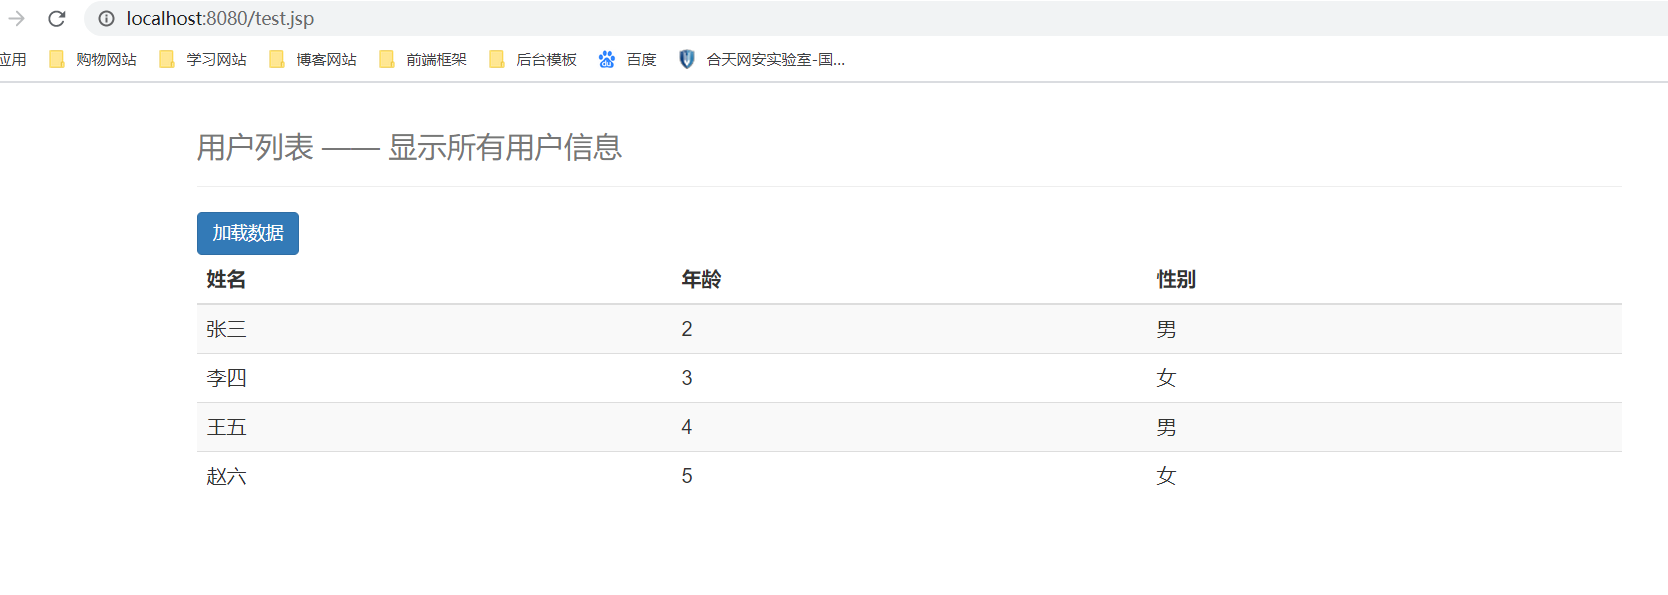
3、前端页面test.jsp
<%@ page contentType="text/html;charset=UTF-8" language="java" %>
<html>
<head>
    <title>Title</title>

    <link href="https://cdn.bootcss.com/bootstrap/3.3.7/css/bootstrap.min.css" rel="stylesheet">
    <script src="${pageContext.request.contextPath}/statics/js/jquery-3.4.1.js"></script>

    <script>
        $(function () {
            $("#btn").click(function () {
                $.post("${pageContext.request.contextPath}/t2", function (data) {
                    console.log(data);
                    var html ="";
                    for (let i = 0; i < data.length; i++) {
                        html += "<tr>" +
                            "<td>" + data[i].name + "</td>" +
                            "<td>" + data[i].age + "</td>" +
                            "<td>" + data[i].sex + "</td>" +
                            "</tr>"
                    }
                    $("#content").html(html);
                })
            })
        })
    </script>

</head>
<body>

<div class="container">

    <div class="row clearfix">
        <div class="col-md-12 column">
            <div class="page-header">
                <h1>
                    <small>用户列表 —— 显示所有用户信息</small>
                </h1>
            </div>
        </div>
    </div>

    <div class="row">
        <div class="col-md-4 column">
            <input class="btn btn-primary" id="btn" type="button" value="加载数据">
        </div>
    </div>

    <div class="row clearfix">
        <div class="col-md-12 column">
            <table class="table table-hover table-striped">
                <thead>
                <tr>
                    <th>姓名</th>
                    <th>年龄</th>
                    <th>性别</th>
                </tr>
                </thead>
                <tbody id="content">
                </tbody>
            </table>
        </div>
    </div>
</div>

</body>
</html>
4、启动测试:点击按钮获取数据
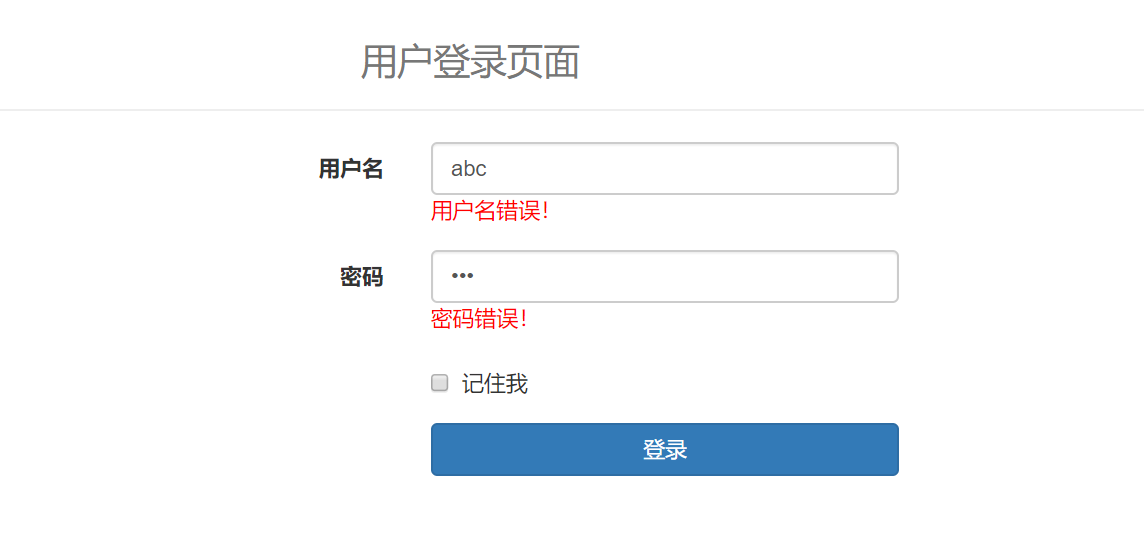
6、注册提示效果
我们平时注册时候,输入框后面的实时提示怎么做到的;如何优化?
1、Controller类
    @RequestMapping("/t3")
    public String test4(String name,String pwd){
        String msg="";
        if(name!=null){
            if("lenStar".equals(name)){
                msg = "OK!";
            }else {
                msg = "用户名错误!";
            }
        }
        if(pwd!=null){
            if("123456".equals(pwd)){
                msg = "OK!";
            }else {
                msg = "密码错误!";
            }
        }
        return msg;
    }
2、前端登录页面
<%@ page contentType="text/html;charset=UTF-8" language="java" %>
<html>
<head>
    <title>Title</title>

    <link href="https://cdn.bootcss.com/bootstrap/3.3.7/css/bootstrap.min.css" rel="stylesheet">
    <script src="${pageContext.request.contextPath}/statics/js/jquery-3.4.1.js"></script>

    <script>
        function a1() {
            $.post({
                url:"${pageContext.request.contextPath}/t3",
                data:{"name":$("#name").val()},
                success:function (data) {
                    if(data.toString()==="OK!"){
                        $("#nameInfo").css("color","green")
                    }else {
                        $("#nameInfo").css("color","red")
                    }
                    $("#nameInfo").html(data)
                }
            })
        }
        function a2() {
            $.post({
                url:"${pageContext.request.contextPath}/t3",
                data:{"pwd":$("#pwd").val()},
                success:function (data) {
                    if(data.toString()==="OK!"){
                        $("#pwdInfo").css("color","green")
                    }else {
                        $("#pwdInfo").css("color","red")
                    }
                    $("#pwdInfo").html(data)
                }
            })
        }
    </script>

</head>
<body>
    <div class="container">
        <div class="row clearfix">
            <div class="col-md-12 column">
                <div class="page-header">
                    <h1>
                        <small style="padding-left: 400px">用户登录页面</small>
                    </h1>
                </div>
            </div>
        </div>

        <form style="padding-left: 300px" class="form-horizontal" role="form">
            <div class="form-group">
                <label class="col-sm-2 control-label">用户名</label>
                <div class="col-sm-10">
                    <input type="text" id="name" class="form-control" style=" 300px" placeholder="请输入用户名" onblur="a1()">
                    <span id="nameInfo"></span>
                </div>

            </div>

            <div class="form-group">
                <label class="col-sm-2 control-label">密码</label>
                <div class="col-sm-10">
                    <input type="password" class="form-control" style=" 300px" id="pwd" placeholder="请输入密码" onblur="a2()">
                    <span id="pwdInfo"></span>
                </div>

            </div>

            <div class="form-group">
                <div class="col-sm-offset-2 col-sm-10">
                    <div class="checkbox">
                        <label>
                            <input  type="checkbox"> 记住我
                        </label>
                    </div>
                </div>
            </div>

            <div class="form-group">
                <div class="col-sm-offset-2 col-sm-10">
                    <button style=" 300px" type="submit" class="btn btn-primary">登录</button>
                </div>
            </div>
        </form>
    </div>
</body>
</html>
3、启动测试
输入不正确时:
输入正确时:
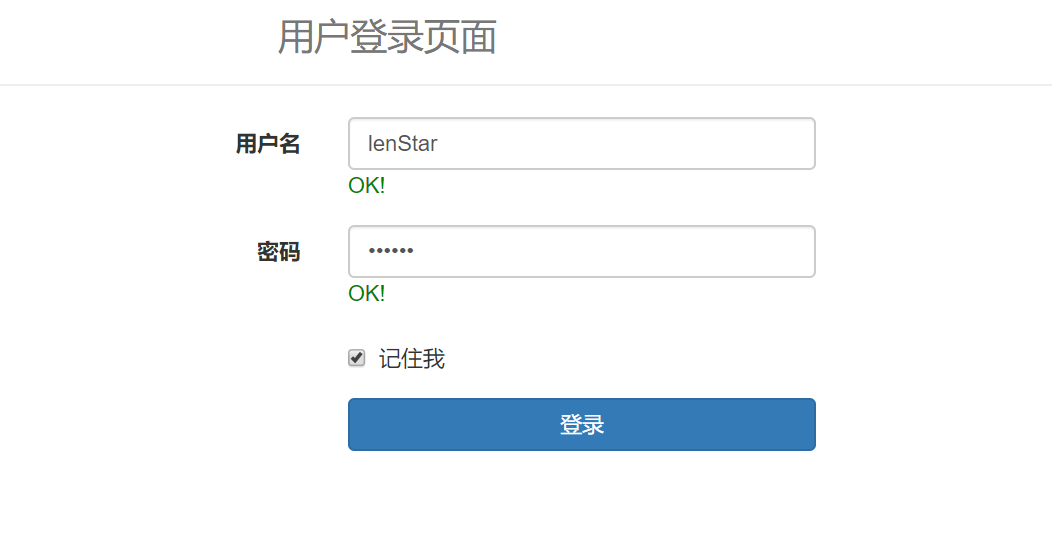
**动态请求响应,局部刷新,就是如此!