## 简述
前面我们讲到了springboot的启动流程,可以说是加载的是SpringBoot的包,现在我们从我们写的Main方法SpringApplication.run(DemoApplication.class, args)开始解读。
## 启动过程
### 直接运行的Main函数是应用自己的Main函数
```
@SpringBootApplication
public class DemoApplication {
public static void main(String[] args) {
SpringApplication.run(DemoApplication.class, args);
}
}
```
入口是一个SpringApplication类,我们debug一步一步的往下走看看。
### 1.调用SpringApplication类的静态方法run()
```
public static ConfigurableApplicationContext run(Object source, String... args) {
   return run(new Object[] { source }, args);
}
```
因为,启动的时候可以传入多个class,我们只把当前的传入过来,然后调用run(Object[] sources, String[] args)方法。这前面的都很容易看懂,主要的来了,在静态的run方法里开始新建一个SpringApplication对象,并且调用run对象的run方法。
### 2.创建SpringApplication对象过程。
SpringApplication构造方法里,先调用initialize()方法,该方法主要是来判断是不是Web环境,如果是的话,则会创建AnnotationConfigEmbeddedWebApplicationContext,否则Spring context就是AnnotationConfigApplicationContext:
代码如下
```
private static final String[] WEB_ENVIRONMENT_CLASSES = { "javax.servlet.Servlet",
"org.springframework.web.context.ConfigurableWebApplicationContext" };
private void initialize(Object[] sources) {
if (sources != null && sources.length > 0) {
this.sources.addAll(Arrays.asList(sources));
}
this.webEnvironment = deduceWebEnvironment();
setInitializers((Collection) getSpringFactoriesInstances(
ApplicationContextInitializer.class));
setListeners((Collection) getSpringFactoriesInstances(ApplicationListener.class));
this.mainApplicationClass = deduceMainApplicationClass();
}
private boolean deduceWebEnvironment() {
for (String className : WEB_ENVIRONMENT_CLASSES) {
if (!ClassUtils.isPresent(className, null)) {
return false;
}
}
return true;
}
private Class<?> deduceMainApplicationClass() {
try {
StackTraceElement[] stackTrace = new RuntimeException().getStackTrace();
for (StackTraceElement stackTraceElement : stackTrace) {
if ("main".equals(stackTraceElement.getMethodName())) {
return Class.forName(stackTraceElement.getClassName());
}
}
}
catch (ClassNotFoundException ex) {
// Swallow and continue
}
return null;
}
protected ConfigurableApplicationContext createApplicationContext() {
Class<?> contextClass = this.applicationContextClass;
if (contextClass == null) {
try {
contextClass = Class.forName(this.webEnvironment
? DEFAULT_WEB_CONTEXT_CLASS : DEFAULT_CONTEXT_CLASS);
}
catch (ClassNotFoundException ex) {
throw new IllegalStateException(
"Unable create a default ApplicationContext, "
+ "please specify an ApplicationContextClass",
ex);
}
}
return (ConfigurableApplicationContext) BeanUtils.instantiate(contextClass);
}
```
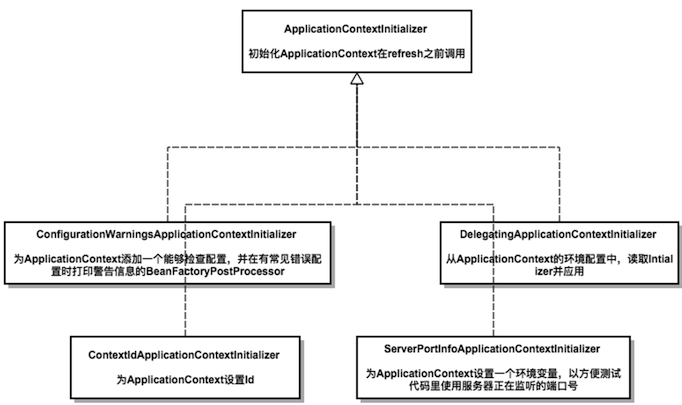
### 3.创建ApplicationContextInitializer列表
创建ApplicationContextInitializer时先调用SpringFactoriesLoader.loadFactoryNames(type, classLoader)来获取所有Spring Factories的名字,然后为每一个Spring Factories根据读取到的名字创建其对象
初始化的对象如下:
Application Context Initializers
org.springframework.context.ApplicationContextInitializer=
org.springframework.boot.context.ConfigurationWarningsApplicationContextInitializer,
org.springframework.boot.context.ContextIdApplicationContextInitializer,
org.springframework.boot.context.config.DelegatingApplicationContextInitializer,
org.springframework.boot.context.embedded.ServerPortInfoApplicationContextInitializer
遍历每一个spring-factories文件,并获取其下key为factoryClass.getName()(这里是入参
org.springframework.context.ApplicationContextInitializer)的value(这里有以上四个ApplicationContextInitializer实现类)
```
//SpringApplication.class
private <T> Collection<? extends T> getSpringFactoriesInstances(Class<T> type,
      Class<?>[] parameterTypes, Object... args) {
   ClassLoader classLoader = Thread.currentThread().getContextClassLoader();
   // Use names and ensure unique to protect against duplicates
   Set<String> names = new LinkedHashSet<String>(
         SpringFactoriesLoader.loadFactoryNames(type, classLoader));
   List<T> instances = createSpringFactoriesInstances(type, parameterTypes,
         classLoader, args, names);
   AnnotationAwareOrderComparator.sort(instances);
   return instances;
}
//SpringFactoriesLoader.class
/**
 * The location to look for factories.
 * <p>Can be present in multiple JAR files.
 */
public static final String FACTORIES_RESOURCE_LOCATION = "META-INF/spring.factories";
public static List<String> loadFactoryNames(Class<?> factoryClass, ClassLoader classLoader) {
   String factoryClassName = factoryClass.getName();
   try {
      Enumeration<URL> urls = (classLoader != null ? classLoader.getResources(FACTORIES_RESOURCE_LOCATION) :
            ClassLoader.getSystemResources(FACTORIES_RESOURCE_LOCATION));
      List<String> result = new ArrayList<String>();
      while (urls.hasMoreElements()) {
         URL url = urls.nextElement();
         Properties properties = PropertiesLoaderUtils.loadProperties(new UrlResource(url));
         String factoryClassNames = properties.getProperty(factoryClassName);
         result.addAll(Arrays.asList(StringUtils.commaDelimitedListToStringArray(factoryClassNames)));
      }
      return result;
   }
   catch (IOException ex) {
      throw new IllegalArgumentException("Unable to load [" + factoryClass.getName() +
            "] factories from location [" + FACTORIES_RESOURCE_LOCATION + "]", ex);
   }
```
### 4.初始化ApplicationListener列表
```
private List<ApplicationListener<?>> listeners;
private void initialize(Object[] sources) {
...
// 为成员变量listeners赋值
setListeners((Collection) getSpringFactoriesInstances(ApplicationListener.class));
...
}
public void setListeners(Collection<? extends ApplicationListener<?>> listeners) {
this.listeners = new ArrayList<ApplicationListener<?>>();
this.listeners.addAll(listeners);
}
```
listeners成员变量,是一个ApplicationListener<?>类型对象的集合。可以看到获取该成员变量内容使用的是跟成员变量initializers一样的方法,只不过传入的类型从ApplicationContextInitializer.class变成了ApplicationListener.class。
看一下spring.factories中的相关内容:
以下内容摘自spring-boot.jar中的资源文件META-INF/spring.factories
Application Listeners
org.springframework.context.ApplicationListener=
org.springframework.boot.builder.ParentContextCloserApplicationListener,
org.springframework.boot.context.FileEncodingApplicationListener,
org.springframework.boot.context.config.AnsiOutputApplicationListener,
org.springframework.boot.context.config.ConfigFileApplicationListener,
org.springframework.boot.context.config.DelegatingApplicationListener,
org.springframework.boot.liquibase.LiquibaseServiceLocatorApplicationListener,
org.springframework.boot.logging.ClasspathLoggingApplicationListener,
org.springframework.boot.logging.LoggingApplicationListener
也就是说,在我们的例子中,listener最终会被初始化为ParentContextCloserApplicationListener,FileEncodingApplicationListener,AnsiOutputApplicationListener,ConfigFileApplicationListener,DelegatingApplicationListener,LiquibaseServiceLocatorApplicationListener,ClasspathLoggingApplicationListener,LoggingApplicationListener这几个类的对象组成的list。
下图画出了加载的ApplicationListener,并说明了他们的作用。至于他们何时会被触发,等事件出现时,我们再说明。
### 5.最后是mainApplicationClass
```
private Class<?> mainApplicationClass;
private void initialize(Object[] sources) {
...
// 为成员变量mainApplicationClass赋值
this.mainApplicationClass = deduceMainApplicationClass();
...
}
private Class<?> deduceMainApplicationClass() {
try {
StackTraceElement[] stackTrace = new RuntimeException().getStackTrace();
for (StackTraceElement stackTraceElement : stackTrace) {
if ("main".equals(stackTraceElement.getMethodName())) {
return Class.forName(stackTraceElement.getClassName());
}
}
}
catch (ClassNotFoundException ex) {
// Swallow and continue
}
return null;
}
```
在deduceMainApplicationClass方法中,通过获取当前调用栈,找到入口方法main所在的类,并将其复制给SpringApplication对象的成员变量mainApplicationClass。在我们的例子中mainApplicationClass即是我们自己编写的Application类。
### 6.SpringApplication对象的run方法

可变个数参数args即是我们整个应用程序的入口main方法的参数,在我们的例子中,参数个数为零。
StopWatch是来自org.springframework.util的工具类,可以用来方便的记录程序的运行时间。
SpringApplication对象的run方法创建并刷新ApplicationContext,算是开始进入正题了。下面按照执行顺序,介绍该方法所做的工作。
#### 7.headless模式
```
private static final String SYSTEM_PROPERTY_JAVA_AWT_HEADLESS = "java.awt.headless";
private boolean headless = true;
public ConfigurableApplicationContext run(String... args) {
...
//设置headless模式
configureHeadlessProperty();
...
}
private void configureHeadlessProperty() {
System.setProperty(SYSTEM_PROPERTY_JAVA_AWT_HEADLESS, System.getProperty(
SYSTEM_PROPERTY_JAVA_AWT_HEADLESS, Boolean.toString(this.headless)));
}
```
实际上是就是设置系统属性java.awt.headless,在我们的例子中该属性会被设置为true,因为我们开发的是服务器程序,一般运行在没有显示器和键盘的环境。关于java中的headless模式,更多信息可以参考这里。
#### 8.SpringApplicationRunListeners
```
public ConfigurableApplicationContext run(String... args) {
...
SpringApplicationRunListeners listeners = getRunListeners(args);
listeners.started();
/**
* 创建并刷新ApplicationContext
* context = createAndRefreshContext(listeners, applicationArguments);
**/
listeners.finished(context, null);
...
}
private SpringApplicationRunListeners getRunListeners(String[] args) {
Class<?>[] types = new Class<?>[] { SpringApplication.class, String[].class };
return new SpringApplicationRunListeners(logger, getSpringFactoriesInstances(
SpringApplicationRunListener.class, types, this, args));
}
```
run方法中,加载了一系列SpringApplicationRunListener对象,在创建和更新ApplicationContext方法前后分别调用了listeners对象的started方法和finished方法, 并在创建和刷新ApplicationContext时,将listeners作为参数传递到了createAndRefreshContext方法中,以便在创建和刷新ApplicationContext的不同阶段,调用listeners的相应方法以执行操作。所以,所谓的SpringApplicationRunListeners实际上就是在SpringApplication对象的run方法执行的不同阶段,去执行一些操作,并且这些操作是可配置的。
同时,可以看到,加载SpringApplicationRunListener时,使用的是跟加载ApplicationContextInitializer和ApplicationListener时一样的方法。那么加载了什么,就可以从spring.factories文件中看到了
##总结
在调用SpringApplication的run方法之前都做了哪些事情,首先调用void initialize(Object[] sources)方法,这个方法主要是先判断是不是WEB环境,然后创建ApplicationContextInitializer列表,再初始化ApplicationListener列表,最后初始化主类mainApplicationClass.
前面是自己一点一点的写,后面发现有写的比教好的,就直接过了一遍。