0.补充 exist 存在 了解.py


 1 """"""
 2 """
 3 '''exist'''
 4 EXIST 关键字表示存在
 5     在使用EXIST 关键字时 ,
 6
 7     内层查询语句不返回 查询的记录,
 8     而是返回一个真假值 ,True|False
 9
10     当返回True时,外层语句将进行查询,
11     当返回值为False 外层查询语句不进行查询
12
13     select * from emp where exists (select id from dep where id > 203);
14
15     MySQL 中的注释
16 """
1.pymysql 操作mysql.py
 1 """"""
 2 """pymysql 模块 :Python操作 mysql"""
 3
 4 import pymysql
 5 """连接数据库"""
 6 conn = pymysql.connect(
 7     host = '127.0.0.1',
 8     port = 3306,
 9     user = 'root',
10     password = 'llx20190411',
11     database = 'day38',
12     charset = 'utf8' # 编码千万不要加"-" 如果写成了 utf-8 会直接报错
13 )
14 """设置一个游标"""
15 cursor = conn.cursor(pymysql.cursors.DictCursor)  # 产生一个游标对像 以字典的形式返回查询下出来的数据 键是表的字段  值是表的字段对应的信息
16 """SQL语句"""
17 sql = 'select * from teacher'
18
19 """执行传入的sql语句"""
20 cursor.execute(sql)
21 # res = cursor.execute(sql)
22 # print(res)   # 5 # res是执行语句返回的数据条数
23
24 """只获取一条数据"""
25 # print(cursor.fetchone())
26 # print(cursor.fetchone())
27 # print(cursor.fetchone())
28 # print(cursor.fetchone())
29 # print(cursor.fetchone())
30 # print(cursor.fetchone())
31 """
32 值:
33     {'tid': 1, 'tname': '张磊老师'}
34     {'tid': 2, 'tname': '李平老师'}
35     {'tid': 3, 'tname': '刘海燕老师'}
36     {'tid': 4, 'tname': '朱云海老师'}
37     {'tid': 5, 'tname': '李杰老师'}
38     None
39 """
40 """scroll 控制光标移动| absolute 相对于其实位置 往后移动几位"""
41 # cursor.scroll(2,'absolute')
42 #
43 # print(cursor.fetchall())
44 """
45 值:[{'tid': 3, 'tname': '刘海燕老师'}, {'tid': 4, 'tname': '朱云海老师'}, {'tid': 5, 'tname': '李杰老师'}]
46 """
47
48 """relative 相对于当前位置 往后移动几位"""
49 cursor.scroll(3,'relative')
50 print(cursor.fetchall())  # [{'tid': 4, 'tname': '朱云海老师'}, {'tid': 5, 'tname': '李杰老师'}]
2.sql 的注入问题
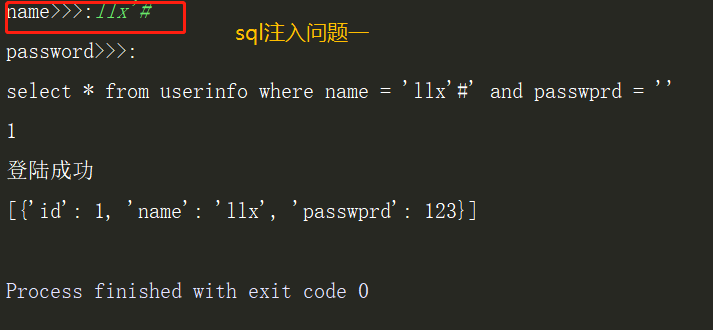
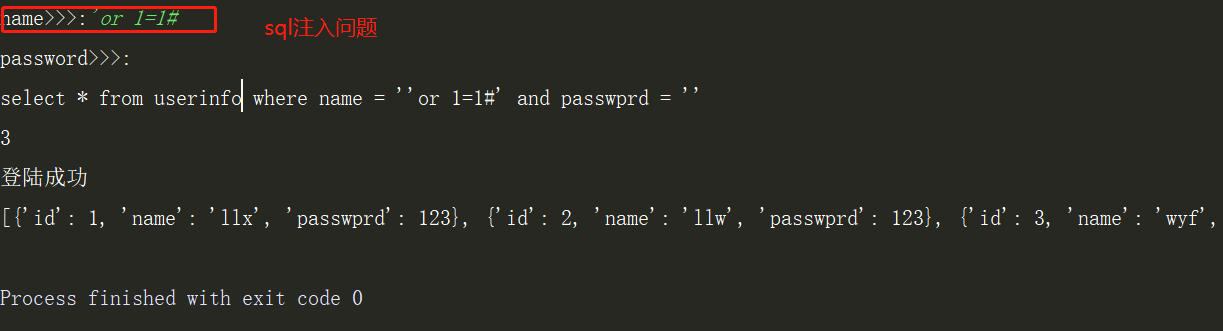
 1 import pymysql
 2
 3 name = input('name>>>:').strip()
 4 passwprd = input(('password>>>:')).strip()
 5
 6 conn = pymysql.connect(
 7     host = '127.0.0.1',
 8     port = 3306,
 9     user = 'root',
10     password = 'llx20190411',
11     database = 'day38',
12     charset = 'utf8'  # 编码千万不要加- 如果写成了utf-8会直接报错
13
14 )
15 cursor = conn.cursor(pymysql.cursors.DictCursor)
16 # 产生一个游标对象  以字典的形式返回查询出来的数据 键是表的字段  值是表的字段对应的信息
17
18 sql = "select * from userinfo where name = '%s' and passwprd = '%s'" % (name,passwprd)
19 print(sql)
20 # 能够帮你自动过滤特殊符号 避免sql注入的问题
21 res = cursor.execute(sql)
22 print(res)
23
24 if res:
25     print('登陆成功')
26     print(cursor.fetchall())
27 else:
28     print('用户名,或密码错误')
29
30 # 关闭游标
31 cursor.close()
32 # 关闭链接
33 conn.close()
34
35 """
36 sql 注入 就是利用 注释等具有特殊意义的符号来完成一些骚操作
37
38 解决方法:
39     后续写sql语句  不要手动拼接关键性的数据
40 而是让excute帮你去做拼接
41 """
 1 import pymysql
 2 name = input('name>>>:').strip()
 3 passwprd = input(('password>>>:')).strip()
 4 conn = pymysql.connect(
 5     host = '127.0.0.1',
 6     port = 3306,
 7     database = 'day38',
 8     user = 'root',
 9     password = 'llx20190411',
10     charset = 'utf8',
11     autocommit = True
12 )
13 cursor = conn.cursor(pymysql.cursors.DictCursor)
14
15
16 sql = 'insert into userinfo(name,passwprd) values(%s,%s)'
17
18 res = cursor.execute(sql,(name,passwprd))
19 # conn.commit()
20 if res:
21     print(cursor.fetchone())
22     print('注册成功')
23 else:
24     print('注册失败')
 1 import pymysql
 2 name = input('name>>>:').strip()
 3 passwprd = input(('password>>>:')).strip()
 4 conn = pymysql.connect(
 5     host = '127.0.0.1',
 6     port = 3306,
 7     database = 'day38',
 8     user = 'root',
 9     password = 'llx20190411',
10     charset = 'utf8',
11     autocommit = True
12 )
13 cursor = conn.cursor(pymysql.cursors.DictCursor)
14
15
16 sql = "update userinfo set passwprd = %s where name = %s"
17
18 res = cursor.execute(sql,(passwprd,name))
19 # conn.commit()
20 if res:
21     print(cursor.fetchone())
22     print('密码修改成功')
23 else:
24     print('失败')
 1 import pymysql
 2 name = input('name>>>:').strip()
 3 conn = pymysql.connect(
 4     host = '127.0.0.1',
 5     port = 3306,
 6     database = 'day38',
 7     user = 'root',
 8     password = 'llx20190411',
 9     charset = 'utf8',
10     autocommit = True
11 )
12 cursor = conn.cursor(pymysql.cursors.DictCursor)
13
14
15 sql = "delete from userinfo where name = %s"
16
17 res = cursor.execute(sql,name)
18 # conn.commit()
19 if res:
20     print(cursor.fetchone())
21     print('删除用户成功')
22 else:
23     print('失败')
SQL注入问题1.png
SQL注入问题2.png
3.Navicat使用.py
 1 """"""
 2 """
 3 下载地址:<https://pan.baidu.com/s/1bpo5mqj
 4
 5 掌握:
 6 #1. 测试+链接数据库
 7 #2. 新建库
 8 #3. 新建表,新增字段+类型+约束
 9 #4. 设计表:外键
10 #5. 新建查询
11 #6. 建立表模型
12
13 #注意:
14 批量加注释:ctrl+?键
15 批量去注释:ctrl+shift+?键
16 """
4.作业
readme
 1 1、查询所有的课程的名称以及对应的任课老师姓名
 2 分析:
 3     表 course 列名 cname teacher_id
 4     select teacher_id,cname from course
 5
 6     表 teacher 列名 tid tname
 7     select teacher.tname,course.cname from teacher inner join course on teacher.tid = course.teacher_id;
 8
 9 mysql> select teacher.tname,course.cname from teacher inner join course on teacher.tid = course.teacher_id;
10 +-----------------+--------+
11 | tname           | cname  |
12 +-----------------+--------+
13 | 张磊老师        | 生物   |
14 | 李平老师        | 物理   |
15 | 李平老师        | 美术   |
16 | 刘海燕老师      | 体育   |
17 +-----------------+--------+
18 4 rows in set (0.00 sec)
19 2、查询学生表中男女生各有多少人
20
21     分析:
22     student   count(gender) group by gender
23     select gender,count(gender) from student group by gender;
24
25 mysql> select gender,count(gender) from student group by gender;
26 +--------+---------------+
27 | gender | count(gender) |
28 +--------+---------------+
29 | 女     |             6 |
30 | 男     |            10 |
31 +--------+---------------+
32 2 rows in set (0.00 sec)
33
34 3、查询物理成绩等于100的学生的姓名
35     分析:
36      score num student_id
37      student sname sid
38
39      select student_id from score where num = 100;
40      select student.sname from student where sid in (select student_id from score inner join course on score.course_id = course.cid where course.cname = '物理' and score.num = 100);
41 4、查询平均成绩大于八十分的同学的姓名和平均成绩
42
43 5、查询所有学生的学号,姓名,选课数,总成绩
44
45 6、 查询姓李老师的个数
46
47 7、 查询没有报李平老师课的学生姓名
48
49 8、 查询物理课程比生物课程高的学生的学号
50
51 9、 查询没有同时选修物理课程和体育课程的学生姓名
52
53 10、查询挂科超过两门(包括两门)的学生姓名和班级
54 、查询选修了所有课程的学生姓名
55
56 12、查询李平老师教的课程的所有成绩记录
57
58 13、查询全部学生都选修了的课程号和课程名
59
60 14、查询每门课程被选修的次数
61
62 15、查询之选修了一门课程的学生姓名和学号
63
64 16、查询所有学生考出的成绩并按从高到低排序(成绩去重)
65
66 17、查询平均成绩大于85的学生姓名和平均成绩
67
68 18、查询生物成绩不及格的学生姓名和对应生物分数
69
70 19、查询在所有选修了李平老师课程的学生中,这些课程(李平老师的课程,不是所有课程)平均成绩最高的学生姓名
71
72 20、查询每门课程成绩最好的前两名学生姓名
73
74 21、查询不同课程但成绩相同的学号,课程号,成绩
75
76 22、查询没学过“叶平”老师课程的学生姓名以及选修的课程名称;
77
78 23、查询所有选修了学号为1的同学选修过的一门或者多门课程的同学学号和姓名;
79
80 24、任课最多的老师中学生单科成绩最高的学生姓名