Nginx 是俄罗斯人编写的十分轻量级的 HTTP 服务器,Nginx,它的发音为“engine X”,是一个高 性能的 HTTP 和反向代理服务器,同时也是一个 IMAP/POP3/SMTP 代理服务器.Nginx 是由 俄罗斯人 Igor Sysoev 为俄罗斯访问量第二的 Rambler.ru 站点开发. Nginx 以事件驱动(epoll)的方式编写,所以有非常好的性能,同时也是一个非常高效的反 向代理、负载平衡。但是 Nginx 并不支持 cgi 方式运行,原因是可以减少因此带来的一些程 序上的漏洞。所以必须使用 FastCGI 方式来执行 PHP 程序。 由于 Nginx 本身的一些优点,轻量,开源,易用,越来越多的公司使用 nginx 作为自己公司 的 web 应用服务器,本文详细介绍 nginx 源码安装的同时并对 nginx 进行优化配置。
一、Nginx 的优化
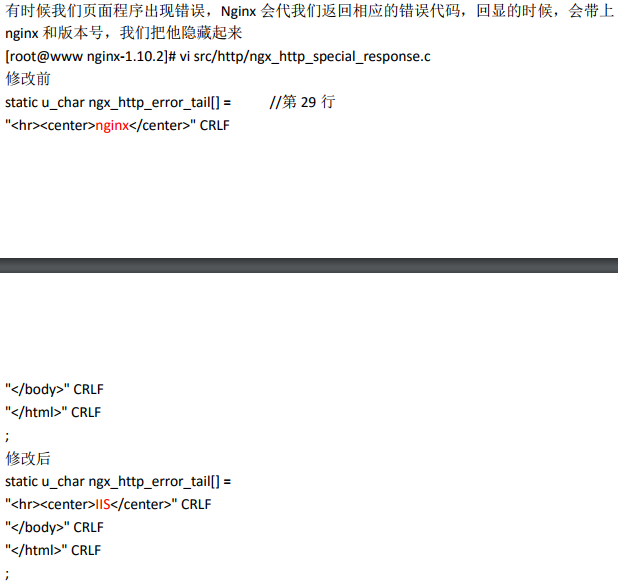
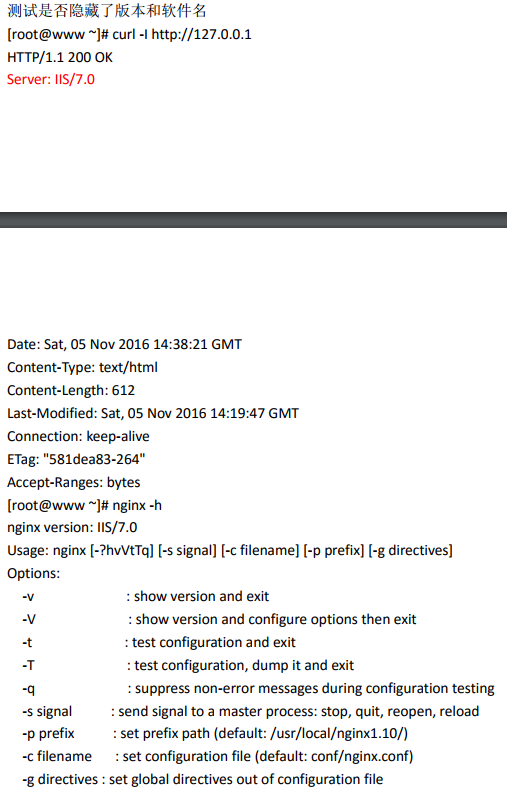
1、编译安装前优化 编译前的优化主要是用来修改程序名等等,目的更改源码隐藏软件名称和版本号
安装 zlib-devel、pcre-devel 等依赖包
[root@www ~]# yum -y install gcc gcc-c++ make libtool zlib zlib-devel pcre pcre-devel openssl openssl-devel
下载 nginx 的源码包:http://nginx.org/download
解压源码包:
[root@www ~]# tar zxf nginx-1.10.2.tar.gz [root@www ~]# cd nginx-1.10.2/
#####################
隐藏软件名称和版本号
[root@www nginx-1.10.2]# vim src/core/nginx.h
//此行修改的是你想要的版本
#define NGINX_VERSION "1.10.2" //第 13 行
//此行修改的是你想修改的软件名称
#define NGINX_VER "nginx/" NGINX_VERSION //第 14 行
修改上面的信息,即可更改 nginx 显示版本。例如:(curl –I 可看到,请求头和响应头显示)
#define NGINX_VERSION "7.0"
#define NGINX_VER "ljl/" NGINX_VERSION
2、安装 ngnix
[root@www ~]# groupadd www #添加 www 组
[root@www ~]# useradd -g www www -s /sbin/nologin #创建nginx运行账户www并加入到 www 组,不允许 www 用户直接登录系统
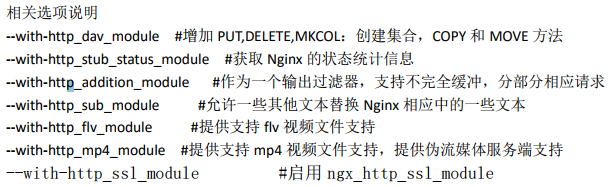
[root@www nginx-1.10.2]# ./configure --prefix=/usr/local/nginx(版本号可删除) --with-http_dav_module --with-http_stub_status_module --with-http_addition_module --with-http_sub_module --with-http_flv_module --with-http_mp4_module --with-pcre --with-http_ssl_module --with-http_gzip_static_module --user=www --group=www
[root@www nginx-1.10.2]# make && make install
[root@www nginx-1.10.2]# ln -s /usr/local/nginx1.10/sbin/nginx /usr/local/sbin/
[root@www nginx-1.10.2]# nginx -t
启动 nginx [root@www nginx-1.10.2]# nginx
[root@www nginx-1.10.2]# netstat -anpt | grep nginx
tcp 0 0 0.0.0.0:80 0.0.0.0:* LISTEN 9834/nginx: master
3、nginx 配置项优化
[root@www ~]# ps -ef | grep nginx
root 9834 1 0 22:36 ? 00:00:00 nginx: master process nginx
www 9953 9834 0 22:43 ? 00:00:00 nginx: worker process
在这里我们还可以看到在查看的时候,work 进程是 nginx 程序用户,但是 master 进程还是 root,其中,master 是监控进程,也叫主进程,work 是工作进程,部分还有 cache 相关进程, 关系如图:
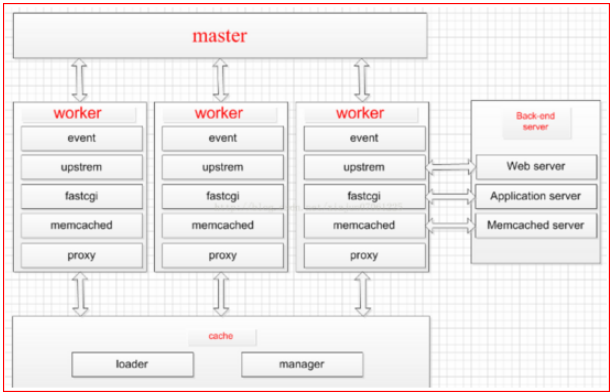
可以直接理解为 master 是管理员,work 进程才是为用户提供服务的!
(1):Nginx 运行工作进程个数,一般我们设置 CPU 的核心或者核心数 x2
如果不了解 cpu 的核数可以查看cat/proc/cpuinfo 文 件#grep ^processor /proc/cpuinfo | wc -l
[root@www ~]# vi /usr/local/nginx1.10/conf/nginx.conf
worker_processes 4;
[root@www ~]# /usr/local/nginx1.10/sbin/nginx -s reload
[root@www ~]# ps -aux | grep nginx | grep -v grep
root 9834 0.0 0.0 47556 1948 ? Ss 22:36 0:00 nginx: master process nginx
www 10135 0.0 0.0 50088 2004 ? S 22:58 0:00 nginx: worker process
www 10136 0.0 0.0 50088 2004 ? S 22:58 0:00 nginx: worker process
www 10137 0.0 0.0 50088 2004 ? S 22:58 0:00 nginx: worker process
www 10138 0.0 0.0 50088 2004 ? S 22:58 0:00 nginx: worker process
Nginx 运行 CPU 亲和力
比如 2 核配置 worker_processes 2;
worker_cpu_affinity 01 10;
worker_processes 最多开启 8 个,8 个以上性能提升不会再提升了,而且稳定性变得更低, 所以 8 个进程够用了。
Nginx 最多可以打开文件数
这个指令是指当一个 nginx 进程打开的最多文件描述符数目,理论值应该是最多打开文件数 (ulimit -n)与 nginx 进程数相除,但是 nginx 分配请求并不是那么均匀,所以最好与 ulimit -n 的值保持一致。
注: 文件资源限制的配置可以在/etc/security/limits.conf 设置,针对 root/user 等各个用户或者* 代表所有用户来设置。
* soft nofile 65535
* hard nofile 65535
用户重新登录生效(ulimit -n)
二、部署 LNMP (部署环境需求:nginx和php在一台,再开启一台apache做防盗链)
1、安装 php
(1)解决依赖关系 [root@www ~]# yum -y install libxml2-devel libcurl-devel openssl-devel bzip2-devel
安装 libmcrypt
[root@www ~]# tar zxf libmcrypt-2.5.7.tar.gz
[root@wwwr ~]# cd libmcrypt-2.5.7/
[root@www libmcrypt-2.5.7]# ./configure --prefix=/usr/local/libmcrypt && make && make install
(2)编译安装 php
[root@www ~]# tar zxf php-5.6.27.tar.gz
[root@www ~]# cd php-5.6.27/
[root@www php-5.6.27]# ./configure --prefix=/usr/local/php5.6 --with-mysql=mysqlnd --with-pdo-mysql=mysqlnd --with-mysqli=mysqlnd --with-openssl --enable-fpm --enable-sockets --enable-sysvshm --enable-mbstring --with-freetype-dir --with-jpeg-dir --with-png-dir --with-zlib --with-libxml-dir=/usr --enable-xml --with-mhash --with-mcrypt=/usr/local/libmcrypt --with-config-file-path=/etc --with-config-file-scan-dir=/etc/php.d --with-bz2 --enable-maintainer-zts
[root@www php-5.6.27]# make && make install
(3)提供 php 配置文件
[root@www php-5.6.27]# cp php.ini-production /etc /php.ini
(4)为 php-fpm 提供脚本
[root@www php-5.6.27]# cp sapi/fpm/init.d.php-fpm /etc/init.d/php-fpm
[root@www php-5.6.27]# chmod +x /etc/init.d/php-fpm
[root@www php-5.6.27]# chkconfig --add php-fpm
[root@www php-5.6.27]# chkconfig php-fpm on
(5)提供 php-fpm 配置文件并编辑: # cp /usr/local/php5.6/etc/php-fpm.conf.default /usr/local/php5.6/etc/php-fpm.conf
[root@www ~]# vi /usr/local/php5.6/etc/php-fpm.conf
修改内容如下:
pid = run/php-fpm.pid
listen = 0.0.0.0:9000
pm.max_children = 50
pm.start_servers = 5
pm.min_spare_servers = 5
pm.max_spare_servers = 35
启动 php-fpm 服务:
[root@www ~]# service php-fpm start
Starting php-fpm done
[root@www ~]# netstat -anpt | grep php-fpm
tcp 0 0 0.0.0.0:9000 0.0.0.0:* LISTEN 25456/php-fpm: mast
[root@www ~]# firewall-cmd --permanent --add-port=9000/tcp
success
[root@www ~]# firewall-cmd --reload
Success
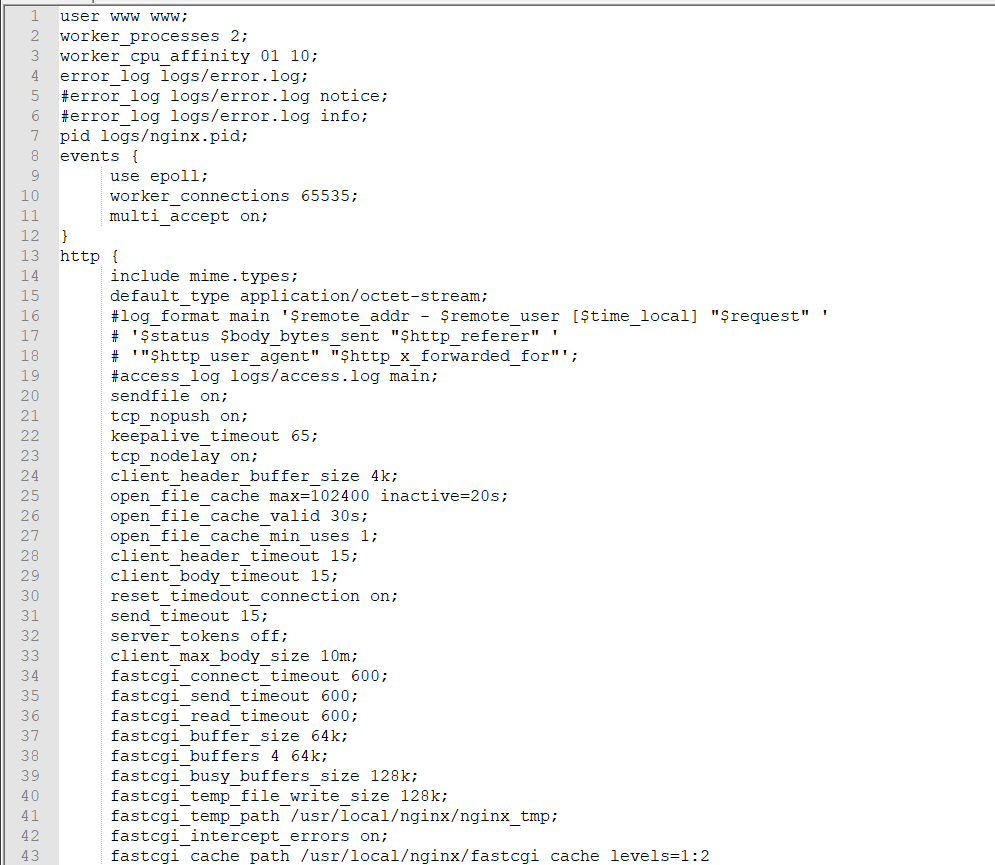
下面是nginx.conf的一个完整配置文件
user www www;
worker_processes 2;
worker_cpu_affinity 01 10;
error_log logs/error.log;
#error_log logs/error.log notice;
#error_log logs/error.log info;
pid logs/nginx.pid;
events {
use epoll;
worker_connections 65535;
multi_accept on;
}
http {
include mime.types;
default_type application/octet-stream;
#log_format main '$remote_addr - $remote_user [$time_local] "$request" '
# '$status $body_bytes_sent "$http_referer" '
# '"$http_user_agent" "$http_x_forwarded_for"';
#access_log logs/access.log main;
sendfile on;
tcp_nopush on;
keepalive_timeout 65;
tcp_nodelay on;
client_header_buffer_size 4k;
open_file_cache max=102400 inactive=20s;
open_file_cache_valid 30s;
open_file_cache_min_uses 1;
client_header_timeout 15;
client_body_timeout 15;
reset_timedout_connection on;
send_timeout 15;
server_tokens off;
client_max_body_size 10m;
fastcgi_connect_timeout 600;
fastcgi_send_timeout 600;
fastcgi_read_timeout 600;
fastcgi_buffer_size 64k;
fastcgi_buffers 4 64k;
fastcgi_busy_buffers_size 128k;
fastcgi_temp_file_write_size 128k;
fastcgi_temp_path /usr/local/nginx/nginx_tmp;
fastcgi_intercept_errors on;
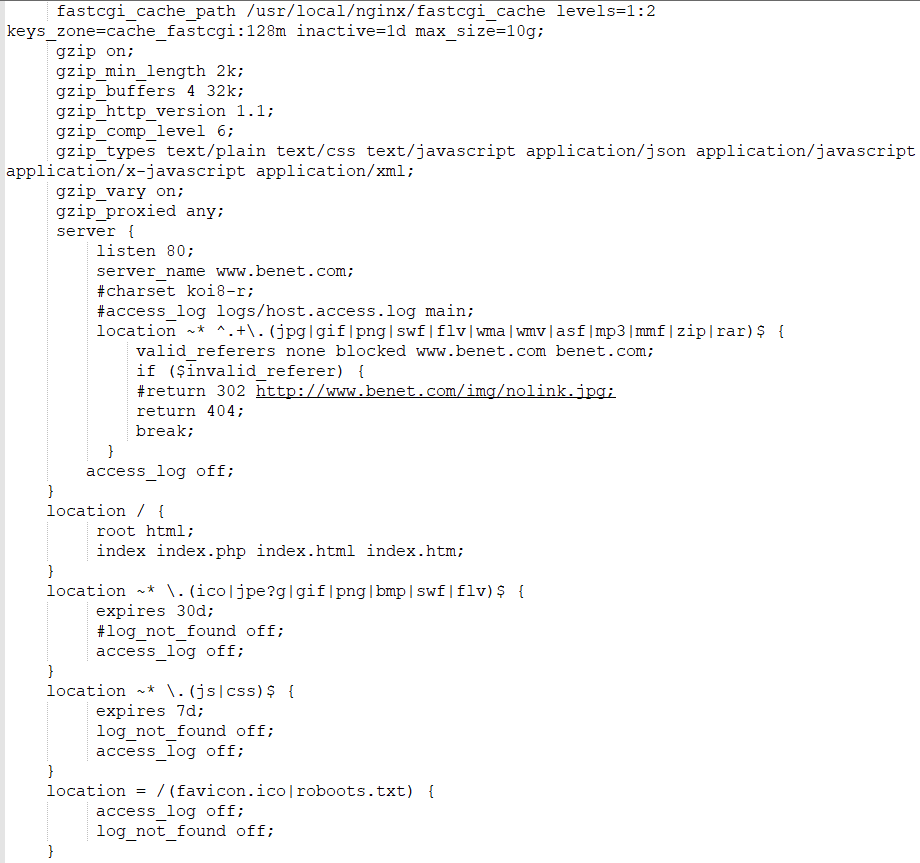
fastcgi_cache_path /usr/local/nginx/fastcgi_cache levels=1:2
keys_zone=cache_fastcgi:128m inactive=1d max_size=10g;
gzip on;
gzip_min_length 2k;
gzip_buffers 4 32k;
gzip_http_version 1.1;
gzip_comp_level 6;
gzip_types text/plain text/css text/javascript application/json application/javascript
application/x-javascript application/xml;
gzip_vary on;
gzip_proxied any;
server {
listen 80;
server_name www.benet.com;
#charset koi8-r;
#access_log logs/host.access.log main;
location ~* ^.+.(jpg|gif|png|swf|flv|wma|wmv|asf|mp3|mmf|zip|rar)$ {
valid_referers none blocked www.benet.com benet.com;
if ($invalid_referer) {
#return 302 http://www.benet.com/img/nolink.jpg;
return 404;
break;
}
access_log off;
}
location / {
root html;
index index.php index.html index.htm;
}
location ~* .(ico|jpe?g|gif|png|bmp|swf|flv)$ {
expires 30d;
#log_not_found off;
access_log off;
}
location ~* .(js|css)$ {
expires 7d;
log_not_found off;
access_log off;
}
location = /(favicon.ico|roboots.txt) {
access_log off;
log_not_found off;
}
location /status {
stub_status on;
}
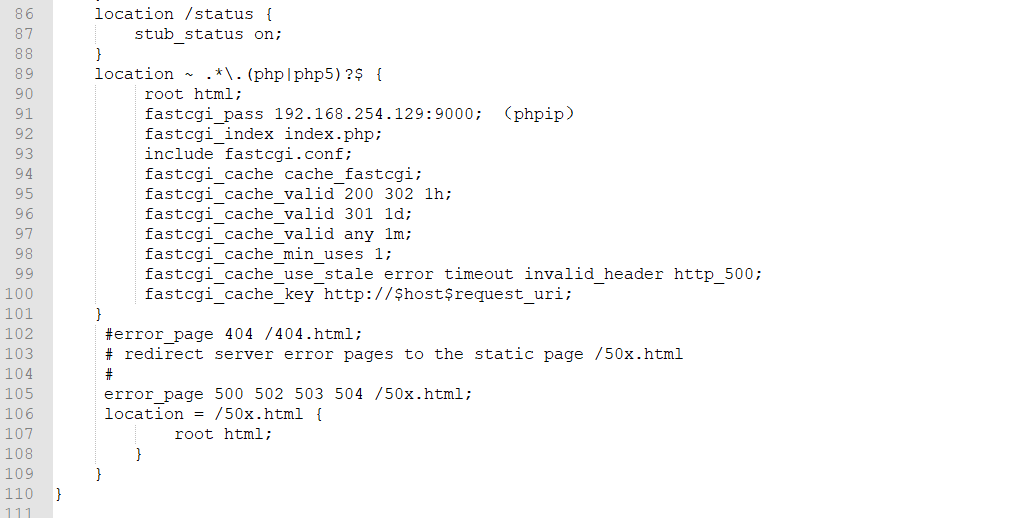
location ~ .*.(php|php5)?$ {
root html;
fastcgi_pass 192.168.254.129:9000; (phpip)
fastcgi_index index.php;
include fastcgi.conf;
fastcgi_cache cache_fastcgi;
fastcgi_cache_valid 200 302 1h;
fastcgi_cache_valid 301 1d;
fastcgi_cache_valid any 1m;
fastcgi_cache_min_uses 1;
fastcgi_cache_use_stale error timeout invalid_header http_500;
fastcgi_cache_key http://$host$request_uri;
}
#error_page 404 /404.html;
# redirect server error pages to the static page /50x.html
#
error_page 500 502 503 504 /50x.html;
location = /50x.html {
root html;
}
}
}
图片概述:
重载 nginx 服务
[root@www ~]# /usr/local/nginx1.10/sbin/nginx -s reload
三、验证、压力测试
(1)验证防盗链
使用 apache 做为一个测试站点,域名为 www.test.com,在测试页上做一个超链接,链接 nginx
站点的一张图片 (nginx下放张照片)
[root@centos1 ~]# cat /var/www/html/index.html
<a href="http://www.benet.com/1.jpg">link</a>
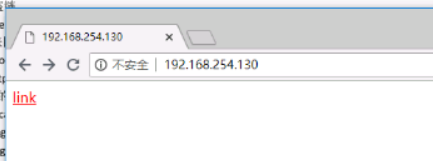
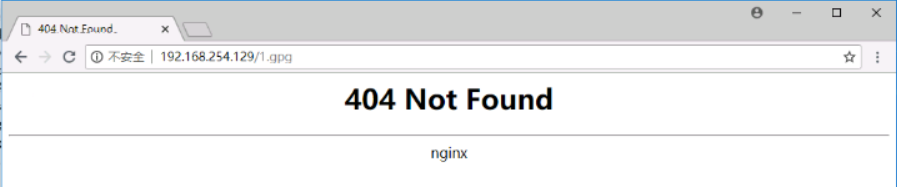
从上图可以看到防盗链设置生效了
(2)验证 gzip 功能
使用谷歌浏览器测试访问,如下图显示结果:(提示:在访问测试页之前按 F12 键)
在php上做个测试页面:

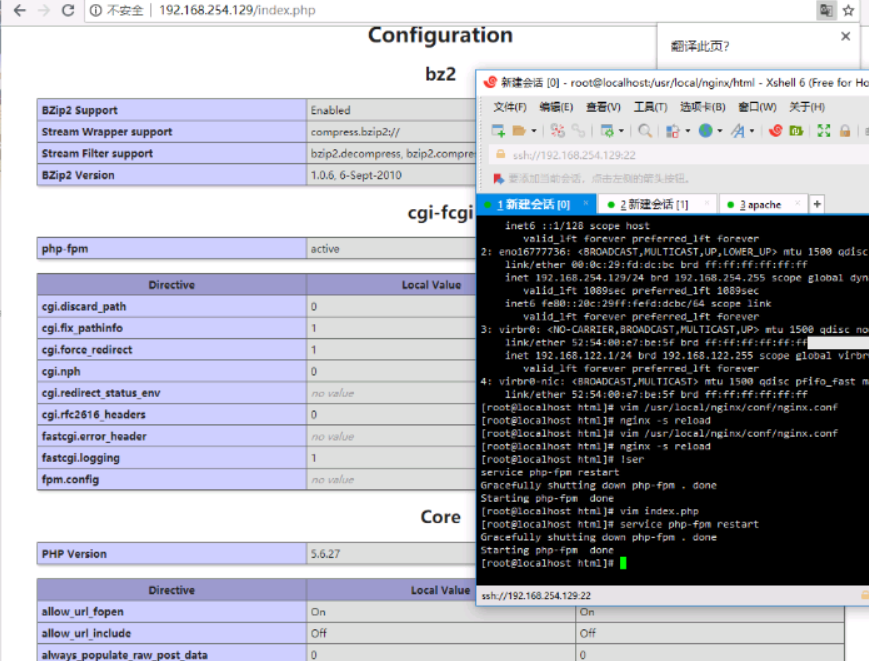
用户访问html.php文件,在上图中content-encoding:gzip表明响应给用户的数据是压缩传输。
(3)压力测试
安装 httpd-tools 软件包
[root@www ~]# yum -y install httpd-tools
[root@www ~]# ab -c 500 -n 50000 http://www.benet.com/index.html
(内容简述)
第二次压力测试,比较两次的差异
[root@www ~]# ab -c 1000 -n 100000 http://www.benet.com/index.html
(内容简述)
(5)xcache 加速 php
安装 xcache
wget http://xcache.lighttpd.net/pub/Releases/3.2.0/xcache-3.2.0.tar.gz #下载
[root@www ~]# tar zxf xcache-3.2.0.tar.gz #解压
[root@www ~]# cd xcache-3.2.0/ #进入安装目录
[root@www xcache-3.2.0]# /usr/local/php5.6/bin/phpize #用 phpize 生成 configure 配置文件
[root@www xcache-3.2.0]# ./configure --enable-xcache --enable-xcache-coverager --enable-xcache-optimizer --with-php-config=/usr/local/php5.6/bin/php-config #配置
[root@www xcache-3.2.0]# make && make install #编译、安装

2)创建 xcache 缓存文件
# touch /tmp/xcache
# chmod 777 /tmp/xcache
3)拷贝 xcache 后台管理程序到网站根目录
[root@www xcache-3.2.0]# cp -r htdocs/ /usr/local/nginx/html/xcache (版本号已删除)
4)配置 php 支持 xcache
vi / etc/php.ini #编辑配置文件,在最后一行添加以下内容
[xcache-common]
extension = /usr/local/php5.6/lib/php/extensions/no-debug-zts-20131226/xcache.so
[xcache.admin]
xcache.admin.enable_auth = Off
[xcache]
xcache.shm_scheme ="mmap"
xcache.size=60M
xcache.count =1
xcache.slots =8K
xcache.ttl=0
xcache.gc_interval =0
xcache.var_size=64M
xcache.var_count =1
xcache.var_slots =8K
xcache.var_ttl=0
xcache.var_maxttl=0
xcache.var_gc_interval =300
xcache.test =Off
xcache.readonly_protection = Off
xcache.mmap_path ="/tmp/xcache"
xcache.coredump_directory =""
xcache.cacher =On
xcache.stat=On
xcache.optimizer =Off
[xcache.coverager]
xcache.coverager =On
xcache.coveragedump_directory =""
测试
service php-fpm restart #重启 php-fpm
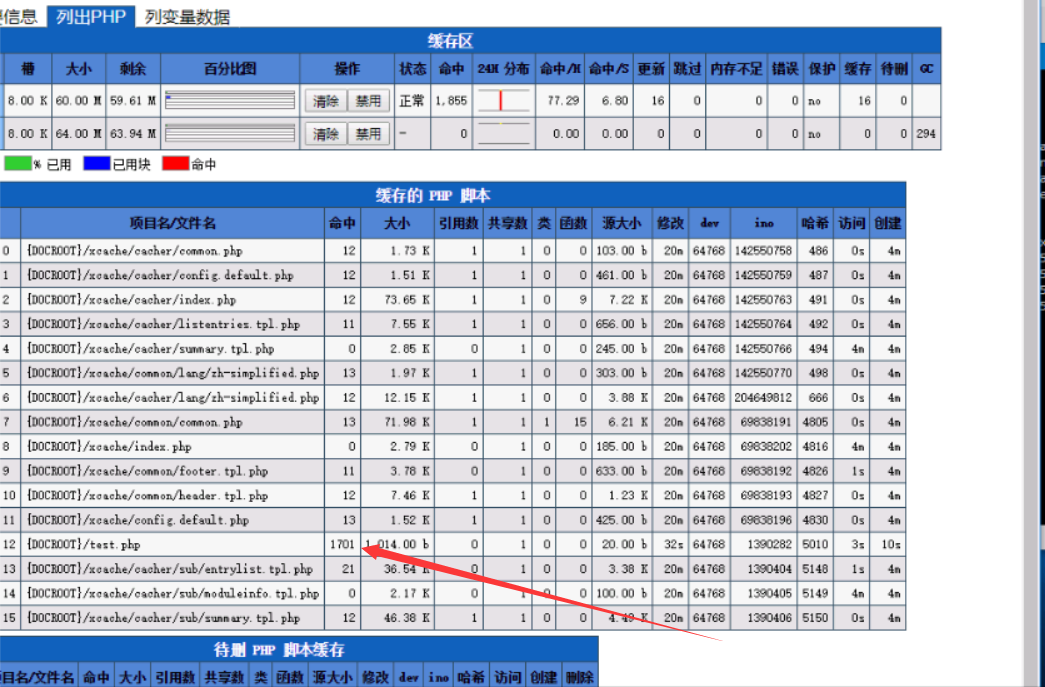
浏览器打开网站根目录下面的 xcache
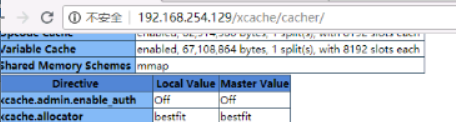 可以看到此页面:
进nginx主配置文件:(注释掉)

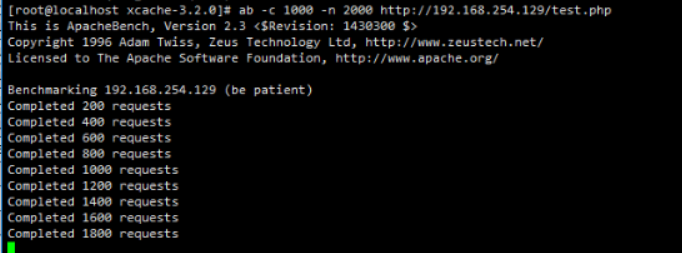
测试对 php 动态页面的压力测试