环境:ubuntu16.04(Qt5.7creater 需要在16.04 版本上运行-迅为IMX6Q开发板)
下载链接:http://cn.ubuntu.com/download/
编译器:arm-2014.05-29-arm-none-linux-gnueabi-i686-pc-linux-gnu.tar.bz2
下载链接: http://www.veryarm.com/arm-none-linux-gnueabi-gcc
触摸工具:tslib-1.4.tar.gz
下载链接: http://vdisk.weibo.com/s/AcUHxOERV2k0?sudaref=www.baidu.com
Qt 源码:qt-everywhere-opensource-src-5.7.0.tar.gz
下载链接: http://download.qt.io/official_releases/qt/5.7/5.7.0/
1.搭建环境
1.1 安装 vim ssh
apt-get install vim ssh
遇到问题 SSH 连接失败
解决:vim /etc/ssh/sshd_config
加
Ciphers aes128-cbc,aes192-cbc,aes256-cbc,aes128-ctr,aes192-ctr,aes256-
ctr,3des-cbc,arcfour128,arcfour256,arcfour,blowfish-cbc,cast128-cbc
MACs hmac-md5,hmac-sha1,umac-64@openssh.com,hmac-ripemd160,hmac-
sha1-96,hmac-md5-96
KexAlgorithms diffie-hellman-group1-sha1,diffie-hellman-group14-sha1,diffie-
hellman-group-exchange-sha1,diffie-hellman-group-exchange-sha256,ecdh-sha2-
nistp256,ecdh-sha2-nistp384,ecdh-sha2-nistp521,diffie-hellman-group1-
sha1,curve25519-sha256@libssh.org
找到下面这段代码,修改如下
# Authentication:
LoginGraceTime 120
#PermitRootLogin prohibit-password
PermitRootLogin yes
StrictModes yes
之后重启 service ssh restart
1.2 安装编译器
将源码放到/usr/local/arm 下解压
修改环境变量 vim /etc/profile 并 source 如下图
arm+tab 键,确定可以显示 arm-none-linux-gnueabi-
输入 arm-none-linux-gnueabi-gcc -v 显示 gcc version 4.8.3 20140320
(prerelease) (Sourcery CodeBench Lite 2014.05-29),那就没问题了。如果提示 no
such 等,要 sudo apt-get install lib32z1 lib32ncurses5
2.编译 tslib
解压源码 tslib-1.4.tar.gz
cd tslib
sudo apt-get install autoconf
sudo apt-get install automake
sudo apt-get install libtool
安装完之后执行
./autogen.sh
./configure CC=arm-none-linux-gnueabi-gcc CXX=arm-none-linux-gnueabi-g++
--host=arm-none-linux-gnueabi --prefix=/opt/tslib1.4
ac_cv_func_malloc_0_nonnull=yes
make
make install
vim /opt/tslib1.4/etc/ts.conf 修改第二行如下
3.编译 Qt5.7 的源码
注意是-O2
在 qt-everywhere-opensource-src-5.7.0 下建立一 autoconfigure.sh 文件内容为: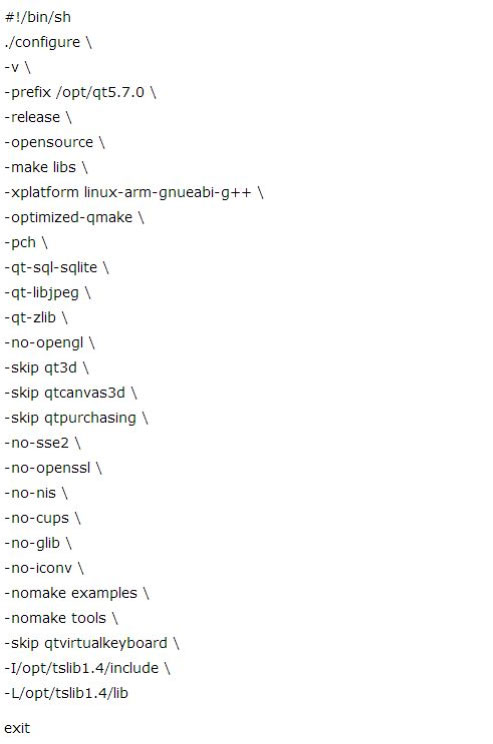
(没有编译 examples,用户需要可自行调整参数)设置完成后,运行./autoconfigure.sh
之后再 make make install
4.生成 system.img
参考“Linux 系统编程_v2.1.pdf”编译最小 linux,做到打包生成 system.img 前一步(也
可直接使用迅为提供的“最小 linux 文件系统”),将前两节生成的“qt-5.7.0”“tslib1.4”
拷贝到“opt”目录下如下图。(注意 qt5.7.0 文件名统一成 qt-5.7.0)
将字库文件夹“fonts”拷贝到“opt/qt-5.7.0/lib/”下。
同时将“libstdc.tar.gz”拷贝到“lib”解压,并输入命令“ln -s libstdc++.so.6.0.19
libstdc++.so.6”。
修改环境变量“vim etc/profile”如下图。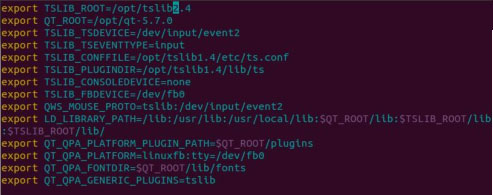
修改开机启动脚本“vi etc/init.d/rcS”,最后加一行“/bin/qt5.7 &”。
将迅为提供的“
qt5.7”文件拷贝到“bin”下。
参照“Linux 系统编程_v2.1.pdf”编译最小 linux,打包生成 system.img。若出现
一般出现该错误是由于应用程序是 32 位导致的,可以使用 file 命令来查看:
root@ubuntu:/usr/local/bin# file make_ext4fs make_ext4fs: ELF 32-bit LSB executable,
Intel 80386, version 1 (SYSV), dynamically linked (uses shared libs), for GNU/Linux
2.6.8, stripped 可以从上面看到 make_ext4fs 为 32 位程序,所以我们需要让 64 位机支持运
行 32 位应用。 执行下面两条命令即可解决问题: apt-get install lib32c-dev
apt-get install lib32stdc++6 再运行 make_ext4fs 就不会报错了。
输入命令打包系统镜像“make_ext4fs -s -l 314572800 -a root -L linux system.img
system”
内核使用最小 linux 即可。烧写镜像到开发板。
使用迅为提供的“hello”测试程序进行测试,成功
5. qtcreater
将“qt-opensource-linux-x64-5.7.0.run”拷贝到 ubuntu16.04 任意文件夹下,
“chmod 777 qt-opensource-linux-x64-5.7.0.run”,之后直接“./qt-opensource-linux-
x64-5.7.0.run”执行,安装一直点下一步就 OK!