背景:之前一直做的是数据库的增删改查工作,对于文件的上传下载比较排斥,今天研究了下具体的实现,发现其实是很简单。此处不仅要实现单文件的上传,还要实现多文件的上传。
单文件的下载知道了,多文件的下载呢??
我这里使用的spring boot来快速搭建spring mvc框架,贼方便,不用都对不起自己。
本篇博客将讲解的是Springmvc的文件上传和下载功能。对于上传功能,我们在项目中是经常会用到的,比如用户注册的时候,上传用户头像,这个时候就会使用到上传的功能。而对于下载,使用场景也很常见,比如我们项目中有个使用说明是是pdf版的,会提供给用户进行下载的功能。相对于来说,这两个功能都是很常见。
搭建Springmvc开发环境
使用spring boot来搭建mvc的框架。
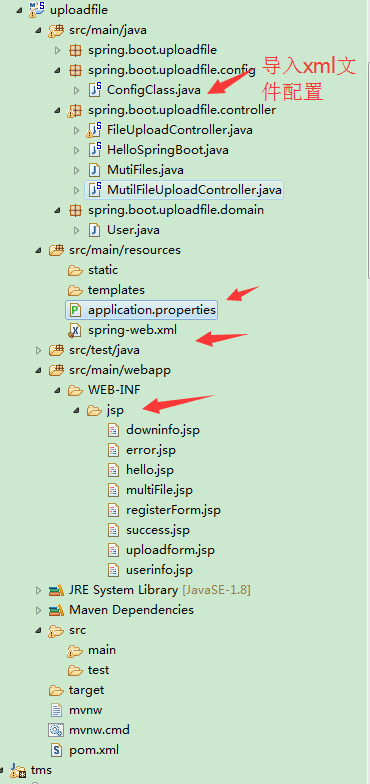
文件目录:
pom.xml文件依赖:
<?xml version="1.0" encoding="UTF-8"?>
<project xmlns="http://maven.apache.org/POM/4.0.0" xmlns:xsi="http://www.w3.org/2001/XMLSchema-instance"
    xsi:schemaLocation="http://maven.apache.org/POM/4.0.0 http://maven.apache.org/xsd/maven-4.0.0.xsd">
    <modelVersion>4.0.0</modelVersion>

    <groupId>spring.boot</groupId>
    <artifactId>uploadfile</artifactId>
    <version>0.0.1-SNAPSHOT</version>
    <packaging>jar</packaging>

    <name>uploadfile</name>
    <description>Demo project for Spring Boot</description>

    <parent>
        <groupId>org.springframework.boot</groupId>
        <artifactId>spring-boot-starter-parent</artifactId>
        <version>2.0.0.RELEASE</version>
        <relativePath /> <!-- lookup parent from repository -->
    </parent>

    <properties>
        <project.build.sourceEncoding>UTF-8</project.build.sourceEncoding>
        <project.reporting.outputEncoding>UTF-8</project.reporting.outputEncoding>
        <java.version>1.8</java.version>
    </properties>

    <dependencies>
        <dependency>
            <groupId>org.springframework.boot</groupId>
            <artifactId>spring-boot-starter-web</artifactId>
        </dependency>

        <dependency>
            <groupId>org.springframework.boot</groupId>
            <artifactId>spring-boot-starter-test</artifactId>
            <scope>test</scope>
        </dependency>

        <!--jsp页面使用jstl标签 -->
        <dependency>
            <groupId>javax.servlet</groupId>
            <artifactId>jstl</artifactId>
        </dependency>

        <!--用于编译jsp -->
        <dependency>
            <groupId>org.apache.tomcat.embed</groupId>
            <artifactId>tomcat-embed-jasper</artifactId>
            <scope>provided</scope>
        </dependency>
        <!-- https://mvnrepository.com/artifact/commons-fileupload/commons-fileupload -->
        <!-- 配置文件上传的bean 控制文件大大小,编码等 -->
        <dependency>
            <groupId>commons-fileupload</groupId>
            <artifactId>commons-fileupload</artifactId>
            <version>1.3</version>
        </dependency>
        <!-- https://mvnrepository.com/artifact/org.apache.commons/commons-io -->
        <!-- 使用到其中的FileUtil工具类 -->
        <dependency>
            <groupId>org.apache.commons</groupId>
            <artifactId>commons-io</artifactId>
            <version>1.3.2</version>
        </dependency>


    </dependencies>

    <build>
        <plugins>
            <plugin>
                <groupId>org.springframework.boot</groupId>
                <artifactId>spring-boot-maven-plugin</artifactId>
            </plugin>
        </plugins>
    </build>


</project>
spring-web.xml:
注入这个bean,控制文件的上传。
<?xml version="1.0" encoding="UTF-8"?>
<beans xmlns="http://www.springframework.org/schema/beans"
    xmlns:xsi="http://www.w3.org/2001/XMLSchema-instance" xmlns:p="http://www.springframework.org/schema/p"
    xmlns:context="http://www.springframework.org/schema/context"
    xmlns:mvc="http://www.springframework.org/schema/mvc" xmlns:aop="http://www.springframework.org/schema/aop"
    xsi:schemaLocation="http://www.springframework.org/schema/beans http://www.springframework.org/schema/beans/spring-beans.xsd
                        http://www.springframework.org/schema/context http://www.springframework.org/schema/context/spring-context.xsd
                        http://www.springframework.org/schema/mvc http://www.springframework.org/schema/mvc/spring-mvc.xsd
                        http://www.springframework.org/schema/aop
        http://www.springframework.org/schema/aop/spring-aop.xsd">

<!--     <mvc:annotation-driven conversion-service="conversionSerivce" /> -->

<bean id="multipartResolver"
    class="org.springframework.web.multipart.commons.CommonsMultipartResolver">
    <!-- 默认编码 -->
    <property name="defaultEncoding" value="utf-8" />
    <!-- 文件大小最大值 -->
    <property name="maxUploadSize" value="80485760" />
    <!-- 内存中的最大值 -->
    <property name="maxInMemorySize" value="40960" />
</bean>
</beans>
ps:对于文件大小的控制,在spring boot中出现一个问题,就是xml的配置有时生效,有时不会生效,特别是单文件上传和多文件上传时候会导致上传文件的参数为null。最后的解决办法是通过显示的bean注入的方式。
在使用过程中可以将xml中的bean注释掉,只用下述方式控制即可。
ConfigClass:导入xml文件
package spring.boot.uploadfile.config;

import javax.servlet.MultipartConfigElement;

import org.springframework.boot.web.servlet.MultipartConfigFactory;
import org.springframework.context.annotation.Bean;
import org.springframework.context.annotation.Configuration;
import org.springframework.context.annotation.ImportResource;

/**
 * ClassName:ConfigClass <br/>
 * Function: TODO  <br/>
 * Date:     2018年3月2日 下午8:20:05 <br/>
 * @author   prd-lxw
 * @version   1.0
 * @since    JDK 1.7
 * @see
 */
/**
 * classpath路径:locations={"classpath:application-bean1.xml","classpath:application-bean2.xml"}
 * file路径: locations = {"file:d:/test/application-bean1.xml"};
 */
@Configuration
@ImportResource(locations = { "classpath:spring-web.xml" })
//@ImportResource(locations={"file:d:/test/application-bean1.xml"})
public class ConfigClass {

    @Bean
    public MultipartConfigElement multipartConfigElement() {
        MultipartConfigFactory factory = new MultipartConfigFactory();
        //文件最大
        factory.setMaxFileSize("1000240KB"); //KB,MB
        /// 设置总上传数据总大小
        factory.setMaxRequestSize("102400KB");
        return factory.createMultipartConfig();
    }

}
以上配置是spring boot中的内容,此处简单讲解,主要就是mvc框架的搭建。
实现文件上传的功能
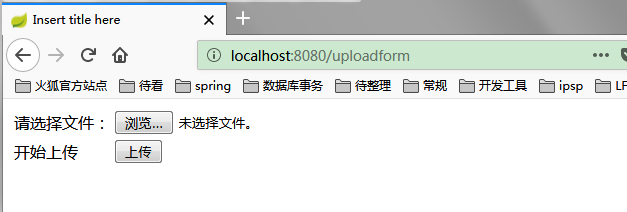
2.1:首先我们来新建一个jsp页面,命名为:uploadform.jsp:
<%@ page language="java" contentType="text/html; charset=UTF-8"
    pageEncoding="UTF-8"%>
<!DOCTYPE html PUBLIC "-//W3C//DTD HTML 4.01 Transitional//EN" "http://www.w3.org/TR/html4/loose.dtd">
<html>
<head>
<meta http-equiv="Content-Type" content="text/html; charset=UTF-8">
<title>Insert title here</title>
</head>
<body>
    <form action="gotoAction" enctype="multipart/form-data" method="post">
        <table>
            <tr>
                <td>请选择文件:</td>
                <td><input type="file" name="file"></td>
            </tr>
            <tr>
                <td>开始上传</td>
                <td><input type="submit" value="上传"></td>
            </tr>
        </table>
    </form>
</body>
</html>
ps:上传页面jsp的编写
写一个上传的页面form表单,其中一定要注意的是在表单的属性中添加entcypt="multipart/form-data",这表示上传的将会是二进制流的格式,以规定的二进制进行上传,便于服务器处理,使用post请求:
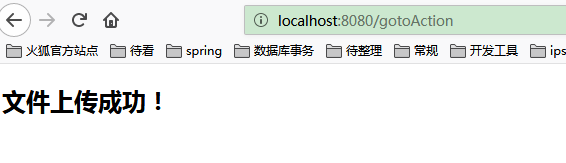
2.2:再写一个上传成功的jsp页面,主要是用来当上传成功时候跳转的页面,命名为:success.jsp
  <body>
   <h2>文件上传成功!</h2>
  </body>
2.3:然后再写一个上传失败的页面,主要是用来当上传失败的时候跳转的页面,命名为:error.jsp
<body>
<h2>文件上传失败!请检查文件是否存在</h2>
</body>
2.4:写好了jsp页面,接下来就是写我们的控制器了,Springmvc控制器,我们写了一个FileUploadController类,然后写上具体的代码,如下所示,
注意其中使用MultipartFile来接受form表单传过来的file文件,MultipartFile有几个核心的api,可以供我们使用,比如 boolean isEmpty(),用来判断文件是否为空。void transferTo( File file),把文件写入目标路径地址
下属代码是最终实验的Controller中的代码。后面的详解因为太累了,直接复制原来的文章。。。。。


/**
 * Project Name:uploadfile
 * File Name:FileUploadController.java
 * Package Name:spring.boot.uploadfile.controller
 * Date:2018年3月2日下午8:28:42
 * Copyright (c) 2018, 深圳金融电子结算中心 All Rights Reserved.
 *
*/

package spring.boot.uploadfile.controller;

import java.io.File;
import java.io.IOException;
import java.util.Map;

import javax.servlet.http.HttpServletRequest;

import org.apache.commons.io.FileUtils;
import org.springframework.http.HttpHeaders;
import org.springframework.http.HttpStatus;
import org.springframework.http.MediaType;
import org.springframework.http.ResponseEntity;
import org.springframework.stereotype.Controller;
import org.springframework.ui.Model;
import org.springframework.web.bind.annotation.ModelAttribute;
import org.springframework.web.bind.annotation.PathVariable;
import org.springframework.web.bind.annotation.RequestMapping;
import org.springframework.web.bind.annotation.RequestMethod;
import org.springframework.web.bind.annotation.RequestParam;
import org.springframework.web.multipart.MultipartFile;

import spring.boot.uploadfile.domain.User;

/**
 * ClassName:FileUploadController <br/>
 * Function: 实现spring中的单文件上传与下载,文件可以作为一个参数传递,也可以作为bean的一个属性传递
 * Date:     2018年3月2日 下午8:28:42 <br/>
 * @author   prd-lxw
 * @version   1.0
 * @since    JDK 1.7
 * @see
 */
@Controller
public class FileUploadController {

    /**
     * 首次进入时候的页面
     * @param formName
     * @return
     */
    @RequestMapping(value = "/{formName}")
    public String loginForm(@PathVariable String formName) {

        return formName;

    }

    /**
     * 实现单文件的上传
     * @param file
     * @param request
     * @return
     */
    @RequestMapping(value = "/gotoAction", method = RequestMethod.POST)
    public String upload(@RequestParam("file") MultipartFile file, HttpServletRequest request) {

        if (!file.isEmpty()) {

            String contextPath = request.getContextPath();//"/SpringMvcFileUpload"
            String servletPath = request.getServletPath();//"/gotoAction"
            String scheme = request.getScheme();//"http"

            String storePath = "E:\testJava\filesss";//存放我们上传的文件路径

            String fileName = file.getOriginalFilename();

            File filepath = new File(storePath, fileName);

            if (!filepath.getParentFile().exists()) {

                filepath.getParentFile().mkdirs();//如果目录不存在,创建目录

            }

            try {
                file.transferTo(new File(storePath + File.separator + fileName));//把文件写入目标文件地址

            } catch (Exception e) {

                e.printStackTrace();

                return "error";

            }

            return "success";//返回到成功页面

        } else {

            return "error";//返回到失败的页面
        }

    }

    /**
     * 将文件作为bean的一个属性上传
     * @param user
     * @param request
     * @param map
     * @return
     */
    @RequestMapping(value = "/register", method = RequestMethod.POST)
    public String reg(@ModelAttribute User user, HttpServletRequest request, Map<String, Object> map) {

        final String wrong = "error";

        final String good = "success";

        MultipartFile headimage = user.getHeadimage();

        boolean empty = headimage.isEmpty();

        if (!empty) {

            String realPath = request.getServletContext().getRealPath("/images");

            String uploadPath = "E:\testJava\filesss";

            String headimageName = headimage.getOriginalFilename();

            File imageFile = new File(uploadPath, headimageName);

            try {

                headimage.transferTo(new File(uploadPath + File.separator + headimageName));

            } catch (Exception e) {

                e.printStackTrace();

                return wrong;

            }
            map.put("user", user);

            return "userinfo";

        } else {
            return wrong;
        }
    }

    /**
     * 实现单文件的下载
     * @param request
     * @param filename
     * @param model
     * @return
     * @throws IOException
     */
    @RequestMapping(value = "/download", method = RequestMethod.GET)
    //匹配的是href中的download请求
    public ResponseEntity<byte[]> download(HttpServletRequest request, @RequestParam("filename") String filename, Model model) throws IOException {

        String downloadFilePath = "E:\testJava\filesss";//从我们的上传文件夹中去取

        File file = new File(downloadFilePath + File.separator + filename);//新建一个文件
        //        byte[] body = null;
        //        InputStream is = new FileInputStream(file);
        //        body = new byte[is.available()];
        //        is.read(body);

        HttpHeaders headers = new HttpHeaders();//http头信息

        String downloadFileName = new String(filename.getBytes("UTF-8"), "iso-8859-1");//设置编码

        headers.setContentDispositionFormData("attachment", downloadFileName);

        headers.setContentType(MediaType.APPLICATION_OCTET_STREAM);
        //MediaType:互联网媒介类型  contentType:具体请求中的媒体类型信息

        return new ResponseEntity<byte[]>(FileUtils.readFileToByteArray(file), headers, HttpStatus.CREATED);

    }
}
User.java
/**
 * Project Name:uploadfile
 * File Name:User.java
 * Package Name:spring.boot.uploadfile.domain
 * Date:2018年3月2日下午8:41:47
 * Copyright (c) 2018, 深圳金融电子结算中心 All Rights Reserved.
 *
*/

package spring.boot.uploadfile.domain;

import java.io.Serializable;

import org.springframework.web.multipart.MultipartFile;

/**
 * ClassName:User <br/>
 * Function: 将文件作为bean的一个属性
 * Date:     2018年3月2日 下午8:41:47 <br/>
 * @author   prd-lxw
 * @version   1.0
 * @since    JDK 1.7
 * @see
 */
public class User implements Serializable {//用户实体类

    /**  */
    private static final long serialVersionUID = 1L;

    private String            userName;

    private MultipartFile     headimage;            //上传文件会自动绑定到该属性


    //省略getter和setter方法
}
2.5:好了,到此我们就可以实现上传功能了,发布在Tomact容器里,然后就可以进行上传文件了。
在浏览中输入:http://localhost:8080/uploadform
具体的页面请求如下,然后浏览具体的文件,点击上传按钮:
点击浏览,上传
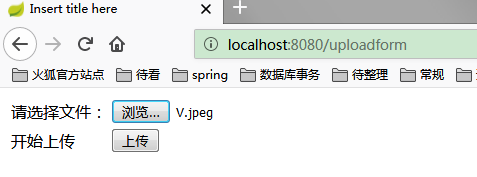
然后执行相应的方法,完成文件的上传。
三:将上传文件绑定到具体的对象上
3.1:首先我们来定义一个实体类User,这个实体类中的headimage属性的主要作用就是用来映射我们上传的文件,可以看到它是MultipartFile类型的:
三:将上传文件绑定到具体的对象上
3.1:首先我们来定义一个实体类User,这个实体类中的headimage属性的主要作用就是用来映射我们上传的文件,可以看到它是MultipartFile类型的:
将上传文件绑定到具体的对象上
3.1:首先我们来定义一个实体类User,这个实体类中的headimage属性的主要作用就是用来映射我们上传的文件,可以看到它是MultipartFile类型的:
public class User implements Serializable{//用户实体类

    private String userName;

    private MultipartFile headimage;//上传文件会自动绑定到该属性

     //省略getter和setter方法
}
3.2:然后写我们的 jsp上传页面,这里我们来模拟一个用户注册上传头像的场景,新建一个registerForm.jsp页面,然后写一个form表单,如下:
<body>
    <h2>用户注册</h2>
    <form action="register" enctype="multipart/form-data" method="post">
        <table>
            <tr>
                <td>用户头像:</td>
                <td><input type="file" name="headimage"></td>
            </tr>
            <tr>
                <td>上传:</td>
                <td><input type="submit" value="上传"></td>
            </tr>
        </table>
    </form>
</body>
3.3:写我们的方法控制器处理注册逻辑的层的代码,注意其中的user对象加入了@ModelAttribute注解,其主要作用是用来映射把上面的form表单的headimage属性自动注入到对象里面,还有Map<String,Object> map主要是为了存放user对象,放在requestScope里面,这样就可用el表达式把其中的值取出来了。
@RequestMapping(value="/register",method=RequestMethod.POST)
    public String reg(@ModelAttribute User user,HttpServletRequest request,Map<String,Object> map){

        final String wrong="error";

        final String good="success";

        MultipartFile headimage = user.getHeadimage();

        boolean empty = headimage.isEmpty();

        if (!empty) {

            String realPath = request.getServletContext().getRealPath("/images");

            String uploadPath="D:\userUploadFile\Files";

            String headimageName = headimage.getOriginalFilename();

            File imageFile = new File(uploadPath,headimageName);


            try {

                headimage.transferTo(new File(uploadPath+File.separator+headimageName));

            } catch (Exception e) {

                e.printStackTrace();

                return wrong;

            }
            map.put("user", user);

            return "userInfo";

        }else {
            return wrong;
        }
    }
3.4:我们来新建一个jsp页面,取名为userinfo.jsp,其主要作用是显示刚才的我们的文件名:
<body>
用户头像:${requestScope.user.headimage.originalFilename}
</body>
3.5:页面写完了,我们在来模拟测试一下,在客户端Ie浏览器中,输入http://localhost:8080/SpringMvcFileUpload/registerForm:


实现用户下载的功能
4.1:首先定义一个downinfo.jsp
<%@ page language="java" contentType="text/html; charset=UTF-8"
    pageEncoding="UTF-8"%>
<!DOCTYPE html PUBLIC "-//W3C//DTD HTML 4.01 Transitional//EN" "http://www.w3.org/TR/html4/loose.dtd">
<html>
<head>
<meta http-equiv="Content-Type" content="text/html; charset=UTF-8">
<title>Insert title here</title>
</head>
<body>

      <h3>文件下载</h3>
     <a
        href="download?filename=V.jpeg">
            用户头像:V
      </a>
</body>
</html>
4.2:来看看我们的download控制器代码:注意download方法返回的是ResponseEntity<byte[]> 类型,这个是封装好的返回类型,我们需要传入byte数组、headers、HttpStatus,然后它就会返回具体的下载流,调用客户端去下载资源
@RequestMapping(value="/download",method=RequestMethod.GET) //匹配的是href中的download请求
    public ResponseEntity<byte[]> download(HttpServletRequest request,@RequestParam("filename") String filename,
            Model model) throws IOException{

        String downloadFilePath="D:\userUploadFile\Files";//从我们的上传文件夹中去取

        File file = new File(downloadFilePath+File.separator+filename);//新建一个文件

        HttpHeaders headers = new HttpHeaders();//http头信息

        String downloadFileName = new String(filename.getBytes("UTF-8"),"iso-8859-1");//设置编码

        headers.setContentDispositionFormData("attachment", downloadFileName);

        headers.setContentType(MediaType.APPLICATION_OCTET_STREAM);

        //MediaType:互联网媒介类型  contentType:具体请求中的媒体类型信息

        return new ResponseEntity<byte[]>(FileUtils.readFileToByteArray(file),headers,HttpStatus.CREATED);

    }
ps:此处注意这两个类的jar包。
FileUtils来自org.apache.commons.commons-io
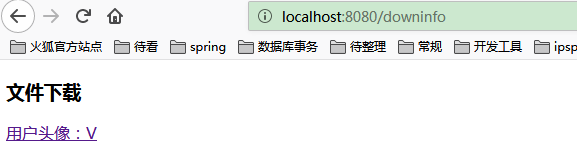
4.3:我们来测试一下写的东西是否能准确运行,点击超链接,注意此链接指向的地址:http://localhost:8080/SpringMvcFileUpload/download?filename="myheadimage".jpg,这就表示这个链接会去请求控制器,然后控制器进行处理下载, 这样就完成了文件的下载功能了:

点击超链接:

总结
本篇博文介绍了SpringMvc上传和文件的功能,需要注意的地方就是对于文件上传包common-fileupload.jar包的使用,还有在配置文件上配置mulitipartResolver这个bean。下面又介绍了用java 实体类去映射上传文件的属性对应的文件,这点的好处就是它会自动映射,然后把对象放入到我们的请求域中,就可以展示给界面用户层,这也是mvc思想模式的体现。接下来是介绍去下载文件,只需要从我们的写入的目标地址去取出文件,再进行responseEntity对象的封装,就可以实现下载功能