最终效果
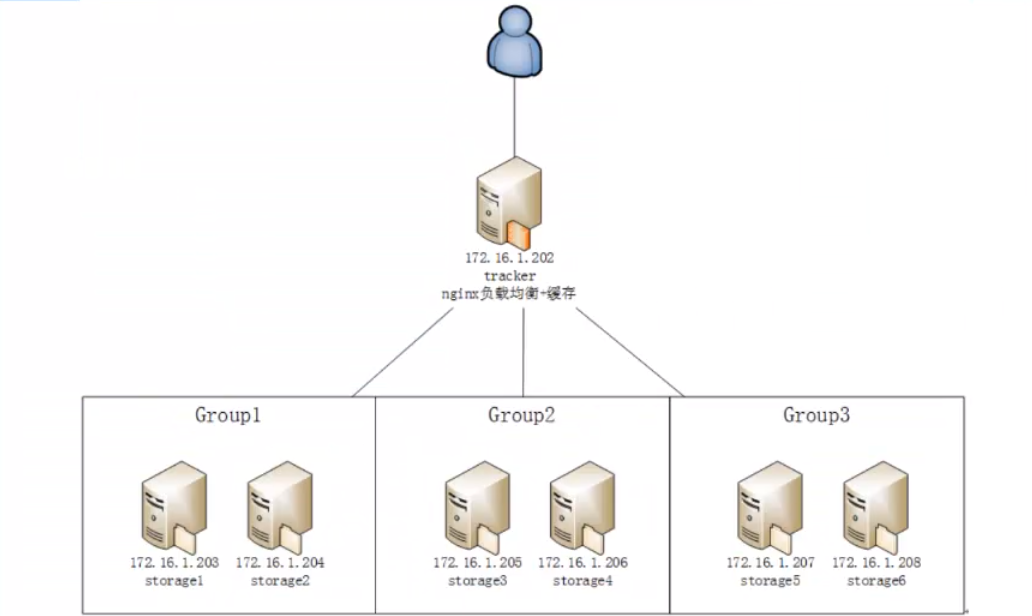

初始化为6个节点

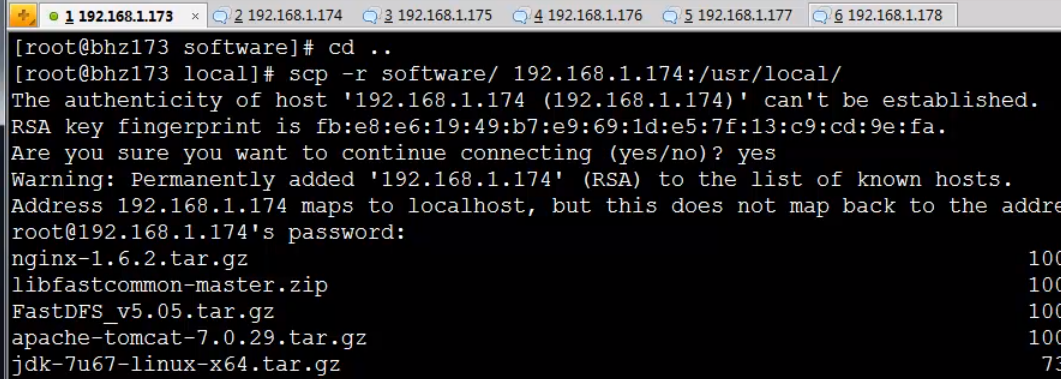
在/usr/local/software 目录下上传需要用到tar包,分别在各个节点上传

使用scp 将本地software目录复制到其他节点上
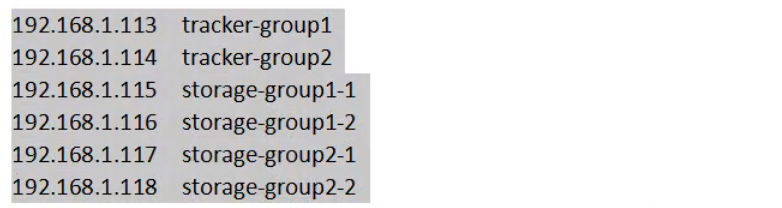
73、74为 tracker集群,其他为storage集群
其中13对应15,16
其中14对应17,18
------------------------------------------------------------------------------------------------------
一、安装软件部分,6台机器同时进行安装
1.安装 gcc :yum install make cmake gcc gcc-c
2.安装libfastcommon 包
上传libfastcommon-master.zip到/usr/local/software下
unzip libfastcommon-master.zip -d /usr/local/fast/
cd /usr/local/fast/libfastcomon-master/ 进行安装编译
./make.sh
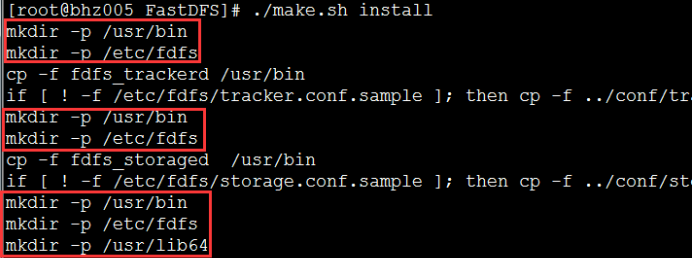
./make.sh install

FastDFS主程序设置的目录为/usr/local/lib/,所以我们需要创建/usr/lib64/下的一些核心执行程序的软连接文件。
mkdir /usr/local/lib
ln -s /usr/lib64/libfastcommon.so /usr/lib/libfastcommon.so
ln -s /usr/lib64/libfdfsclient.so /usr/local/lib/libfdfsclient.so
ln -s /usr/lib64/libfdfsclient.so /usr/lib/libfdfsclient.so
3.安装FastDFS系统
cd /usr/local/software 解压 FastDFS_v5.05.tar.gz 文件
cd /usr/local/software
tar -zxvf FastDFS_v5.05.tar.gz -C /usr/local/fast
解压后进行安装编译
cd /usr/local/fast/FastDFS
./make.sh
./make.sh install
fastDFS的配置文件在 /etc/fdfs/ 目录下 其中有三个文件 客户端,storaged以及tracker文件
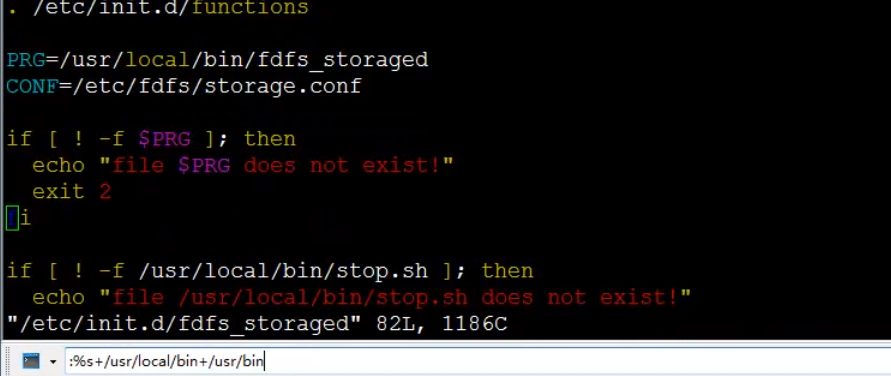
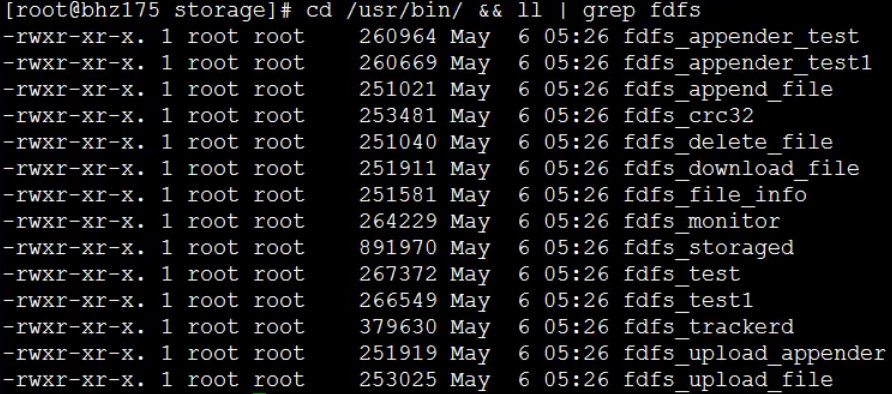
因为FastDFS服务脚本设置的bin目录为 /usr/local/bin下,实际安装如上图在 /usr/bin下,所以修改
FastDFS配置文件中的路径,需要修改两个配置文件 /etc/init.d/fdfs_storaged 和 fdfs_trackerd文件
vim打开两个配置文件 执行 %s+/usr/local/bin+/usr/bin,其中所有节点都进行此项操作
二、进行两个 tracker 的配置 两个tracker服务器同时进行
1.进入到etc目录下的fastdfs配置文件夹中,共有三个文件
cd /etc/fdfs

2.修改tracker配置文件,修改conf文件
cp tracker.conf.sample tracker.conf
vim tracker.conf
修改属性 base_path=/fastdfs/tracker
store_lookup = 0
0 轮询上传文件
1 固定上传1个group 为 store_group 指定group
2 负载均衡上传,谁空闲大上传谁
3.启动跟踪器
mkdier -p /fastdfs/tracker 对应上面配置的 base_path
cd /fastdfs/tracker/ && ll
没有文件 total 0
/etc/init.d/fdfs_trackerd start 启动命令 / stop 停止命令
/etc/init.d/fdfs_tracker
查看进程
ps -ef | grep fdfs / netstat -tunp | grep fdfs
查看log后100行数据
tail -f n 100 /fastdfs/tracker/logs/trackerd.log
三、四台机器分别配置存储节点storaged
1.修改storage.conf文件
cd /etc/fdfs
cp storage.conf.sample storage.conf
vim storage.conf
115,116为1组 group1, 117和118为1组 group2 编辑文件内容如下:
disabled=false 启用配置文件
group_name=group1 组名 第一组group1 第二组group2
Port=23000 storage 端口号 同一个storage端口号必须相同
base_path=/fastdfs/storage 设置log存储路径
store_path_count=1 设置存储路径个数
store_path0=/fastdfs/storage 设置存储路径
tracker_server=tracker1IP:22122 tracker服务器ip地址和端口号
tracker_server=tracker2IP:22122 多个tracker直接添加多个配置
Http.server_port=8888 设置端口号 -》 nginx.conf 设置 listen 8888 对应
同步文件到其余3个storage服务器中
其中117,118服务器storage.cnf 修改group_name,其余不用修改
group_name=group2
2.创建storage存放数据目录
mkdir -p /fastdfs/storage
3.启动storage服务
启动服务: /etc/init.d/fdfs_storaged start
查看日志: tail -f /fastdfs/storage/logs/storaged.log
注意:启动服务时候先启动 173 174 tracker 跟踪器节点,然后分别启动第一组存储节点(175,176)节点,通过日志可以知道谁是leader节点,如下图:175节点log, tracker leader 是174节点,最后一句 75成功连接 76 服务同为 group1组

4.如果174 leader 节点down了,则服务自动切换成 173 为leader 节点
5.在usr/bin 下有好多命令,通过fdfs_monitor 命令监控当前storage存储状态
/usr/binfdfs_monitor /etc/fdfs/storage.conf 会显示集群所有节点信息
6.进行服务测试,通过client 服务测试
cd /etc/fastdfs/ 进行测试
cp client.conf.sample client.conf
vim client.conf 修改测试客户信息
base_path=/fastdfs/tracker
tracker_server=trackerIP1:22122
tracker_server=trackerIP2:22122
cd /usr/local
长传文件到storage上
/usr/bin/fdfs_upload_file /etc/fdfs/client.conf /usr/local/software/xxxxx.file
返回 group1/M00/00/00/xxxxxxxxx.file
查看75,76文件data,都有上传文件,77,78没有文件
/usr/bin/fdfs_upload_file /etc/fdfs/client.conf /usr/local/software/ssss.file
返回 group2/M00/00/00/ssss.file
查看75,76 没有文件, 77 ,78 data目录下有文件
(在 store_lookup=0 设置 轮询上传)
------------------------------------------------------fastdfs集群部署完成--------------------------------------------------------
四.fastdfs配置ngnix
(在storage节点上安装)
1.添加 fastdfs-nginx-modue模块,
cd /usr/local/software
tar -zxvf fastdfs-nginx-module_v1.16.tar.gz -C /usr/local/fast
2.安装fastdfs-nginx-modue之前,对配置文件进行修改
cd fastdfs-nginx-module/src/
vim config
去除local文件层次 四个节点同时操作

3.四个存储节点安装nginx依赖包,安装nginx,添加fastdfs和nginx的整合模块
(1).安装nginx依赖包
yum install pcre
yum install pcre-devel
yum install zlib
yum install zlib-devel
(2).安装nginx,加入fastdfs-nginx-module
cd /usr/local/software
tar -zxvf nginx-1.6.2.tar.gz -C /usr/local
cd /usr/local/nginx-1.6.2/
./configure --add-module=/usr/local/fast/fastdfs-nginx-module/src
make && make install
(3).复制fastdfs-nginx-module中的配置文件到 /etc/fdfs 目录下
cd /usr/local/fast/fastdfs-nginx-module/src
cp mod_fastdfs.conf /etc/fdfs/
vim /etc/fdfs/mod_fastdfs.conf 修改连接超时时间。追踪器路径,url的group配置等
第一组 175 176 和 第二组 177 178 节点修改内容 只有组名称不同
[115]
connect_timeout=10
tracker_server=trackerIP1:22122
tracker_server=trackerIP2:22122
storage_server_port=23000
url_have_group_name=true
store_path0=/fastdfs/storage
group_name=group1 / group2 第一组(115 116)为group1 第二组(117 118)为 group2
group_count=2
(4).复制FastDFS中的 2 个文件到 /etc/fdfs 目录中 所有节点
cd /usr/local/fast/FastDFS/conf
cp http.conf mime.types /etc/fdfs/
(5).创建一个软连接,在 /fastdfs/storage 文件存储目录下创建, 将其连接到实际存放数据的目录
源文件 连接文件 M00 指向 data
ln -s /fastdfs/storage/data /fastdfs/storage/data/M00
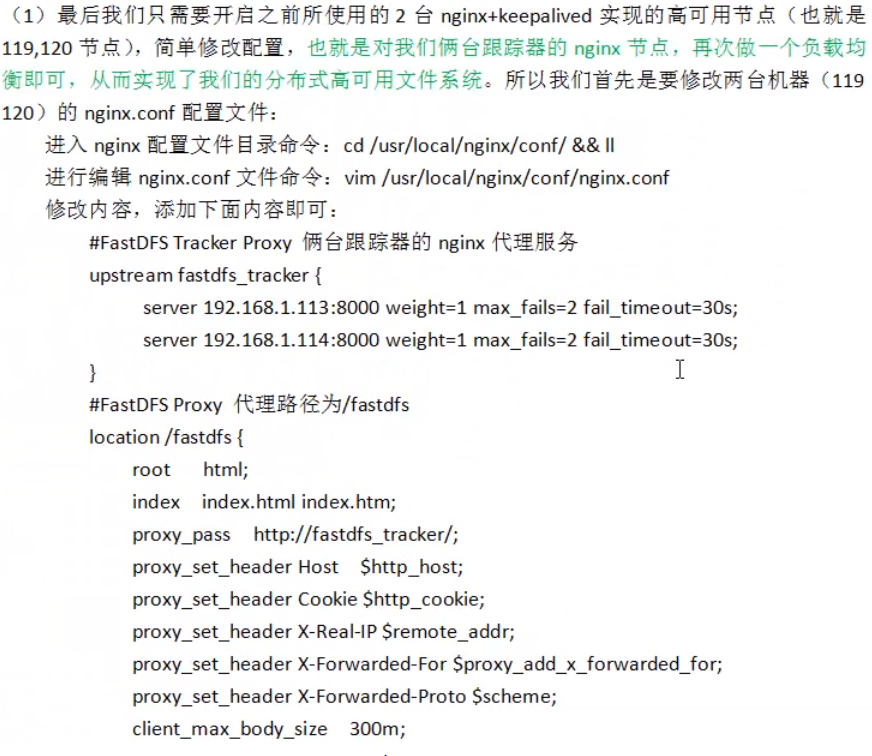
(6).配置 nginx 配置文件
cd /usr/local/nginx/conf
vim nginx.conf
访问 group [0-9] ,直接访问 M00软连接,执行 ngx_fastdfs_module模块
listen 8888为 storage http.server_port=8888 配置对应

(7).检查防火墙,启动 nginx
/usr/local/nginx/sbin/nginx 启动服务
/usr/local/nginx/sbin/nginx stop 停止服务
/usr/local/nginx/sbin/nginx -s stop 重启服务
(8).可以通过 tracler 节点 client 上传文件 然后使用http url访问图片了
/usr/bin/fdfs_upload_file /etc/fdfs/client.conf /usr/local/software/xxxxxx.file
http://ClientIP:8888/group1/M00/00/00/xxxxxx.file -》ClientID 75 76 77 78
其中 75 76 数据相同 77 78 数据相同 不能跨域访问
------------------------------------------------------nginx fastdfs 整合完成--------------------------------------------------------
五.追踪器上提那家nginx,提供反向代理服务(使用一个ip向外部提供服务)
1.上传ngx_cache_purge-2.3.tar.gz 文件到 /usr/local/software 目录下
2.上传tar -zxvf ngx_cache_purge-2.3.tar.gz -C /usr/local/fast 并且进行解压
3.cd /usr/local/fast/ ll 查看目录下文件 新增缓存模块

4.配置nginx,添加nginx依赖包等
yum install pcre
yum install pcre-devel
yum install zlib
yum install zlib-devel
5.解压nginx 并且加入 ngx_cache_pureg (缓存模块)
cd /usr/local/software
tar -zxvf nginx-1.6.2.tar.gz -C /usr/local
cd /usr/local/nginx-1.6.2
添加ngx_cache_pureg模块,之前加入 fastdfs 模块
./configure --add-module=/usr/local/fast/ngx_catch_purge-2.3
make && make install
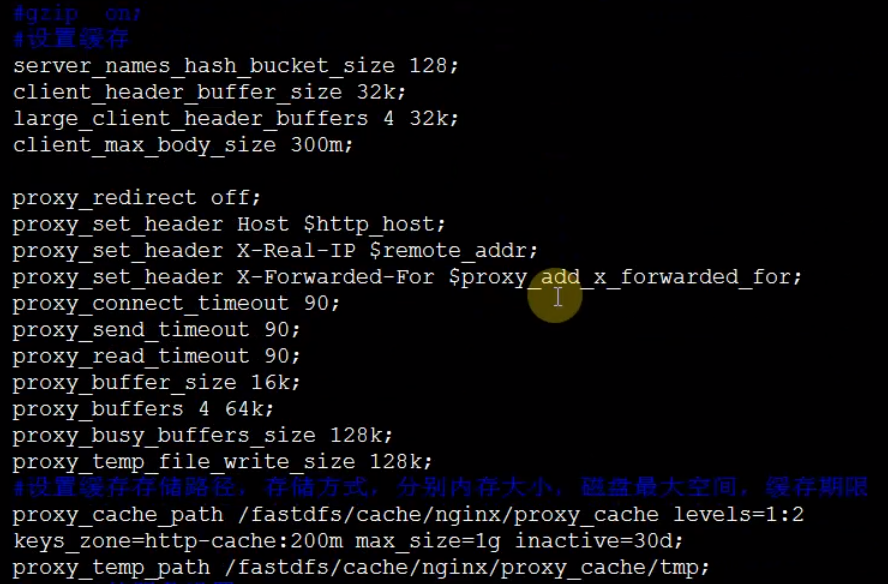
6.配置nginx 负载均衡和缓存 (173 174 节点配置一致) /usr/local/nginx/conf/nginx.conf
(1).设置缓存信息
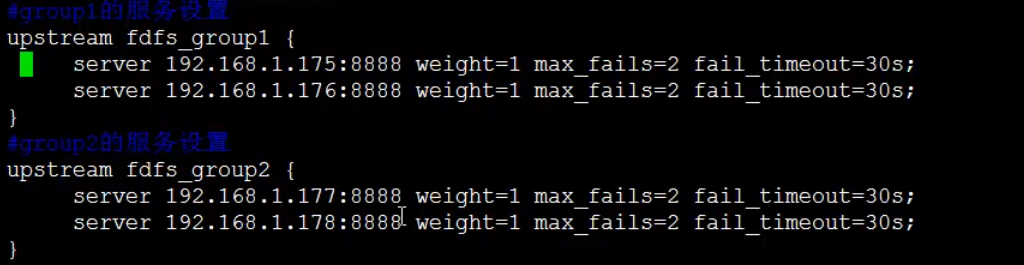
(2).负载均衡 fdfs_group1 两个服务对应 tracker 173,fdfs_group2 对应 tracker174
(3).设定服务,对外提供统一端口 8000 ,其中 173 174 服务配置参数完全相同
服务访问 /group1/M00 则对应访问 fdfs_group1 服务 对应上面图片中 fdfs_group1 集群服务
服务访问 /group2/M00 则对应访问 fdfs_group2 服务 对应上面图片中 fdfs_group2 集群服务
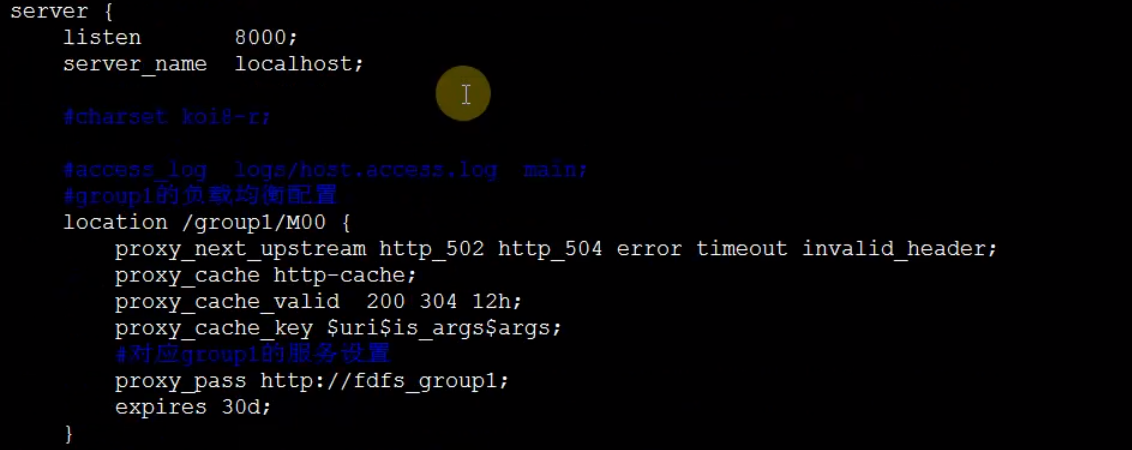


(4).添加创建缓存的使用文件夹 上面 3 中配置缓存路径
mkdir -p /fastdfs/cache/nginx/proxy_cache
mkdir -p /fastdfs/cache/nginx/proxy_cache/tmp
(5).开放8000 端口, 修改 /etc/sysconfig/iptables 文件 添加 8000端口号
service iptables restart
(6).client 上传文件 通过 8000端口进行访问
73 上传文件 /usr/bin/fdfs_upload_file /etc/fdfs/client.conf /usr/local/software/xxxxx.file
通过 tracker ip:8000 访问文件
http://192.168.1.173:8000/group1/M00/00/00/xxxxxx.file
73 代理 75 76 storage
73 上传文件 /usr/bin/fdfs_upload_file /etc/fdfs/client.conf /usr/local/software/xxxxx.file
http://192.168.1.174:8000/group2/M00/00/00/xxxxxx.file
74 代理 77 78 storage
7.在 tracker (73 74) 安装nginx后,可以对 group1 和 group2 进行访问(反向代理),最后虚拟一个keepalived,虚拟出一个VIP对两台tracker做高可用配置
nginx + keepalived ???学习

修改后需要把 nginx.conf 配置文件传送到 带有 keepalived 的节点上 (114 115)
114,115 两节点代理 73 74 两节点 修改配置文件后需要重启 nginx,
/usr/local/nginx/sbin/nginx -s reload
在 73 上传文件 通过 110 (115 114 代理)进行访问
192.168.1.110/fastdfs/group1/M00/00/00/xxxx.file fastdfs 对应 上面配置 location
(可以将 173 174 结合keepalived 做出高可用 虚拟IP访问)
8.关闭集群步骤
