
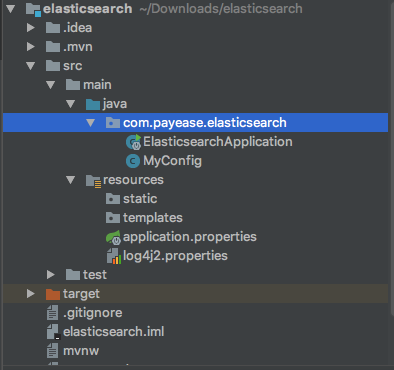
第一步:创建项目elasticsearch 编写pom文件
<?xml version="1.0" encoding="UTF-8"?>
<project xmlns="http://maven.apache.org/POM/4.0.0" xmlns:xsi="http://www.w3.org/2001/XMLSchema-instance"
    xsi:schemaLocation="http://maven.apache.org/POM/4.0.0 http://maven.apache.org/xsd/maven-4.0.0.xsd">
    <modelVersion>4.0.0</modelVersion>

    <groupId>com.payease</groupId>
    <artifactId>elasticsearch</artifactId>
    <version>0.0.1-SNAPSHOT</version>
    <packaging>jar</packaging>

    <name>elasticsearch</name>
    <description>Demo project for Spring Boot</description>

    <parent>
        <groupId>org.springframework.boot</groupId>
        <artifactId>spring-boot-starter-parent</artifactId>
        <version>1.5.9.RELEASE</version>
        <relativePath/> <!-- lookup parent from repository -->
    </parent>

    <properties>
        <project.build.sourceEncoding>UTF-8</project.build.sourceEncoding>
        <project.reporting.outputEncoding>UTF-8</project.reporting.outputEncoding>
        <java.version>1.8</java.version>
        <elasticsearch.version>6.1.1</elasticsearch.version>
    </properties>

    <dependencies>
        <dependency>
            <groupId>org.springframework.boot</groupId>
            <artifactId>spring-boot-starter-web</artifactId>
        </dependency>

        <dependency>
            <groupId>org.springframework.boot</groupId>
            <artifactId>spring-boot-starter-test</artifactId>
            <scope>test</scope>
        </dependency>


        <!-- Elasticsearch核心依赖包 -->
        <dependency>
            <groupId>org.elasticsearch.client</groupId>
            <artifactId>transport</artifactId>
            <version>${elasticsearch.version}</version>
        </dependency>
        <!-- 日志依赖 -->
        <!-- ===================== @Getter @Setter @Slf4j @Data ======================== -->
        <dependency>
            <groupId>org.projectlombok</groupId>
            <artifactId>lombok</artifactId>
        </dependency>
        <dependency>
            <groupId>org.springframework</groupId>
            <artifactId>spring-beans</artifactId>
            <version>4.3.12.RELEASE</version>
        </dependency>
    </dependencies>

    <build>
        <plugins>
            <plugin>
                <groupId>org.springframework.boot</groupId>
                <artifactId>spring-boot-maven-plugin</artifactId>
            </plugin>
        </plugins>
    </build>


</project>
第二步:ElasticSearch配置的构造:创建MyConfig.java文件
package com.payease.elasticsearch;

import org.elasticsearch.client.transport.TransportClient;
import org.elasticsearch.common.settings.Settings;
import org.elasticsearch.common.transport.TransportAddress;
import org.elasticsearch.transport.client.PreBuiltTransportClient;
import org.springframework.context.annotation.Bean;
import org.springframework.context.annotation.Configuration;

import java.net.InetAddress;
import java.net.UnknownHostException;

/**
 * ElasticSearch配置的构造
 * @Created By liuxiaoming
 * @CreateTime 2017/12/27 下午4:41
 **/
@Configuration
public class MyConfig {

    @Bean
    public TransportClient client() throws UnknownHostException{

        //es集群连接
        TransportAddress node = new TransportAddress(
                InetAddress.getByName("localhost"),
                9300
        );
        TransportAddress node1 = new TransportAddress(
                InetAddress.getByName("localhost"),
                9301
        );
        TransportAddress node2 = new TransportAddress(
                InetAddress.getByName("localhost"),
                9302
        );

        //es集群配置(自定义配置) 连接自己安装的集群名称
        Settings settings = Settings.builder()
                .put("cluster.name","xiaoming")
                .build();

        PreBuiltTransportClient client = new PreBuiltTransportClient(settings);

        client.addTransportAddress(node);
        client.addTransportAddress(node1);
        client.addTransportAddress(node2);

        return client;
    }
}
第三步:配置日志文件log4j2.properties
appender.console.type = Console
appender.console.name = console
appender.console.layout.type = PatternLayout
appender.console.layout.pattern = [%t] %-5p %c - %m%n

rootLogger.level = info
rootLogger.appenderRef.console.ref = console
第四步:在ElasticsearchApplication 启动类中编写
package com.payease.elasticsearch;

import lombok.extern.slf4j.Slf4j;
import org.elasticsearch.action.delete.DeleteResponse;
import org.elasticsearch.action.get.GetResponse;
import org.elasticsearch.action.index.IndexResponse;
import org.elasticsearch.action.search.SearchRequestBuilder;
import org.elasticsearch.action.search.SearchResponse;
import org.elasticsearch.action.search.SearchType;
import org.elasticsearch.action.update.UpdateRequest;
import org.elasticsearch.action.update.UpdateResponse;
import org.elasticsearch.client.transport.TransportClient;
import org.elasticsearch.common.xcontent.XContentBuilder;
import org.elasticsearch.common.xcontent.XContentFactory;
import org.elasticsearch.index.query.BoolQueryBuilder;
import org.elasticsearch.index.query.QueryBuilders;
import org.elasticsearch.index.query.RangeQueryBuilder;
import org.elasticsearch.search.SearchHit;
import org.springframework.beans.factory.annotation.Autowired;
import org.springframework.boot.SpringApplication;
import org.springframework.boot.autoconfigure.SpringBootApplication;
import org.springframework.format.annotation.DateTimeFormat;
import org.springframework.http.HttpStatus;
import org.springframework.http.ResponseEntity;
import org.springframework.web.bind.annotation.*;

import java.io.IOException;
import java.util.ArrayList;
import java.util.Date;
import java.util.List;
import java.util.Map;

@SpringBootApplication
@RestController
@Slf4j
public class ElasticsearchApplication {

    @Autowired
    private TransportClient client;

    /*@GetMapping("/")
    public String index(){return "index";}*/

    //单一查询
    @GetMapping("/get/book/novel")
    @ResponseBody
    public ResponseEntity get(@RequestParam(name = "id",defaultValue = "") String id){
        if(id.isEmpty()){
            return new ResponseEntity(HttpStatus.NOT_FOUND);
        }

        GetResponse result = this.client.prepareGet("book", "novel", id).get();

        if(!result.isExists()){
            return new ResponseEntity(HttpStatus.NOT_FOUND);
        }

        return new ResponseEntity(result.getSource(), HttpStatus.OK);
    }

    //新增
    @PostMapping("add/book/novel")
    @ResponseBody
    public ResponseEntity add(
            @RequestParam(name = "title") String title,
            @RequestParam(name = "author") String author,
            @RequestParam(name = "word_count") int wordCount,
            @RequestParam(name = "publish_date")
                    @DateTimeFormat(pattern = "yyyy-MM-dd HH:mm:ss")
                    Date publishDate){
        try {
            XContentBuilder content = XContentFactory.jsonBuilder()
                    .startObject()
                    .field("title", title)
                    .field("author", author)
                    .field("word_count", wordCount)
                    .field("publish_date", publishDate.getTime())
                    .endObject();

            IndexResponse result = this.client.prepareIndex("book", "novel")
                    .setSource(content)
                    .get();
            return new ResponseEntity(result.getId(),HttpStatus.OK);
        }catch (IOException e){
            e.printStackTrace();
            return new ResponseEntity(HttpStatus.INTERNAL_SERVER_ERROR);
        }


    }

    //删除
    @DeleteMapping("delete/book/novel")
    @ResponseBody
    public ResponseEntity delete(@RequestParam(name = "id") String id){
        DeleteResponse result = this.client.prepareDelete("book", "novel", id).get();
        return new ResponseEntity(result.getResult().toString(),HttpStatus.OK);
    }
    public static void main(String[] args) {
        SpringApplication.run(ElasticsearchApplication.class, args);
    }

    //修改
    @PutMapping("update/book/novel")
    @ResponseBody
    public ResponseEntity update(
            @RequestParam(name = "id") String id,
            @RequestParam(name = "title", required = false) String title,
            @RequestParam(name = "author", required = false) String author
    ){
        UpdateRequest update = new UpdateRequest("book", "novel", id);

        try {
            XContentBuilder builder= XContentFactory.jsonBuilder().startObject();
            if (title != null){
                builder.field("title", title);
            }
            if(author != null){
                builder.field("author", author);
            }
            builder.endObject();
            update.doc(builder);

        } catch (IOException e) {
            e.printStackTrace();
            return new ResponseEntity(HttpStatus.INTERNAL_SERVER_ERROR);
        }

        try {
            UpdateResponse result = this.client.update(update).get();
            return new ResponseEntity(result.getResult().toString(), HttpStatus.OK);
        } catch (Exception e) {
            e.printStackTrace();
            return new ResponseEntity(HttpStatus.INTERNAL_SERVER_ERROR);
        }
    }

    //复合查询
    @PostMapping("query/book/novel")
    @ResponseBody
    public ResponseEntity query(
        @RequestParam(name = "author", required = false) String author,
        @RequestParam(name = "title", required = false) String title,
        @RequestParam(name = "gt_word_count", defaultValue = "0") int gtWordCount,
        @RequestParam(name = "lt_word_count", required = false) Integer ltWordCount
    ){
        BoolQueryBuilder boolQuery = QueryBuilders.boolQuery();

        if(author != null){
            boolQuery.must(QueryBuilders.matchQuery("author", author));
        }

        if(title != null){
            boolQuery.must(QueryBuilders.matchQuery("title", title));
        }

        RangeQueryBuilder rangeQuery = QueryBuilders.rangeQuery("word_count").from(gtWordCount);

        if(ltWordCount != null && ltWordCount > 0){
            rangeQuery.to(ltWordCount);
        }

        boolQuery.filter(rangeQuery);

        SearchRequestBuilder builder = this.client.prepareSearch("book")
                .setTypes("novel")
                .setSearchType(SearchType.DFS_QUERY_THEN_FETCH)
                .setQuery(boolQuery)
                .setFrom(0)
                .setSize(10);

            log.info(String.valueOf(builder));

        SearchResponse response = builder.get();
        List<Map<String, Object>> result = new ArrayList<>();

        for (SearchHit hit : response.getHits()){
            result.add(hit.getSourceAsMap());
        }
        return new ResponseEntity(result, HttpStatus.OK);

    }
}
第五步:启动项目 进行postman验证
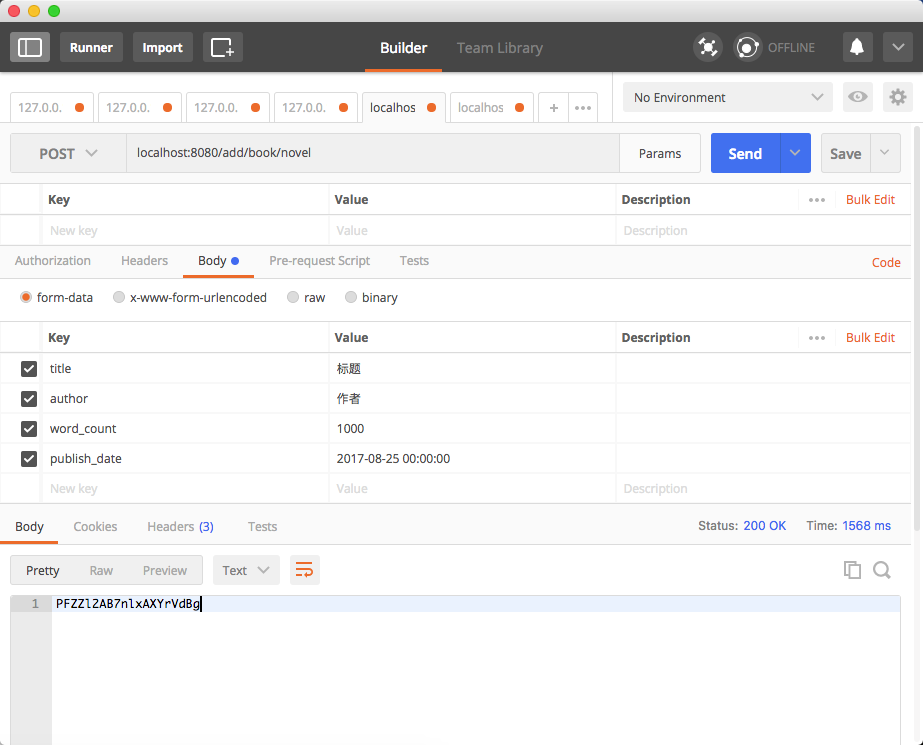
1.添加操作:
1.1 postman请求: POST localhost:8080/add/book/novel
添加参数,点击send发送请求
得到返回值:PFZZl2AB7nlxAXYrVdBg
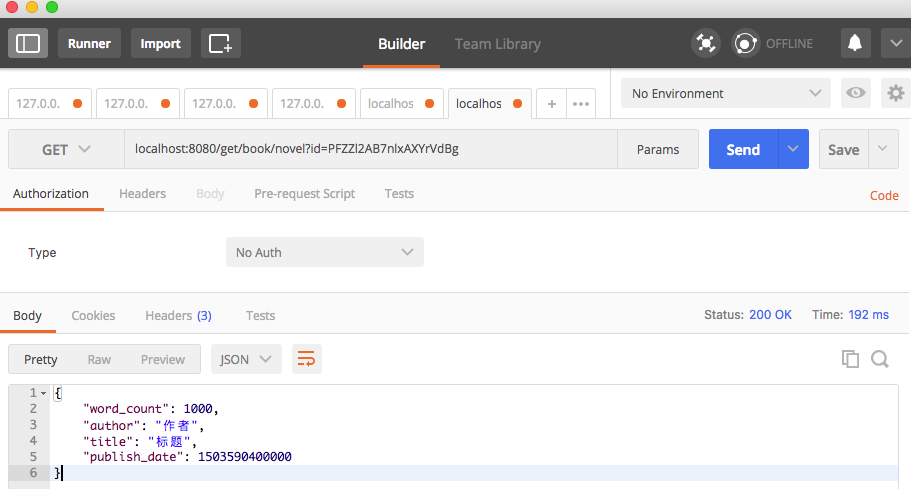
2.单一查询操作:
2.1 postman请求: GET localhost:8080/get/book/novel?id=PFZZl2AB7nlxAXYrVdBg
点击send发送请求
得到响应数据
{
    "word_count": 1000,
    "author": "作者",
    "title": "标题",
    "publish_date": 1503590400000
}
3.删除操作:
3.1 postman请求: DELETE localhost:8080/delete/book/novel?id=PFZZl2AB7nlxAXYrVdBg
点击send发送请求
得到响应数据
DELETED

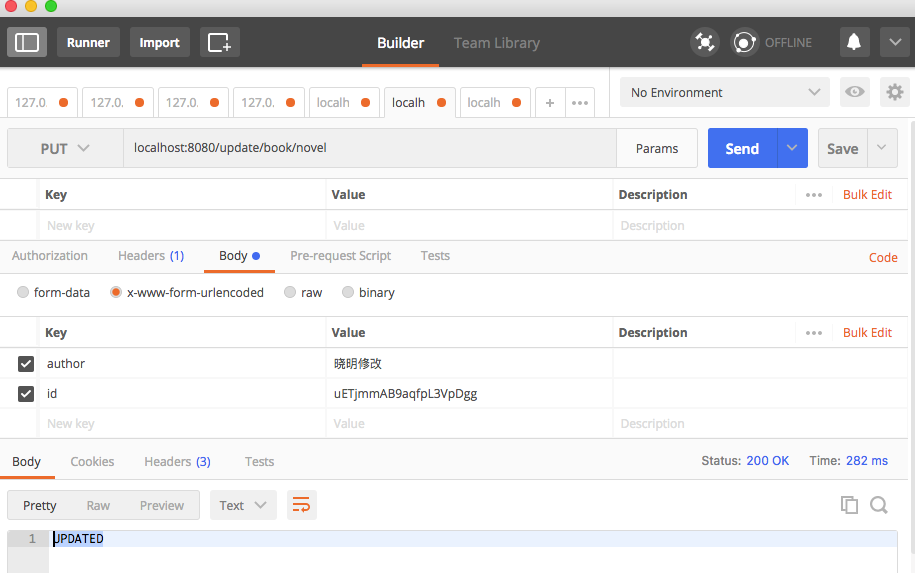
4.修改操作:
4.1 postman请求: PUT localhost:8080/update/book/novel
点击send发送请求
得到响应数据
UPDATED
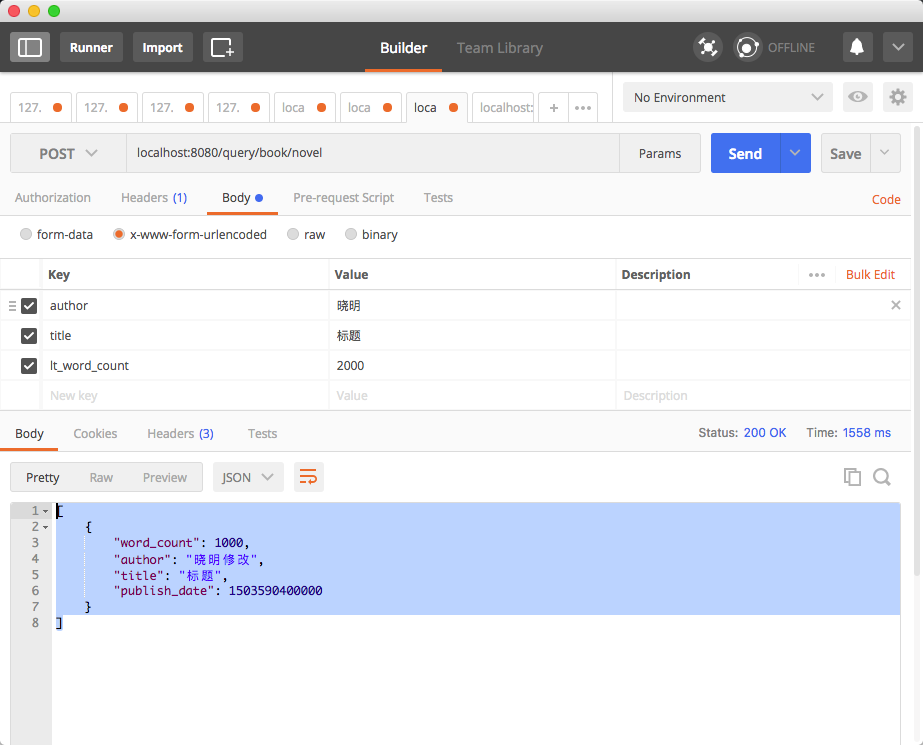
4.复合查询:
4.1 postman请求: POST localhost:8080/query/book/novel
点击send发送请求
得到响应数据
[
    {
        "word_count": 1000,
        "author": "晓明修改",
        "title": "标题",
        "publish_date": 1503590400000
    }
]
4.2 idea控制台打印信息
{
    "from": 0,
    "size": 10,
    "query": {
        "bool": {
            "must": [
                {
                    "match": {
                        "author": {
                            "query": "晓明",
                            "operator": "OR",
                            "prefix_length": 0,
                            "max_expansions": 50,
                            "fuzzy_transpositions": true,
                            "lenient": false,
                            "zero_terms_query": "NONE",
                            "auto_generate_synonyms_phrase_query": true,
                            "boost": 1
                        }
                    }
                },
                {
                    "match": {
                        "title": {
                            "query": "标题",
                            "operator": "OR",
                            "prefix_length": 0,
                            "max_expansions": 50,
                            "fuzzy_transpositions": true,
                            "lenient": false,
                            "zero_terms_query": "NONE",
                            "auto_generate_synonyms_phrase_query": true,
                            "boost": 1
                        }
                    }
                }
            ],
            "filter": [
                {
                    "range": {
                        "word_count": {
                            "from": 0,
                            "to": 2000,
                            "include_lower": true,
                            "include_upper": true,
                            "boost": 1
                        }
                    }
                }
            ],
            "adjust_pure_negative": true,
            "boost": 1
        }
    }
}