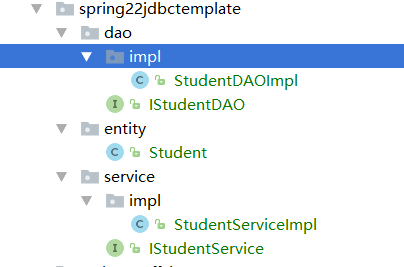
案例:单测查询全部学生
项目结构:

1.导入部署jar包:spring-jdbc
<!--spring-jdbc-->
        <dependency>
            <groupId>org.springframework</groupId>
            <artifactId>spring-jdbc</artifactId>
            <version>4.2.0.RELEASE</version>
        </dependency>
2.创建实体类:Student
public class Student {
    private Integer id;  //编号
    private String name;  //姓名
    private Integer age;  //年龄
    private Date birthday;  //出生日期
}
3.创建dao层的接口和实现类:
IStudentDAO:
public interface IStudentDAO {
    //查询全部
    public List<Student> findAll();
}
StudentDAOImpl:继承JdbcDaoSupport 实现IStudentDAO
public class StudentDAOImpl extends JdbcDaoSupport implements IStudentDAO{

    public List<Student> findAll() {
        String sql="select * from student";
        List<Student> list=this.getJdbcTemplate().query(sql, new RowMapper<Student>() {
            /**
             *
             * @param rs
             * @param i
             * @return
             * @throws SQLException
             */
            public Student mapRow(ResultSet rs, int i) throws SQLException {
                Student student=new Student();
                student.setId(rs.getInt("id"));
                student.setName(rs.getString("name"));
                student.setAge(rs.getInt("age"));
                student.setBirthday(rs.getDate("birthday"));
                return student;
            }
        });
        return list;
    }
}
4.创建service层的接口和实现类:
IStudentService:
public interface IStudentService {
    //查询全部
    public List<Student> findAll();
}
StudentServiceImpl:
public class StudentServiceImpl implements IStudentService {
    private IStudentDAO dao;
    public List<Student> findAll() {
        return dao.findAll();
    }

    public IStudentDAO getDao() {
        return dao;
    }

    public void setDao(IStudentDAO dao) {
        this.dao = dao;
    }
}
在applicationContextSpring15jdbctemplate.xml中配置:
<?xml version="1.0" encoding="UTF-8"?>
<beans xmlns="http://www.springframework.org/schema/beans"
       xmlns:aop="http://www.springframework.org/schema/aop"
       xmlns:context="http://www.springframework.org/schema/context"
       xmlns:xsi="http://www.w3.org/2001/XMLSchema-instance"
       xsi:schemaLocation="
       http://www.springframework.org/schema/beans http://www.springframework.org/schema/beans/spring-beans.xsd
       http://www.springframework.org/schema/aop http://www.springframework.org/schema/aop/spring-aop.xsd
       http://www.springframework.org/schema/context http://www.springframework.org/schema/context/spring-context.xsd
">
   <!--00.识别jdbc.properties-->
    <!--方式一-->
   <!-- <context:property-placeholder location="jdbc.properties"></context:property-placeholder>-->
    <!--方式二-->
    <bean class="org.springframework.beans.factory.config.PropertyPlaceholderConfigurer">
        <property name="location" value="jdbc.properties"></property>
    </bean>
    <!--01.建立数据源-->
    <bean id="dataSource" class="org.springframework.jdbc.datasource.DriverManagerDataSource">
        <property name="driverClassName" value="${jdbc.driver}"></property>
        <property name="url" value="${jdbc.url}"></property>
        <property name="username" value="${jdbc.uname}"></property>
        <property name="password" value="${jdbc.password}"></property>
    </bean>
    <!--03.dao的配置-->
    <bean id="studentDao" class="cn.happy.spring22jdbctemplate.dao.impl.StudentDAOImpl">
        <property name="dataSource" ref="dataSource"></property>
    </bean>
    <!--04.service的配置-->
    <bean id="studentService" class="cn.happy.spring22jdbctemplate.service.impl.StudentServiceImpl">
        <property name="dao" ref="studentDao"></property>
    </bean>
</beans>
其他三种数据源的方案:
 1 <!--02建立数据源 dbcp-->
 2     <bean id="dataSource" class="org.apache.commons.dbcp.BasicDataSource">
 3         <property name="driverClassName" value="${jdbc.driver}"></property>
 4         <property name="url" value="${jdbc.url}"></property>
 5         <property name="username" value="${jdbc.uname}"></property>
 6         <property name="password" value="${jdbc.password}"></property>
 7     </bean>
 8     <!--03建立数据源 c3p0-->
 9     <bean id="dataSource" class="com.mchange.v2.c3p0.ComboPooledDataSource">
10         <property name="driverClass" value="${jdbc.driver}"></property>
11         <property name="jdbcUrl" value="${jdbc.url}"></property>
12         <property name="user" value="${jdbc.uname}"></property>
13         <property name="password" value="${jdbc.password}"></property>
14     </bean>
15     <!--03建立数据源 alibaba-->
16     <bean id="dataSource" class="com.alibaba.druid.pool.DruidDataSource">
17         <property name="driverClassName" value="${jdbc.driver}"></property>
18         <property name="url" value="${jdbc.url}"></property>
19         <property name="username" value="${jdbc.uname}"></property>
20         <property name="password" value="${jdbc.password}"></property>
21     </bean>
单元测试:
  //jdbcTemplate
    @Test
    public void test01(){
        ApplicationContext context=new ClassPathXmlApplicationContext("applicationContextSpring15jdbctemplate.xml");
        IStudentService dao=(IStudentService) context.getBean("studentService");
        List<Student> list = dao.findAll();
        for (Student item:list){
            System.out.println(item.getName());
        }
    }
执行结果:
